


Top RC Models MkIV full Composite Spitfire-a game changer

 07-27-2016, 06:28 PM
#302

My Feedback: (53)
Join Date: Jul 2003
Location: milwaukee, WI
Posts: 941
Likes: 0
Received 0 Likes
on
0 Posts
Some of the construction was poor. Former joints and cowl screw mounts weren't property glued to the fuse and didn't hold. I personally didn't
care for the way the servos mounted with out bushings .The biggest problem with a composite plane in general is that they are extremely hard to fix, if they are damaged. I'll stick with built up planes.
care for the way the servos mounted with out bushings .The biggest problem with a composite plane in general is that they are extremely hard to fix, if they are damaged. I'll stick with built up planes.
07-28-2016, 04:29 AM
#303

Join Date: Nov 2012
Location: Navarre, FL
Posts: 268
Likes: 0
Received 0 Likes
on
0 Posts
I definitely agree that there are some quality control issues, and the manual is sorely lacking, but there were definitely some things they did right. It's a very pretty airplane and apparently flys well. We'll see if I feel the same after Saturday.
Bottom line, I will never buy another monokote/ultrakote/whateverkote warbird. So it's composite for me from now on (this is my third composite warbird).
Whether I buy another Top RC plane sold by the current distributors remains to be seen...
Bottom line, I will never buy another monokote/ultrakote/whateverkote warbird. So it's composite for me from now on (this is my third composite warbird).
Whether I buy another Top RC plane sold by the current distributors remains to be seen...
07-28-2016, 09:11 PM
#304
Senior Member
My Feedback: (4)

Join Date: Aug 2008
Location: EllinikoAthens, GREECE
Posts: 1,079
Likes: 0
Received 5 Likes
on
5 Posts
Z,
Agree with you, I converted to composite long time ago: ESM, CMP, some old TopFlite like the Cessna 310, and now TopRC.
Composite can be easily repaired and with some experience you get same strength and lightness as before the damage. There are new materials (Fliteskin, Airex, carbon tow) and old traditional ones (glass, resin, filler, molding, etc), and the methods are well documented if you search in the right places - RCU has extensive info and there are some very knowledgeable and friendly people around. I had some experience from repairing my windsurfing boards, but its really not that big a deal.
CG: see page 11, I added about 1/2 lb. and it still is very light. It has the lowest wing loading in my warbird fleet.
07-29-2016, 04:41 AM
#305
Join Date: Nov 2012
Location: Navarre, FL
Posts: 268
Likes: 0
Received 0 Likes
on
0 Posts
I saw that. You definitely moved a lot of stuff forward, which obviously helps a lot. I finally got it to balance out with about 43-44 oz in the nose (I drilled out holes and hammered flat, so lost some material from the weights there). I'll maiden it like that, but am going to work on moving things forward and eliminating weight over time.
Where'd you put the weight? I'm thinking seriously thinking epoxying some to the inside of the cowling, so I can get it as far forward as possible. Maybe that'll help me eliminate some.
Where'd you put the weight? I'm thinking seriously thinking epoxying some to the inside of the cowling, so I can get it as far forward as possible. Maybe that'll help me eliminate some.
Last edited by zrooster; 07-29-2016 at 06:02 AM.
 07-29-2016, 10:38 AM
#307
I saw that. You definitely moved a lot of stuff forward, which obviously helps a lot. I finally got it to balance out with about 43-44 oz in the nose (I drilled out holes and hammered flat, so lost some material from the weights there). I'll maiden it like that, but am going to work on moving things forward and eliminating weight over time.
Where'd you put the weight? I'm thinking seriously thinking epoxying some to the inside of the cowling, so I can get it as far forward as possible. Maybe that'll help me eliminate some.
Where'd you put the weight? I'm thinking seriously thinking epoxying some to the inside of the cowling, so I can get it as far forward as possible. Maybe that'll help me eliminate some.
Last edited by ForcesR; 07-29-2016 at 12:29 PM. Reason: H9 total weight before fuel added
07-29-2016, 02:28 PM
#308
Join Date: Nov 2012
Location: Navarre, FL
Posts: 268
Likes: 0
Received 0 Likes
on
0 Posts
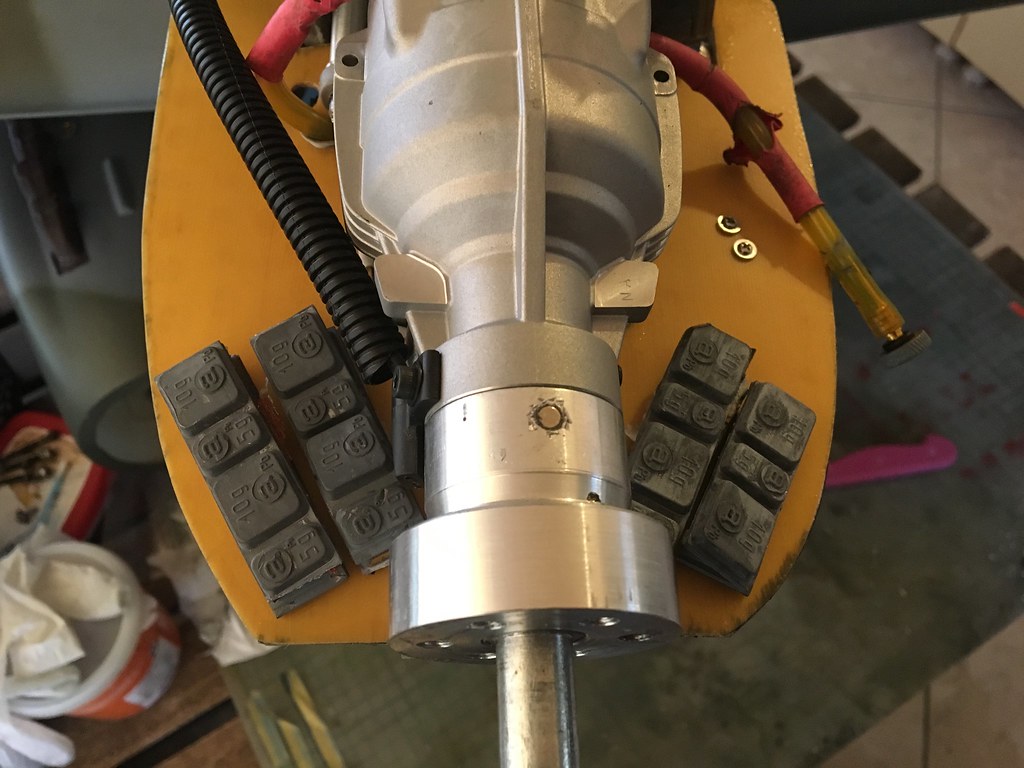
I haven't weighed it yet...I'm working on putting it on a diet by JB Welding some of my weights into my cowling (as far forward as they'll go). I just did one, and I think it's going to save me 4oz. Here's the 43-44oz set-up:
07-29-2016, 09:19 PM
#309
Senior Member
My Feedback: (4)
Join Date: Aug 2008
Location: EllinikoAthens, GREECE
Posts: 1,079
Likes: 0
Received 5 Likes
on
5 Posts
ZR,
I wouldn't recommend attaching any ballast on the engine or stand-offs. Couple of years back a buddy at the field had a similar setup on a ESM 88" Spit with an EME 55cc and the stand-offs broke mid-flight. Not a pretty sight after the crash ...
My 2c
Nick
I wouldn't recommend attaching any ballast on the engine or stand-offs. Couple of years back a buddy at the field had a similar setup on a ESM 88" Spit with an EME 55cc and the stand-offs broke mid-flight. Not a pretty sight after the crash ...
My 2c
Nick
07-30-2016, 03:52 AM
#310
Join Date: Nov 2012
Location: Navarre, FL
Posts: 268
Likes: 0
Received 0 Likes
on
0 Posts
Roger. I'll move them after the maiden today...should be pretty much a 1 "G" flight! I was able to eliminate about 4oz by relocating a weight to the front of the cowling. Really I could remove more, but I'll let it be a bit nose heavy today.
Last edited by zrooster; 07-30-2016 at 03:55 AM.
07-30-2016, 08:42 AM
#311
Join Date: May 2006
Location: Grand Ledge, MI
Posts: 21
Likes: 0
Received 0 Likes
on
0 Posts
Gents, have been following thread and am about 1/2 thru the assembly of the Spit. As mentioned, it has some quirks and some less than perfect items, but over all it has been an easy model to put together.
Have a question on the elevator push rod. The "manual" shows a 10mm EVA glued to the rear former. The only item I can determine what the EVA is, is a foam ring? Is that what you folks have figured out as well? Am also not certain exactly where it should be glued or what its purpose is. It's bigger diameter than the push rod so it can't function as a centering piece. It does appear to have same diameter as the hole thru the former, so I guess you line it up with that??
any advise would be appreciated. Thanks
Have a question on the elevator push rod. The "manual"
shows a 10mm EVA glued to the rear former. The only item I can determine what the EVA is, is a foam ring? Is that what you folks have figured out as well? Am also not certain exactly where it should be glued or what its purpose is. It's bigger diameter than the push rod so it can't function as a centering piece. It does appear to have same diameter as the hole thru the former, so I guess you line it up with that??any advise would be appreciated. Thanks
07-30-2016, 11:51 AM
#312
Join Date: Nov 2012
Location: Navarre, FL
Posts: 268
Likes: 0
Received 0 Likes
on
0 Posts
Ledge, I epoxied it to the furthest aft former that the ele pushrods goes through. Yes, quotes are appropriate around "manual" ")
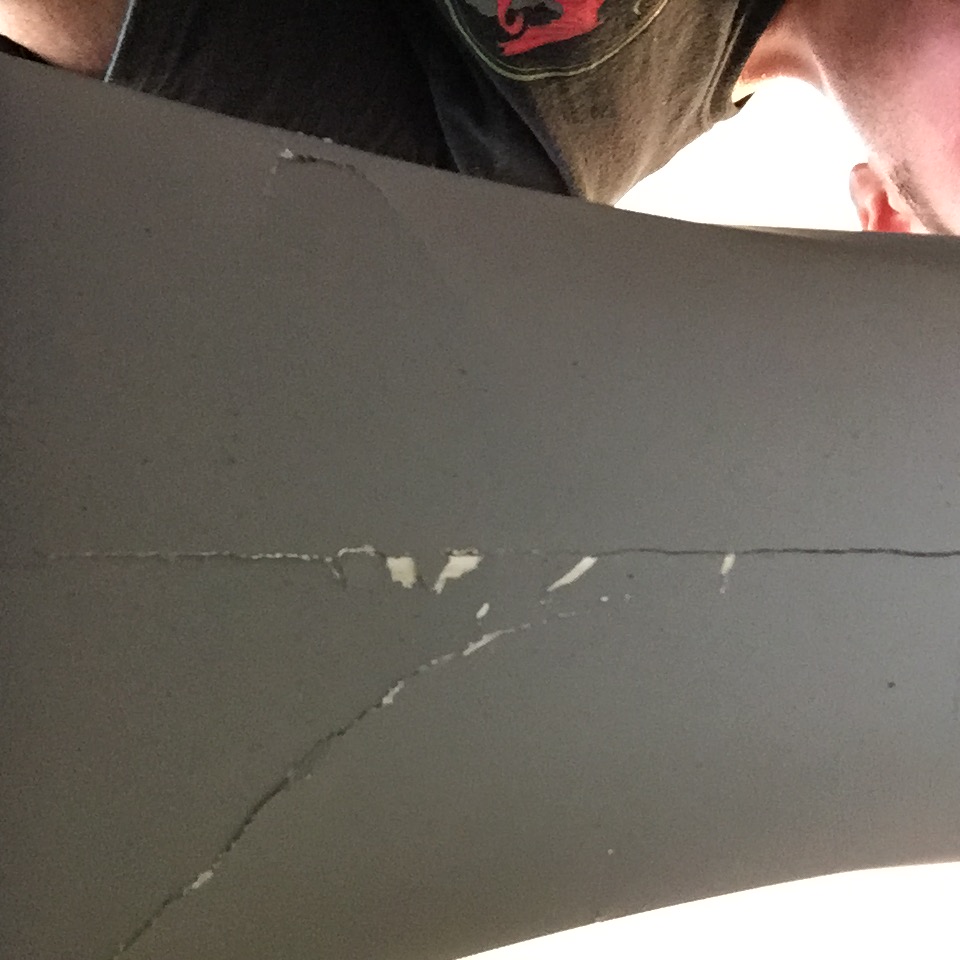
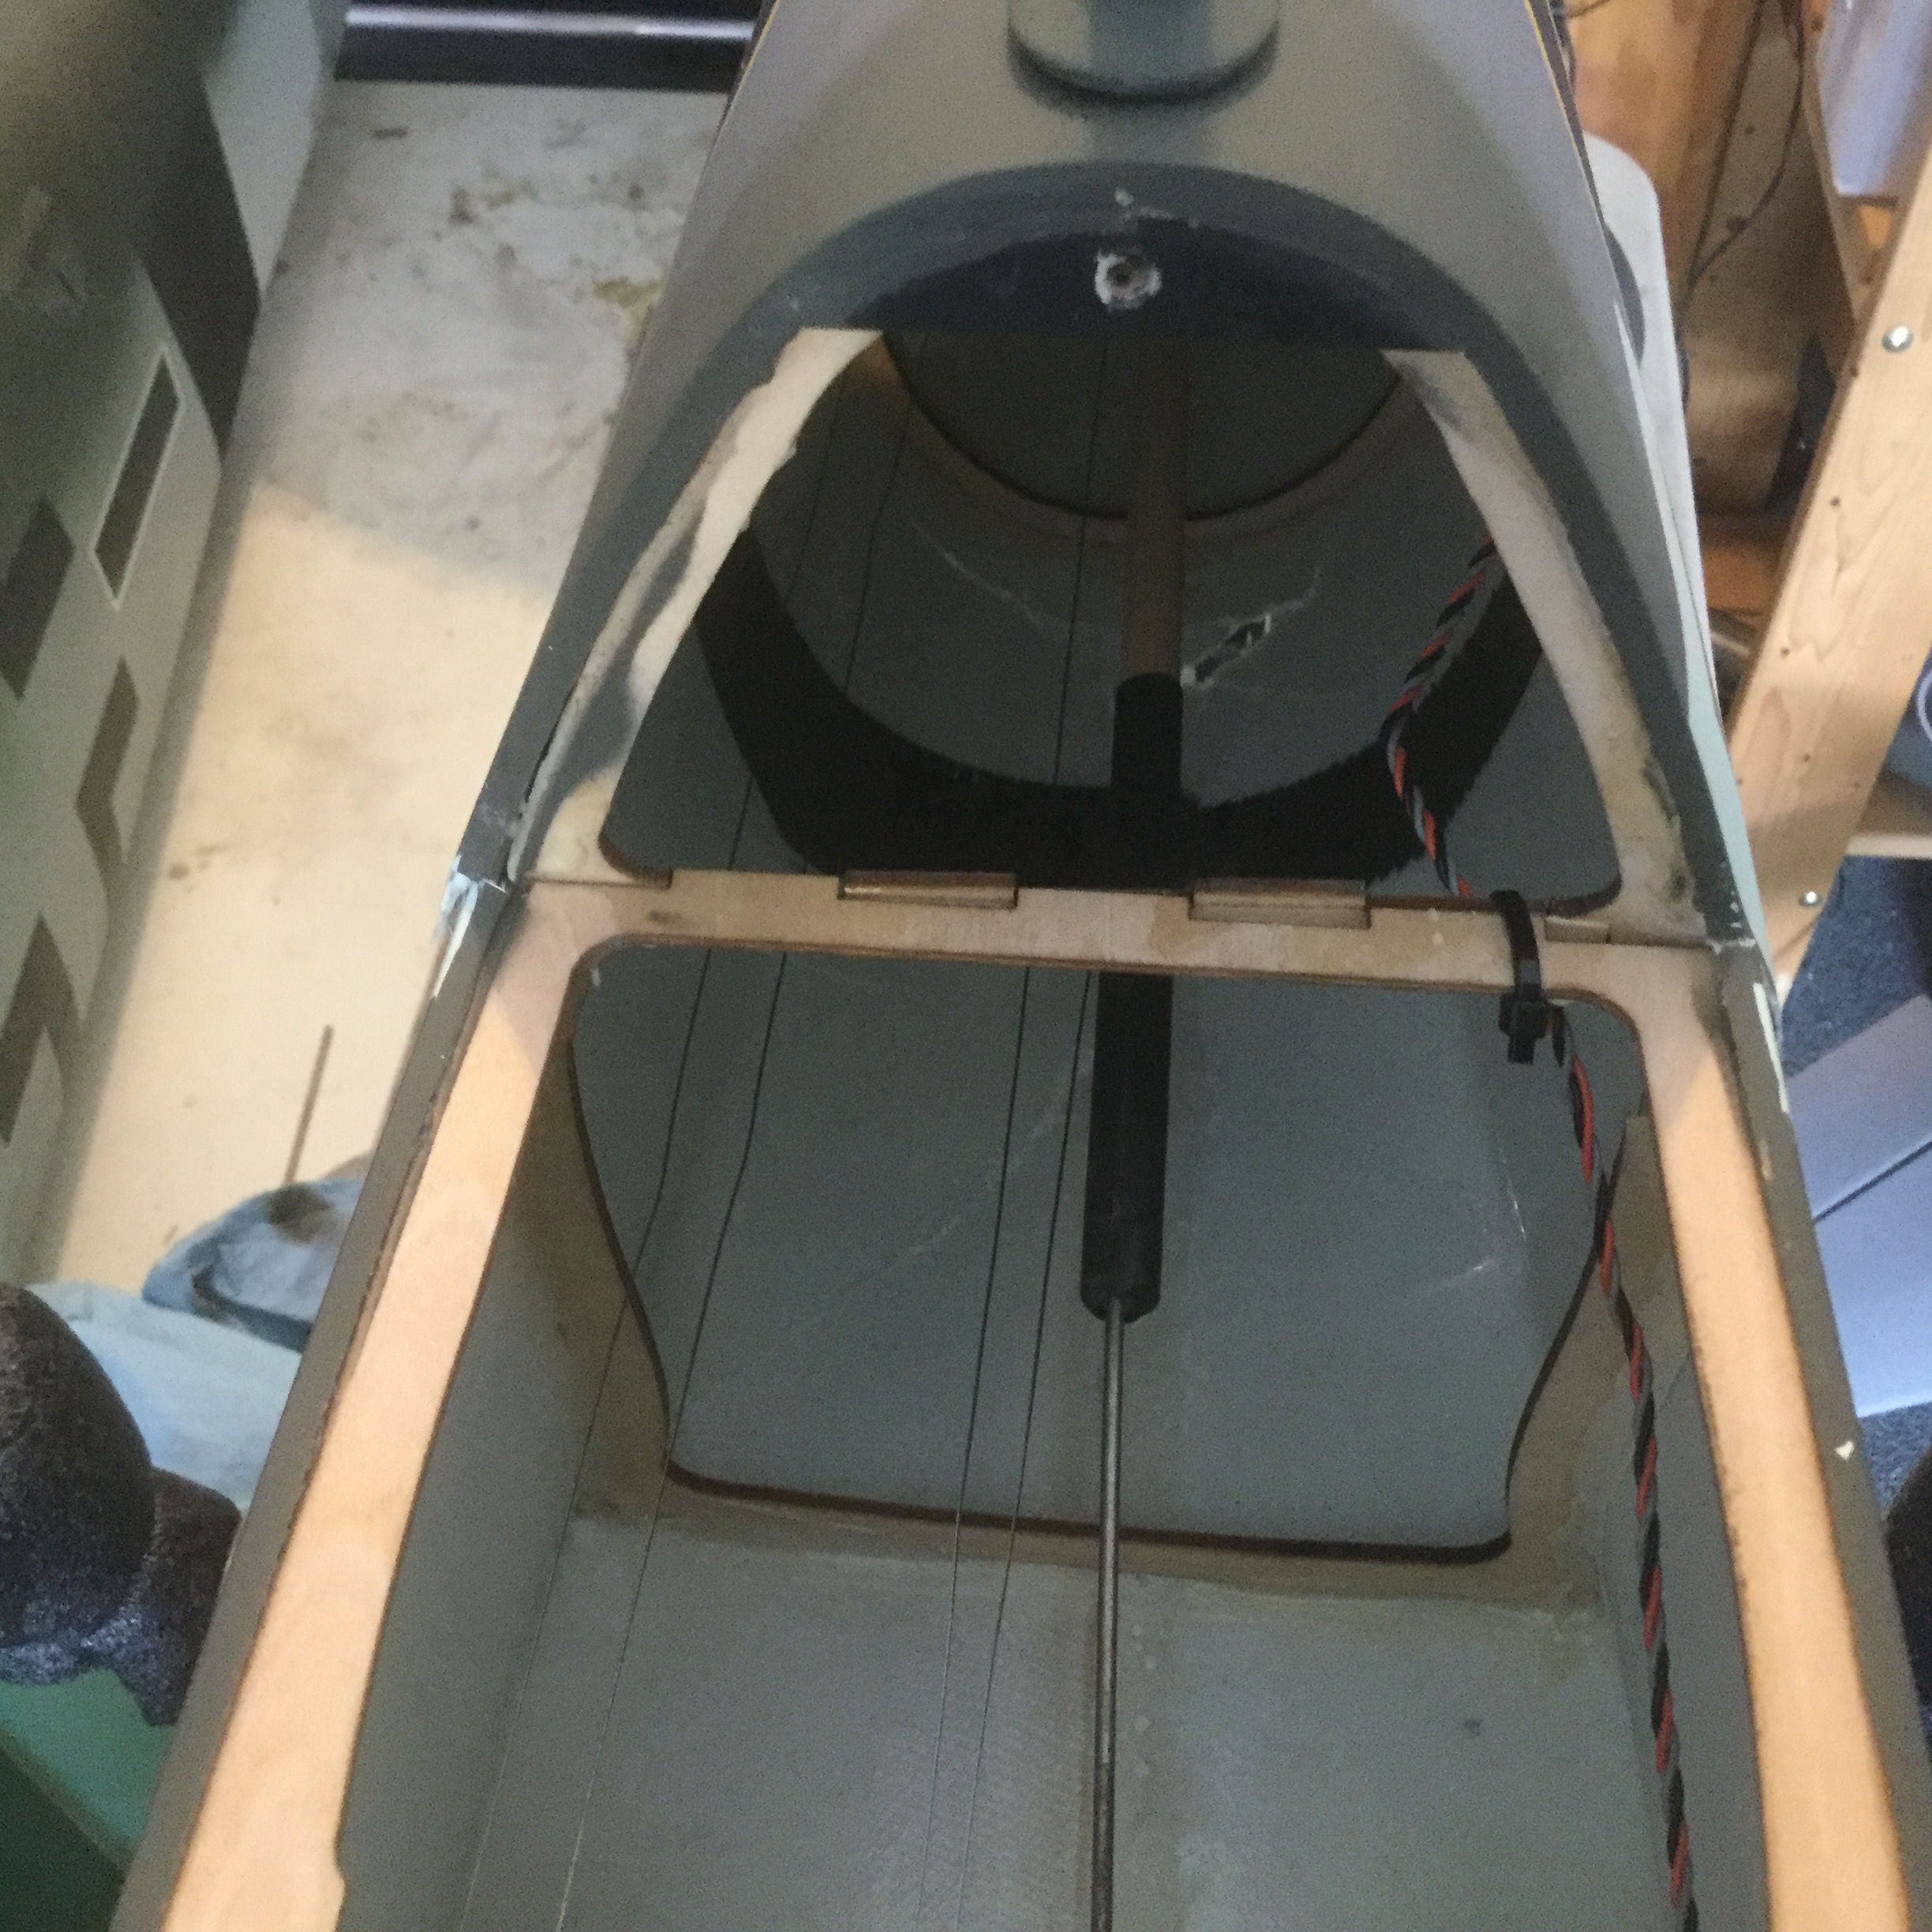
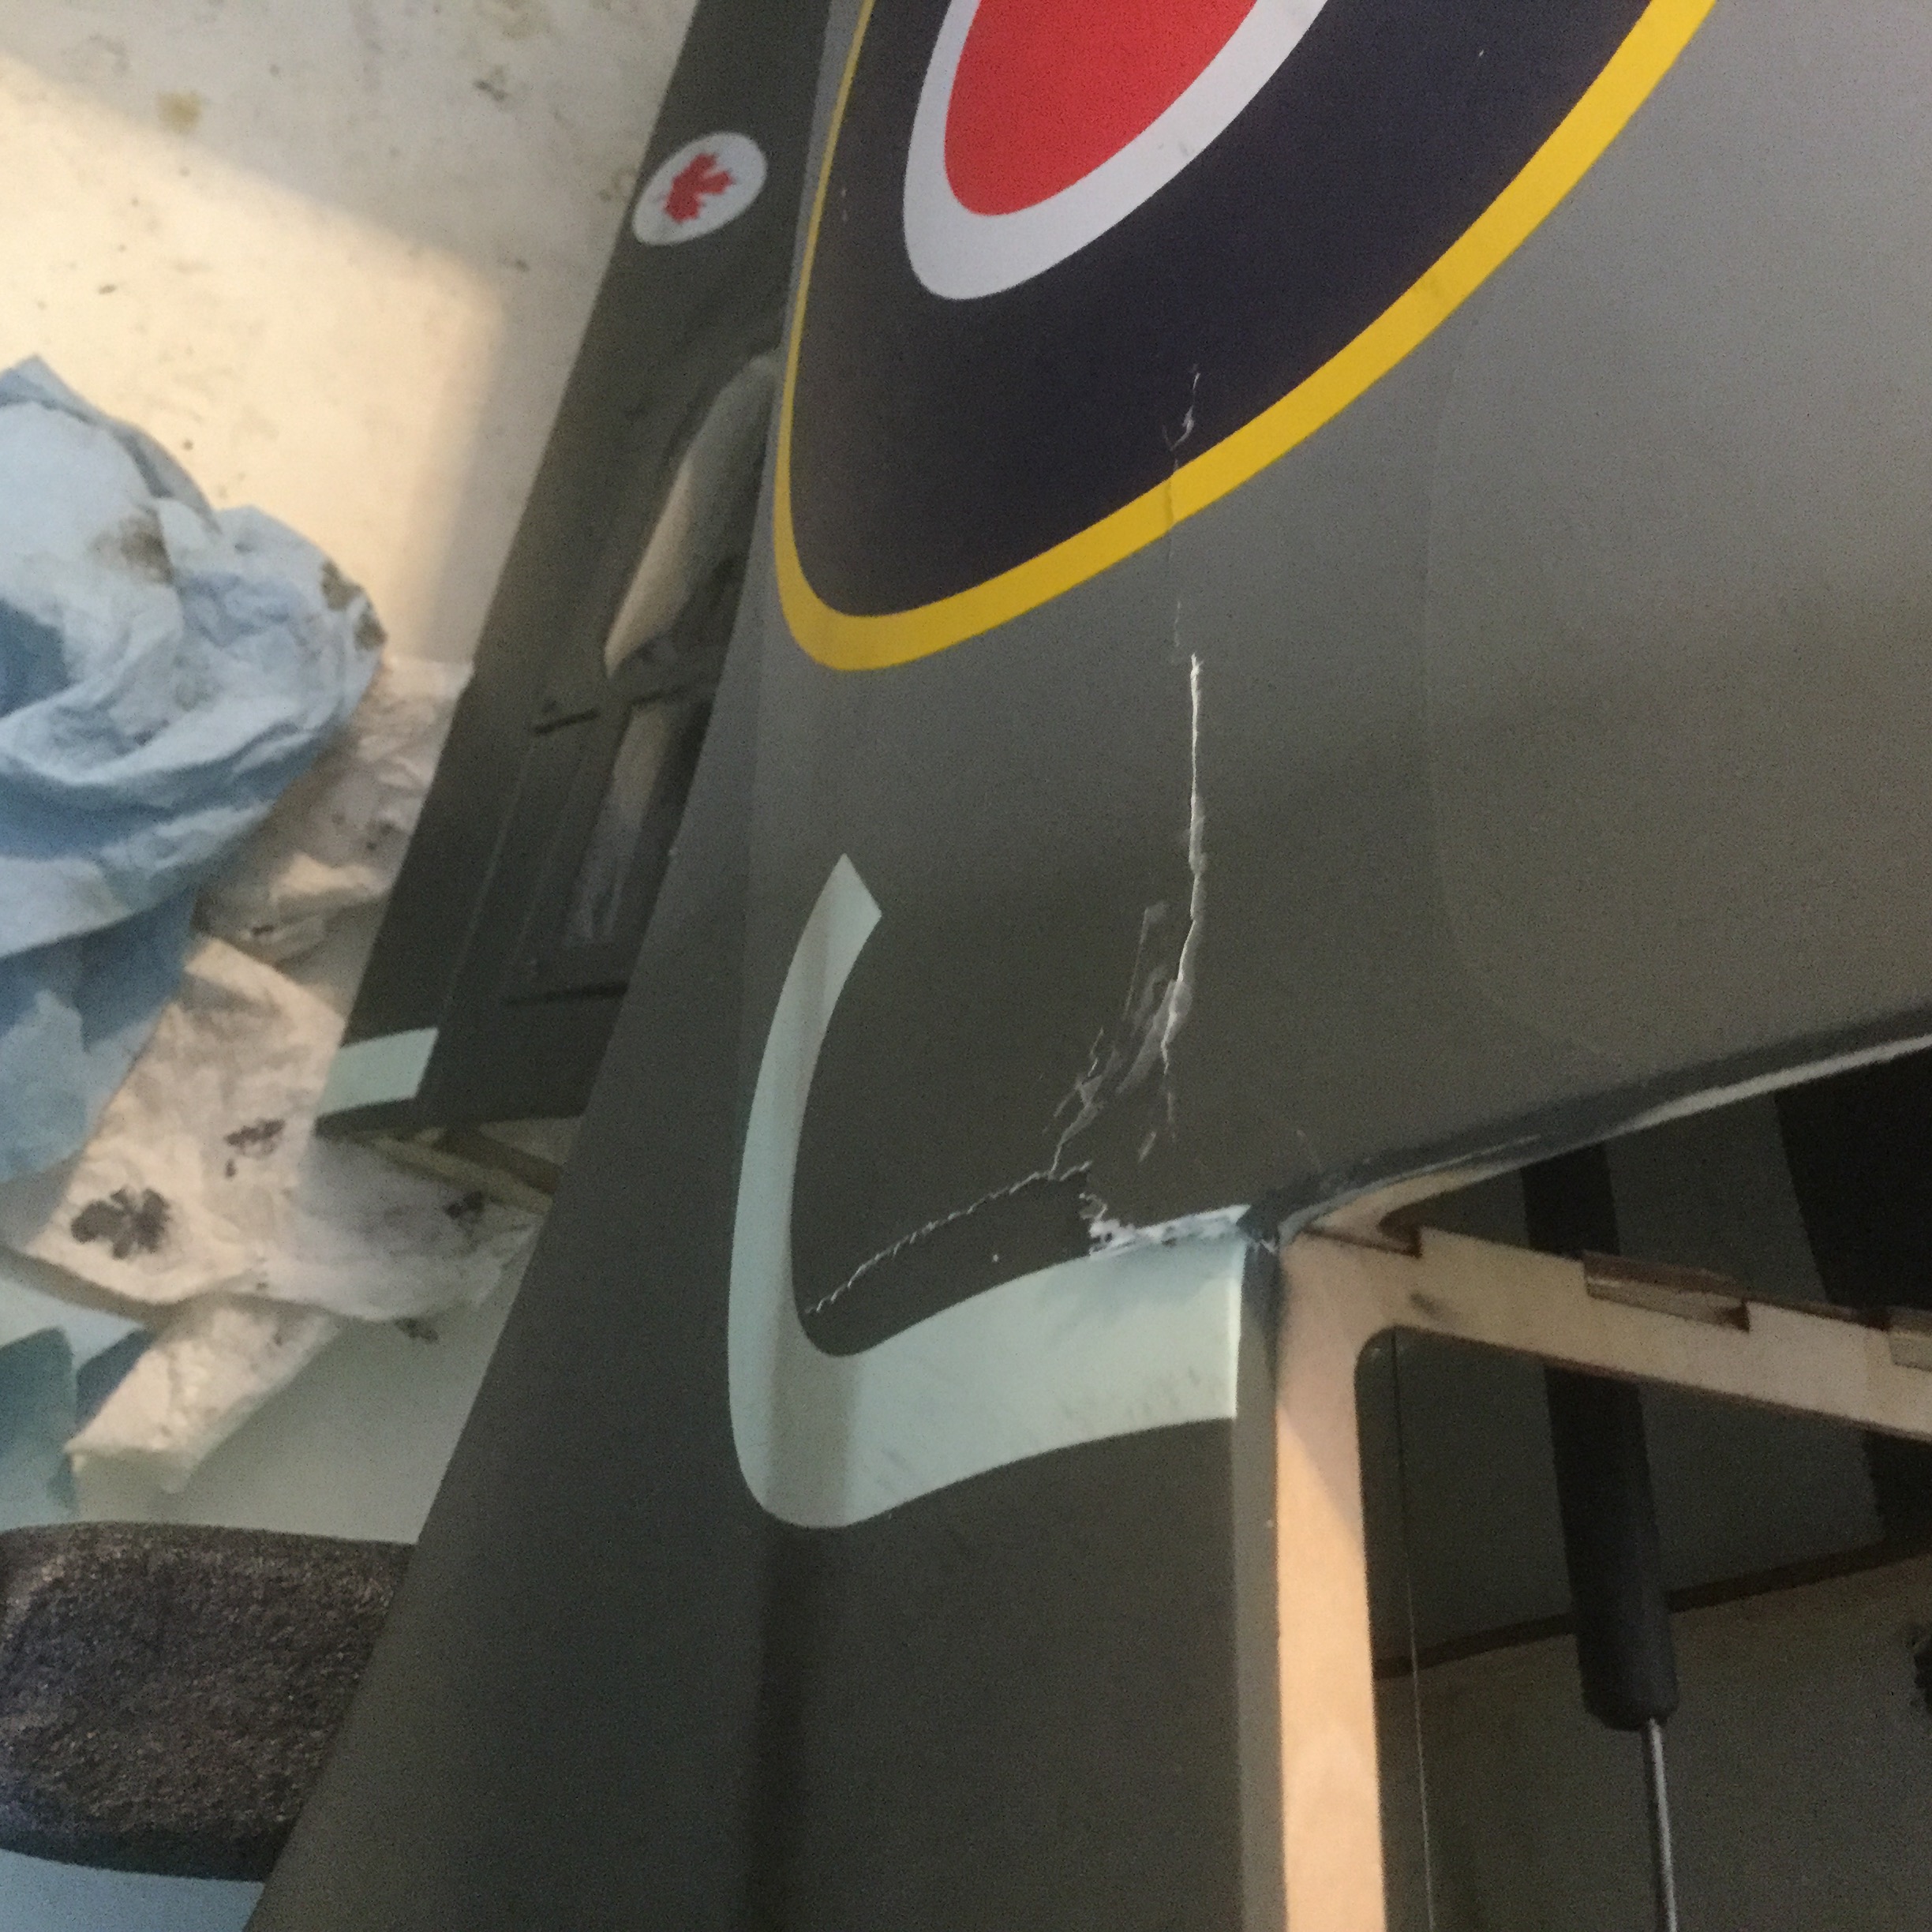
I maidened mine today. Taking out 4oz of weight was a mistake as the plane was tail heavy. It wasn't uncontrollable, but was extremely twitchy (pitch sensitive). Good news is it was a successful maiden in that it will fly again. Bad news is that the engine quit and with the tail heavyness my dead stick landing (not my first) wasn't my best. Result was two bent landing gear struts, scuffed spinner, and the thin fiberglass aft of where the cockpit/hatch clicks into place cracked on both sides and further aft on the underside of the fuselage (see photos). Easy fiberglass repair there. Might be able to straighten the struts. The wings are solid! No damage to where the gear mount, and not a single chip or crack to on the fiberglass. One of the retract mechanisms may be damaged... I'll need to run it through to confirm.
Overall impressions: plane is beautiful from any angle...ground or flight. It handles great on the ground. Takeoff roll was no problem. I put a bit of rudder trim in and with sufficient right stick it tracked straight without a problem...even with the left to right crosswind we had today. It handles fine in the air...I felt like another plane might have been tougher to control with a similar CG deficiency. Slower flight was relatively stable, considering. No instability in the roll axis. It's also reasonably tough except for the thin fiberglass in the aft fuselage/empennage. The plane touched down on the mains, and then nosed over and skidded on the spinner. Never did the tailwheel touch the ground.
Way forward: I'm going to add 6 oz of lead, bringing it up to 45-46 oz total, and will epoxy it in as far forward in the cowling as it will go. I'll repair/reinforce the fiberglass in the aft fuselage. I'll let you know what I need to do to repair the gear. Plan A is to straighten the struts. I also need to figure out why the engine quit. Possible overheat, but I ran it inside the garage for 10 min with no overheat. It quit after less than 5 total minutes of run time, including ground ops.
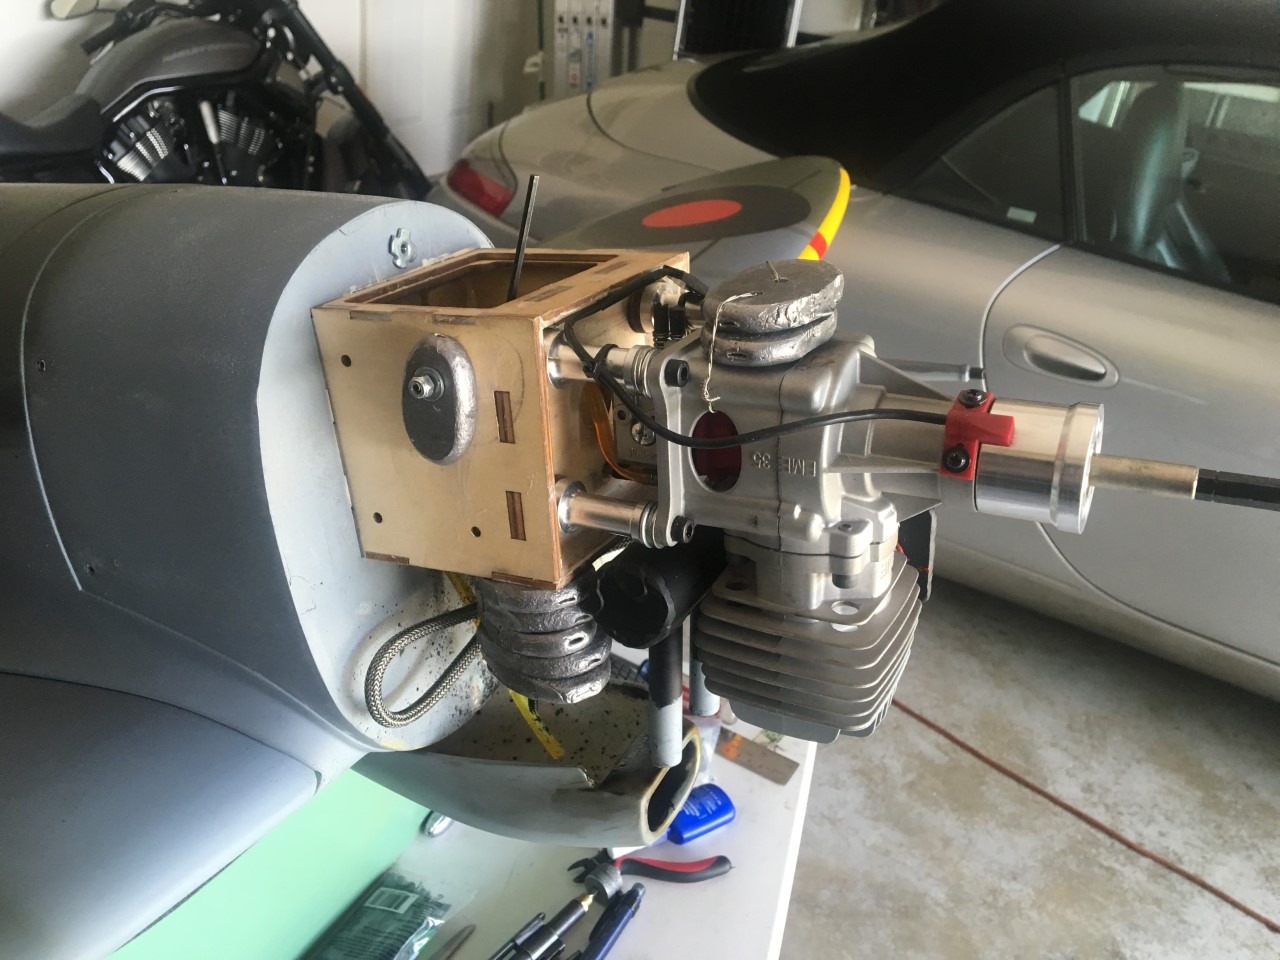
Heres how she looked just before takeoff:

Here's the fuselage damage...as you can see, it didn't damage the former, which was loose (in need of glue), as it turns out. That may have contributed, but hard to say:


I maidened mine today. Taking out 4oz of weight was a mistake as the plane was tail heavy. It wasn't uncontrollable, but was extremely twitchy (pitch sensitive). Good news is it was a successful maiden in that it will fly again. Bad news is that the engine quit and with the tail heavyness my dead stick landing (not my first) wasn't my best. Result was two bent landing gear struts, scuffed spinner, and the thin fiberglass aft of where the cockpit/hatch clicks into place cracked on both sides and further aft on the underside of the fuselage (see photos). Easy fiberglass repair there. Might be able to straighten the struts. The wings are solid! No damage to where the gear mount, and not a single chip or crack to on the fiberglass. One of the retract mechanisms may be damaged... I'll need to run it through to confirm.
Overall impressions: plane is beautiful from any angle...ground or flight. It handles great on the ground. Takeoff roll was no problem. I put a bit of rudder trim in and with sufficient right stick it tracked straight without a problem...even with the left to right crosswind we had today. It handles fine in the air...I felt like another plane might have been tougher to control with a similar CG deficiency. Slower flight was relatively stable, considering. No instability in the roll axis. It's also reasonably tough except for the thin fiberglass in the aft fuselage/empennage. The plane touched down on the mains, and then nosed over and skidded on the spinner. Never did the tailwheel touch the ground.
Way forward: I'm going to add 6 oz of lead, bringing it up to 45-46 oz total, and will epoxy it in as far forward in the cowling as it will go. I'll repair/reinforce the fiberglass in the aft fuselage. I'll let you know what I need to do to repair the gear. Plan A is to straighten the struts. I also need to figure out why the engine quit. Possible overheat, but I ran it inside the garage for 10 min with no overheat. It quit after less than 5 total minutes of run time, including ground ops.
Heres how she looked just before takeoff:
Here's the fuselage damage...as you can see, it didn't damage the former, which was loose (in need of glue), as it turns out. That may have contributed, but hard to say:
Last edited by zrooster; 07-30-2016 at 12:00 PM. Reason: Multiple type-os
07-30-2016, 01:49 PM
#314
Join Date: Nov 2012
Location: Navarre, FL
Posts: 268
Likes: 0
Received 0 Likes
on
0 Posts
Yeah! No kidding!
That reminds me, I also meant to say that the 35cc motor I had in there had more than enough power for this bird, even with all the extra weight I had to add. Just need to get her dialed in, and shell be a sweet flying plane.
That reminds me, I also meant to say that the 35cc motor I had in there had more than enough power for this bird, even with all the extra weight I had to add. Just need to get her dialed in, and shell be a sweet flying plane.
07-30-2016, 10:52 PM
#315
Senior Member
My Feedback: (4)
Join Date: Aug 2008
Location: EllinikoAthens, GREECE
Posts: 1,079
Likes: 0
Received 5 Likes
on
5 Posts
ZR congrats on the maiden, and saving the plane - not many would have the cool head to do a successful deadstick landing on a maiden
However I am perplexed as to the amount of damage considering the tail never touched the ground - together with the fact that 4 oz on a 19 lb. plane wouldn't have affected the CG that much, I am tempted to consider the possibility that the damage happened in the air and that caused the elevator twitchiness? The loose former and intense vibration from the 35cc might have contributed?
Reason I'm saying this: on my 3rd or 4th flight the strut oleo grub screw broke and on touch down one of the wheels twisted 90 degrees causing a nose-over into the grass next to the runway. The plane didn't have much speed but it cartwheeled with the rudder hitting the ground and I was worried the fuse might have cracked. Thorough check - no damage whatsoever!
I would recommend adding some ply or hardwood longerons to the damage area, then you can use less glass to save weight
Now your main concern is engine cooling. A rear exhaust 35cc needs considerable air stream through the head fins and even more low-pressure grilles or cowl flaps to suck heat from the rear exhaust.
How badly are the struts bent?
07-31-2016, 07:11 AM
#316
Join Date: Nov 2012
Location: Navarre, FL
Posts: 268
Likes: 0
Received 0 Likes
on
0 Posts
It touched on the left first, so that took the brunt of it as you can see...it looks like the metal bulged just outside the trunnion (compressed vertically before bending) and then bent quite badly. I may try to disassemble the strut befor repairing...the lower strut seems undamaged. The right is just slightly bent at the top (near the trunnion). The funny thing is that, though the left took the bigger hit, the housing/track/flange components on the right were damaged. I bent it back into shape and repaired with JB weld. May or may not work...not sure if the motor was also damaged. Jack screw seems fine. The left retract runs through fine, the right wouldn't cycle...I'm hoping it's because the track was damaged.
Photos:


You pose an interesting theory. You're exactly right that it's most likely an overheat that caused an engine failure. I actually think I need to expose more of the cylinder to airflow, vice heat evacuation on the back side. That said, I still need to pull the cowling and make sure nothing came loose.
As for the fuselage cracking, I think your theory has merit, however I'm not sure it's what happened in my case. The reason being, the fuselage was intact when the plane rolled down the runway, and it felt tail heave as soon as it lifted off...controllability didn't change throughout the flight (get worse). So, the crack would have had to have happenedunless as soon as it lifted off. That is possible, but I'm not 100% convinced.
My theory was that the fuselage flexed due to the vertical component of the impact and the weight of the tail/tail gear.
To hedge, I'm going to add more nose weight AND reinforce the fuselage with longerons...
For those building, I would concur with Chris on his recommendation that you balance it at 120mm as a safety precaution. If it flies nose heavy, you can slowly work the CG further aft. The extra weight isn't a performance issue. It didn't fly heavy (wing loading wasn't a problem)and a 35cc size or greater motor has sufficient power.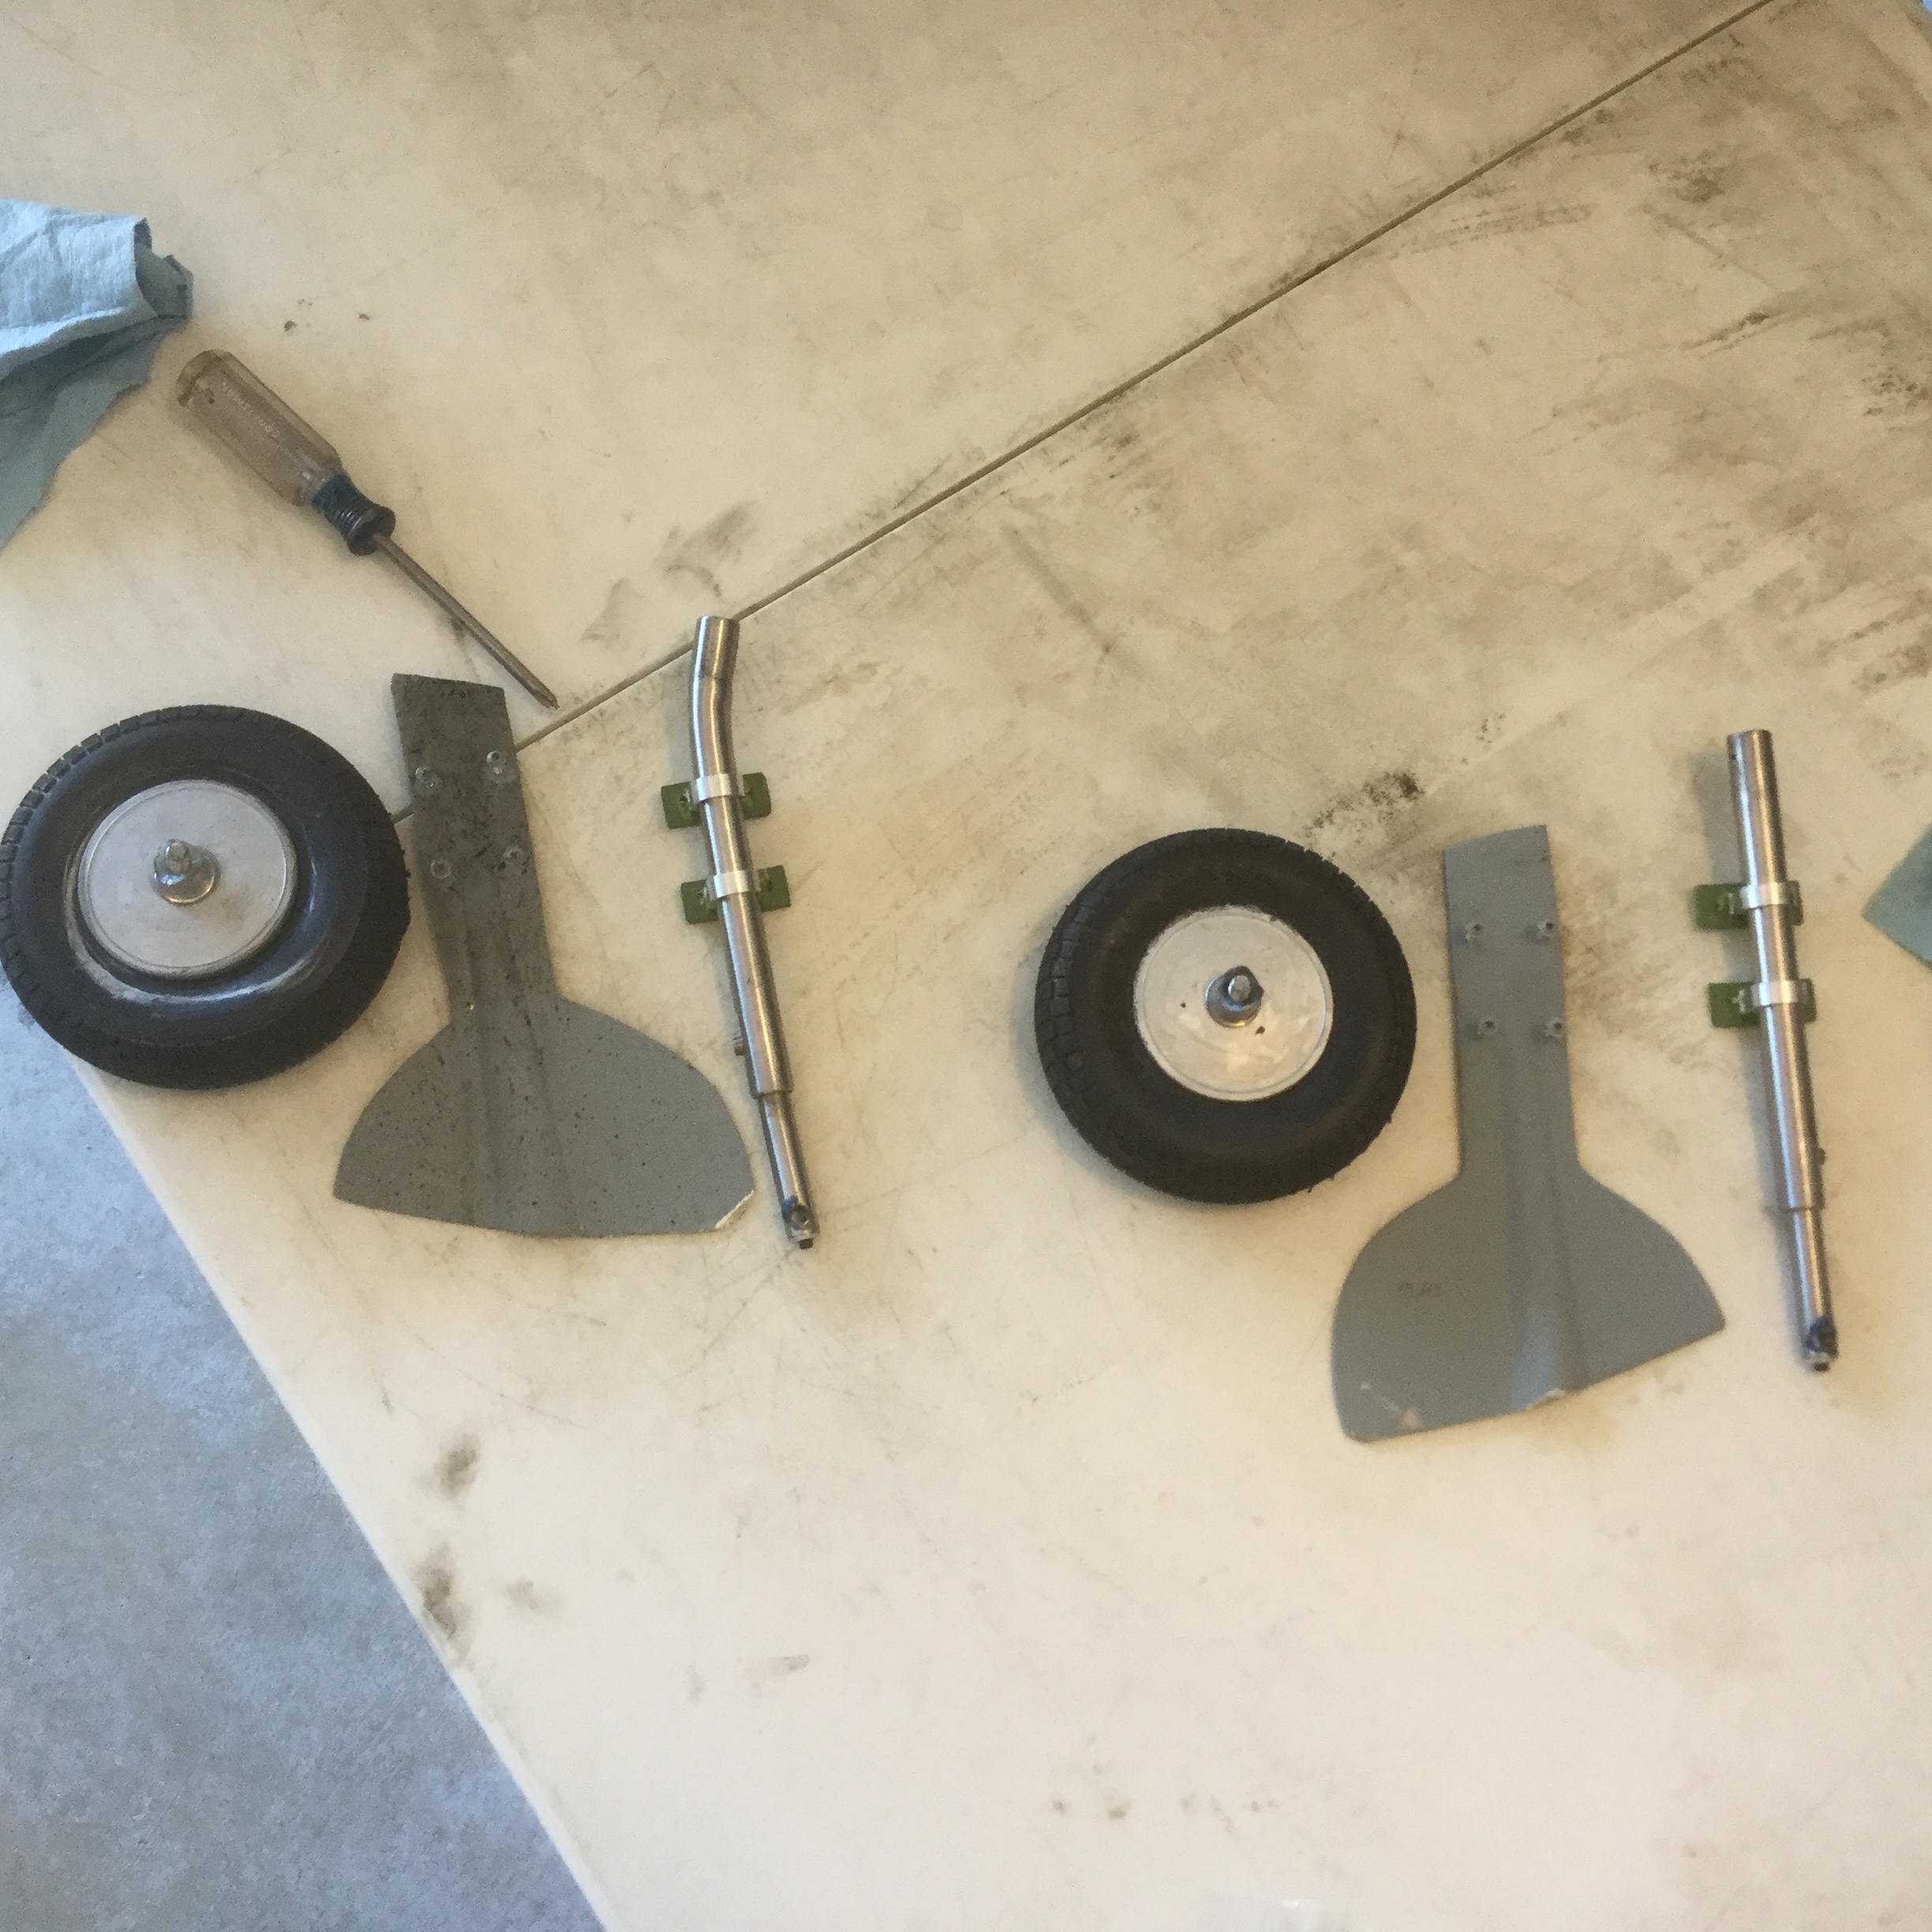


Photos:
You pose an interesting theory. You're exactly right that it's most likely an overheat that caused an engine failure. I actually think I need to expose more of the cylinder to airflow, vice heat evacuation on the back side. That said, I still need to pull the cowling and make sure nothing came loose.
As for the fuselage cracking, I think your theory has merit, however I'm not sure it's what happened in my case. The reason being, the fuselage was intact when the plane rolled down the runway, and it felt tail heave as soon as it lifted off...controllability didn't change throughout the flight (get worse). So, the crack would have had to have happenedunless as soon as it lifted off. That is possible, but I'm not 100% convinced.
My theory was that the fuselage flexed due to the vertical component of the impact and the weight of the tail/tail gear.
To hedge, I'm going to add more nose weight AND reinforce the fuselage with longerons...
For those building, I would concur with Chris on his recommendation that you balance it at 120mm as a safety precaution. If it flies nose heavy, you can slowly work the CG further aft. The extra weight isn't a performance issue. It didn't fly heavy (wing loading wasn't a problem)and a 35cc size or greater motor has sufficient power.
Last edited by zrooster; 08-01-2016 at 04:36 AM.
08-01-2016, 04:39 AM
#317
Join Date: Nov 2012
Location: Navarre, FL
Posts: 268
Likes: 0
Received 0 Likes
on
0 Posts
Update on the gear, the right retract motor is fine, but the jack screw was bent. I tried to straighten it, but it still keeps binding up. I'm going to call CJM today and see if they can sell me just the jack screw/motor assembly. Or, if not, just one retract. I might go ahead and just replace the struts too. One is straightenable, but the other is pretty messed up...
08-01-2016, 02:14 PM
#318
Join Date: Nov 2012
Location: Navarre, FL
Posts: 268
Likes: 0
Received 0 Likes
on
0 Posts
More on the gear. I got in touch with CJM, and they said they will replace what's damaged and only charge for the parts replaced, so I shipped them the bad retract mechanism and both struts. I'll post what the charge is when I find out.
I started repairing the fiberglas using hysol and strips of 1 oz cloth. The former just aft of the hatch broke in two places and also separated from the left side of the fuse. It also had never been glued to the horizontal piece that goes across the back of the hatch area. I epoxied that together as well. I also affixed two more 6 oz weights using "JB Weld" to the front of the cowling. I used this heavy duty epoxi for two reasons: it, itself, will add weight to the nose, and I get a little peace of mind knowing those lead weights aren't going anywhere.
I am now up to approximately 52 oz of weight in the nose. I am considering moving one more 6 oz weight forward which may allow me to remove some of the weight I have further aft, but I may leave everything there until I fly her again.
Ill do an all up weight check after I get everything put back together and post it here.
08-04-2016, 02:35 PM
#319
Senior Member
Join Date: Dec 2004
Location: Thessaloniki, GREECE
Posts: 128
Likes: 0
Received 0 Likes
on
0 Posts
I was one of the first lucky guys who bought the V2 Spitfire of Top RC, as we have discussed with Nikos (aka w1nd6urfa) except from the invasion stripes there are also some structural differences at this version. One difference that we spotted is the existence of carbon fibre along of the sides of the fuselage...That might have saved your fuselage from cracking....
08-04-2016, 02:40 PM
#320
Senior Member
Join Date: Dec 2004
Location: Thessaloniki, GREECE
Posts: 128
Likes: 0
Received 0 Likes
on
0 Posts
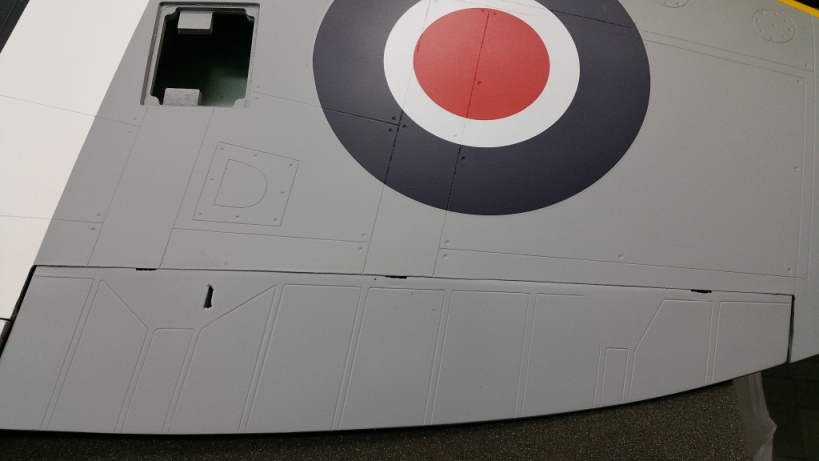
Of course there are more differences at the appearance such us the paint scheme with the stripes and beautiful panel lines at the wings...which are very close to scale and at the right positions....


08-04-2016, 04:15 PM
#321
Join Date: Nov 2012
Location: Navarre, FL
Posts: 268
Likes: 0
Received 0 Likes
on
0 Posts
Nice! I love the panel lines!
Structural repairs are complete and blemishes filled. CG adjustments and and minor tweaks are also complete. CJM called yesterday and said that the LG struts aren't salvageable, but the electric motor is. No idea on timeline yet. At this point, I need to sand and paint repaired areas, install the gear and run the engine. The biggest hold-up I anticipate is getting the gear back from CJM.
Structural repairs are complete and blemishes filled. CG adjustments and and minor tweaks are also complete. CJM called yesterday and said that the LG struts aren't salvageable, but the electric motor is. No idea on timeline yet. At this point, I need to sand and paint repaired areas, install the gear and run the engine. The biggest hold-up I anticipate is getting the gear back from CJM.