


Welcome to Club SAITO !
 07-08-2019, 11:52 PM

Here is the field I fly at, well used to, haven't flown there in two years.  Last year after putting the Rascal and Something Xtra into the dirt, lost interest. This year the weather has sucked, too much rain, and if not, then windy.
See the building with the red circle? Thats where I bounced the P-47 off the edge of the roof, I was standing somewhere in the lower red circle. The blue is the actual strip we take off and land from.
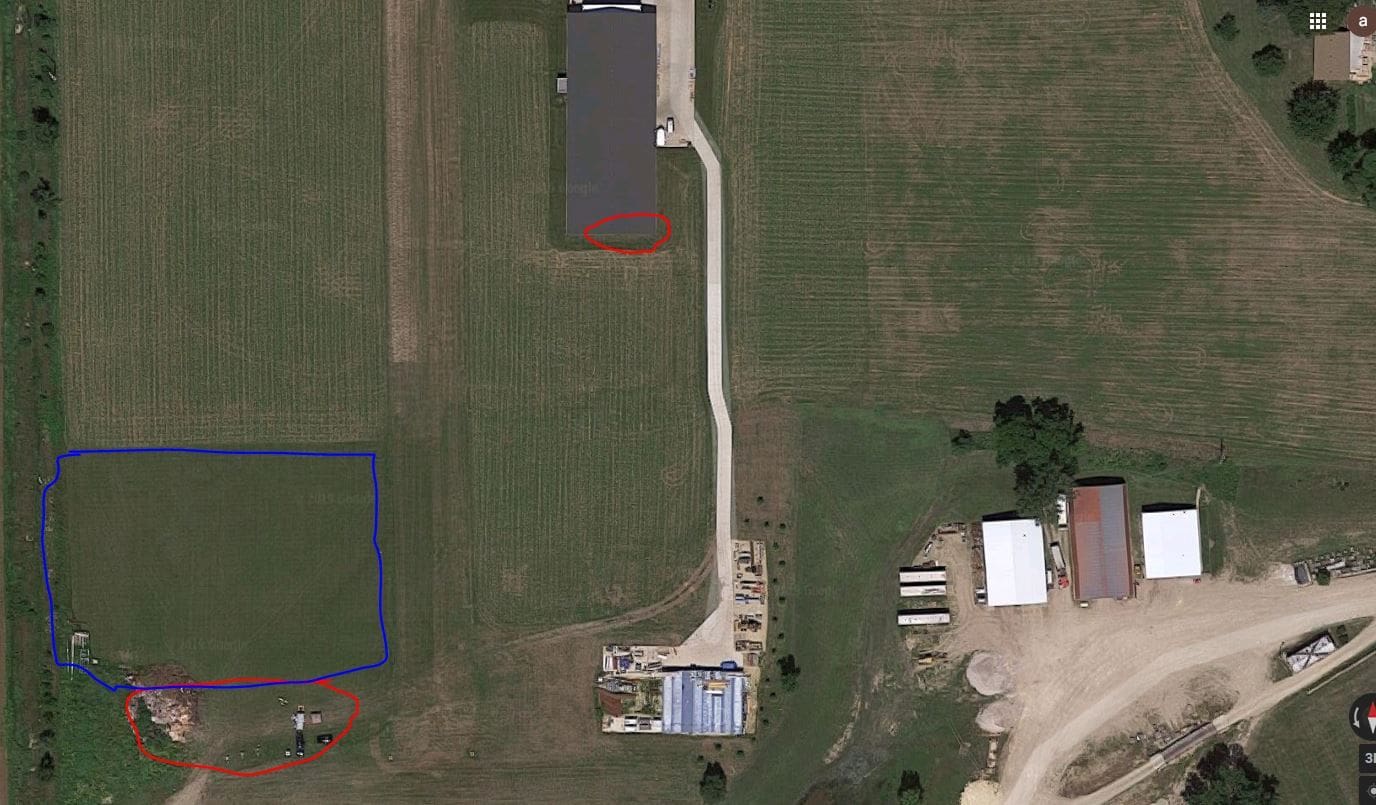
To the right of the blue used to be semi trailers and a flatbed with machines on it, right at the end of the runway, and a line of trees to the right of the road. So to land from the east, you had to thread between the building and the trees, and being so used to a small plane, I thought the P-47 was past the building, when in fact it was just behind it, caught the wingtip 2" in on the edge of the roof, flipped it over and plopped it next to it. The first time I flew the Rascal 168 it dead sticked, and it touched down right at the left edge of the lower red circle, and didn't stop until it was past that squiggle in the road and into the hay field.
I'm the only one that flies a Saito of any kind there, the other guys either have wee planes or 2 stroke gassers.
Last year after putting the Rascal and Something Xtra into the dirt, lost interest. This year the weather has sucked, too much rain, and if not, then windy.See the building with the red circle? Thats where I bounced the P-47 off the edge of the roof, I was standing somewhere in the lower red circle. The blue is the actual strip we take off and land from.
To the right of the blue used to be semi trailers and a flatbed with machines on it, right at the end of the runway, and a line of trees to the right of the road. So to land from the east, you had to thread between the building and the trees, and being so used to a small plane, I thought the P-47 was past the building, when in fact it was just behind it, caught the wingtip 2" in on the edge of the roof, flipped it over and plopped it next to it. The first time I flew the Rascal 168 it dead sticked, and it touched down right at the left edge of the lower red circle, and didn't stop until it was past that squiggle in the road and into the hay field.
I'm the only one that flies a Saito of any kind there, the other guys either have wee planes or 2 stroke gassers.

Jim i keep telling you to get rid of those heli parts man
do you remember bill cosby comedy records back in the seventies and a character called fat albert ? he always used to say 'never challenge worse man'Gary i hope your jackrabbit who ploughs through thistle bushes is feeling as well as you are. I've said here before that 70's playboy or hustler glossy magazine covers are well and truly underated as a material for making saito cam cover gaskets. As an aussie i'm trying to come to terms with american culture as far as gaskets go
is there a natural modesty prevailing ?
 07-09-2019, 01:56 AM

My Feedback: (102)

Join Date: Dec 2001
Location: Colonial Beach, VA
Posts: 20,370
Likes: 0
Received 25 Likes
on
25 Posts
What material is used for gaskets in these? I picked up a pack of card stock to test cuts with, figured cheaper than balsa, and would also be a good test bed for gasket making even if it isn't correct material, at least it would be good enough to test with. I do need gaskets for the rocker covers on two engines.
https://www.stationaryengineparts.co...et-0.25mm.html
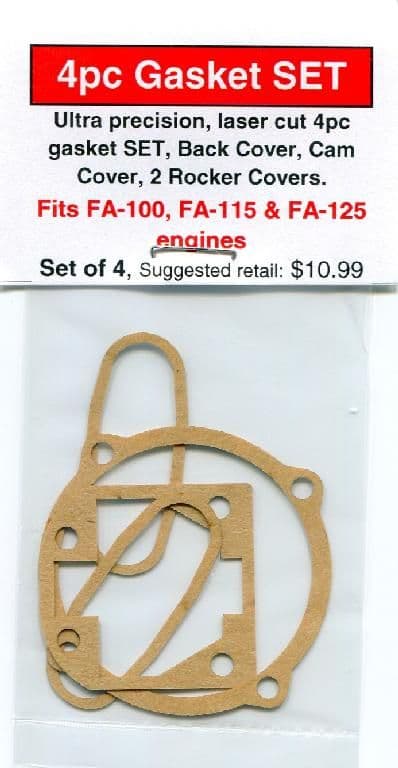
This relatively new gasket source for Saito's is made of the above material called Flex Oid.
http://icbimproducts.com/gaskets/new...php?groupid=80
Last edited by Hobbsy; 07-09-2019 at 01:59 AM.
07-09-2019, 03:02 AM
Wasp
I found that you have to put the bind plug in and rebind the RX to change from XBuss back to APW. Or vise versa If the receiver is flashing blue you are in APW then you need to put bind blug in and rebind RX and it should flash green. Then you are in the XBuss mode.
How owe do you like the XBuss? I have yet to hook that up. I need to sit down and play with it I think it should be awesome
07-09-2019, 04:20 AM

I can remember buying gasket material sheets from NAPA Auto Parts on the cheap. Then cutting my own gaskets for the TR-3A. I still have my Snap-on gasket punch set somewhere.
07-09-2019, 05:16 AM
https://www.stationaryengineparts.co...et-0.25mm.html
This relatively new gasket source for Saito's is made of the above material called Flex Oid.
ICBIMProducts.com - Saito 4 Stroke Gasket Sets
This relatively new gasket source for Saito's is made of the above material called Flex Oid.
ICBIMProducts.com - Saito 4 Stroke Gasket Sets
Those are simple enough a few minutes in Lightburn is all that is needed to create them.
07-09-2019, 05:28 AM


Count me in.
I would be glad to stock up on a few.
You can find plenty of paper suppliers here in the states. The most critical is the cam housing thickness.
The valve covers are a bit thicker, probably vegetable fiber stock.
I would be glad to stock up on a few.
You can find plenty of paper suppliers here in the states. The most critical is the cam housing thickness.
The valve covers are a bit thicker, probably vegetable fiber stock.
07-09-2019, 05:19 PM
Count me in too Bruce. At least for Rocker cover and back plate gaskets.
An interesting note, .006" thick card stock worked great for the cam housing on my 62 but not on my 82, it needed .008" to keep the gears from binding. Also, .006" worked fine on my 62 back plate but the 82 needed .008" to keep the crank pin from rubbing.
I may have some factory gaskets here somewhere. I'll measure the thicknesses.
EDITED:
FA56a, FA56b, FA62a & FA62b
Cam gear cover: .0063-.0070 (critical)
Back plate: .0070-.0085 (non-critical)
Rocker cover: .018-.019 (non-critical)
Perhaps others here have new factory gaskets they can measure?
Last edited by Glowgeek; 07-09-2019 at 06:04 PM.
 07-09-2019, 06:45 PM
I have a 45, I think a 65, a 72, a 91, a 100 and a 125 as well as the FG-11 and FG-30 so I can use those for templating and getting thicknesses. Then the next step is to get gasket material of the correct thicknesses.
07-09-2019, 07:39 PM
My Feedback: (1)
well I said I wanted to give myself a brake from the hobby with all the junk going on, but I could not stay away, the lure was like something eating it you. I had to fix my problems, LOL at least the ones I knew I could fix.. to add I have a new switch on the way, after I settled down I knew I could solder it..
Captcrunch44, yes, I did fix my XBus problems, I had to install the "Switching Plug" as you said, the thing is I got confused with the RX instructions with Switching Plug " with "Switch" then I realized the photo was of the Switching Plug,then some guys answered my question on the Radio Page,..
as for the XBus, it will be grate for wings with more than 2 servos,. on my VQ P-40 wing I have 4 servos and the 2 electric retracts, so with the XBus 4 port converter cable I will use 2 ports for aileron servos, one port with a Y-Harness for the flaps and the 4th port for the retracts with a Y-Harness, I have to use the Y-harness that comes with the retracts because it has a voltage regulator on it,. so the 2 Y-harnesses will be set inside the wing and there will be only 1 wire to connect to the RX when I mount the wing to the fuselage,,, slick and cleaner..
my World models P-40's wing has 3 servos, but 1 Bus cable..
Pete,, I am going to send those Heli parts to you .. actually, there must be some $500 in new/used parts, today I would sell them for $200 shipped inside the states, but no one wants them
Jim
Captcrunch44, yes, I did fix my XBus problems, I had to install the "Switching Plug" as you said, the thing is I got confused with the RX instructions with Switching Plug " with "Switch" then I realized the photo was of the Switching Plug,then some guys answered my question on the Radio Page,..
as for the XBus, it will be grate for wings with more than 2 servos,. on my VQ P-40 wing I have 4 servos and the 2 electric retracts, so with the XBus 4 port converter cable I will use 2 ports for aileron servos, one port with a Y-Harness for the flaps and the 4th port for the retracts with a Y-Harness, I have to use the Y-harness that comes with the retracts because it has a voltage regulator on it,. so the 2 Y-harnesses will be set inside the wing and there will be only 1 wire to connect to the RX when I mount the wing to the fuselage,,, slick and cleaner..
my World models P-40's wing has 3 servos, but 1 Bus cable..
Pete
,, I am going to send those Heli parts to you .. actually, there must be some $500 in new/used parts, today I would sell them for $200 shipped inside the states, but no one wants themJim
07-10-2019, 04:08 AM
Fabricated .006" worth of brass shims to lower compression ratio from 11.75 to 1 back to previous 10.5 to 1. Hard to tell with my very crappy tach but it looked like the peak rpm dropped maybe 75-100 rpm. The hsn sweet spot narrowed a tiny bit too. Took the shims out and the 75-100 came back. The wider hsn sweet spot returned as well.
The engine seems happy at 11.75 to 1 C/R and after 1/2 gallon of test runs the OS-f glow plug looked great. No aluminum adhesions and no deformation, just a slight white powdery appearance. Compression feels very snappy and start up is a 2 flip ordeal using 15% nitro.
The engine seems happy at 11.75 to 1 C/R and after 1/2 gallon of test runs the OS-f glow plug looked great. No aluminum adhesions and no deformation, just a slight white powdery appearance. Compression feels very snappy and start up is a 2 flip ordeal using 15% nitro.
07-10-2019, 10:24 AM
Fabricated .006" worth of brass shims to lower compression ratio from 11.75 to 1 back to previous 10.5 to 1. Hard to tell with my very crappy tach but it looked like the peak rpm dropped maybe 75-100 rpm. The hsn sweet spot narrowed a tiny bit too. Took the shims out and the 75-100 came back. The wider hsn sweet spot returned as well.
The engine seems happy at 11.75 to 1 C/R and after 1/2 gallon of test runs the OS-f glow plug looked great. No aluminum adhesions and no deformation, just a slight white powdery appearance. Compression feels very snappy and start up is a 2 flip ordeal using 15% nitro.
The engine seems happy at 11.75 to 1 C/R and after 1/2 gallon of test runs the OS-f glow plug looked great. No aluminum adhesions and no deformation, just a slight white powdery appearance. Compression feels very snappy and start up is a 2 flip ordeal using 15% nitro.
Last edited by Captcrunch44; 07-10-2019 at 10:26 AM.
07-10-2019, 12:20 PM
Overall rpm gain was around 700 rpms using an fa100 carb and Gary's super nice custom muffler. The C/R increase accounts for about 350 rpms of the total gain. This thing spools an APC 14x6 pretty darned fast.
Last edited by Glowgeek; 07-10-2019 at 12:22 PM.
07-10-2019, 03:54 PM
Did you take that .018" from the skirt or was it from the cylinder spigot? I can understand having to trim the spigot as the cylinder was dropped in closer to the crank. The skirt has me baffled a bit as that travel in relation to the crank remains unchanged, or perhaps, (likely) I am missing something (?)...
07-10-2019, 04:18 PM
Yes, the cylinder spigot. Some call it a cylinder skirt. I removed the material by hand sanding with progressively finer emery cloth grits to reduce chipping of the chrome liner. Circular motions on a cast iron table saw top. I didn't feel the need to get the surface perfectly square to the bore but did manage to hand sand it within .0015".
Last edited by Glowgeek; 07-10-2019 at 04:21 PM.
07-10-2019, 06:13 PM
Sorry Lonnie,
Sloppy reading on my part. You had it right. Upon Re-reading, you said cylinder skirt but my weary brain swears it said "piston skirt".
The sleeves are taught but the brain is slack
Sloppy reading on my part. You had it right. Upon Re-reading, you said cylinder skirt but my weary brain swears it said "piston skirt".
The sleeves are taught but the brain is slack
07-10-2019, 10:50 PM

Gary, like a few guys our age over here i sometimes miss that 1970's level of disco floor dance fitness
thank God the old alz is starting to kick in and i'm slowly forgetting about it.Jim by all means post the heli parts and i'll conduct a smallish ceremonial bonfire in the back yard at night. Filmed one we had one two years ago with a few mates and a few beers, in that instance we burned some old crashed planes. Send your parts and i'll add some old style hard boiled grey graupner props to the fire just to raise dave's pulse rate above zero
hell could even break out in a sweat and kick an fa125 round the back yard just for fun.
07-11-2019, 06:57 PM
My Feedback: (1)
water in my fuel or not ??
so who was it that told me to freeze my old fuel to see if there was ice in it,,,, did it. I froze about 8oz for 3 days, and poured it into a coffee strainer, I found just a very few bits, that I thought may/could, be ice, but they were so tiny I could not tell, I am just about ready to fly the Wolds Models P-40, I'm wondering how it will run LOL
Pete, I would send the parts, but if I sell them I would put the money into a new 70" Phoenix STA Ryan
https://www.towerhobbies.com/cgi-bin...?&I=LXETVD&P=0
hey Pete, you know a Saito 150 would really turn up the speed in that Ryan, but I don't have one, dang..
Jim
07-11-2019, 07:37 PM
water in my fuel or not ??
so who was it that told me to freeze my old fuel to see if there was ice in it,,,, did it. I froze about 8oz for 3 days, and poured it into a coffee strainer, I found just a very few bits, that I thought may/could, be ice, but they were so tiny I could not tell, I am just about ready to fly the Wolds Models P-40, I'm wondering how it will run LOL
Pete, I would send the parts, but if I sell them I would put the money into a new 70" Phoenix STA Ryan
https://www.towerhobbies.com/cgi-bin...?&I=LXETVD&P=0
hey Pete, you know a Saito 150 would really turn up the speed in that Ryan, but I don't have one, dang..
Jim
so who was it that told me to freeze my old fuel to see if there was ice in it,,,, did it. I froze about 8oz for 3 days, and poured it into a coffee strainer, I found just a very few bits, that I thought may/could, be ice, but they were so tiny I could not tell, I am just about ready to fly the Wolds Models P-40, I'm wondering how it will run LOL
Pete, I would send the parts, but if I sell them I would put the money into a new 70" Phoenix STA Ryan
https://www.towerhobbies.com/cgi-bin...?&I=LXETVD&P=0
hey Pete, you know a Saito 150 would really turn up the speed in that Ryan, but I don't have one, dang..
Jim