


new smaller (composite) Sebart Avanti XS
 08-13-2018, 10:43 AM
#51

My Feedback: (2)

Join Date: Aug 2003
Location: Grove City, OH
Posts: 497
Likes: 0
Received 0 Likes
on
0 Posts
Thank you for responding. I will order mine from Sebart.it in the next few days, does this have coposite wings or built up balsa with a Monokote type covering. Thanks!
Dan
Dan
 08-29-2018, 10:39 AM
#53
My Feedback: (2)
Join Date: Aug 2003
Location: Grove City, OH
Posts: 497
Likes: 0
Received 0 Likes
on
0 Posts
Thanks Bob. I have ordered mine from sebart.it on 8/22 but it has been really frustrating trying to get them to email me the stock status and the bank wire information. As of yet, they still have not given me any information.
08-30-2018, 02:40 AM
#55

Seba can be a bit variable with his email response. When he is quick, he is quick. If he is busy he sometimes doesn�t reply at all.
Have you tried some of the other European retailers? I know quite a few people in the US bought their Mini Avantis from Lindinger.at and they also stock the XS.
Have you tried some of the other European retailers? I know quite a few people in the US bought their Mini Avantis from Lindinger.at and they also stock the XS.
08-30-2018, 05:04 AM
#56
My Feedback: (2)
Join Date: Aug 2003
Location: Grove City, OH
Posts: 497
Likes: 0
Received 0 Likes
on
0 Posts
Seba responded last night. I am sure he is very busy with all of the events he attends in the EU and elsewhere. It was 800 Euros to ship to the US. I got a quote from Lindinger which was much more reasonable. I ordered my Mini Avanti from them last year with no issues and a great price. It says they will be in stock on 9/20/2018 so I will order then. This seems like the best size and best jet in this class.
08-30-2018, 07:38 AM
#58
Hi Dan,
No progress yet, thought i now have all parts ready to go for assembly, including a jetsmunt m100. Work and holiday was in the way, but will start in about 2 weeks.
Good luck with getting yours!
Florian
No progress yet, thought i now have all parts ready to go for assembly, including a jetsmunt m100. Work and holiday was in the way, but will start in about 2 weeks.
Good luck with getting yours!
Florian
 09-08-2018, 01:35 AM
#61
As I am starting the build now, I noticed that the canopy IS actually painted blue transparent from the inside. How did you remove your blue tint, and what is a recommended spray paint for either smoke tint or black (from the inside painted) ? Would e.g. Tamiya PS paints (used for painting RC car bodies from the inside) work ?
Thanks,
Florian
The following users liked this post:
Tom ling (02-07-2021)
09-08-2018, 03:18 AM
#63
Thanks Neil! Good to know it removes with simple alcohol. I think I�ll go ahead with the Tamiya spray, as transparent auto coating from dupli-color that i can get locally is not intended for polycarbonate, which I think the canopy material is..
10-31-2018, 10:48 AM
#65
Join Date: Aug 2010
Location: Berkshire, UNITED KINGDOM
Posts: 109
Likes: 0
Received 6 Likes
on
6 Posts
I had to shave out some of the inner ID �bumps� on mine too. I deepened the notches too as that allows more airflow for cooling. Not every pipe is made as exact as each other one by all manufacturers. Measure the OD of the pipe to get an idea of how much you need to remove, and relieve SLOWLY the tops of the bumps until it just barely fits tightly. Then relieve some in the notches to gain back the airflow, and finally round off the tops of the bumps to get a good fit. The pipe does not expand much at the rear end on that plane I found, but it does depend on whose pipe and how it was made etc. Start tight, as you can always relieve more. If you end up making the former too loose, you can paint the bumps and indeed the whole former with BVM Heat Shield. It adds a bit of thickness to the bumps...
Hope this helps,
Len
Hope this helps,
Len
10-31-2018, 01:33 PM
#66
Hi,
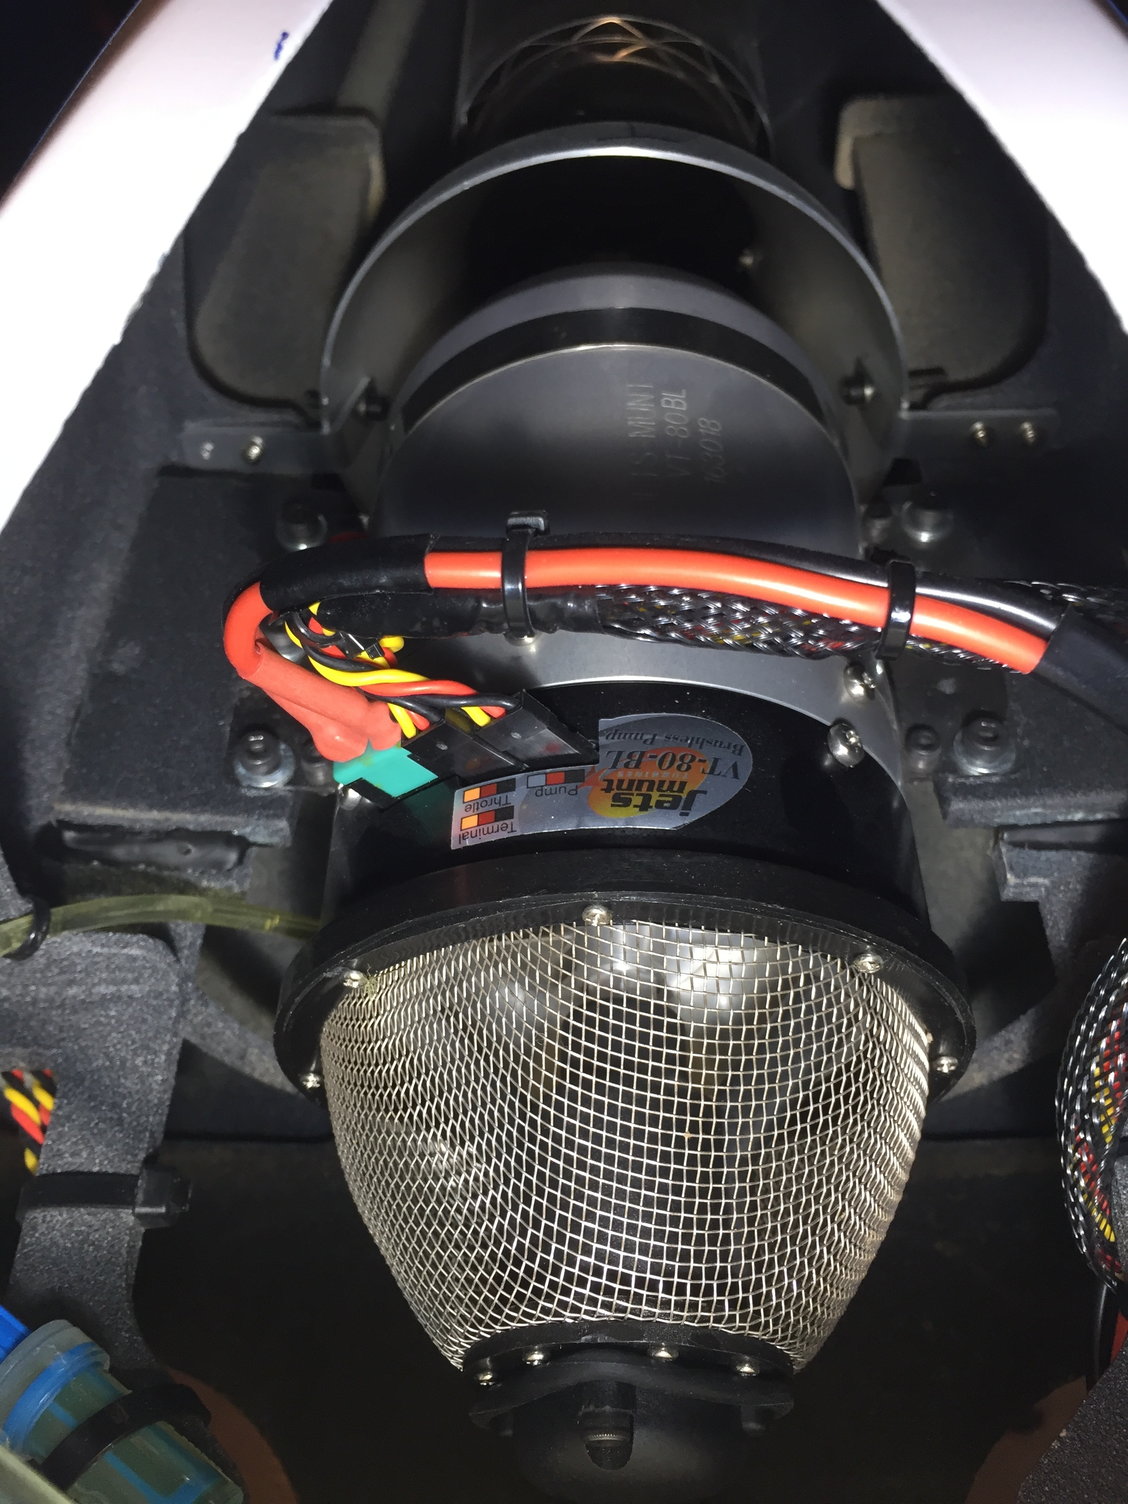
I followed Len�s tips and will post a few pics in next days how i modified the back mount of the pipe. Not completely installed yet, but at least you get an idea of that piece. My build tempo is snail tempo..
I followed Len�s tips and will post a few pics in next days how i modified the back mount of the pipe. Not completely installed yet, but at least you get an idea of that piece. My build tempo is snail tempo..
11-01-2018, 07:19 AM
#68
Join Date: Aug 2010
Location: Berkshire, UNITED KINGDOM
Posts: 109
Likes: 0
Received 6 Likes
on
6 Posts
So been looking at the thrust tube a bit more and it seems the Avanti S has a similar system, I think you remove the rear former and mount the one supplied with the pipe, and then I guess centralise the Bell mouth with the turbine rails, I have tried contact seb for some confirmation
11-01-2018, 01:49 PM
#69
Hi,
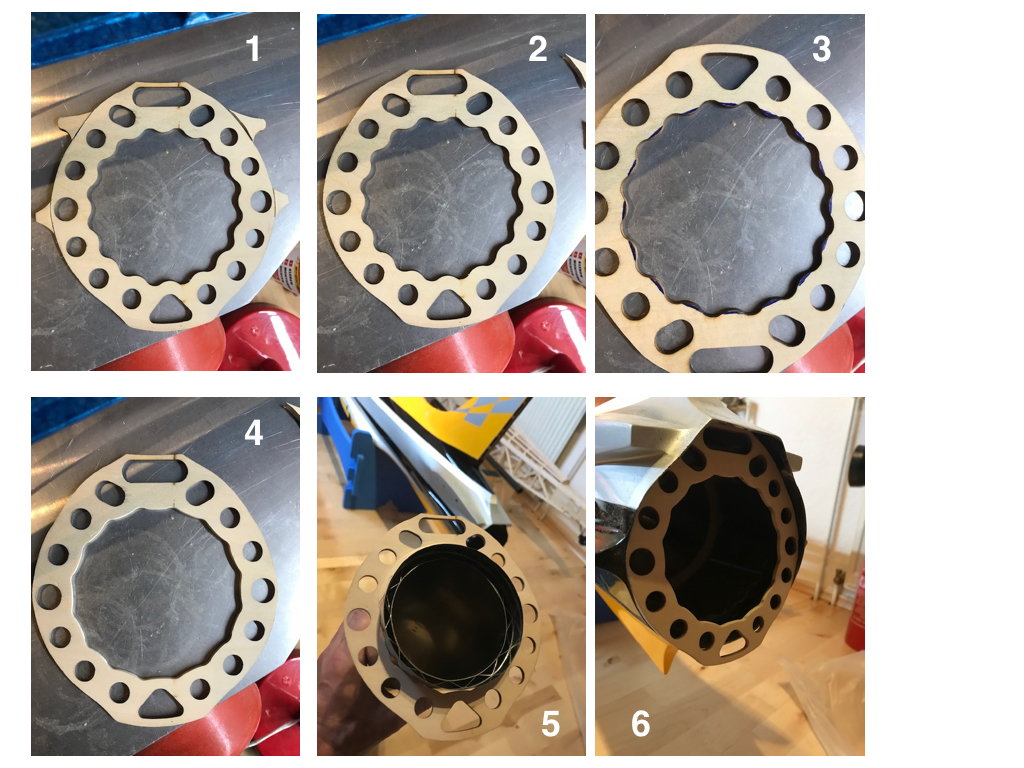
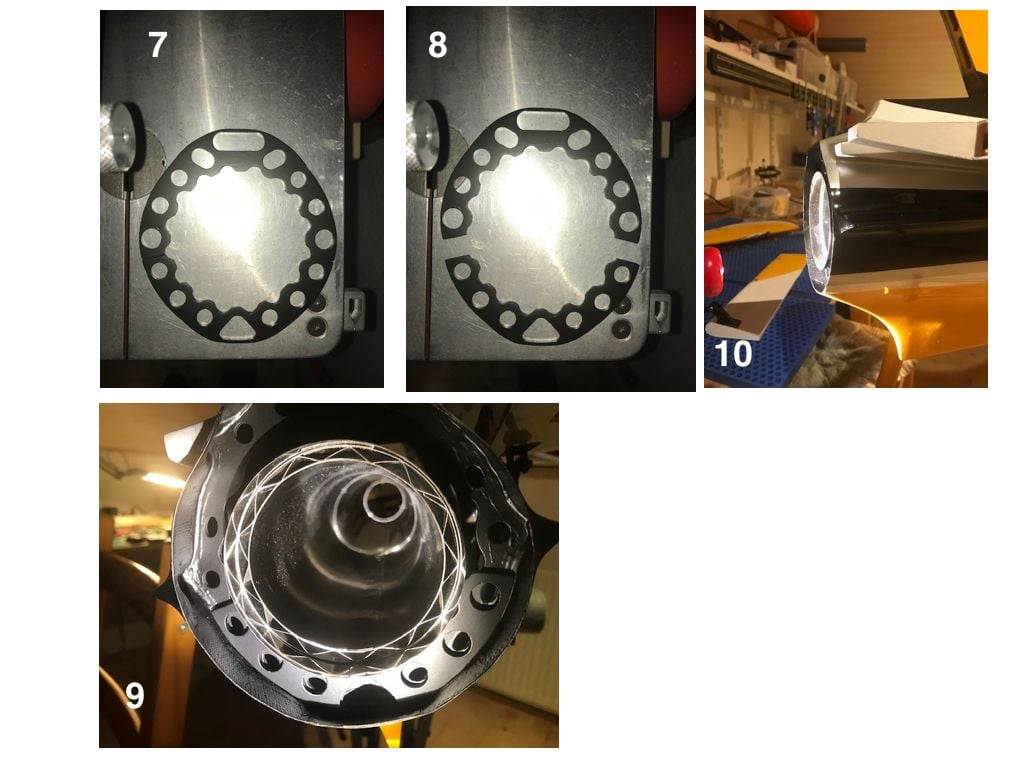
Just to share how I progressed with the mounting of the tail end of the pipe.
1 & 2: Removed the tabs from the bulkhead supplied with the kit
3: Marked the material to remove from the inside notches
4&5: material removed, and the pipe fits!
6: Bulkhead will never fit this way..
7&8: Cut in two pieces, and painted black
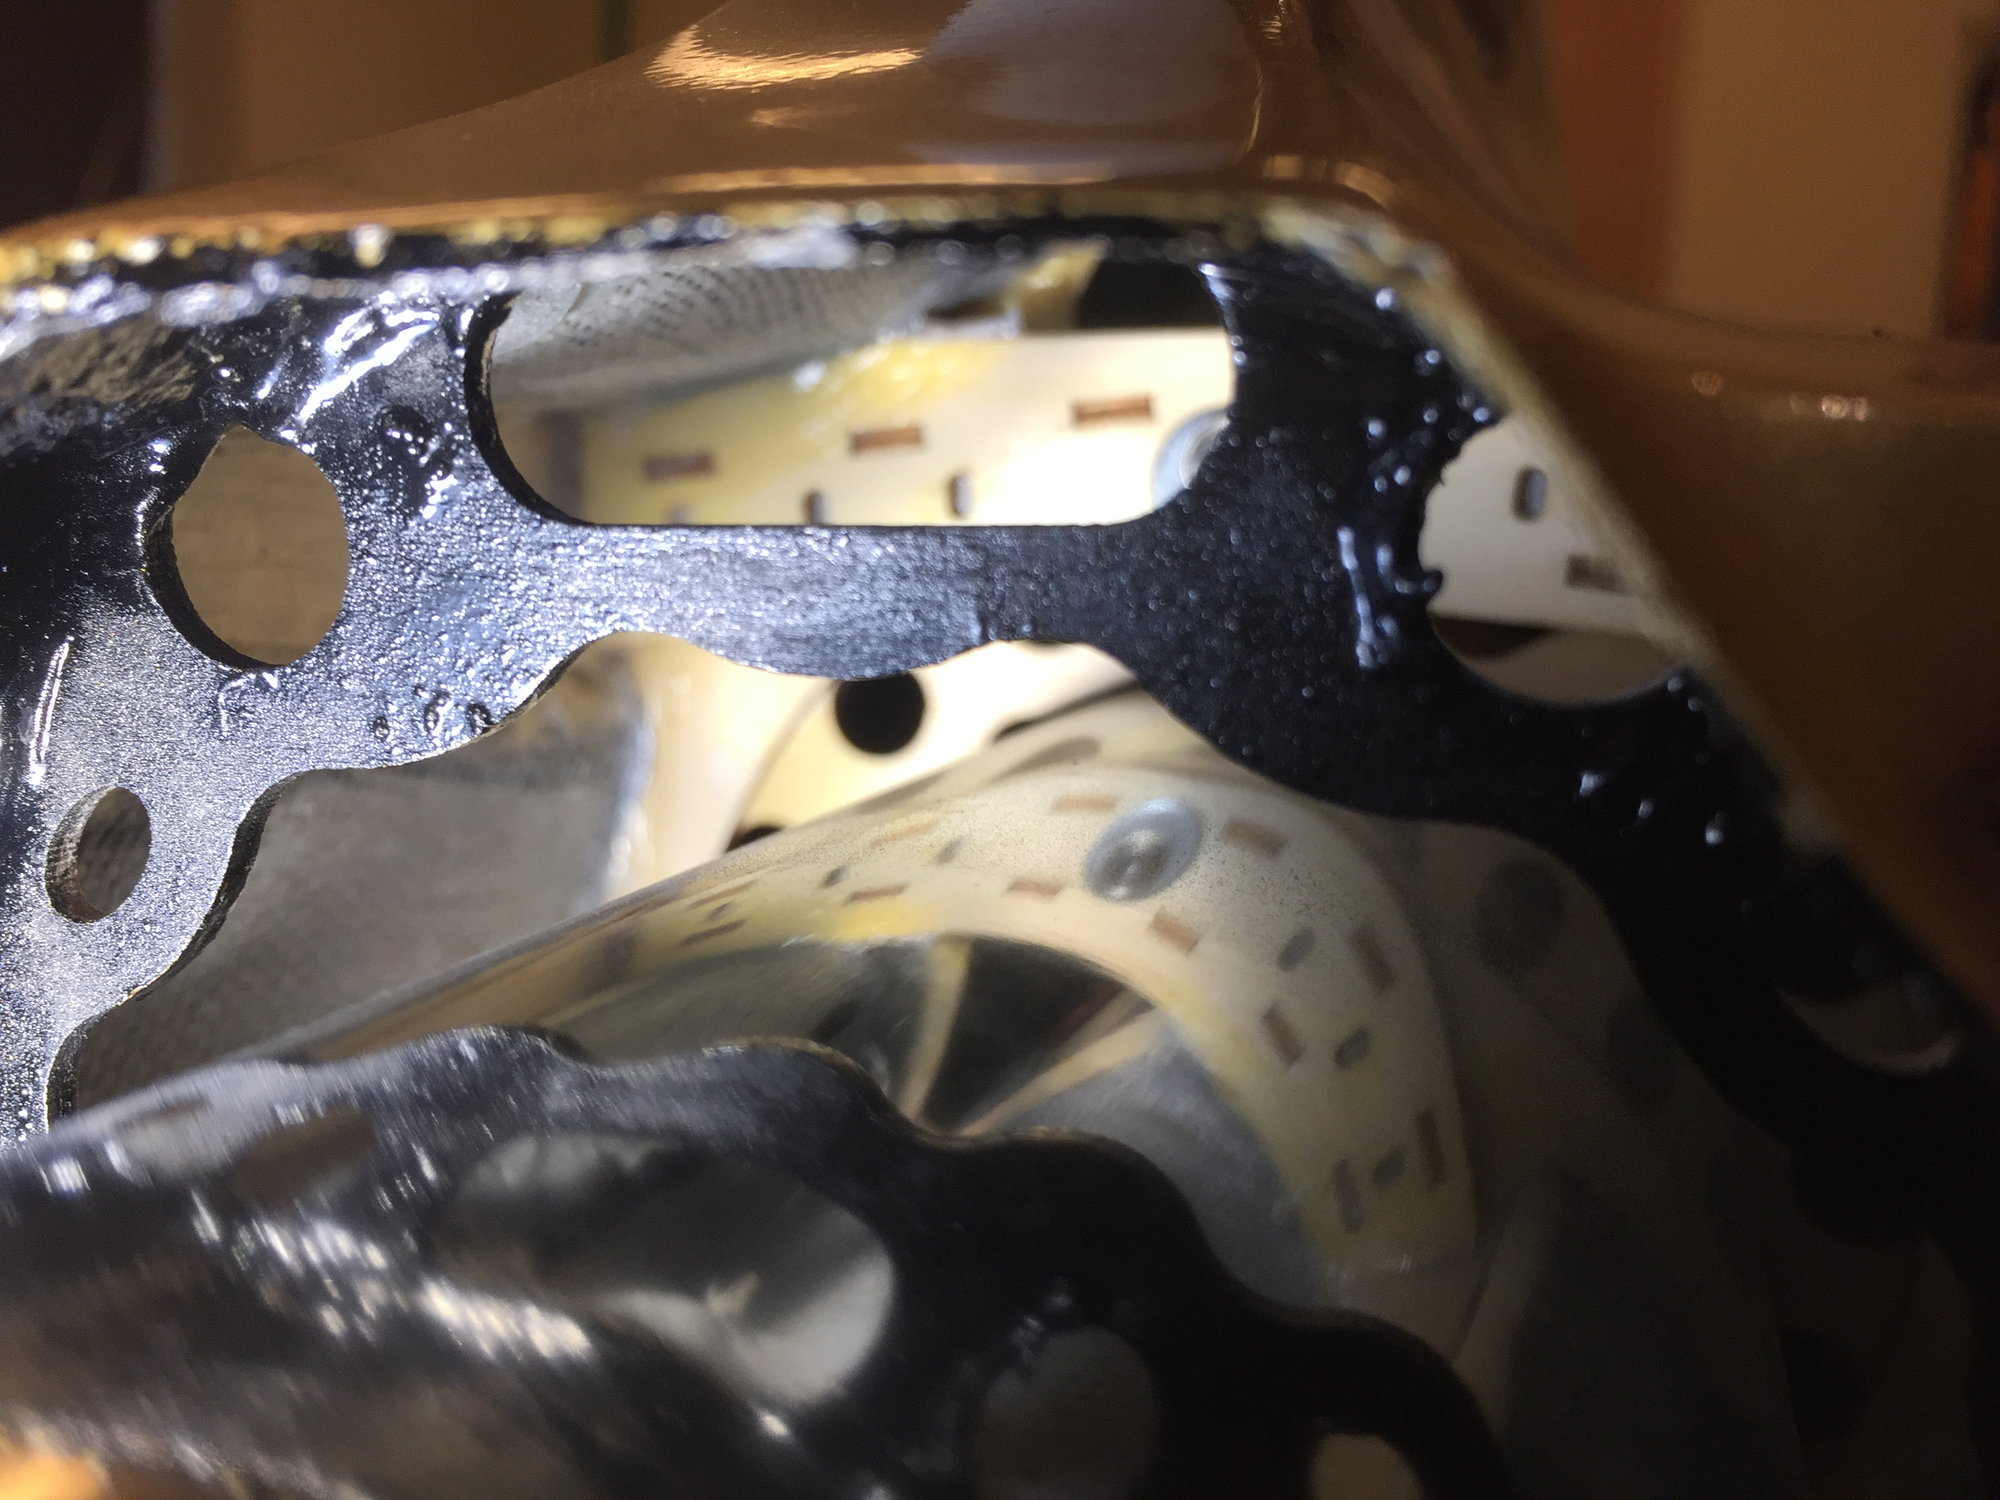
9: Bottom piece of the bulkhead test fit in fuselage with pipe, nicely centered I�d say!
10: Side view
Now, the only thing remaining is to sand away a little from the notches, so that the pipe easily fits (the paint added a bit again)
..And finally mount the two separated pieces of the bulkhead to the already present bulkhead..
Just the way I did it, will finish it later as I am currently working on the stabs and wings.
Hope this helps,
Florian
Just to share how I progressed with the mounting of the tail end of the pipe.
1 & 2: Removed the tabs from the bulkhead supplied with the kit
3: Marked the material to remove from the inside notches
4&5: material removed, and the pipe fits!
6: Bulkhead will never fit this way..
7&8: Cut in two pieces, and painted black
9: Bottom piece of the bulkhead test fit in fuselage with pipe, nicely centered I�d say!
10: Side view
Now, the only thing remaining is to sand away a little from the notches, so that the pipe easily fits (the paint added a bit again)
..And finally mount the two separated pieces of the bulkhead to the already present bulkhead..
Just the way I did it, will finish it later as I am currently working on the stabs and wings.
Hope this helps,
Florian
11-01-2018, 01:56 PM
#70
Join Date: Aug 2010
Location: Berkshire, UNITED KINGDOM
Posts: 109
Likes: 0
Received 6 Likes
on
6 Posts
That works, great detail, I am still waiting to hear from seb, but I think he�s going to say yunremove the Ming old former and fit this new one, but your method looks ace great.
what about the bell mouth end ? I am assuming it�s need centring on the turbine mounting rails
what about the bell mouth end ? I am assuming it�s need centring on the turbine mounting rails
11-01-2018, 02:03 PM
#71
Thanks Lewis,
I am pretty sure he is going to say keep the original former where it is. Removing it is going to weaken the fuselage, and the former only fits as one piece during manufacturing, when the two fuselage halves are joined together.
Doing it this way is pretty standard according jet friends at my field.
good luck with your build.. bell mouth I haven�t looked at yet, sorry


 11-02-2018, 10:56 AM
#74
Thanks Bob. They are terrible receivers and I wouldn�t recommend it to anyone. I�ve been flying this model for a year without any issues. If I had known what I know now (and from experience with a different model using larger servos) I wouldn�t have fitted it. I believe it�s ok due to the use of fewer smaller sized servos.