


1/10 RC Formula 1 Cars...lets see'em
 07-28-2011, 08:42 PM
#726
Senior Member
Thread Starter

Join Date: Jun 2006
Location: Jackson, MS
Posts: 269
Likes: 0
Received 0 Likes
on
0 Posts
Here's a shot of the body I'm working on for the X1. I'm shootin for an off season test car look? I used a flat exterior polycarbonate spray from Tamiya...something different.

 07-29-2011, 05:10 PM
#727
Member
Join Date: Apr 2011
Location: Mackay, AUSTRALIA
Posts: 38
Likes: 0
Received 0 Likes
on
0 Posts
Thanks for the info about the carbon shaft, I'll be keeping that in mind during my build.
I'm still waiting on the shaft, wheels, tyres etc to arrive. I got my bodies through the week. I'd never seen these formula 1 style bodies in their un-cut stages before - damn I'm in for a lot of fiddly work to cut and paint everything! But hey, that's what I love about this hobby
Re. the steering servo: I had seen those pics on that other forum (what was it called? RC tech or something?) I have already ordered a steering servo, but it's a standard size and I'm not too certain that it would fit lying down like that. I might look at getting a low profile servo and mounting it like that. It looks as if the steering linkages would be much happier with the servo mounted like this. That way the instructions tell you to mount it is pretty odd whan you think about it... I could be wrong saying this - remember I've never built an F1 before :P
Again thank you for your assistance in helping a rookie out
Tim
Edit: and nice body Vyger, look's awesome. I love the look of that flat paint!<br type="_moz" />


 08-02-2011, 06:03 AM
#731
Member
Join Date: Apr 2011
Location: Mackay, AUSTRALIA
Posts: 38
Likes: 0
Received 0 Likes
on
0 Posts
ORIGINAL: Vyger

Well guys my build is coming along nicely, which is a pleasent surprise seeing as it's the first experience I've had with F1 cars.
The only problem I've found so far is cutting the body out cleanly, it's a mongrel of a job wouldn't you agree?<br type="_moz" />
08-02-2011, 01:24 PM
#732
Senior Member
Thread Starter
Join Date: Jun 2006
Location: Jackson, MS
Posts: 269
Likes: 0
Received 0 Likes
on
0 Posts
Thank you one and all for your kind words. The truth is I just got lazy and wanted to do something simple but different.
Tim: The pinion and spur alignment is a problem if you plan on running a kit silver can, or sport tuned motor. The armature doesn't stick out enough to allow for flush mounting between the spur and pinion. If you're planning on running a B/L system you'll be fine, as the armature is longer. Despite what some people think, the kit plastic motor-plate is the same thickness as the hop-up aluminum motor-plate. No difference. Sorry.
I'm planning on running the car with a silver can motor. Therefore, I'll be removing the TB03D motor spacer from the equation. I'd rather make sure the spur and pinion have a nice alignment. In my opinion this is more important than using the motor spacer, for a silver can.
The new body's are a pain in the @$$ to get cut out. What use to take a few minutes now takes about thirty or so. They look nice when they're done, but they're a real bugger!
Keep up the good work and lets see the beast when your done.
08-02-2011, 01:37 PM
#733
Senior Member
Thread Starter
Join Date: Jun 2006
Location: Jackson, MS
Posts: 269
Likes: 0
Received 0 Likes
on
0 Posts
Below is a link of the new Tamiya F104X1 running at the Tamiya track in Aliso Viejo, CA, over this past weekend.
[link=http://youtu.be/4ES3YOVlOn8]F104X1 In Action CLICK HERE[/link]
I did have chance to drive the car and I have to say, I really like it.
At first: The car was built per the instructions, black springs up front, diff lube on the roll damper, 300wt oil in the shock, red shock spring, kit T-plate (high traction type). The rear steel axle was swapped out for the graphite option, and a 27 pinion, 93 spur for gearing with a kit, silver-can motor. The car was a little dicey, it seemed like it was on a knifes edge...but pushy. The car wouldn't take a very dependable set entering the corners. The rear traction would break loose exiting corners if pushed too hard. So, we had an understeer up front and loose at the rear. Not a spectacular start with a new car…
Tweaks: On a good note the car seems very responsive to changes at the rear. We slowly increased the viscosity of grease on the roll damper shaft. We went from light diff grease to soft damper grease, to medium damper grease. The car accepted each change and the stiffer we went with the grease the more dependable the rear end got. The nervous twitch at the back end entering a corner settled down, but wasn’t completely gone. The on-power exiting the corners was also better from about 2/3 of the way through the corner on out.
We also tightened up the diff. This was slipping a little too much and was being used like a clutch exiting corners…it was more of a “slipper-rential”. Once we tightened this up the car washed out less exiting.
We also went from the black springs up front to the gold springs up front. This allowed the car to settle into the corner better and reduced a little of the oversteer or push. We also added more camber, from 1.5 to 2.0. This helped, but not much, and at the cost of wearing the inside of the tires.
Misses: Unfortunately I didn’t notice any difference using the counter weight on the rear axle. The car owner and I repeatedly pondered if it was really doing anything. I guess the only true test is to run it with and then without. But I was hoping for more…[ ]
]
Note: this car was set up to use trail breaking entering the corners. This isn’t my preferred way to drive but it did help get it into the corners by taking a set. The turn-in was better but I wasn't consistent or confident with this method. Remember, it was a loner, not my own.
Final thoughts: Like I said at the start I like the car. I think with more tuning the car will get better. All of the changes we made had a positive effect, not as much as we hoped, but a positive effect none the less. The car still has an over-steering issue at the front end. This will have to get sorted out later, as our primary goal was to toy with the rear of the car. For now the rear is still the focus.
This is merely what we went through with our testing, I’m sure others will have their own methods and ideas. I thought it would be worth sharing, please feel free to share your own insights with regards to the new car.
Lates!
Vyg
[link=http://youtu.be/4ES3YOVlOn8]F104X1 In Action CLICK HERE[/link]
I did have chance to drive the car and I have to say, I really like it.
At first: The car was built per the instructions, black springs up front, diff lube on the roll damper, 300wt oil in the shock, red shock spring, kit T-plate (high traction type). The rear steel axle was swapped out for the graphite option, and a 27 pinion, 93 spur for gearing with a kit, silver-can motor. The car was a little dicey, it seemed like it was on a knifes edge...but pushy. The car wouldn't take a very dependable set entering the corners. The rear traction would break loose exiting corners if pushed too hard. So, we had an understeer up front and loose at the rear. Not a spectacular start with a new car…
Tweaks: On a good note the car seems very responsive to changes at the rear. We slowly increased the viscosity of grease on the roll damper shaft. We went from light diff grease to soft damper grease, to medium damper grease. The car accepted each change and the stiffer we went with the grease the more dependable the rear end got. The nervous twitch at the back end entering a corner settled down, but wasn’t completely gone. The on-power exiting the corners was also better from about 2/3 of the way through the corner on out.
We also tightened up the diff. This was slipping a little too much and was being used like a clutch exiting corners…it was more of a “slipper-rential”. Once we tightened this up the car washed out less exiting.
We also went from the black springs up front to the gold springs up front. This allowed the car to settle into the corner better and reduced a little of the oversteer or push. We also added more camber, from 1.5 to 2.0. This helped, but not much, and at the cost of wearing the inside of the tires.
Misses: Unfortunately I didn’t notice any difference using the counter weight on the rear axle. The car owner and I repeatedly pondered if it was really doing anything. I guess the only true test is to run it with and then without. But I was hoping for more…[
]Note: this car was set up to use trail breaking entering the corners. This isn’t my preferred way to drive but it did help get it into the corners by taking a set. The turn-in was better but I wasn't consistent or confident with this method. Remember, it was a loner, not my own.
Final thoughts: Like I said at the start I like the car. I think with more tuning the car will get better. All of the changes we made had a positive effect, not as much as we hoped, but a positive effect none the less. The car still has an over-steering issue at the front end. This will have to get sorted out later, as our primary goal was to toy with the rear of the car. For now the rear is still the focus.
This is merely what we went through with our testing, I’m sure others will have their own methods and ideas. I thought it would be worth sharing, please feel free to share your own insights with regards to the new car.
Lates!
Vyg
08-02-2011, 08:06 PM
#734
Member
Join Date: Apr 2011
Location: Mackay, AUSTRALIA
Posts: 38
Likes: 0
Received 0 Likes
on
0 Posts
<div style="background-color: rgb(255, 255, 255); padding-top: 5px; padding-right: 5px; padding-bottom: 5px; padding-left: 5px; margin-top: 0px; margin-right: 0px; margin-bottom: 0px; margin-left: 0px; font-family: Arial, Verdana, sans-serif; font-size: 12px; ">Great notes on the car's performance and tweaks you made Vyger. I'm sure many of us (myself included) will benefit from this information.
I got all the electronics hooked up this morning and tested out the steering servo and the motor. One thing I did notice is that the spur gear was a little wobbly in between the diff housings. LIke, I can move it side to side very slightly (about 0.5mm) and when the motor is running you can see a little wobble. It's not causing the pinion gear to slip or anything but I don't want it to cause any premature wear. Is this a fairly normal thing on a ball diff?
Tim</div>
08-03-2011, 07:15 AM
#735
Senior Member
Thread Starter
Join Date: Jun 2006
Location: Jackson, MS
Posts: 269
Likes: 0
Received 0 Likes
on
0 Posts
Hey Tim,
Good to hear. If you’ve got all the electronics installed and plumbed your doing well, that’s half the battle with this car.
Don’t worry. The diff gear always has a little play. It centers itself when mounted to the pinion. Just make sure your gear mesh is set right.
As long as you built the diff like the instruction show you’ll be fine. There are a couple of important parts to note as you assemble the diff. A) make sure you put the diff gear in facing the right direction. The cup that holds the bearing in the gear should be facing away from the motor pod. B) The bearings in the hub (inside and outside) should be seated correctly. I use a little grease on the outside of the bearing to hold them in place, this works well for the outside bearing. C) Make sure the pressure washers or coned washers are in correctly with the cones pointed towards each other like this )( . Don’t make fun of my illustration.
08-03-2011, 12:25 PM
#736
Banned
Join Date: Sep 2010
Location: Northampton,
MA
Posts: 1,766
Likes: 0
Received 0 Likes
on
0 Posts
ORIGINAL: Vyger
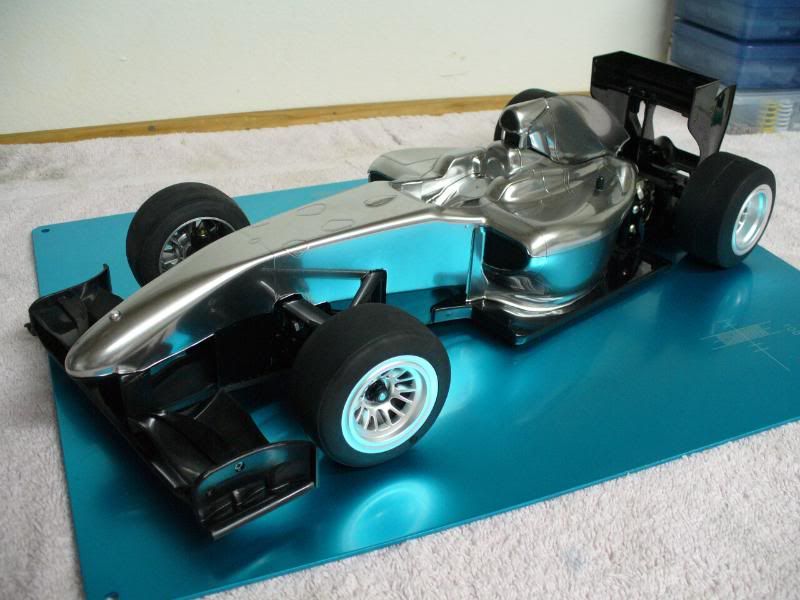
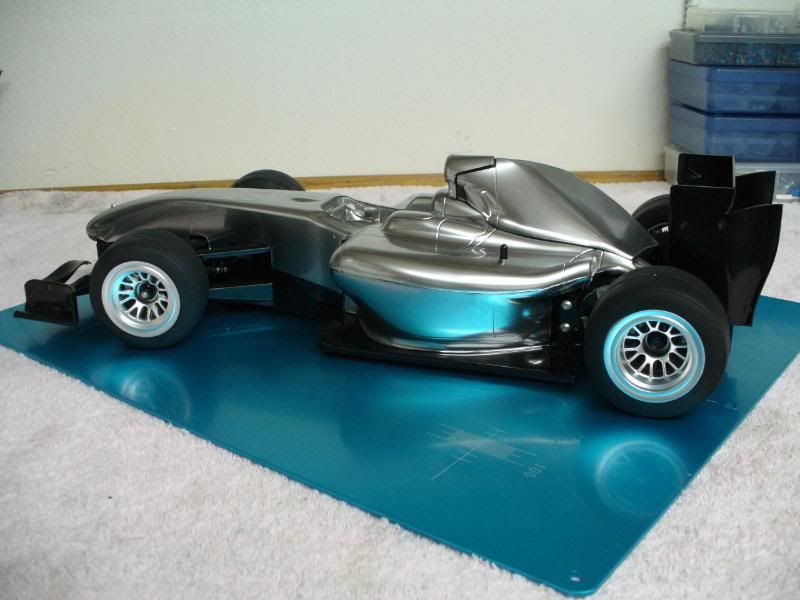
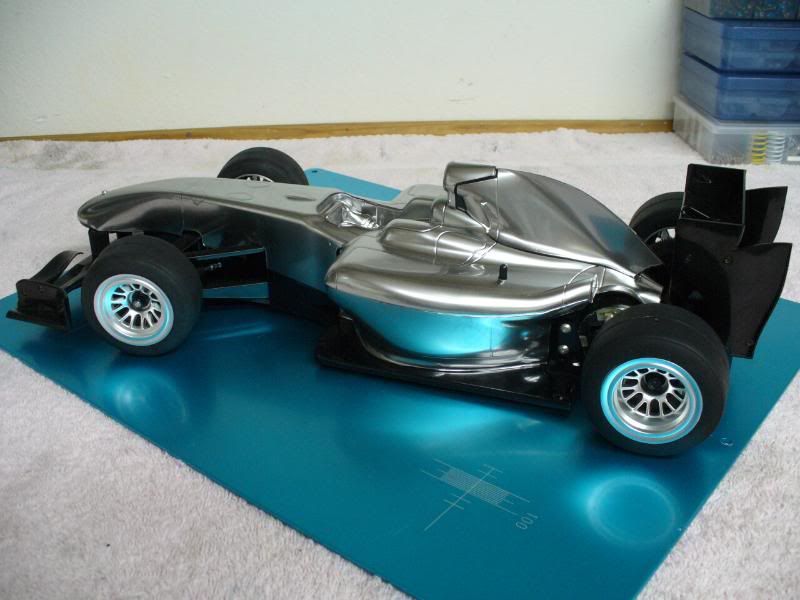
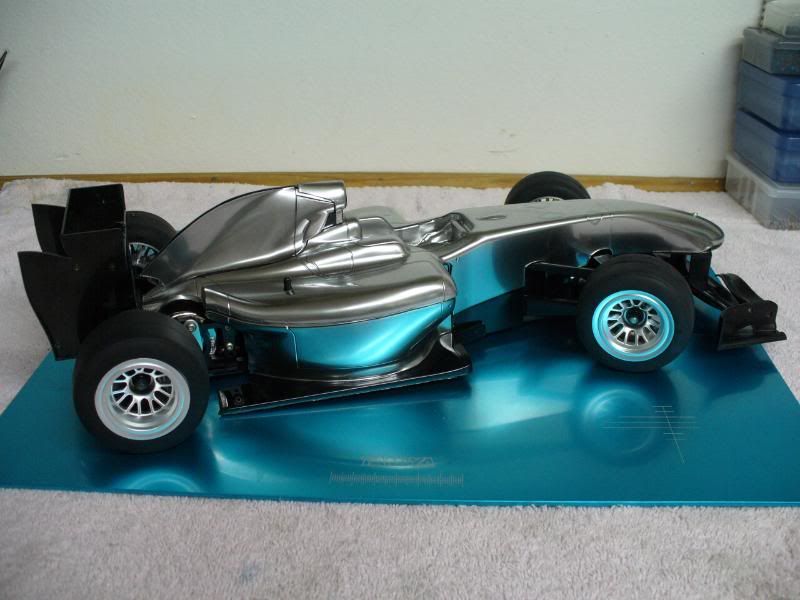
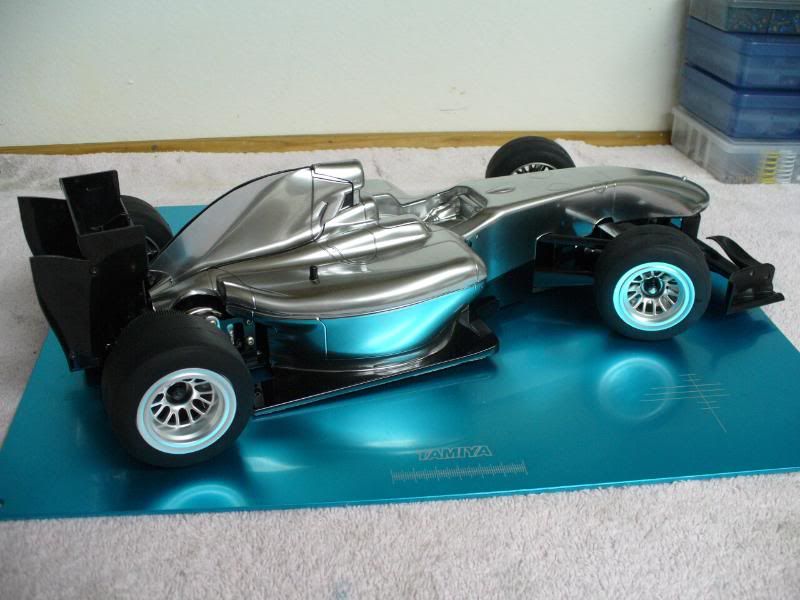
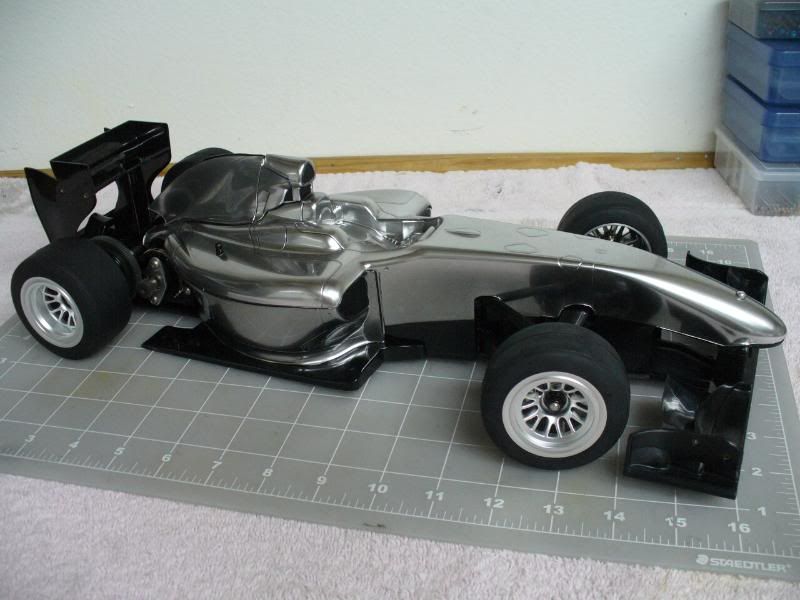
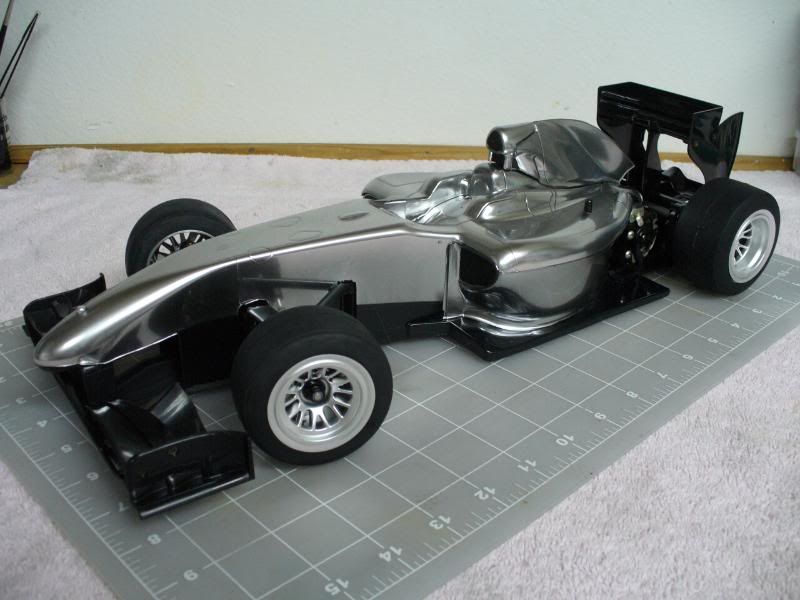
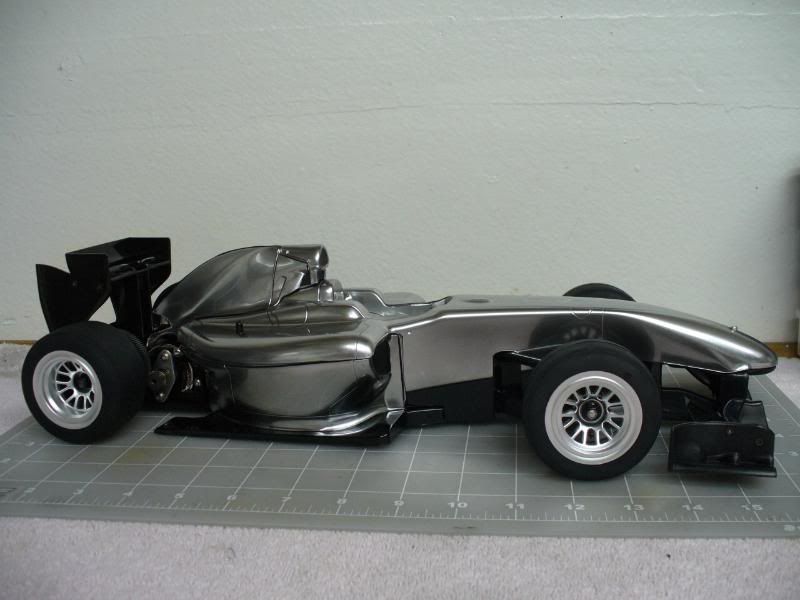
I got the body cut out and shot some paint on the McLaren this weekend. Here’s some pics pre-stickered so you can see how the body looks. I like the shape and there’s a crap load of detail…there’s just a lot of parts to it. All in all it’s good tradeoff. The parts aren’t fastened yet in the pics, so the alignment isn’t exactly perfect.
It was also my first time using this type of paint. It goes on really transparent, even after three coats as suggested in the instructions. Then you hit it with the black and BAMM! It’s like a mirror. I still have to apply the paint to the rear wing side plates, mirrors, and the side splitters. I would suggest getting two cans if you plan to paint it as instructed.
Beautiful - I am speechless. My 420 hour in my finest time painting, cannot compare to the artwork as fine as the job you did.
I salute you sir as an artist!
It reminds me of the glowing muscules off that silver surfer guy in the 2nd installment of that F4 movie.
5 stars hoss - keep up the good work
08-03-2011, 02:19 PM
#737
Senior Member
Thread Starter
Join Date: Jun 2006
Location: Jackson, MS
Posts: 269
Likes: 0
Received 0 Likes
on
0 Posts
Thanks man. Unfortunately I still haven't finished that car. It got parked when I got other projects. But it's next on my list. Thanks again! 
08-03-2011, 10:54 PM
#738
Member
Join Date: Apr 2011
Location: Mackay, AUSTRALIA
Posts: 38
Likes: 0
Received 0 Likes
on
0 Posts
ORIGINAL: Vyger
Hey Tim,
Good to hear. If you’ve got all the electronics installed and plumbed your doing well, that’s half the battle with this car.
Don’t worry. The diff gear always has a little play. It centers itself when mounted to the pinion. Just make sure your gear mesh is set right.
As long as you built the diff like the instruction show you’ll be fine. There are a couple of important parts to note as you assemble the diff. A) make sure you put the diff gear in facing the right direction. The cup that holds the bearing in the gear should be facing away from the motor pod. B) The bearings in the hub (inside and outside) should be seated correctly. I use a little grease on the outside of the bearing to hold them in place, this works well for the outside bearing. C) Make sure the pressure washers or coned washers are in correctly with the cones pointed towards each other like this )( . Don’t make fun of my illustration.
My tires and wheels arrived today. Now I just have to finish cutting/painting/stickering the body and she'll be ready to go.
I must say I'vethoroughly enjoyed this build. Once again thank you to those who gave me useful pointers and tips along the way, I appreciate the help.
<br type="_moz" />
08-04-2011, 07:25 AM
#739
Senior Member
Thread Starter
Join Date: Jun 2006
Location: Jackson, MS
Posts: 269
Likes: 0
Received 0 Likes
on
0 Posts
Hey Tim, happy to hear that you've enjoyed yourself. I think you'll agree, all in all it's a pretty simple kit to build that's allot of fun. The two most difficult parts of the build are installing the electronics and completing the body with all it's bits and peaces. I hope my tips have been helpful, and encouraging. Let us know how the maiden voyage goes with the car.
Good luck and have fun!
Vyg
Good luck and have fun!
Vyg
08-04-2011, 08:49 PM
#740
Member
Join Date: Apr 2011
Location: Mackay, AUSTRALIA
Posts: 38
Likes: 0
Received 0 Likes
on
0 Posts
In regards to painting the cockpit: Should I use the PS spray like it says in the instruction? Or should I do it by hand with an acrylic paint ? It seems strange to paint such a small and detailed area with spray paint... Heaps and heaps of masking would be required, right?
Also, is it absolutely necessary to paint the helmet white? It's already white!
Oh yeah, it's a Ferrari F60 body that I'm working on, if that makes any difference. :P
Thank you in advance
Tim<br type="_moz" />
Also, is it absolutely necessary to paint the helmet white? It's already white!
Oh yeah, it's a Ferrari F60 body that I'm working on, if that makes any difference. :P
Thank you in advance
Tim<br type="_moz" />
08-05-2011, 08:15 AM
#741
Senior Member
Thread Starter
Join Date: Jun 2006
Location: Jackson, MS
Posts: 269
Likes: 0
Received 0 Likes
on
0 Posts
Hey Tim, The F60 is one of the easier bodies to work on, you chose wisely.
For the cockpit I use acrylic flat paints applied to the outside. I’ve never been a fan of using the Poly Sprays. It’s just like you said, it involves a lot of taping and the end result is a semi gloss drivers suit. The last time I checked F1 drivers weren’t wearing vinyl/latex body suits.
You don’t have to paint the helmet. I know it’s white and the instructions tell you to paint it white for Massa. However, the plastic will discolor over time, turning sort of yellow/white. Also, the stickers will stick better to the painted surface. Just make sure if you paint it you give it plenty of time to dry before you apply the stickers.
The helmet stickers can be sort of tricky because of the compound curves the stickers wraps around. Tamiya does a great job of shaping the sticker and using a really good vinyl material. Just go slow with it and if you start getting creases or if you’re having trouble getting the stickers down smooth use a hair-dryer or a heat gun and the vinyl will get soft and should lay right down.
Below are a couple of links to some earlier articles I did on the thread that might help. Check them out and let me know if you have any questions.
Pics of the Williams FW18 interior
http://www.rcuniverse.com/forum/m_79..._6/key_/tm.htm
Helmet tips
http://www.rcuniverse.com/forum/m_79..._5/key_/tm.htm
08-06-2011, 05:43 PM
#743
Member
Join Date: Apr 2011
Location: Mackay, AUSTRALIA
Posts: 38
Likes: 0
Received 0 Likes
on
0 Posts
Thanks for the info and the links there Vyger, I'm going to get some flat acrylic paints from my LHS tomorrow
Did I mention that I ordered some red bull decals? I'm going to make a Mark Webber replica with my second F60 body
Did I mention that I ordered some red bull decals? I'm going to make a Mark Webber replica with my second F60 body
08-08-2011, 09:53 AM
#744
Senior Member
Thread Starter
Join Date: Jun 2006
Location: Jackson, MS
Posts: 269
Likes: 0
Received 0 Likes
on
0 Posts
Tim post up some pics of that Red Bull car and let me know how the decals are when you apply them. I've been toying with this idea for quite a while. I'm a big Webber fan, personally I think he should get better treatment/support from his team...but it looks like he carry's the #2 curse...sort of like Barrichello.
-vtec-: I'm not sure you would want to use one of these for a speed run type of car. Getting the traction to the ground is one of the biggest challenges. Just my 2 cents.
-vtec-: I'm not sure you would want to use one of these for a speed run type of car. Getting the traction to the ground is one of the biggest challenges. Just my 2 cents.
08-08-2011, 06:35 PM
#745
Junior Member
Join Date: Oct 2004
Location: , CA
Posts: 8
Likes: 0
Received 0 Likes
on
0 Posts
Vyg, I went to a 100CST oil to save weight, and used the lightest greases I could find. My question is, what 64pitch pinion should I run with my 48pitch spur? I am running foam on the front and rubber on the rear so I can go 100+ mph!. Tanks Bai!

08-08-2011, 07:33 PM
#746
Banned
Join Date: Sep 2010
Location: Northampton,
MA
Posts: 1,766
Likes: 0
Received 0 Likes
on
0 Posts
Vyger - either the lighting, the camera, or that silver paint just looks very sweet.
I use a transparent highlight color 1st to bring that kind of beauty out of a normally plain color. What did you use?
I'm going to subsrcibe to this thread until I see your finished job. Sweet work so far
I use a transparent highlight color 1st to bring that kind of beauty out of a normally plain color. What did you use?
I'm going to subsrcibe to this thread until I see your finished job. Sweet work so far
08-09-2011, 12:08 PM
#747
Senior Member
Thread Starter
Join Date: Jun 2006
Location: Jackson, MS
Posts: 269
Likes: 0
Received 0 Likes
on
0 Posts
ORIGINAL: dragnse7en
I use a transparent highlight color 1st to bring that kind of beauty out of a normally plain color. What did you use?
I use a transparent highlight color 1st to bring that kind of beauty out of a normally plain color. What did you use?
08-09-2011, 12:23 PM
#748
Senior Member
Thread Starter
Join Date: Jun 2006
Location: Jackson, MS
Posts: 269
Likes: 0
Received 0 Likes
on
0 Posts
Hey rtypec, I see your new here. You’re on the right track that’s for sure. You’ll want to use a lighter oil for sure. But be careful as RC shock oils are a blended fluid and as such you need to make sure you have the correct viscosity.
Calculating the viscosity of a blended liquid/fluid consisting of two or more liquids having different viscosities is a three step procedure. The first step involves calculation of the Viscosity Blending Index (VBI) of each component of the blend using the following equation (known as a Refutas equation):
(1) VBI = 14.534 × ln[ln(v + 0.8)] + 10.975
where v is the viscosity in centistokes and ln is the natural logarithm (Loge).
The second step involves using this blending equation:
(2) VBI-blend = [wA × VBIA] + [wB × VBIB] + ... + [wX × VBIX]
where w is the weight fraction (i.e., % ÷ 100) of each component of the blend. In using the above blending equation, it is necessary that all viscosities are determined at the same temperature, for example, 100 °C.
The third and final step is to determine the viscosity of the blend by using the invert of equation (1):
(3) v = (ee(VBI - 10.975) ÷ 14.534) − 0.8
where VBI is the Viscosity Blending Index of the blend and e is the transcendental number 2.71828, also known as Euler's number. We can get into that later. Just shoot me a PM. But to answer your question…27 or 28, depending on the ambient temperature.
By the way you might want to try foams on the rear and rubbers on the front...you’ll have a better weight balance.
Let me know if this helps,
Vyg
08-09-2011, 12:30 PM
#749
Junior Member
Join Date: Oct 2004
Location: , CA
Posts: 8
Likes: 0
Received 0 Likes
on
0 Posts
Thanks for the help Vyger! I don't have a 64pitch version but I do have a Mod05 27tooth. I'll use that! Again thanks!
Okay, joking aside. W.T.F. Vyg?!? Haha
Okay, joking aside. W.T.F. Vyg?!? Haha
08-09-2011, 12:57 PM
#750
Senior Member
Thread Starter
Join Date: Jun 2006
Location: Jackson, MS
Posts: 269
Likes: 0
Received 0 Likes
on
0 Posts
Sorry man, I didn't mean to loose you. Basically you're on the right track. But don't forget that formula above is only used for measuring the viscosity of a blended liquid or fluid, like silicone shock oil, or damper lube. You still have to calc the fluid viscosity within the shock or tube. You still have to look at the dynamic or absolute viscosity which is, the fluid's resistance to flow, which is caused by a shearing stress within a flowing fluid and between a flowing fluid and its container or your shock body or roll damper. The viscosity is usually the Greek symbol μ (mu) and is defined as the ratio of shearing stress τ (Greek letter tau) to the rate of change of velocity, v, which in mathematical terms can be expressed as dv/dy (where this is the derivative of the of the velocity with respect to the distance y). The derivative dv/dy is called the velocity gradient. This results in the important equation for fluid shear for viscous or laminar flow:
τ = μ•dv/dy
From the calc above you can determined that the dimensions of viscosity are force multiplied by time divided by length squared or FT/L² The units of viscosity in the English system and the SI system are:
lb•sec/ft² or Slug/ft•sec and N•s/m² or kg/m•s
Now you have to calculate the Dynamic Viscosity / Absolute Viscosity. The Pascal unit (Pa) specifies pressure, or stress = force per area. Pascals can be combined with time (seconds) to define dynamic viscosity.
μ = Pa•s
1.00 Pa•s = 10 Poise = 1000 Centipoise
Centipoise (cP) is commonly used to describe dynamic viscosity because water at a temperature of 20°C has a viscosity of 1.002 Centipoise.
REMEMBER! This value must be converted back to 1.002 x 10^-3 Pa•s for use in your calculations.
Kinematic Viscosity is pretty simple. The viscosity can be measured by timing the flow of a known volume of fluid from a viscosity measuring cup. The timings can be used in a formula to estimate the kinematic viscosity value of the fluid in Centistokes (cSt).
The motive force driving the fluid out of the shock body is the head of fluid, which is also contained within the equation that makes up the volume of the fluid. When the equations are rationalized the fluid head term is eliminated leaving the units of Kinematic viscosity as area / time.
v = m²/s
1.0 m²/s = 10000 Stokes = 1000000 Centistokes
Example:
Water at a temperature of 20°C has a viscosity of 1.004 x 10^-6 m²/s
This evaluates to 1.004000 Centistokes.
This value must be converted back to 1.004 x 10^-6 m²/s for use in calculations.
The kinematic viscosity can also be determined by dividing the dynamic viscosity by the fluid density.
I hope this helps clarify things.
Vyg