


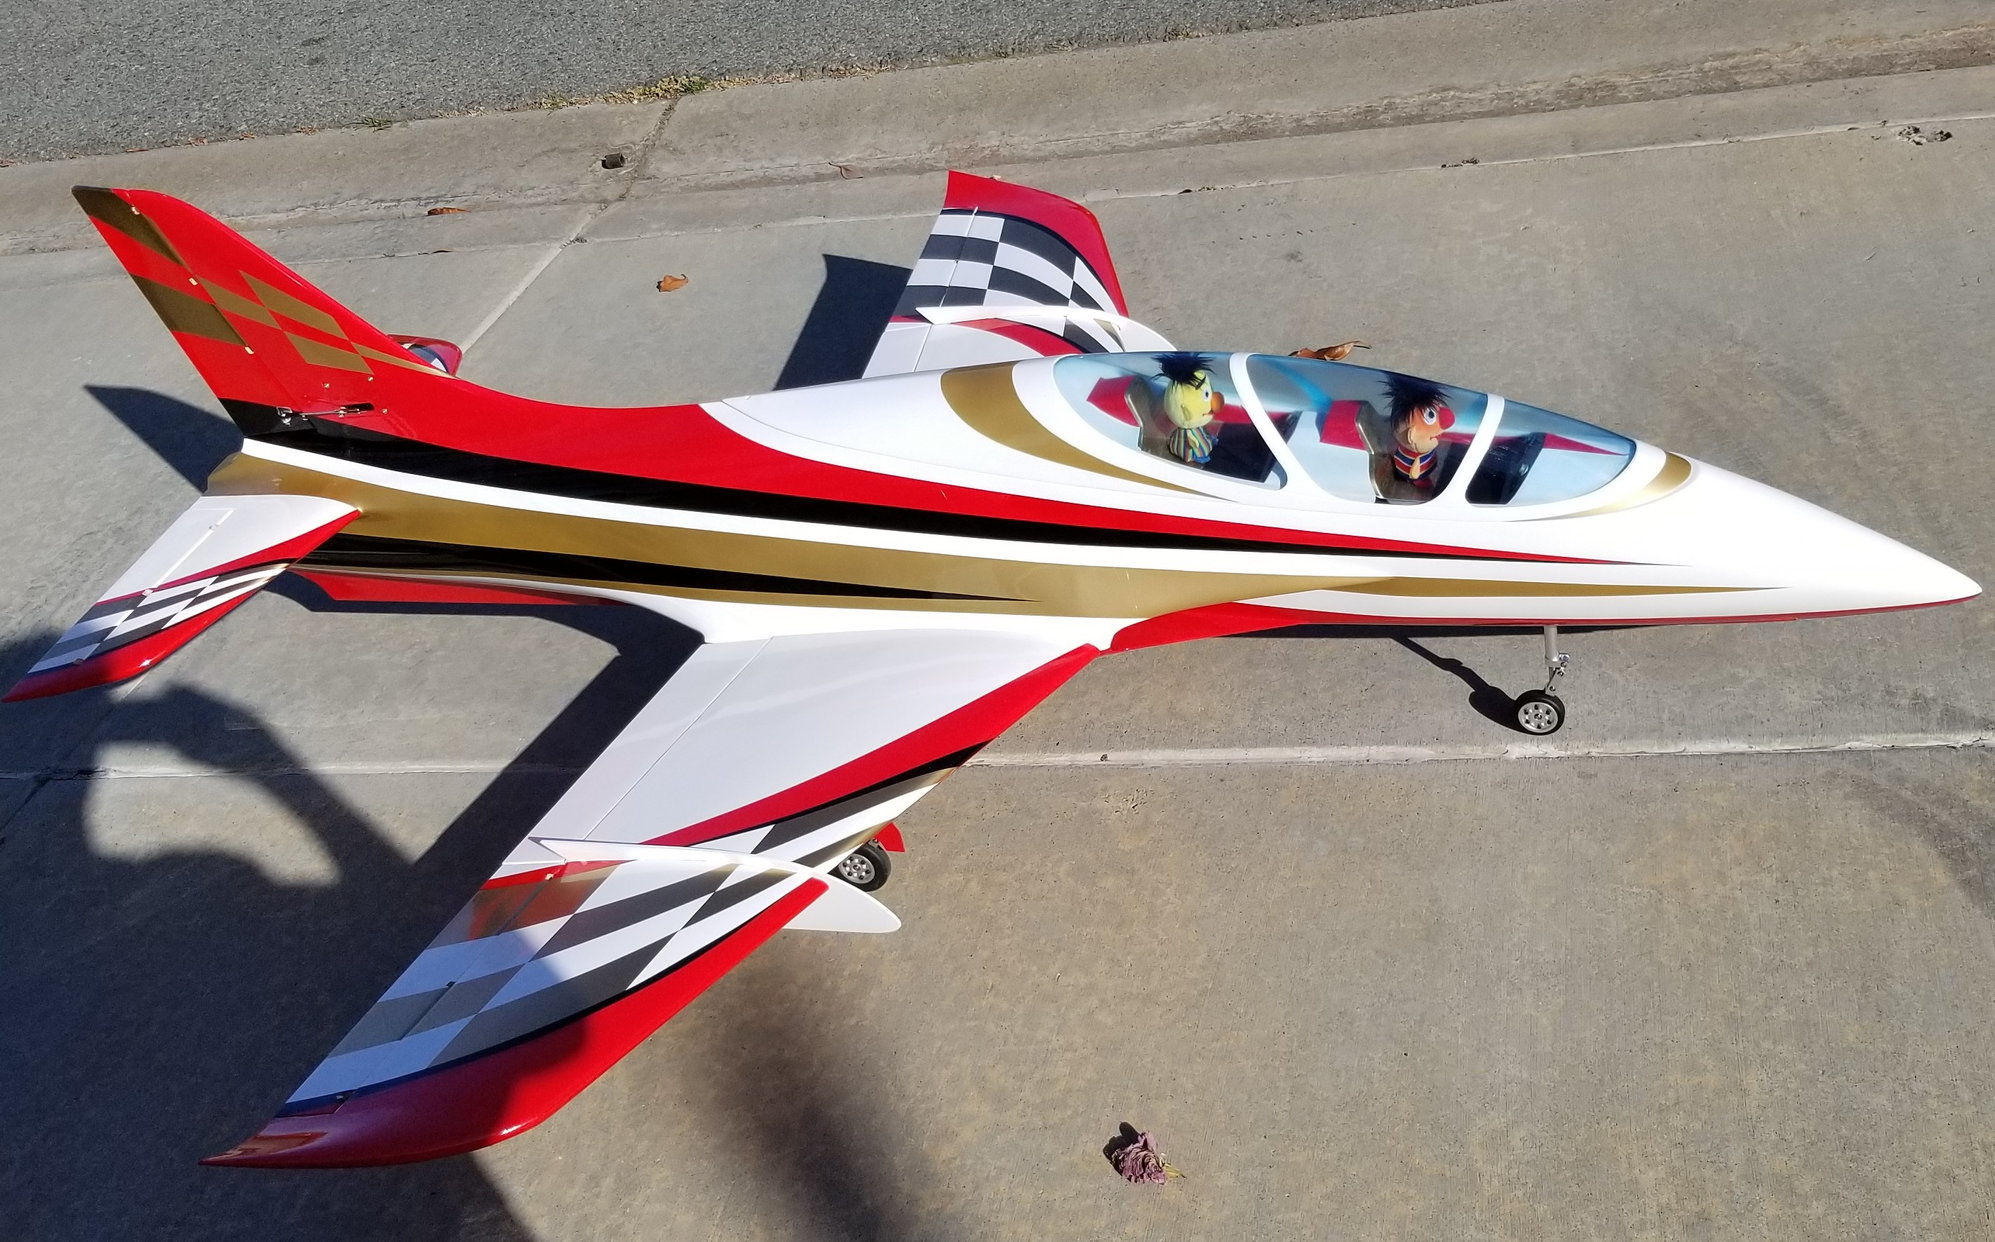
new smaller (composite) Sebart Avanti XS
 09-06-2019, 04:27 PM
#126

Join Date: Jun 2004
Location: Alice Springs, AUSTRALIA
Posts: 191
Likes: 0
Received 0 Likes
on
0 Posts

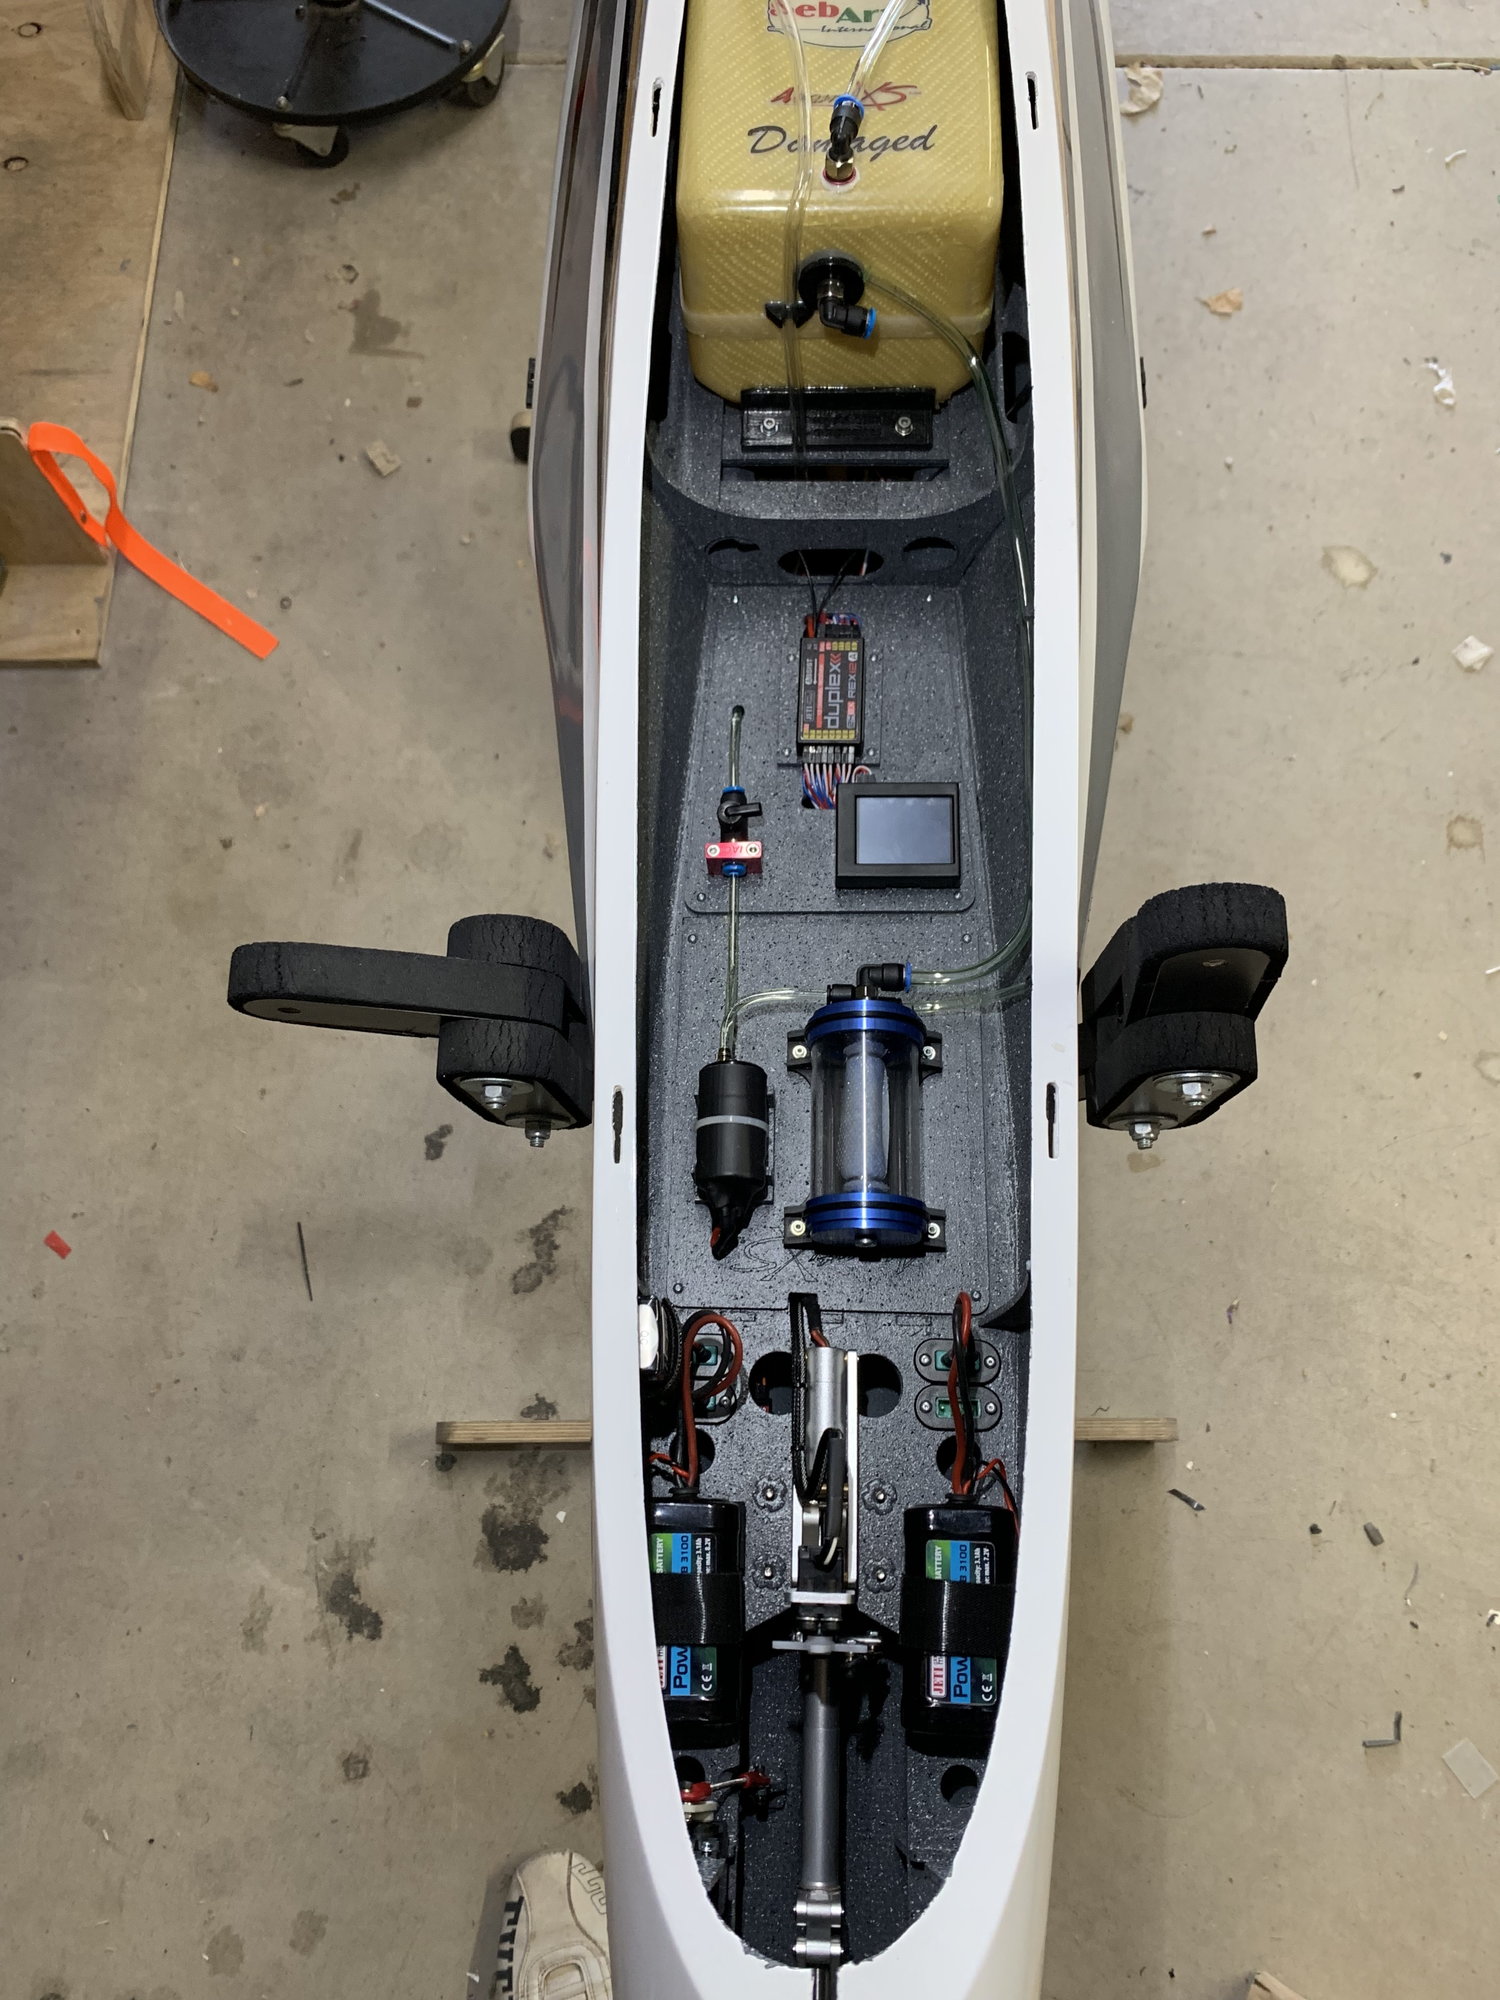
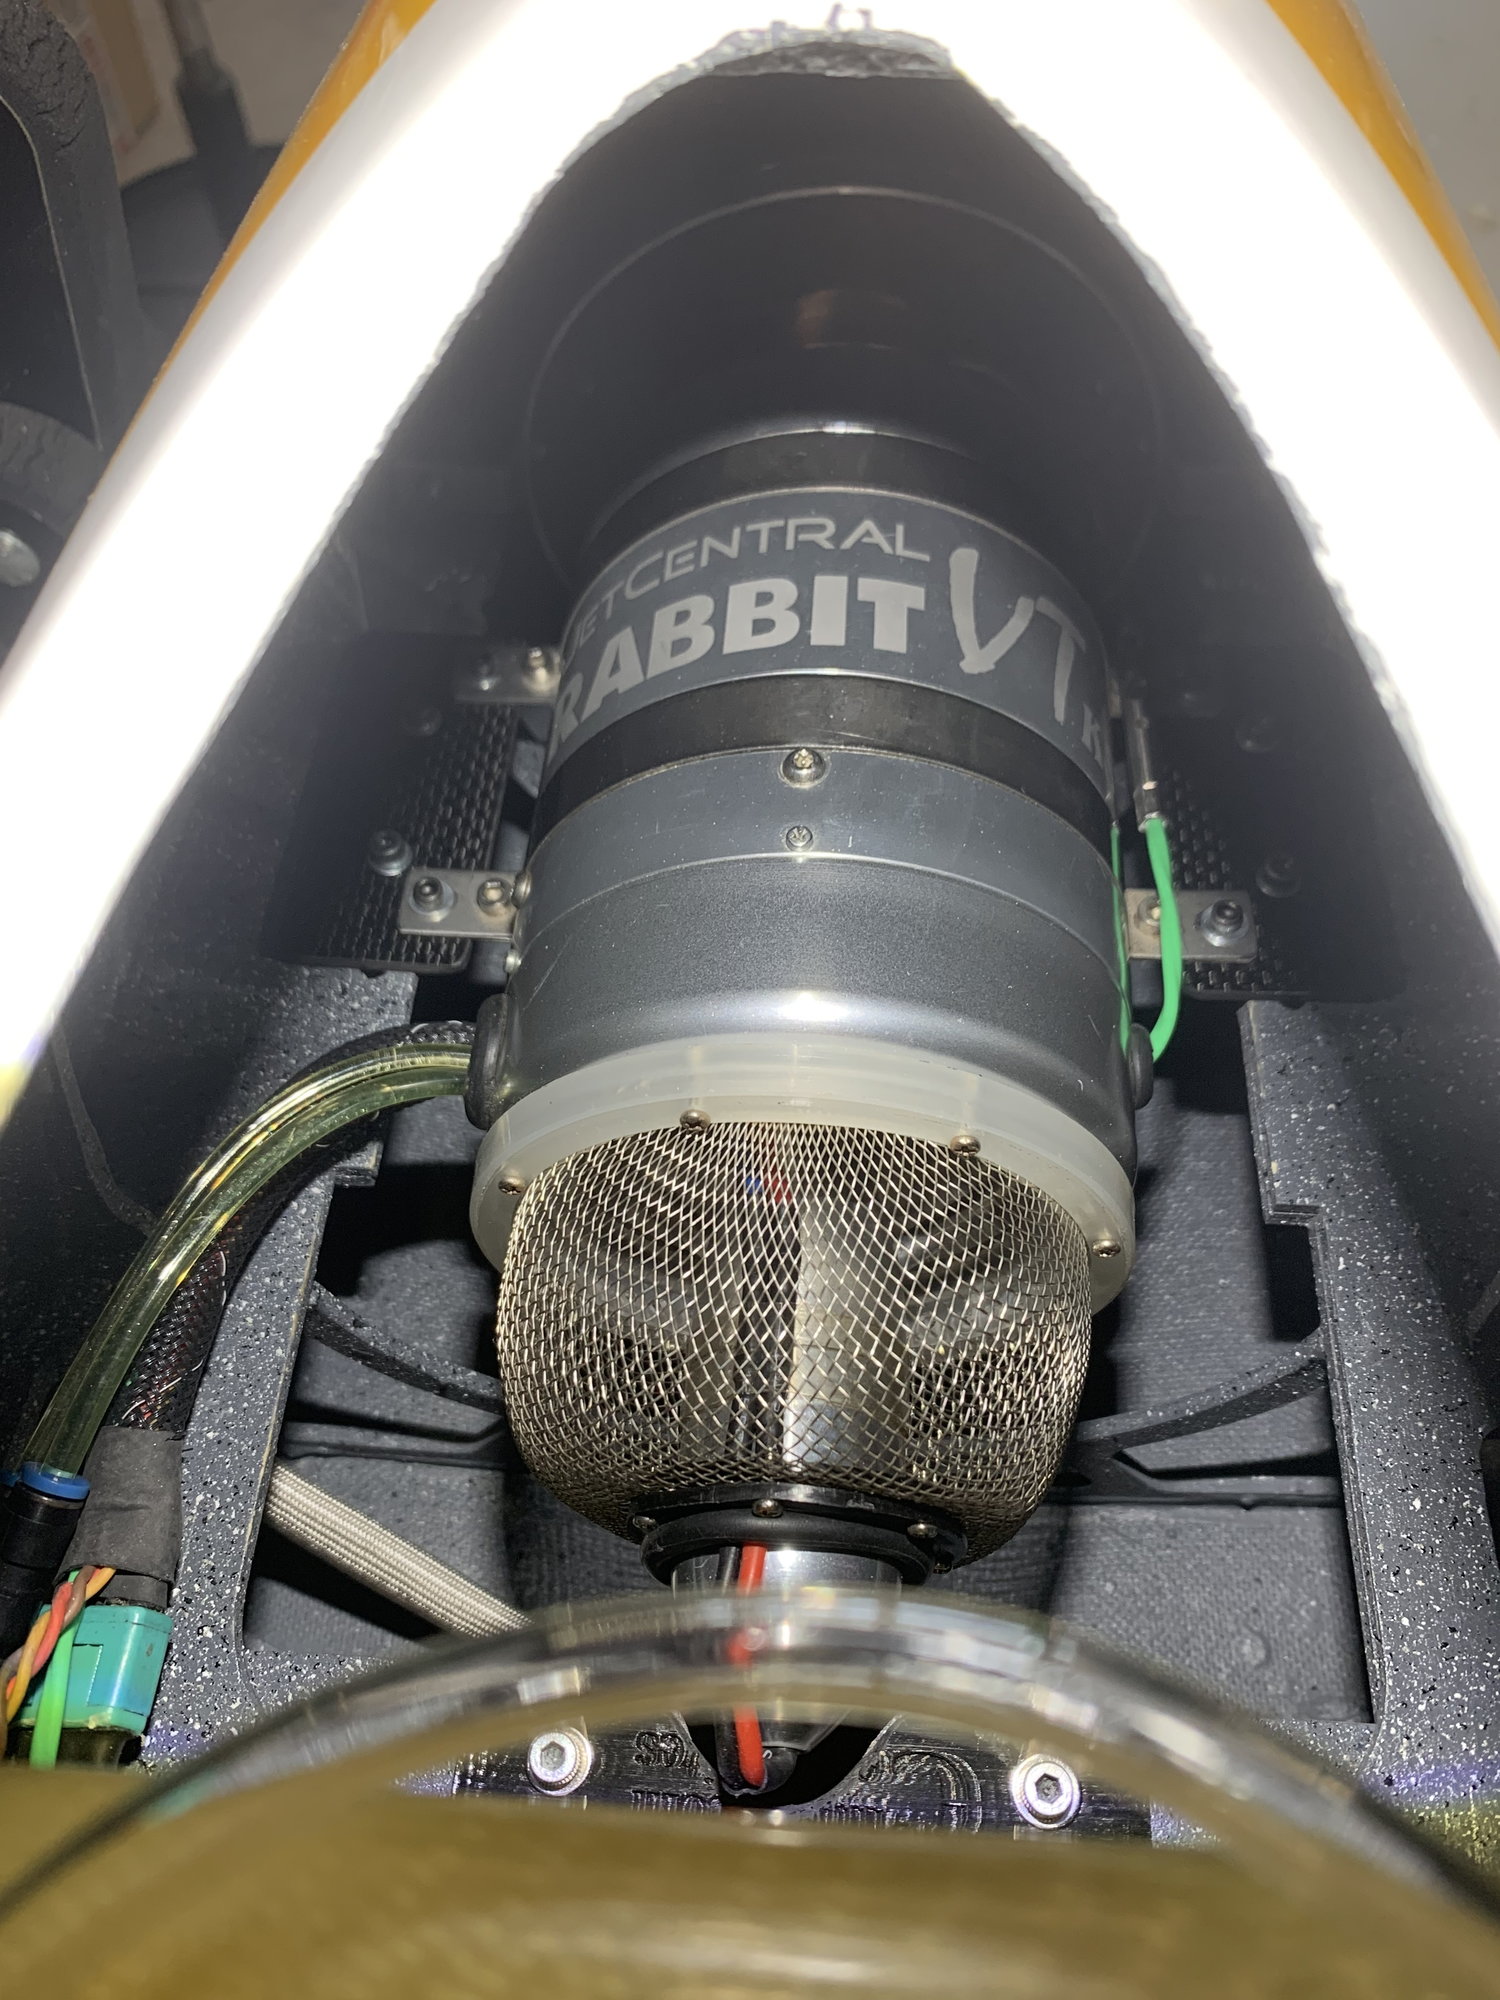
I�ve had 3 flights so far on mine and it�s such an easy flying jet with its light wing loading, it�s nice to have a lie stress model. I agree it would make an excellent trainer/first jet. I moved my fuel tank and turbine back a little however I�ll look at shifting the turbine back even further to get the tank on the CG as I don�t like the shift during flight. Rabbit VT90 KS in mine and it�s a great match. Over Christmas I�ll strip and glass and paint the wings/hori stab.
 09-16-2019, 11:07 AM
#127
Just a little feedback from my end after 7 flights:
Easier to land than my foam Avanti!
As this is my first yet, and I am not a very frequent flyer, I can confirm this is a perfect first jet for anybody that can put an ARF together.. with a few little tweaks and improvements (mainly servo mounts, which are a disaster in my opinion, and the glueing on the fuselage needs a little extra glue here and there..)
On maiden, i forgot my timer, ended up flying for 10 minutes, with 12 minutes turbine run time on a M100.. Thanks Carlos at CMjets for that little extra tank capacity :-).. Hopper was half full, tank completely empty :-D
Electron gear is perfect. For those that find the electron gear too soft in the main springs, (which I found) just ask electron for stiffer springs. They have three sizes available and i found the 1.8mm (medium) springs perfect, which are now mounted as standard in the Electron combo.
Looking forward to flying again next weekend!
11-09-2019, 08:34 AM
#128

Join Date: Nov 2006
Location: USA, USA
Posts: 148
Likes: 0
Received 0 Likes
on
0 Posts
A little late with catching upon the thread, but I finally decided to get me one! I posted a -wanted- ad, but if anyone knows a modellbau willing to ship to the USA directly I'll be glad to know it...
My wanted ad is for a used one, here in the USA, any condition, but if stripped the better !
My wanted ad is for a used one, here in the USA, any condition, but if stripped the better !
11-09-2019, 08:49 AM
#129

I received my Avanti XS from Lindinger. It arrived to my house in Houston at approx three weeks. Shipping cost was low at approx $85. If you sign up you get periodic emails with specials. I was able to get a 10% discount while the red one was still in stock. This was the third shipment I received from Lindinger. I am very pleased with their service.
11-09-2019, 08:40 PM
#130
Join Date: Nov 2006
Location: USA, USA
Posts: 148
Likes: 0
Received 0 Likes
on
0 Posts
swk550; I have had only nice experiences with modellbaus Lindinger and Schweighoffer...quick shipping, reasonable costs... I was trying Lindinger today and, although in stock, their system told they do not ship to my address...but I sent an email inquiring anyway...I had about 4 large boxes shipped from them (both) before...so I know is shippable....I found two possible used ones,,,but one I think is a scam...and one legit...also Sebart USA replied to my question...not bad, but still would like to save a bit of cash on a used one...I can fix anything wrong on any plane...(lucky me 
03-27-2020, 12:39 PM
#132
I've been slowly putting mine together recently. Beautiful kit!
Regarding the pushrods on ailerons and flaps - I don't see how this fits well. The hardware provided with the kit has long bolts and ball links on both the control surface end and the servo end. That entire ball link assembly has to remain clear of the servo slot (i.e, at full deflection, it cannot dip inside the wing, because the ball link assembly is much bigger than the width of the servo slot). So then you need a really long control arm on the servo. It doesn't help that the servo is sunk a few mm deep inside the wing, instead of being flush against the inner surface, which adds even more required length to the servo arm. And with such a long servo control arm, the travel would be way too much for the intended throws. It seems the only way to use the HW provided with the kit is the program low travel on the servo, which is always undesirable. I am thinking of using the provided ball links on the control surface side, but using something like a normal clevis on the servo side. Did anybody else run into this problem, or have a better solution?
Regarding the pushrods on ailerons and flaps - I don't see how this fits well. The hardware provided with the kit has long bolts and ball links on both the control surface end and the servo end. That entire ball link assembly has to remain clear of the servo slot (i.e, at full deflection, it cannot dip inside the wing, because the ball link assembly is much bigger than the width of the servo slot). So then you need a really long control arm on the servo. It doesn't help that the servo is sunk a few mm deep inside the wing, instead of being flush against the inner surface, which adds even more required length to the servo arm. And with such a long servo control arm, the travel would be way too much for the intended throws. It seems the only way to use the HW provided with the kit is the program low travel on the servo, which is always undesirable. I am thinking of using the provided ball links on the control surface side, but using something like a normal clevis on the servo side. Did anybody else run into this problem, or have a better solution?
The following users liked this post:
gringotuerto (05-10-2020)
03-28-2020, 05:43 AM
#134
My Feedback: (8)
I received my Avanti XS from Lindinger. It arrived to my house in Houston at approx three weeks. Shipping cost was low at approx $85. If you sign up you get periodic emails with specials. I was able to get a 10% discount while the red one was still in stock. This was the third shipment I received from Lindinger. I am very pleased with their service.
I also have been very pleased with Lindinger from Austria. I have ordered 2 jets from them so far. I found their shipping to be incredibly reasonable. Just remember, when looking at prices on their website, the prices include VAT tax which, for U.S. customers, is removed at checkout.
05-10-2020, 07:15 AM
#135
I got mine from Neil at SebartUSA (sebartusa.com).
Anyway, I am just putting the finishing touches on this, and notice that the recommended CG in the manual is 23cm, which is a shade over 9inches. When I measure that out on the model (from leading edge where it joins to the fuse), it seems to me this is slightly behind where the main strut hits the fuse. It is approximately aligned with the aft edge of the main strut. With trailing link, the actual wheel axle is some distance aft of the strut, and so might be a tiny bit aft of the CG, which is what matters. But this seems to be cutting it very close. Did you guys balance somewhere between the main strut and the wheel axle?
Also I thought I would post my solution to the wing attachment. Like many others, I was not happy with the wood screw provided in the kit, because it seems the hole would wear out with many uses. I found these very small threaded inserts on Amazon:
(I tried to post the URL, but I get an error message saying I am not allowed to post a URL. OK, so let me just paste the Amazon item description:
"uxcell M3 x 4mm x 4.3mm Brass Knurled Threaded Round Insert Embedded Nuts 100PCS")
With the wings attached, I drilled m3 holes (pushing an m3 bolt into the first hole to ensure that the second one was aligned). When I was convinced I could shove an m3 bolt into both holes with the wing tube in place, I took it all apart. Then I took the wing tube over to my drill press, and put an m3 bit in the chuck, and put it through the hole in the wing tube, to position the tube. I clamped the wing tube in that position, so now the drill chuck was perfectly aligned with the m3 hole. Then I removed the m3 bit and inserted an m4 bit, and drilled about halfway into the wing tube. In this way I get a hole that is m3 for half the tube, and m4 for the other half, the two sections exactly aligned. Then I hardened the holes with CA. Then I took and m3 bolt with a washer, and used it to draw the insert into the m4 hole until it got stuck (i.e., until it encountered the m3 portion of the hole and couldn't sink any farther). So this way, I have an m3 hole with a metal insert, which I think should last a lot longer. And the insert should be pretty solidly in there - in other words, I can't over-tighten and pull out the insert when I'm attaching the wings. One note -- make sure you put the m4 counter-hole on the same side of the tube on both ends! Otherwise you will be sad. Also, make sure the wing tube is perfectly centered when you start drilling - there is not much extra length on each end. The m3 hole is very close to the end of the tube, on both ends.
06-14-2020, 01:06 PM
#138
I haven't flown yet, but might next weekend. I'm going to balance it a little forward of the manual, because I always do for first flights. Also my field is a little bumpy, and I don't want it to be flopping nose high at the slightest bump on takeoff. But I'll do an inverted CG check in the air, and assuming I get the plane back, make adjustments from there.
 12-01-2020, 06:56 PM
#141
I've been doing a long slow build of this jet over the last few months, I had a new Jets Munt 70MXBL to go in it but have now got the new Xicoy 95 on the way. I'm due to receive it the second week of December, and as its the same weight and size as the 70 it should be a great combo with this jet.
I have to say the build instructions are lacking in a few places, such as how the horizontal stabs are fixed in place, after looking at the various components and feeling inside the fuse to check that there was a blind nut taped in place I realized how it all went together. I just hope it all stays in place as once the exhaust tube is in place it may not be too easy to access. Speaking of which I'd prefer it if there was a hatch under the plane to assist with installation/access to turbine and tube. But overall a really beautiful plane and excellent finish.
I have to say the build instructions are lacking in a few places, such as how the horizontal stabs are fixed in place, after looking at the various components and feeling inside the fuse to check that there was a blind nut taped in place I realized how it all went together. I just hope it all stays in place as once the exhaust tube is in place it may not be too easy to access. Speaking of which I'd prefer it if there was a hatch under the plane to assist with installation/access to turbine and tube. But overall a really beautiful plane and excellent finish.
The following users liked this post:
gringotuerto (12-01-2020)
12-02-2020, 12:54 PM
#142
[QUOTE=gringotuerto;12614259]Got rained out last week, but I finally flew today. All went well, it flies very easily. It does land faster than the Freewing foam Avanti of course!
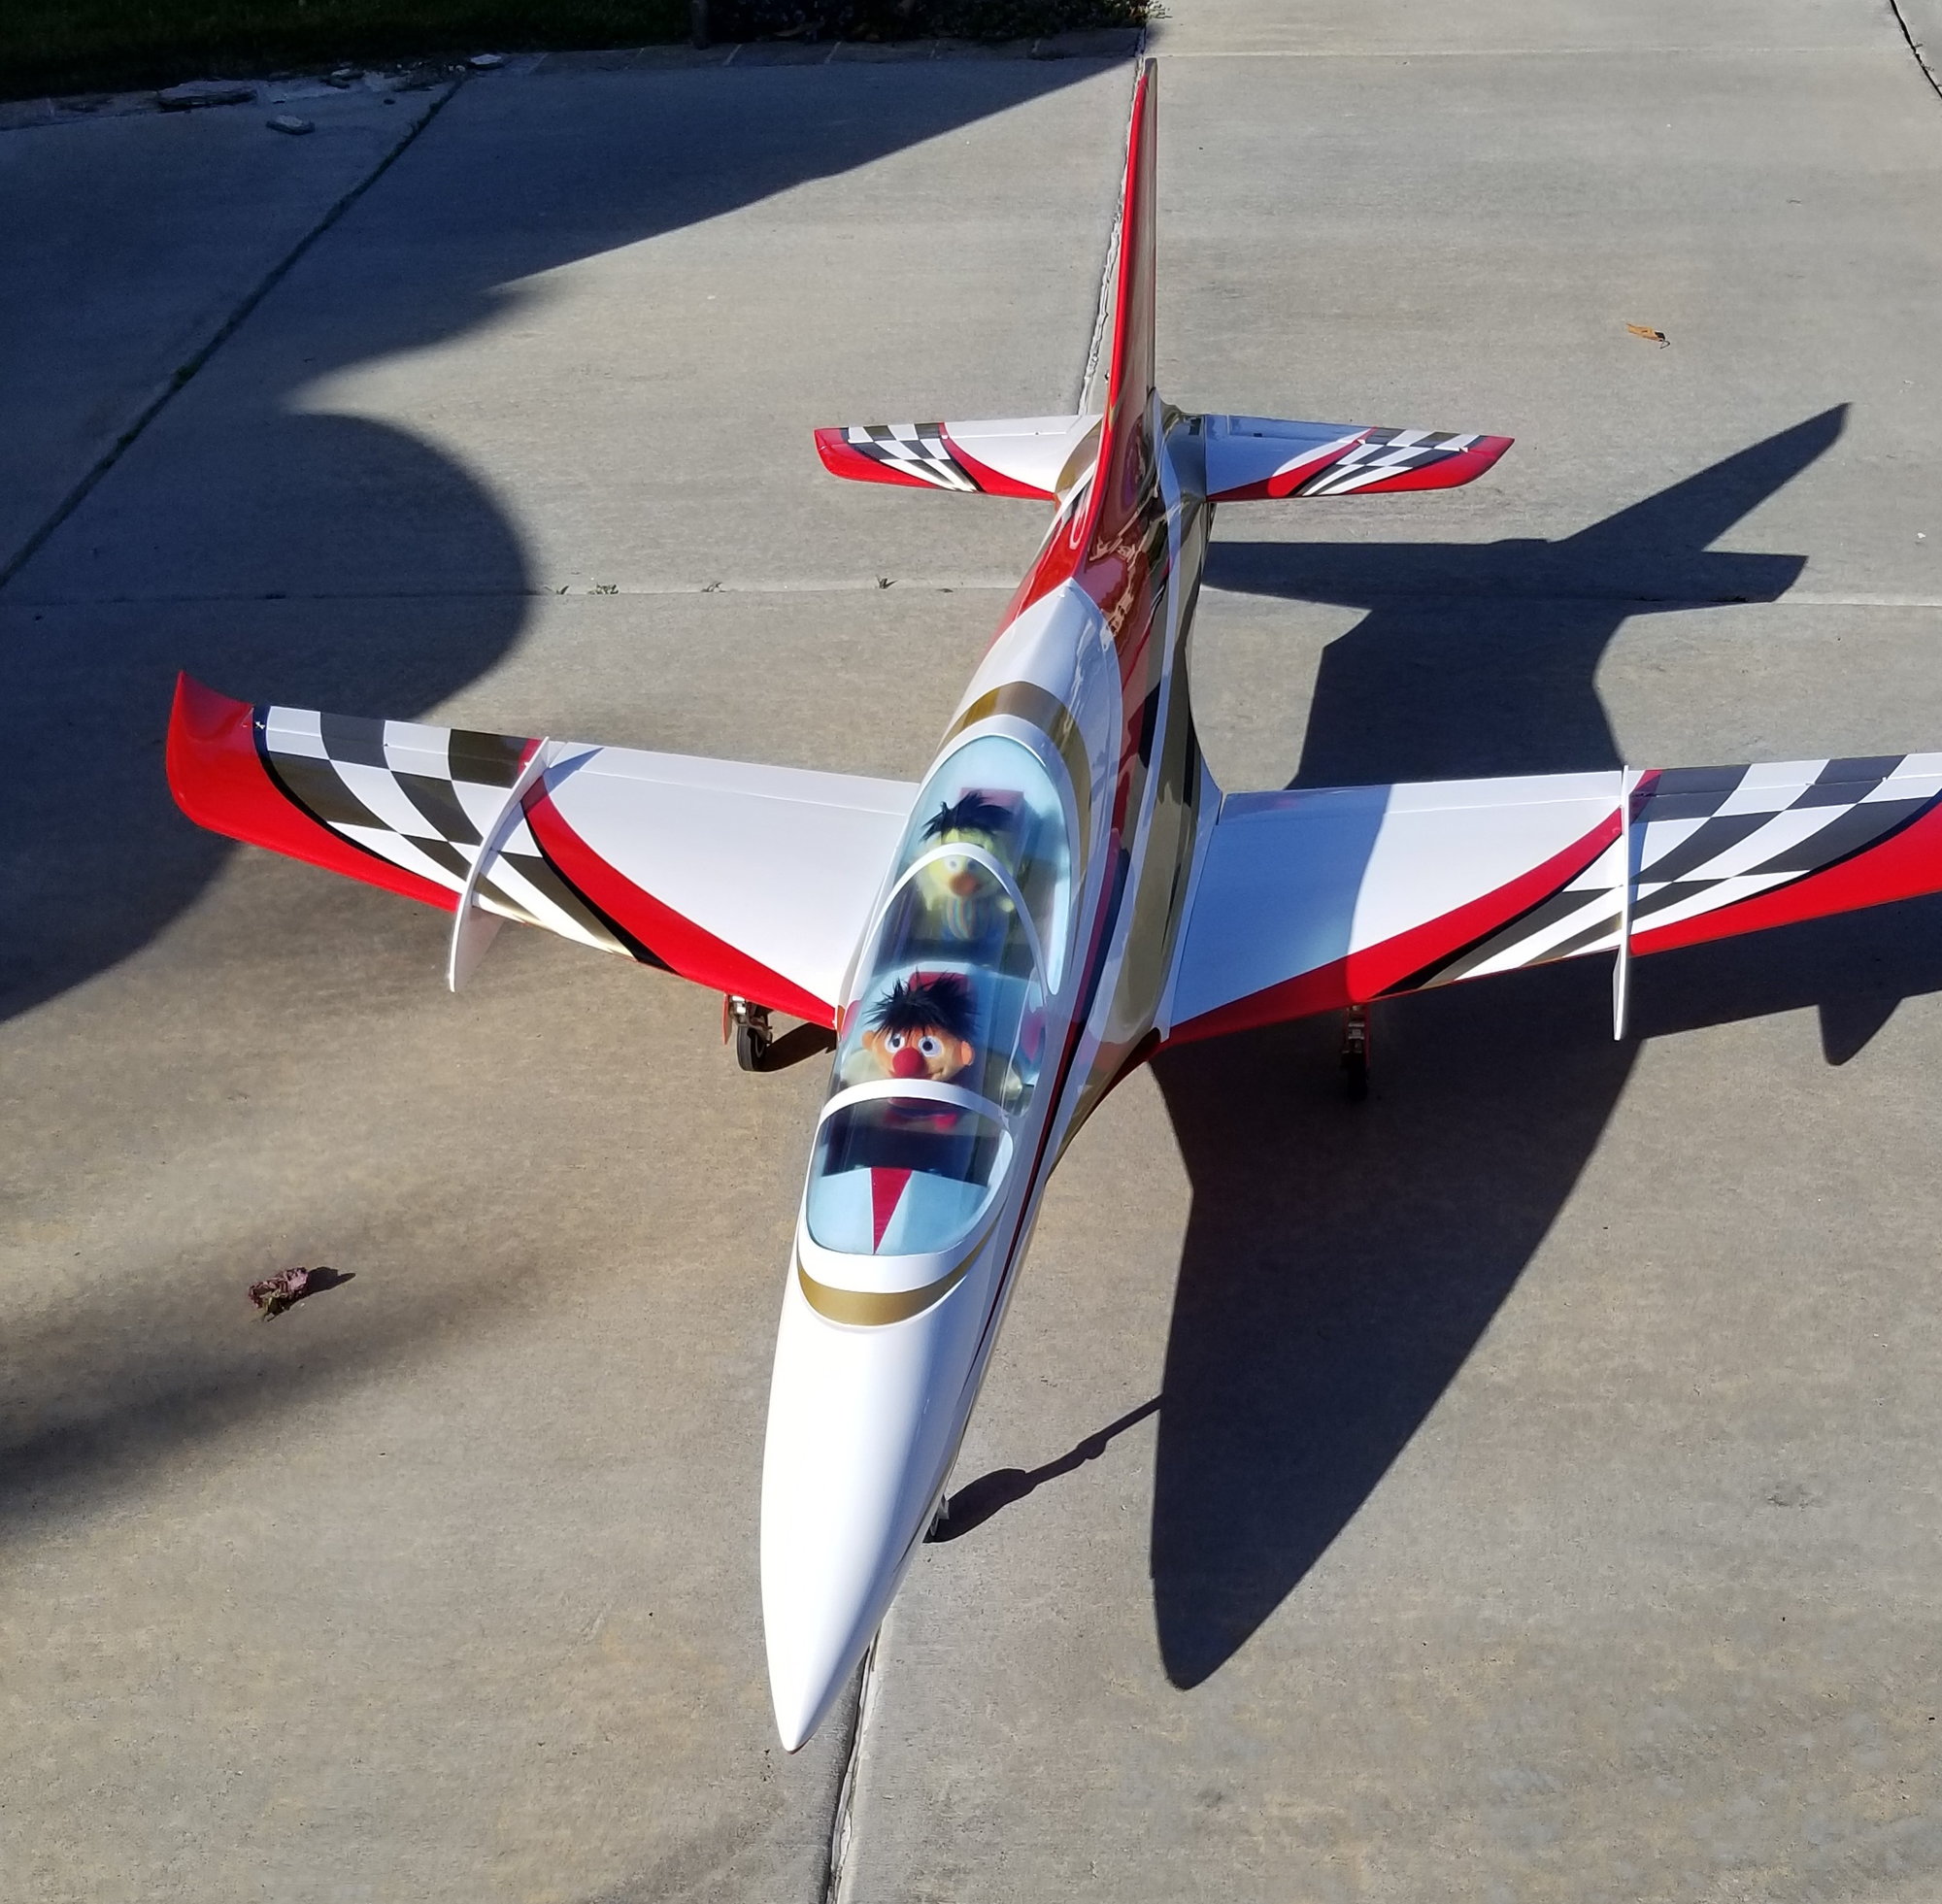
 [/QUOTE Hey Gringotuerto Was your CG as per the manual? If it lands fast that is usually a sign of being a tad nose heavy, which is fine, but surprising given how far back the recommended CG is. Thanks in advance for your answer, BTW how did Bert & Ernie enjoy the ride?
")
[/QUOTE Hey Gringotuerto Was your CG as per the manual? If it lands fast that is usually a sign of being a tad nose heavy, which is fine, but surprising given how far back the recommended CG is. Thanks in advance for your answer, BTW how did Bert & Ernie enjoy the ride?
12-02-2020, 02:22 PM
#143
Hey Gringotuerto Was your CG as per the manual? If it lands fast that is usually a sign of being a tad nose heavy, which is fine, but surprising given how far back the recommended CG is. Thanks in advance for your answer, BTW how did Bert & Ernie enjoy the ride?
 02-15-2021, 07:43 AM
#146
My Feedback: (1)
Hi,
I love the Avanti and was thinking to get this model. I've talked to a fellow jet flyer that had two of the early ones. Both of his suffered catastrophic spar/wing failures. And I know he is a good flyer.
Has Sebart fixed this? Or has anyone else had these issues?
I love the Avanti and was thinking to get this model. I've talked to a fellow jet flyer that had two of the early ones. Both of his suffered catastrophic spar/wing failures. And I know he is a good flyer.
Has Sebart fixed this? Or has anyone else had these issues?
02-16-2021, 06:59 AM
#147
I haven't had any trouble, but I fly pretty gently. I hadn't heard of this being a problem in reading and watching videos about this plane, but there is limited material available because it isn't a super common plane. Anyway, most of the time a "good flyer" is much harder on an airframe than an intermediate pilot.
02-16-2021, 10:12 AM
#148

This is from the 2M Avanti S manual but since they are similar in design it may apply to the Avanti XS as well...
From the manual; "This plane is a compromise between aerobatics jet and 3D jet, it is NOT a pylon racer or speed jet and it is built with a very light structure and for this reason we hardly recommend:
→ Do NOT fly your airplane at to high speeds, because this may cause structural failures or flutter due to the extremely large control surfaces. The plane has been tested until 250 km/h, flying the plane over this speed is not recommendable"