


TopRCModel FW-190
 08-23-2023, 01:25 PM
#1626

Added a decal to each of the main wheels and terminated the wiring for the elevator at the rear, still to do the front of those cables.
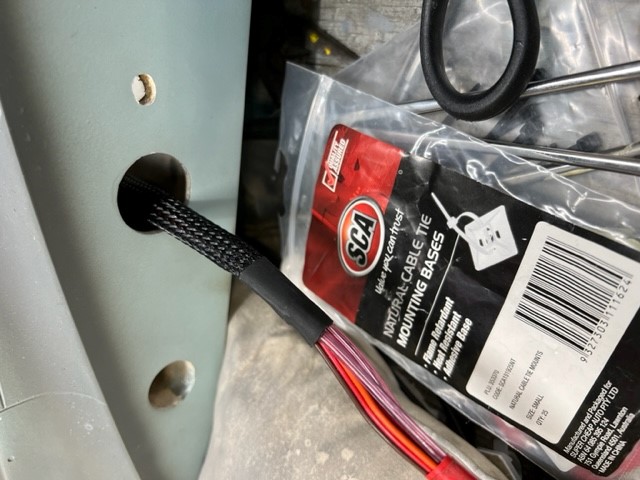
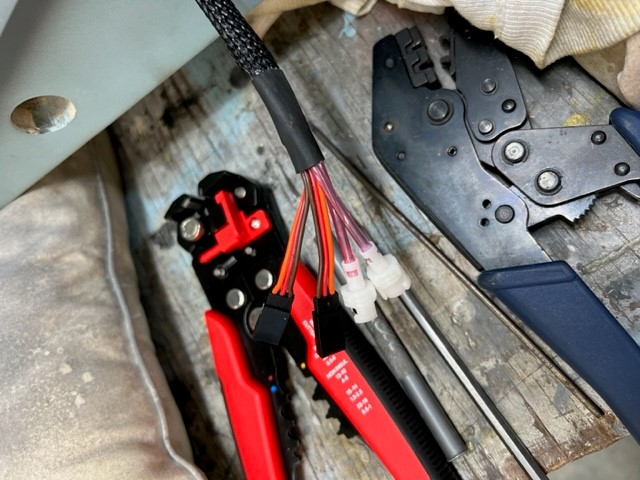
Of course you need the correct tools, wire strippers that strip to correct depth and crimpers.
We had similar but much better tools when I was a techo in the RAAF.

Critical to cut the ends perfectly square

Voila!

Of course you need the correct tools, wire strippers that strip to correct depth and crimpers.
We had similar but much better tools when I was a techo in the RAAF.
Critical to cut the ends perfectly square
Voila!
 08-26-2023, 01:43 AM
#1627
Productive day in the shed once I got myself moving, coffee to drink, washing to do as per my Saturday morning routine.
Engine refitted, tank and plumbing done. Holes in side of cowl for access to the carby needles done. I have guide tubes fitted for that.
cheers big ears
me
Fitted the cowl for ****s and giggles to see how it looks.

Getting the guide tubes location sorted


Marked out on cowl

Holes done

Showing inside the cowl

what a mess!!

Lets get this bad boy mounted. Saito FG90-R3

Nuts are on to seat the 8mm steel plate properly, then they come off to mount the engine.

Engine mounted, need to sort out wiring yet and make a heat shield for the ignition module

Tank is in and plumbing done, forgot to take a photo of that. Shelf with the powerbox will come out tomorrow so I can get stuck into the wiring.

Engine refitted, tank and plumbing done. Holes in side of cowl for access to the carby needles done. I have guide tubes fitted for that.
cheers big ears
me
Fitted the cowl for ****s and giggles to see how it looks.
Getting the guide tubes location sorted
Marked out on cowl
Holes done
Showing inside the cowl
what a mess!!
Lets get this bad boy mounted. Saito FG90-R3
Nuts are on to seat the 8mm steel plate properly, then they come off to mount the engine.
Engine mounted, need to sort out wiring yet and make a heat shield for the ignition module
Tank is in and plumbing done, forgot to take a photo of that. Shelf with the powerbox will come out tomorrow so I can get stuck into the wiring.
08-27-2023, 10:23 PM
#1628
Photo to show tank install, 2 line system with a t-piece to fill and carb.
Started running the airlines. I always seem to get spaghetti!!
Got a sheet of nice thin aluminum that I will make a heat shied for the ignition module. I'll put some muffler heat insulating bandage on as well.
Not sure what to secure that with? Some sort of adhesive that can tolerate heat. Any ideas?
Tired after work so nothing further to report.
No flying Sunday as it was blowing a gale cross strip which is a shame as I had the Typhoon to fly, no pun!


Tank install

Airlines, check out his boots If the servo fails he can push the rudder himself!

Started running the airlines. I always seem to get spaghetti!!
Got a sheet of nice thin aluminum that I will make a heat shied for the ignition module. I'll put some muffler heat insulating bandage on as well.
Not sure what to secure that with? Some sort of adhesive that can tolerate heat. Any ideas?
Tired after work so nothing further to report.
No flying Sunday as it was blowing a gale cross strip which is a shame as I had the Typhoon to fly, no pun!
Tank install
Airlines, check out his boots
09-03-2023, 12:22 AM
#1629
Big day in the shed Saturday 10 hrs doing wiring. Due to me stupidly fitting a great planes 24 oz tank instead of a dubro I can't remove the tank without removing the rear former the powerbox mounts to. That will be a lot of work as a lot of wiring has to then be undone. 
Anyway I am leaving it for now. When it has to come out I will fit a tank that can be removed simply by remove gear servo then sliding it out!!
A lot of wiring is done but have run out of hitec connectors and the crimp pins. Will have to order some more. Also needed to make up an adaptor for the kill switch to connect it to the ignition battery which has a XT-60, luckily a mate in my club had some so dropped into his on way home and he gave me 4 pair. Nice!!
4 more hours spent this afternoon but not all on the FW-190, did some work on the BH Typhoon, need to sort out the axles to prevent them coming loose and causing massive tow out. Last landing it was like the brakes got slammed on, up on its nose, balanced on its nose for several seconds then slowly over on its tail. No damage and the expensive biela 3 blade prop is ok.
Need to get some M5 50mm bolts, nuts and washers and hopefully I can sort that problem.
Short Youtube of pilot's head that is slaved to rudder.
Wiring progress and working out how to program the powerbox
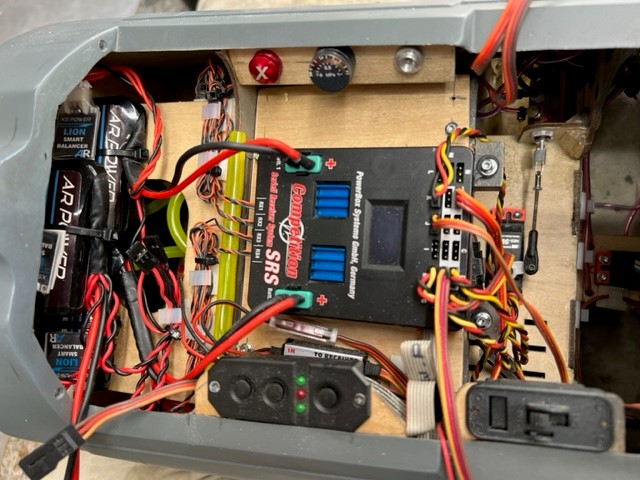
More wiring. The long look has to be shortened then a new connector terminated, I'm out of them. Other lead only has one pin terminated.
Right hand loom started out of the fuz side.
Right hand loom completed
Telemetry stuff to be fitted someplace, its times like this I wish I had a more upto date Tx such as a Spectrum ix20 which has the telemetry already. On the upside this iiSRI system allows me to have 3 x cylinder head temps, RPM, altitude, speed etc via a GPS.
Later lurkers
me


Anyway I am leaving it for now. When it has to come out I will fit a tank that can be removed simply by remove gear servo then sliding it out!!
A lot of wiring is done but have run out of hitec connectors and the crimp pins. Will have to order some more. Also needed to make up an adaptor for the kill switch to connect it to the ignition battery which has a XT-60, luckily a mate in my club had some so dropped into his on way home and he gave me 4 pair. Nice!!
4 more hours spent this afternoon but not all on the FW-190, did some work on the BH Typhoon, need to sort out the axles to prevent them coming loose and causing massive tow out. Last landing it was like the brakes got slammed on, up on its nose, balanced on its nose for several seconds then slowly over on its tail. No damage and the expensive biela 3 blade prop is ok.
Need to get some M5 50mm bolts, nuts and washers and hopefully I can sort that problem.
Short Youtube of pilot's head that is slaved to rudder.
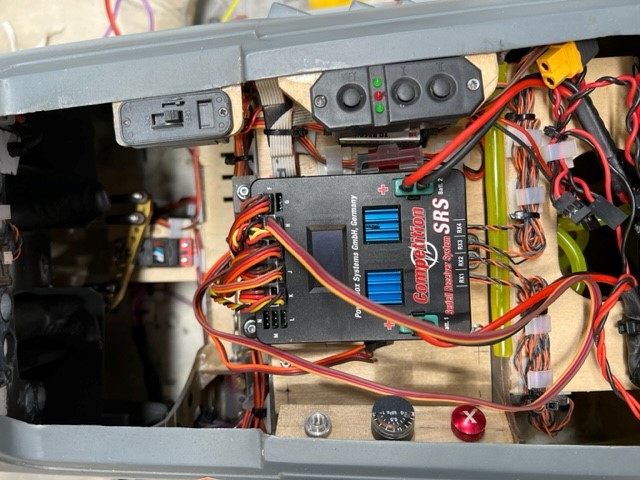
Wiring progress and working out how to program the powerbox
More wiring. The long look has to be shortened then a new connector terminated, I'm out of them. Other lead only has one pin terminated.
Right hand loom started out of the fuz side.
Right hand loom completed
Telemetry stuff to be fitted someplace, its times like this I wish I had a more upto date Tx such as a Spectrum ix20 which has the telemetry already. On the upside this iiSRI system allows me to have 3 x cylinder head temps, RPM, altitude, speed etc via a GPS.
Later lurkers
me
The following users liked this post:
pmosf (09-03-2023)
09-06-2023, 02:36 PM
#1631
Back on wiring, my good mate Dennis came through with some connectors and pins he had and wasn't going to use. Did a couple of hours fiddling in the shed after work and got the 2 cables done near the power box and the left side wing loom done as well.
Next jobs will be cables from ignition - tacho and input lead then the 3 cylinder head temp thermocouple sensors.
From there I need to install the telemetry stuff.
Set throws
CG & weight
ground runs
then ....


Next jobs will be cables from ignition - tacho and input lead then the 3 cylinder head temp thermocouple sensors.
From there I need to install the telemetry stuff.
Set throws
CG & weight
ground runs
then ....
09-07-2023, 02:37 PM
#1632
Felt like doing some of the engine cabling last night after work. Couple of hours work.
Drilled a 15mm hole in the firewall to run cables through into the inside and have a rubber grommet that will be glued in there with silicon sealant.
All ignition spark plug leads have spiral conduit on them and cable tied to stop them flapping.
Instead of making a heat shield out of aluminium (al oooom in ummm for the yanks ) I used some left over muffler heat bandage I had from when I put the fokker together.
Cable tied in place and will do the job. Simples!

Next job is the 3 x cylinder head thermocouple probes then will bundle all leads into some spiral wrap and pass through the grommet.
It's progress!
I'll find a home for the telemetry stuff after work.

Rubber grommet


entry point into the fuz for the cables coming from engine bay. Those red/black wires do not pass through there, they go to the battery balancer cct.

Later later lurkers
me


Drilled a 15mm hole in the firewall to run cables through into the inside and have a rubber grommet that will be glued in there with silicon sealant.
All ignition spark plug leads have spiral conduit on them and cable tied to stop them flapping.
Instead of making a heat shield out of aluminium (al oooom in ummm for the yanks
Cable tied in place and will do the job. Simples!
Next job is the 3 x cylinder head thermocouple probes then will bundle all leads into some spiral wrap and pass through the grommet.
It's progress!
I'll find a home for the telemetry stuff after work.
Rubber grommet
entry point into the fuz for the cables coming from engine bay. Those red/black wires do not pass through there, they go to the battery balancer cct.
Later later lurkers
me
The following 2 users liked this post by planenutzz:
gixer47 (09-07-2023),
rgoinbroke (09-07-2023)
09-07-2023, 02:53 PM
#1633
I wish I was as far along as you! Looking forward to your finished all up weight with the Saito. And whether or not you need lead up front. I have a 5 cylinder UMS radial going into mine
09-07-2023, 03:00 PM
#1634
Yeah I'm also keen to see what my AUW turns out to be and how much nose weight is required.
I should be able to do that before too much longer.
09-08-2023, 10:02 PM
#1638
Some electrics are ok, elektron are supposed to be very good. I have Sierras on mine as well.
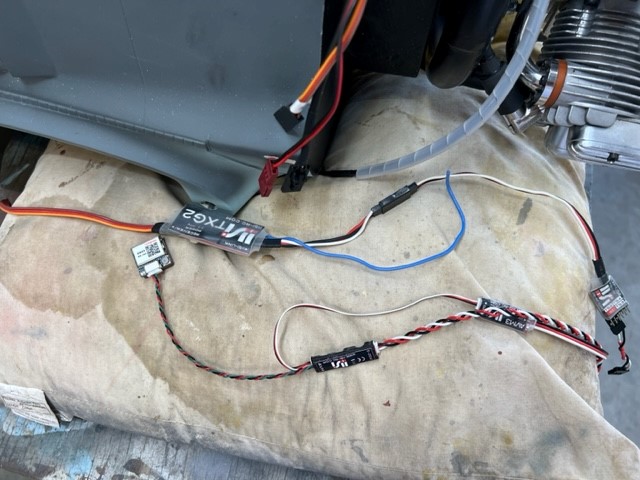
So the FW-190, been a frustrating day. The iisi cockpit v2 unit will not power up. It has not been turned on for over 12 months and was dead flat, put it on USB charger and it eventually came to the charge process and charged it self was sliding bar graph and 100% full indicated.
But would not turn on, tried reset and all I get is a white screen. Occasionally I get SD card error, pulled and reseated that. Tried another micro SD card with same result.
Have emailed iisi to see if they can assist. Still under warranty so may even get a new one sent.
The devices need to be paired to the iisi Tx unit TXG2 and another couple of modules. As I need the cockpit v2 working to do the pairing there is no point doing final install of the gadgets and associated wiring.
Anyway I get all three temp sensors fitted and all the cabling through the grommet.
Kill switch is connected to the ignition module.
As far as I can go with that side of things and really want at minimum temperature readings to do ground runs.
Prob fit the baffle, cowl, hook up the wings and do a swing test then CG.
had enough for today though and stupid dog next door is annoying the heck out of me. Pomeranian, who the fxxx has a stupid dog like that
Later
iisi Cockpit V2 white screen of death


Loom through the firewall

Look closely and you can see the iisi devices, little gadget on the side is the GPS module.
There is an altitude module not visible as well.

So the FW-190, been a frustrating day. The iisi cockpit v2 unit will not power up. It has not been turned on for over 12 months and was dead flat, put it on USB charger and it eventually came to the charge process and charged it self was sliding bar graph and 100% full indicated.
But would not turn on, tried reset and all I get is a white screen. Occasionally I get SD card error, pulled and reseated that. Tried another micro SD card with same result.
Have emailed iisi to see if they can assist. Still under warranty so may even get a new one sent.
The devices need to be paired to the iisi Tx unit TXG2 and another couple of modules. As I need the cockpit v2 working to do the pairing there is no point doing final install of the gadgets and associated wiring.
Anyway I get all three temp sensors fitted and all the cabling through the grommet.
Kill switch is connected to the ignition module.
As far as I can go with that side of things and really want at minimum temperature readings to do ground runs.
Prob fit the baffle, cowl, hook up the wings and do a swing test then CG.
had enough for today though and stupid dog next door is annoying the heck out of me. Pomeranian, who the fxxx has a stupid dog like that
Later
iisi Cockpit V2 white screen of death
Loom through the firewall
Look closely and you can see the iisi devices, little gadget on the side is the GPS module.
There is an altitude module not visible as well.
The following users liked this post:
gixer47 (09-08-2023)
09-09-2023, 09:19 PM
#1639
As I can't progress with the telemetry I did a semi swing test, just used an old pair of retracts to check speed and how well everything in the fuz holds air pressure. All working well and hours later it is still holding air. 

Next job was to fit the baffle then the cowl, bit of trimming on the cowl mount ring on top to clear the cable loom but was easy to sort out and it screwed on as per when I first did it, all internal mounting bolts.
I also have bolts that fit through front cowl ring and into the baffle to provide air seal but will hold off on that till I get CG check done as all of that may have to come back off yet. 8 or so M3 bolts and washers won't add much nose weight anyway.
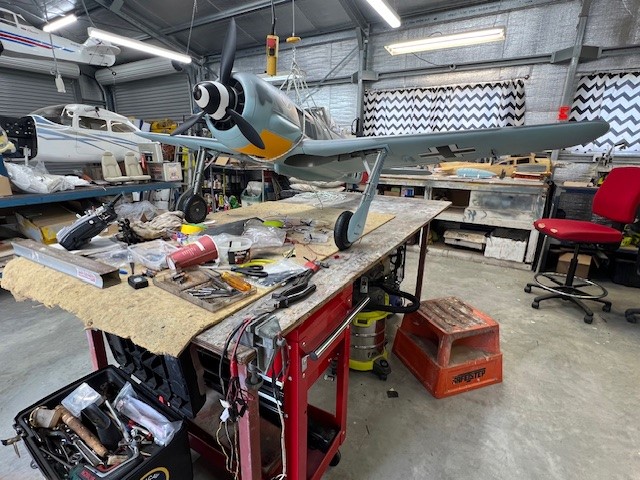
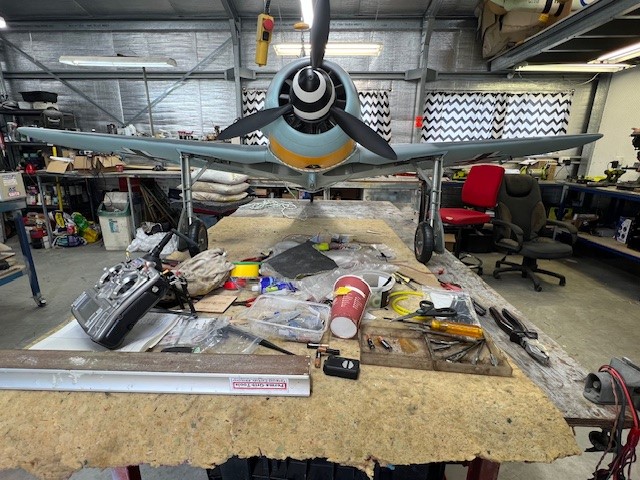
Fan was next and gave that a trim up with some 240 then checked balance, bit of a sand here and there till it sat motionless from several different starting points. Happy with that.
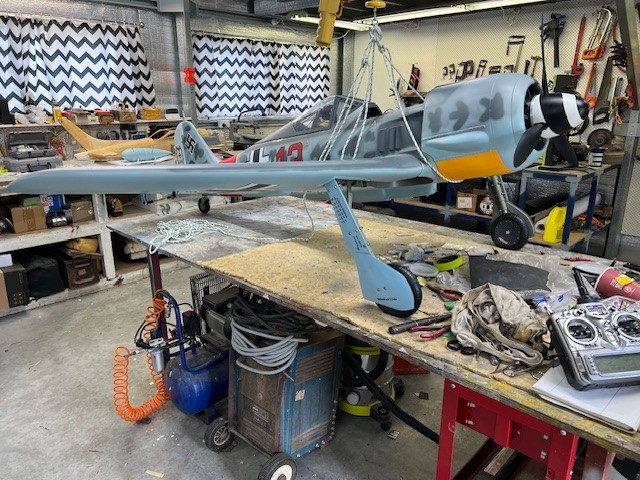
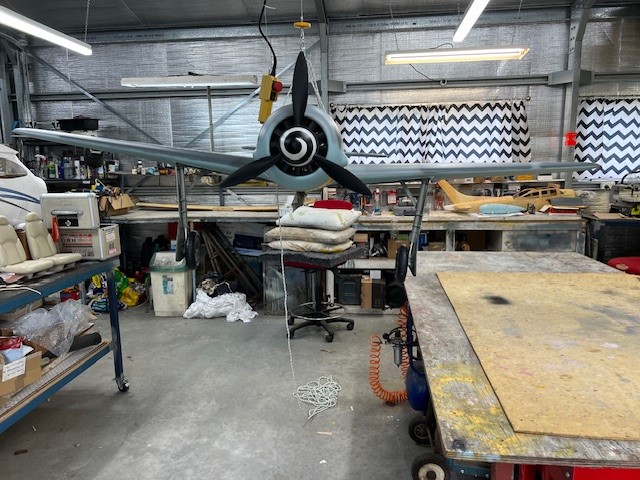
Fitted spinner just to see how it all looked and it is looking like a sinister butcher bird now or nicknamed W�rger ("Shrike") as the Germans called it.
Ran out of puff as far as putting it together and checking CG. AS this will be approx 40lb model it is not going to be easy to do on my own

 . Yet to make a cradle for it.
Typhoon waiting for its foe

Got a new air pump instead of lugging around a big gell cell and 12V compressor

and out with the old! Boy that removed some weight from my flight box. Air compressor and gell cell battery removed.

Baffle on


Look closely and you will see the holes for the cowl ring to screw into the baffle


Balancing the fan

With spinner on, now it look menacing

Next job was to fit the baffle then the cowl, bit of trimming on the cowl mount ring on top to clear the cable loom but was easy to sort out and it screwed on as per when I first did it, all internal mounting bolts.
I also have bolts that fit through front cowl ring and into the baffle to provide air seal but will hold off on that till I get CG check done as all of that may have to come back off yet.
Fan was next and gave that a trim up with some 240 then checked balance, bit of a sand here and there till it sat motionless from several different starting points. Happy with that.
Fitted spinner just to see how it all looked and it is looking like a sinister butcher bird now or nicknamed W�rger ("Shrike") as the Germans called it.
Ran out of puff as far as putting it together and checking CG. AS this will be approx 40lb model it is not going to be easy to do on my own
Typhoon waiting for its foe
Got a new air pump instead of lugging around a big gell cell and 12V compressor
and out with the old! Boy that removed some weight from my flight box. Air compressor and gell cell battery removed.
Baffle on
Look closely and you will see the holes for the cowl ring to screw into the baffle
Balancing the fan
With spinner on, now it look menacing
09-21-2023, 10:24 PM
#1641
More done this arvo.
Flaps programmed, 22 degrees half, and 60 degrees full.
Ailerons & elevators done with 40% expo - need to see what others have used for throws as I have read the manual is wildly off.
Rudder has 25% expo.
Flaps programmed, 22 degrees half, and 60 degrees full.
Ailerons & elevators done with 40% expo - need to see what others have used for throws as I have read the manual is wildly off.
Rudder has 25% expo.
09-21-2023, 11:00 PM
#1643
Did some searching and found a few post about throws.
Flaps 58 degrees, I have them at 60 degrees so will dial them back.
13% down trim on elevator, I still need to add this to the programming.
Elevators +/- 15 - 20mm throws, I'll adjust mine to 20mm and see how it likes it.
Ailerons +/- 25 - 30mm, some have said to reduce down throw to compensate for adverse yaw. Not something I have noticed on a warbird. My 1/4 Cub, 1/4 tiggy and 33% pawnee most definitely need it.
Still its good advice to consider and first flights will determine if it needs it or not.
Will get all that sorted tomorrow and do weights, CG.
later lurkers
me
The following users liked this post:
gixer47 (09-21-2023)
09-23-2023, 01:50 PM
#1644
More programming done, have not yet reduced down travel on the ailerons but everything else is pretty much done.
Though as I type this I need to also set the failsafe on the powerbox. Main failsafe from the Tx seems to work fine as the throttle goes back to idle if I turn off the Tx.
sprayed red the markings on fin/rudder, elevator and stab that indicate the clamps they put on those moving parts to leck them in place. Still to do the little red stripe they put over the cowl latches. Forgot about those when I was playing with the spray gun.
Needs a little weathering and some exhaust staining.
Got the wings on and battled getting the baffle bolts in for over 2 hrs, as they are fine thread if the bolt is slight off centre it won't start was a right PINTFA to get them in but I did after much swearing and sore hand/fingers.


I then hooked up the vanessa rig. I am so pleased I have electric hoist on a gantry!!
Set the model into flight attitude which gave a zero bubble of spirit level when placed on the gun hood.
I measured the 166mm back from root of the wing at leading edge and marked that on some tape on the wing.
I then calculated 33% of the MAC which is 470mm or 155.1mm. This was done at the point in the wing before the outwards taper then that point transferred to the tape.
As it worked out the 33% MAC is 176mm from the wing root at leading edge.
I would suggest the TopRC nominated CG location will be very conservative and the model would be nose heavy at that location.
According to the vanessa rig the balance point is right in the middle of those 2 locations at 171mm from root leading edge.
I am calling that as suitable for test flights.
No additional weight required to balance which I am **** happy about.
Next job was to weight it. 19.05kg or 41.998 lbs, let's call it 42 lbs. I expected it to be around 40 lbs.
Was going to do a retract swing test while it was in the air but forgot. Will do that today.
Then to get it on its wheels!!
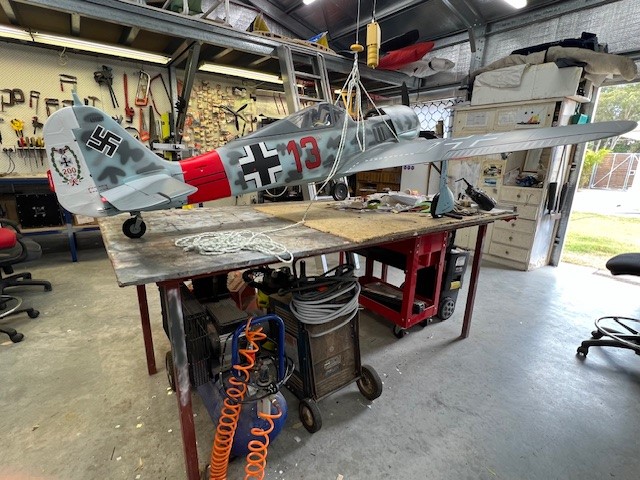
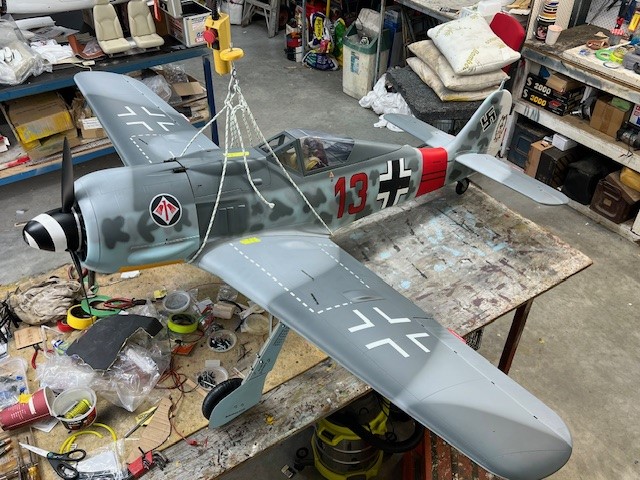
Some pics. Does this count as flying?


Happy with that CG @ zero bubble.

19kg or 42 lbs!!


Though as I type this I need to also set the failsafe on the powerbox. Main failsafe from the Tx seems to work fine as the throttle goes back to idle if I turn off the Tx.
sprayed red the markings on fin/rudder, elevator and stab that indicate the clamps they put on those moving parts to leck them in place. Still to do the little red stripe they put over the cowl latches. Forgot about those when I was playing with the spray gun.
Needs a little weathering and some exhaust staining.
Got the wings on and battled getting the baffle bolts in for over 2 hrs, as they are fine thread if the bolt is slight off centre it won't start was a right PINTFA to get them in but I did after much swearing and sore hand/fingers.
I then hooked up the vanessa rig. I am so pleased I have electric hoist on a gantry!!
Set the model into flight attitude which gave a zero bubble of spirit level when placed on the gun hood.
I measured the 166mm back from root of the wing at leading edge and marked that on some tape on the wing.
I then calculated 33% of the MAC which is 470mm or 155.1mm. This was done at the point in the wing before the outwards taper then that point transferred to the tape.
As it worked out the 33% MAC is 176mm from the wing root at leading edge.
I would suggest the TopRC nominated CG location will be very conservative and the model would be nose heavy at that location.
According to the vanessa rig the balance point is right in the middle of those 2 locations at 171mm from root leading edge.
I am calling that as suitable for test flights.
No additional weight required to balance which I am **** happy about.
Next job was to weight it. 19.05kg or 41.998 lbs, let's call it 42 lbs. I expected it to be around 40 lbs.
Was going to do a retract swing test while it was in the air but forgot. Will do that today.
Then to get it on its wheels!!
Some pics. Does this count as flying?
Happy with that CG @ zero bubble.
19kg or 42 lbs!!
09-23-2023, 09:06 PM
#1645
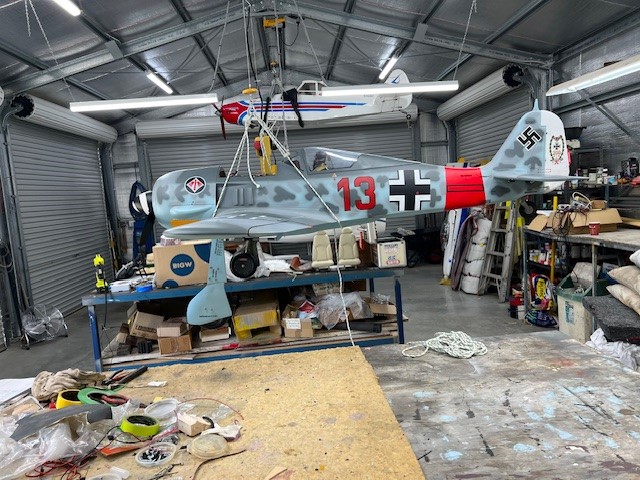
Got it on its wheels for the first time and did retracts test. All went well as you can see from the youtube clip.
I got nervous about the CG, it is rare to have a model balance. I want to do it with model upside down but will need to get a mate to come over to give me a hand as the model is too heavy and awkward to do on my own.
I'd rather double check things than not!!
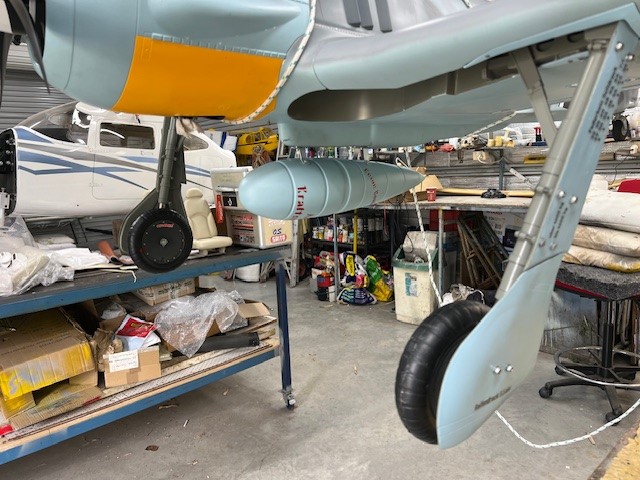
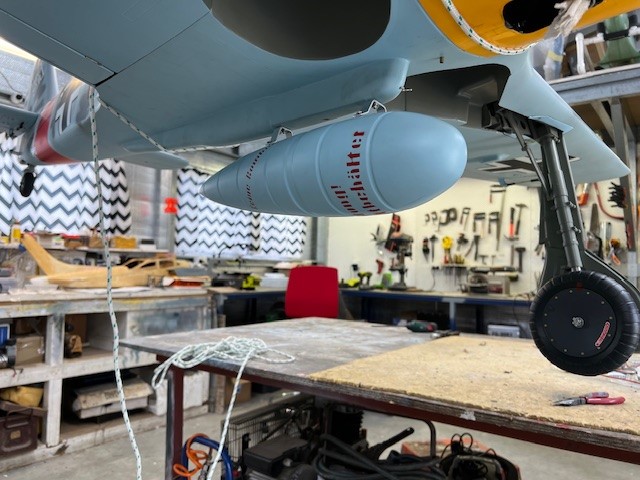
Also fitted the drop tank to see how it looks. Need to get the additional nomenclature for it as the ones I got were not everything.
Bit of mild weathering to do yet.
First time on its wheels
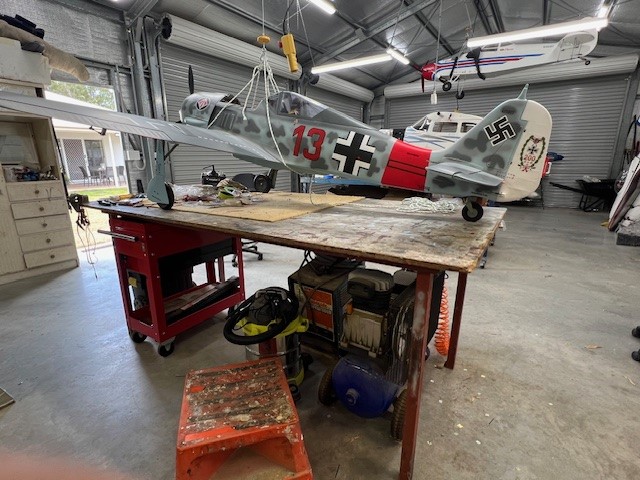
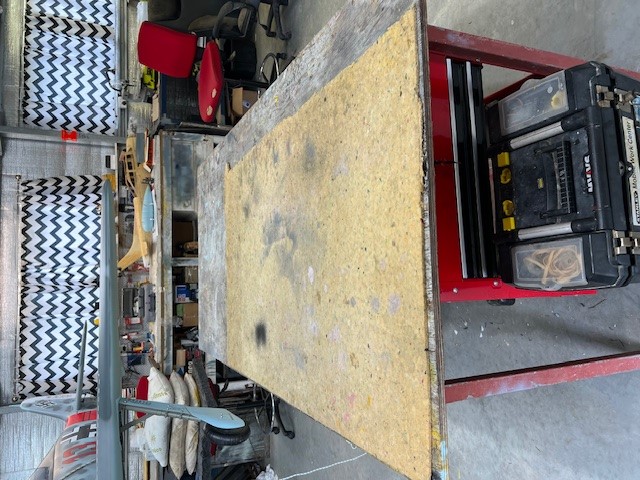
and a clean bench again ...
I got nervous about the CG, it is rare to have a model balance. I want to do it with model upside down but will need to get a mate to come over to give me a hand as the model is too heavy and awkward to do on my own.
I'd rather double check things than not!!
Also fitted the drop tank to see how it looks. Need to get the additional nomenclature for it as the ones I got were not everything.
Bit of mild weathering to do yet.
First time on its wheels
and a clean bench again ...
09-26-2023, 12:35 AM
#1646
I kept thinking about the CG and not not needing additional nose weight and even picked up the tail and thought this is not right, inner voice kept at me about it.
This afternoon after work I re-checked it after I had watched a chap on your tube using vanessa rig.
He took a zero bubble measurement on his stab so I thought I would do same and for good measure I checked if zero bubble was on the panel line going almost full length and it was - ka ching!
I checked where I had marked the locations for 166mm from root LE (TopRC manual location) and my 33% MAC, I was about 8mm out so remarked the locations using a large clear triangle on said zero line.
Ok onto the vanessa rig, set zero bubble and it was about 10mm rearward of the 33% MAC so add on the other 8mm or so and it was badly tail heavy


 oops!
oops!
Added 4 round sinkers, reset zero bubble, check, repeat till I am just slightly forward of 33% MAC.
587g or 20.71 ounces, 1lb 4.7oz
New AUW dry is 19.64kg or 43.3lbs
It is what it is.
It won't be a floater that is for sure.


Added one more for luck to bring it up to 587g

I'll squash these a bit flatter so they fit inside the cowl lip. Cowl is more than strong enough to cater for this.

This afternoon after work I re-checked it after I had watched a chap on your tube using vanessa rig.
He took a zero bubble measurement on his stab so I thought I would do same and for good measure I checked if zero bubble was on the panel line going almost full length and it was - ka ching!
I checked where I had marked the locations for 166mm from root LE (TopRC manual location) and my 33% MAC, I was about 8mm out so remarked the locations using a large clear triangle on said zero line.
Ok onto the vanessa rig, set zero bubble and it was about 10mm rearward of the 33% MAC so add on the other 8mm or so and it was badly tail heavy
Added 4 round sinkers, reset zero bubble, check, repeat till I am just slightly forward of 33% MAC.
587g or 20.71 ounces, 1lb 4.7oz
New AUW dry is 19.64kg or 43.3lbs
It is what it is.
It won't be a floater that is for sure.
Added one more for luck to bring it up to 587g
I'll squash these a bit flatter so they fit inside the cowl lip. Cowl is more than strong enough to cater for this.
09-27-2023, 12:44 AM
#1647
redid it using a different calculator. One above does not ring true.
Approx 29.05% MAC
169mm back from LE at the root which is about what Sparky said.
157mm + 12mm (wing crank distance) = 169mm
I'll go with that.
Now to see what it currently is and how much lead!!

Approx 29.05% MAC
169mm back from LE at the root which is about what Sparky said.
157mm + 12mm (wing crank distance) = 169mm
I'll go with that.
Now to see what it currently is and how much lead!!
09-27-2023, 12:44 AM
#1648
So I have rebalanced at 169mm from LE @ root tip of wing. That is about 28% MAC and with wheels up which I needed to do as it moves CG forward when they are down.
Now require additional 1.53kg or 2.32lbs to balance it at zero bubble.
New AUW dry is 20.58kg or 45.37lbs which is heavier than my Vailly seafury


Now given the fuel tank is so far forward I could balance with say half a tank of fuel which is probably what will be left of the 24oz tank as the Saito is a miser with fuel consumption.
That removes say 280 grams for about 1.24kg required.
Keen for input on that idea please.


Now require additional 1.53kg or 2.32lbs to balance it at zero bubble.
New AUW dry is 20.58kg or 45.37lbs which is heavier than my Vailly seafury
Now given the fuel tank is so far forward I could balance with say half a tank of fuel which is probably what will be left of the 24oz tank as the Saito is a miser with fuel consumption.
That removes say 280 grams for about 1.24kg required.
Keen for input on that idea please.
09-27-2023, 11:34 PM
#1649
Anyway to satisfy my OCD, you arent the only one with it I decided to follow my gut instinct and pull the model apart, rotate the fuz upside down, refit wings and do the balance again.
Was easier than I feared to get it apart and upside down.
Marked the 166 & 169mm points and set out to rebalance. Used same datum reference for zero bubble.
I have now removed 807g or 1.779lbs, for a new AUW dry weight of 43.585lbs or 19.773kg
Quite happy to have had to remove weight.
Helps having a 50kg electric hoist on a gantry.
upside down miss pat (aussies will get it)

Sizing went awry, oh well. You can see the starting location before adding any weight.

Vanessa the undresser strutting her stuff


Lead removed from where I had it yesterday, 807g, 1.59lbs


Weight to be added now, 723g

In ounces

1.59lbs to be added, big reduction.

New AUW dry


Was easier than I feared to get it apart and upside down.
Marked the 166 & 169mm points and set out to rebalance. Used same datum reference for zero bubble.
I have now removed 807g or 1.779lbs, for a new AUW dry weight of 43.585lbs or 19.773kg
Quite happy to have had to remove weight.
Helps having a 50kg electric hoist on a gantry.
upside down miss pat (aussies will get it)
Sizing went awry, oh well. You can see the starting location before adding any weight.
Vanessa the undresser strutting her stuff
Lead removed from where I had it yesterday, 807g, 1.59lbs
Weight to be added now, 723g
In ounces
1.59lbs to be added, big reduction.
New AUW dry
The following users liked this post:
gixer47 (09-28-2023)
10-22-2023, 12:59 PM
#1650
On the FW-190 front after the close call with the teal coloured matt that I had though was clear I managed to get off all the residue around the decal with a bit of turpentine on a tissue and gently dab at it. Came off easily. I got myself a can of rustoleum in ultra matt clear and yes I made sure this time. masked up, paper down and did the wing decals, not many of those so pretty easy job. Very pleased with the result.
Have started to do some mild weathering to highlight panel lines, the rivets that are present and a few scale features. Just using kids water colour paints. Let almost dry then wipe back across the chord with a lightly damp cloth till I see a result I like the look of. The water I am using has some black in it so as I wipe the cloth it leave the smallest tinge of colour, very subtle but enough to take the starkness of fresh paint away.
Will do a before and after of the other wing half bottom next.
Fuselage will be the big challenge, wings are easy.
See ya later lurkers
me
Couple of pics, application along panel lines etc and after. Hard to see in a photo.