


3d printed Bailey bridge
 01-07-2022, 06:30 PM
#76

Thread Starter
It’s been a while since I posted anything about the Bailey Bridge project. I broke my arm last summer, so for a while, I could not pick up an RC tank off the shelf, and sanding or finishing any scale model parts was not possible for me. One good thing about the accident, was that my computer mouse arm was fine, so I kept on printing out bridge parts, and I kept working on design refinements to the bridge. I’m fully recovered now, and back up to speed.
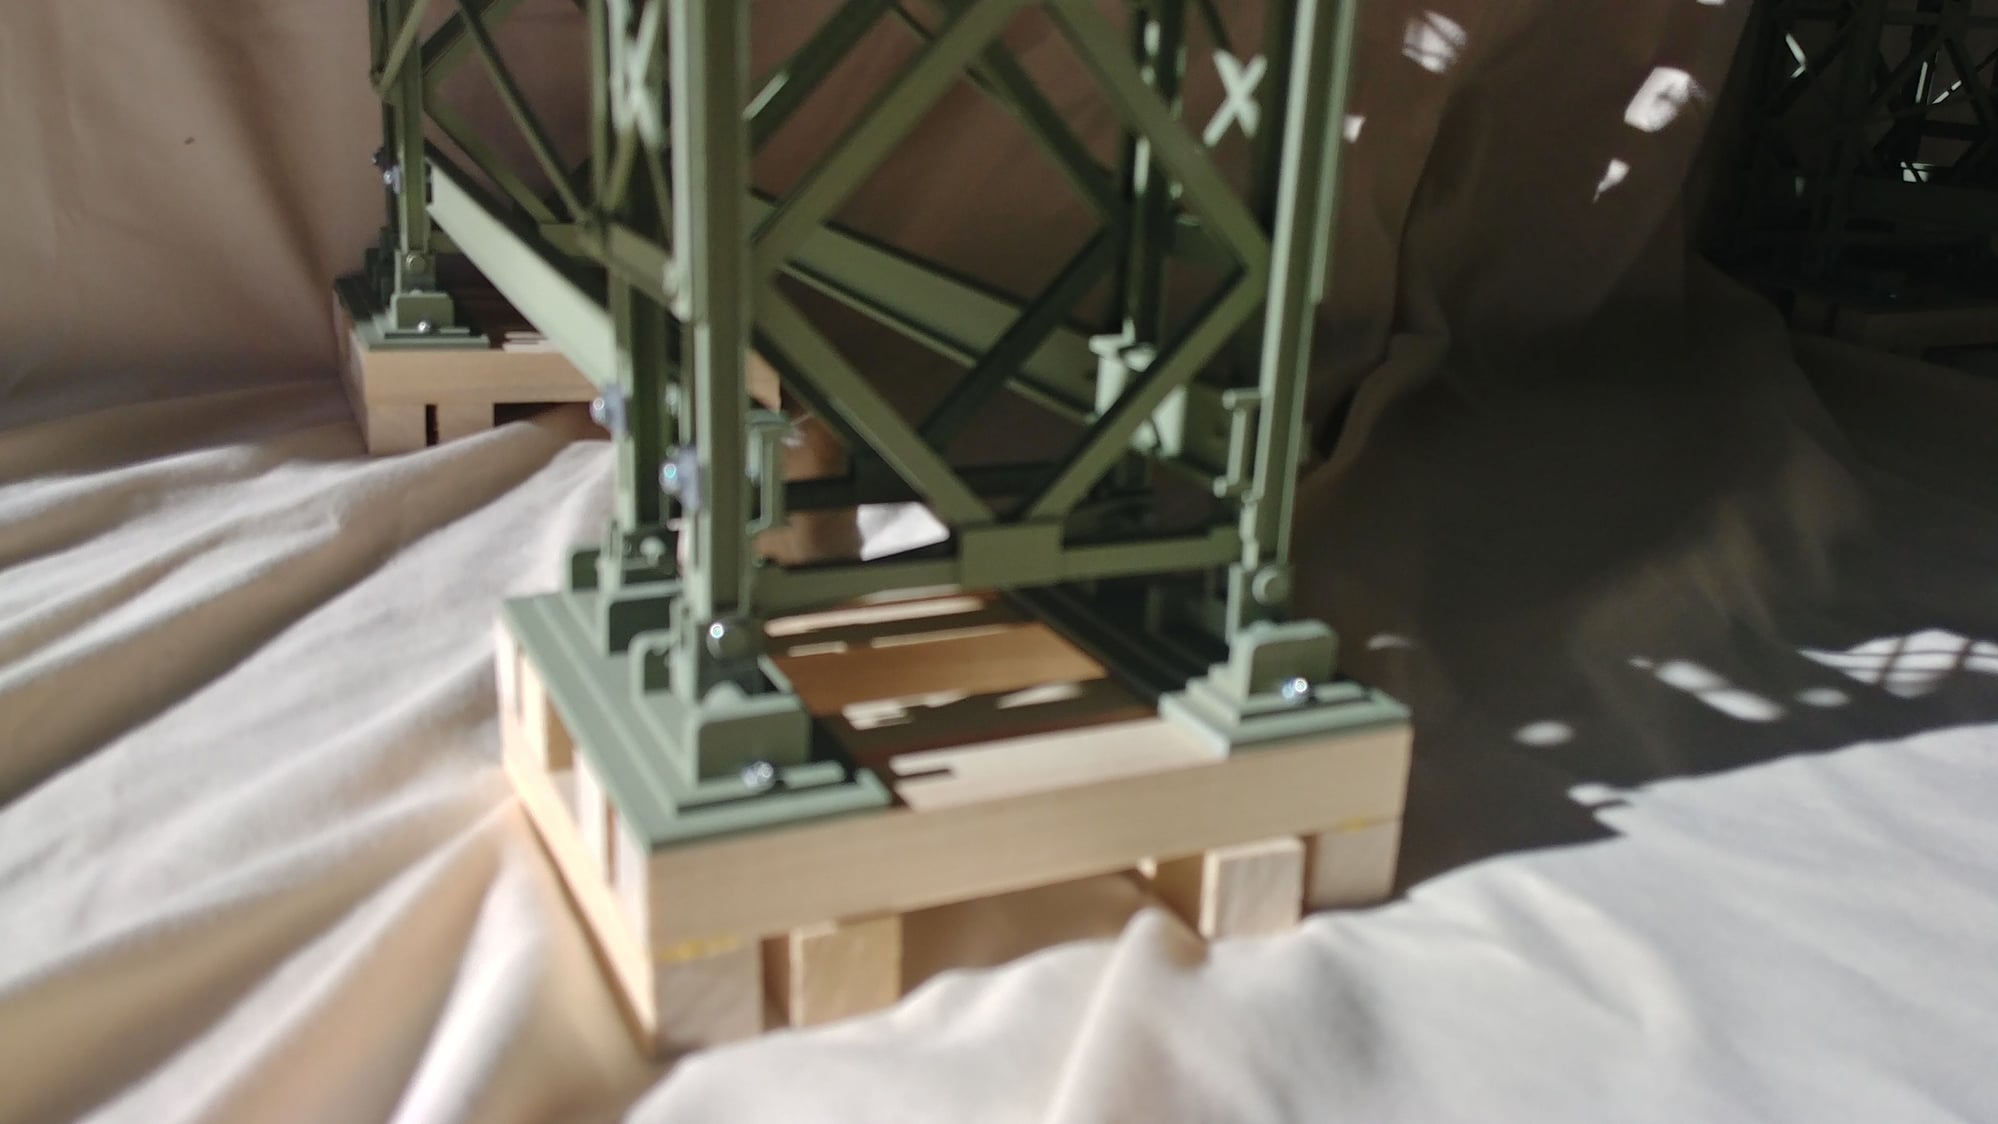
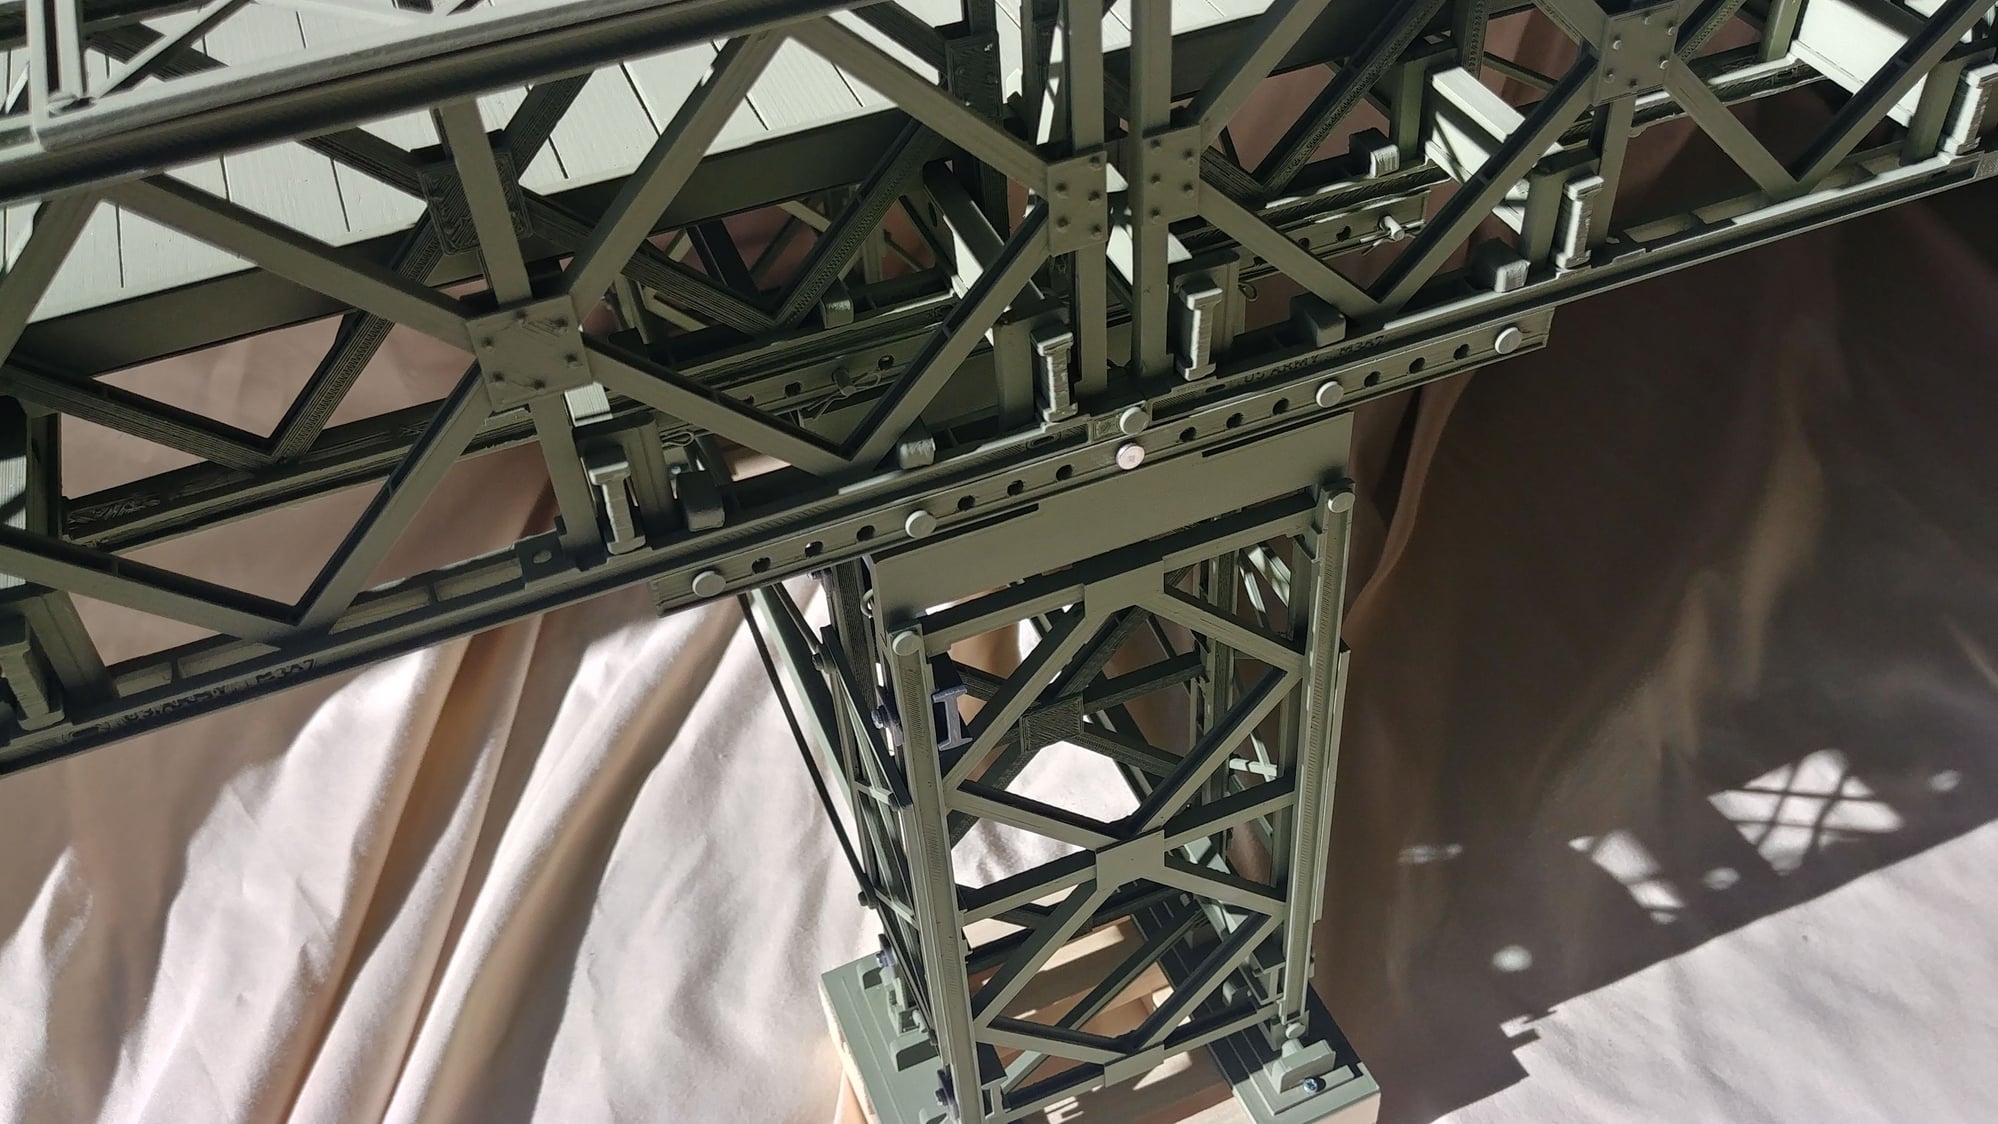
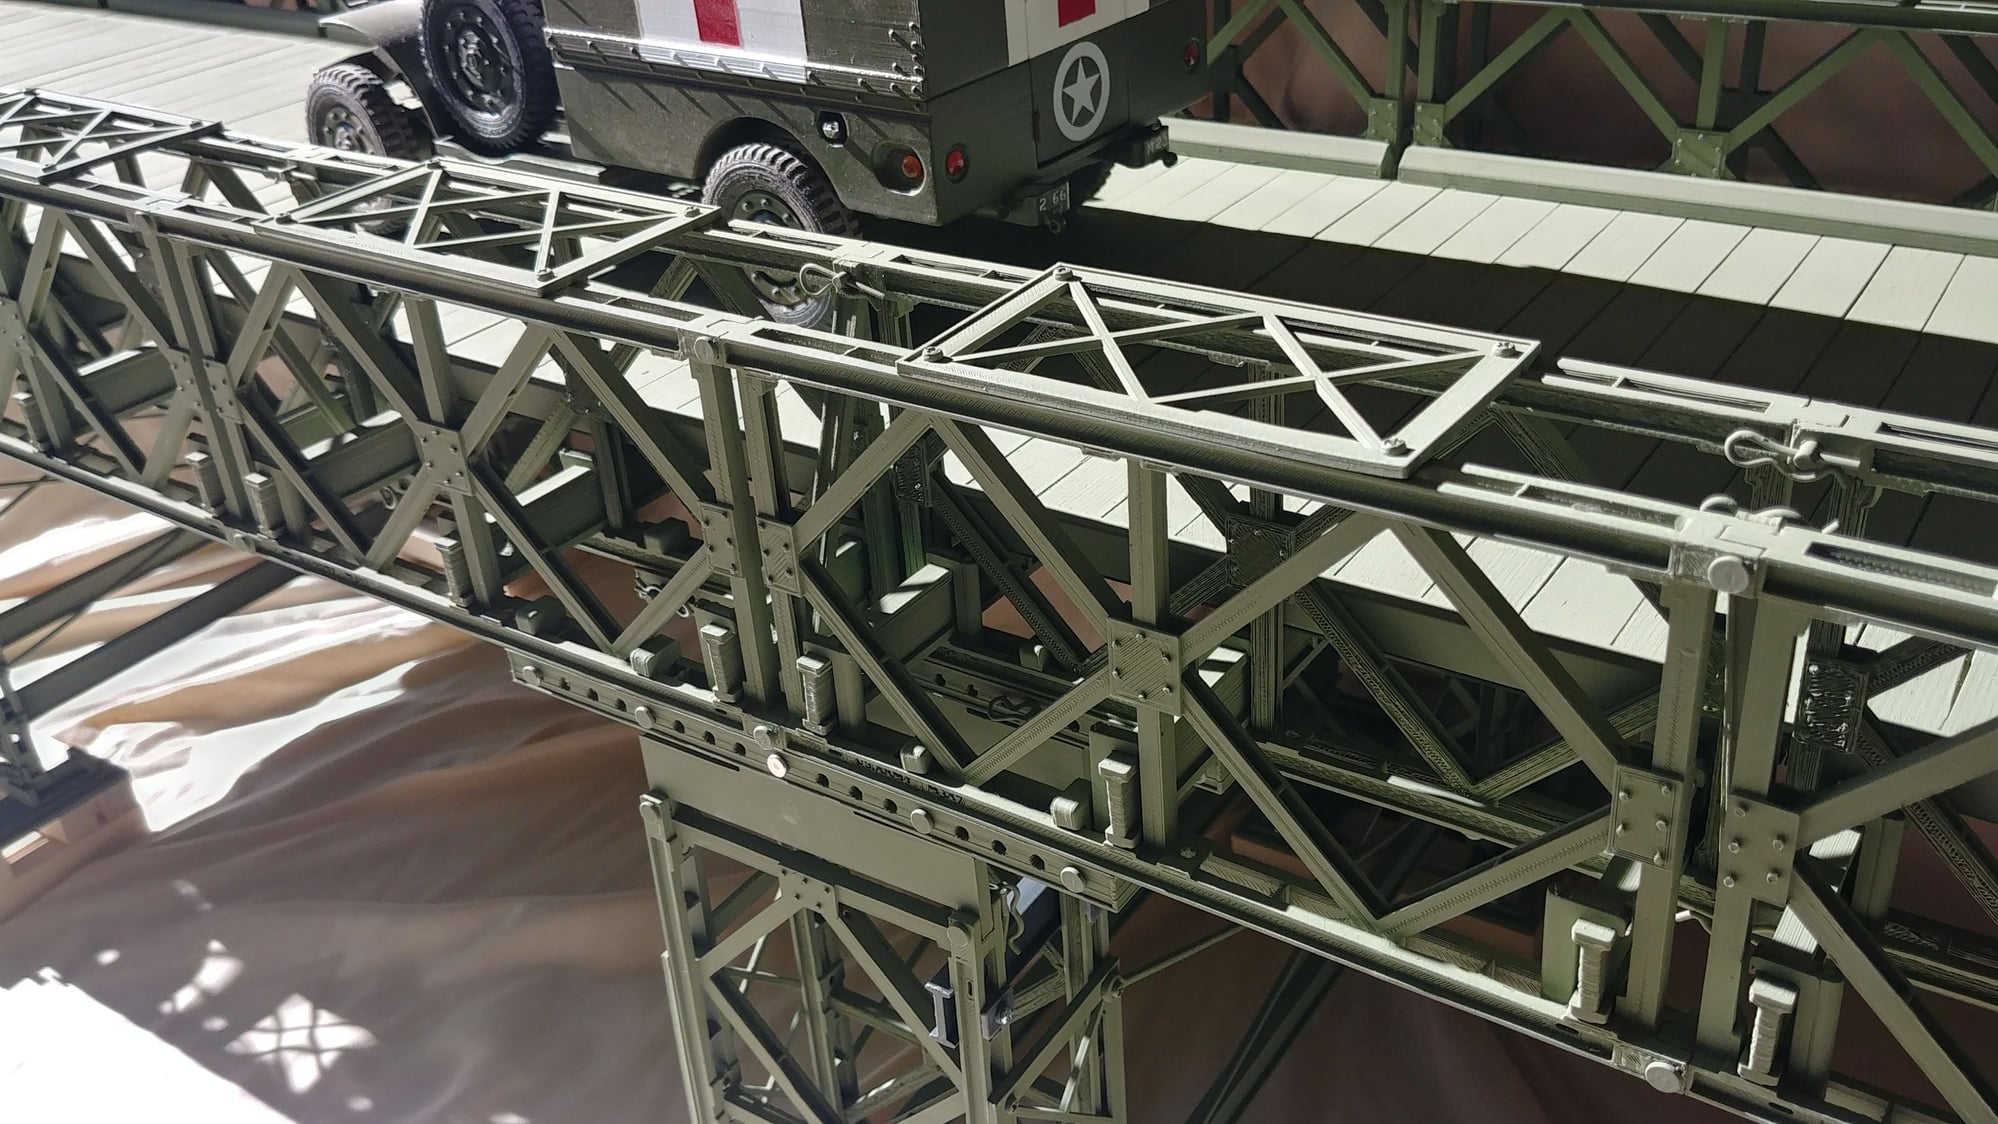
I had extended the bridge out to 7 sections and it showed a distinct sag in the middle when the 40 lbs of static weight was applied to the center of the span. It still held up the 40 lbs just fine, but with a 3/8 inch sag. I decided to design mid span columns to support the bridge allowing longer spans to be deployed. I researched historic photos and matched what I saw as best as I could. I don’t think it’s perfectly correct historically, but it’s close, and from an engineering perspective, it works nicely. The new columns required the design of 4 new parts, mostly connectors, but otherwise uses standard existing bridge parts.
The historic photos all show the bridges set up on wood cribbing stacks, so I made up some scale wood cribbing. I did them up as pallets, so they can stack up as high as needed for the particular deployment site. They will be stained a dark brown, but that’s a task for latter.
I haven’t had a chance to set it up outside yet for pictures or movies. It’s big enough now that I need to break it down into sections so it will fit in my truck for transport to the deployment site up at Tankland. There is snow up there now, so when I get around to setting it up, the tanks will be doing a winter scene.
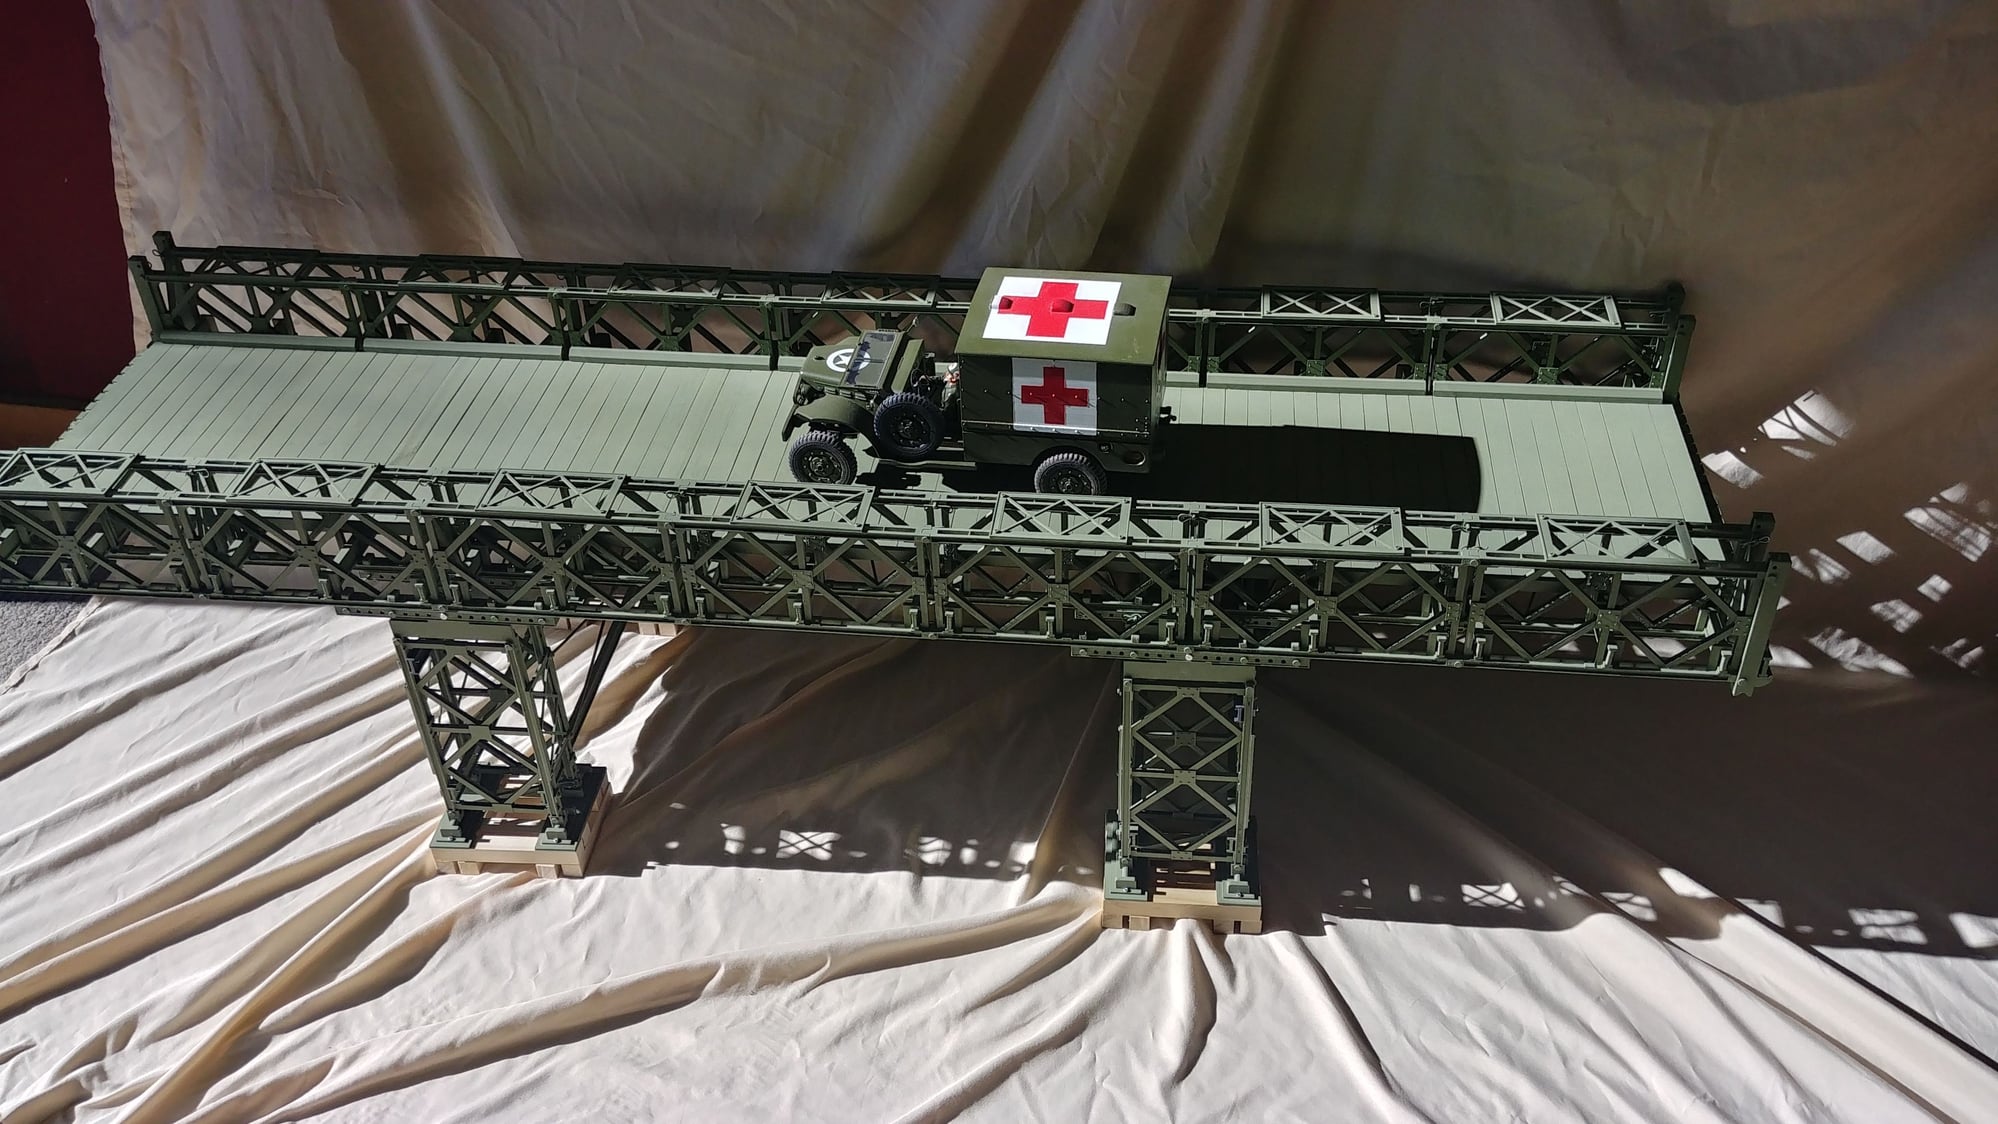
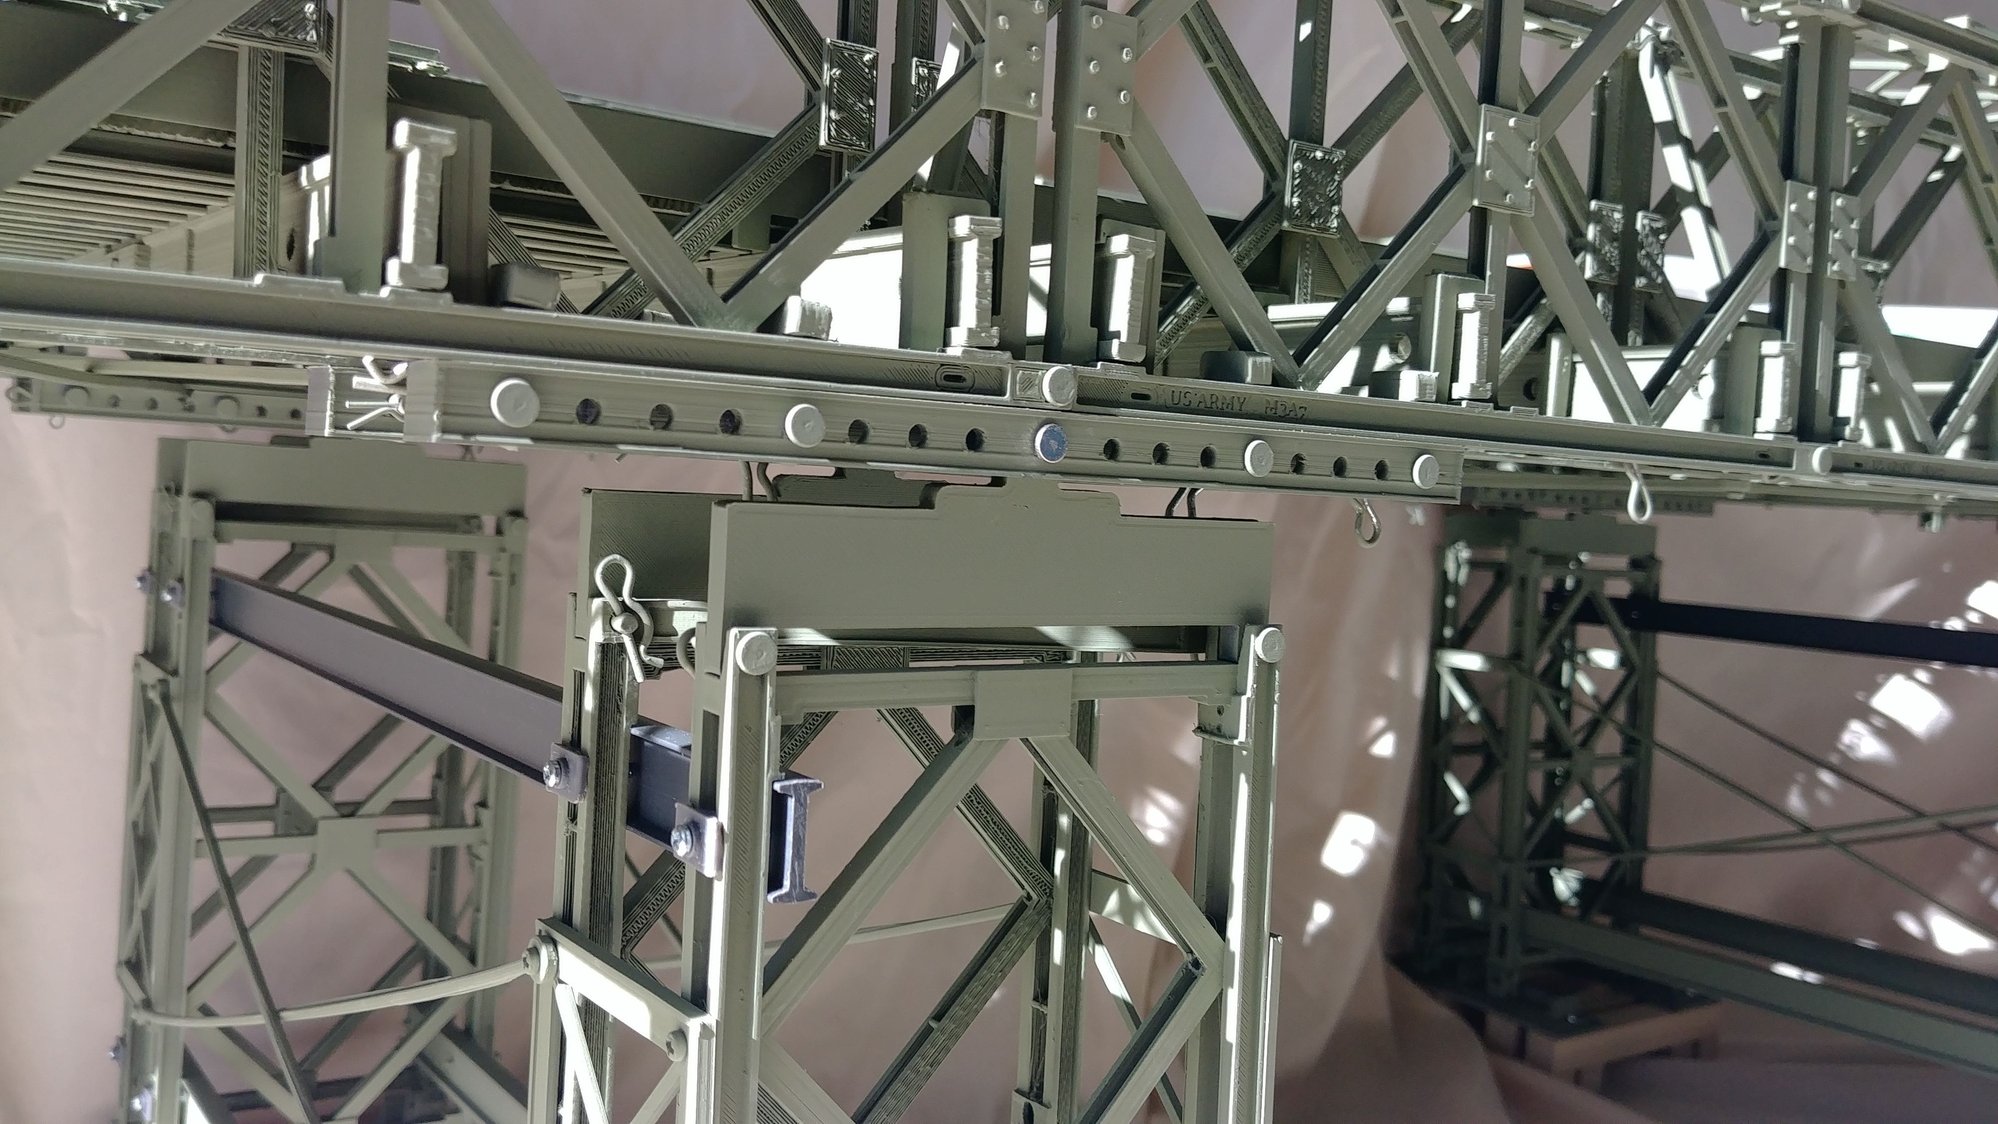
The columns can be set up anywhere along the length of the bridge allowing infinite adjustability to local terrain. The connection point at the column tops will allow the bridge to be off level, while the columns stay plumb.
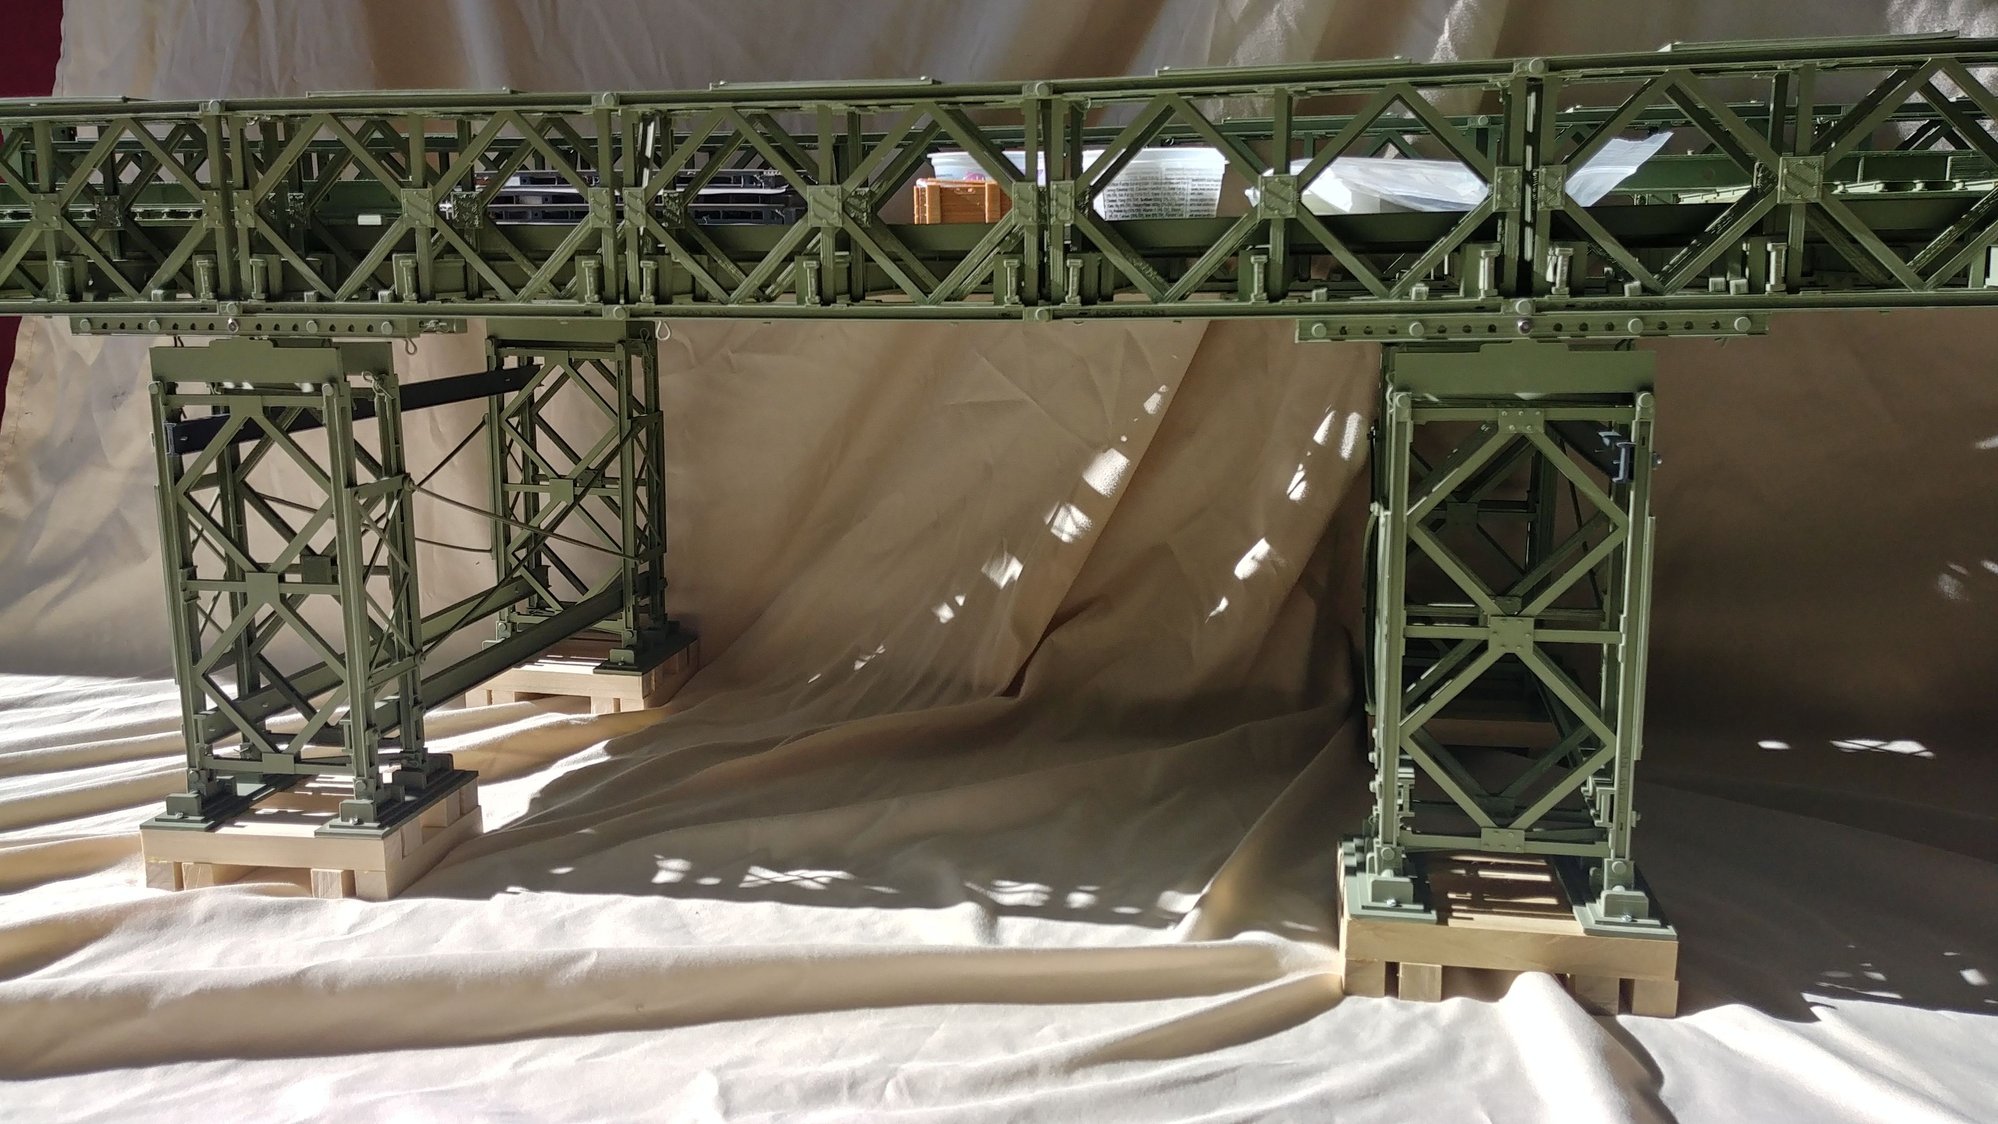
The cribbing is made of scale 10x10 timbers.
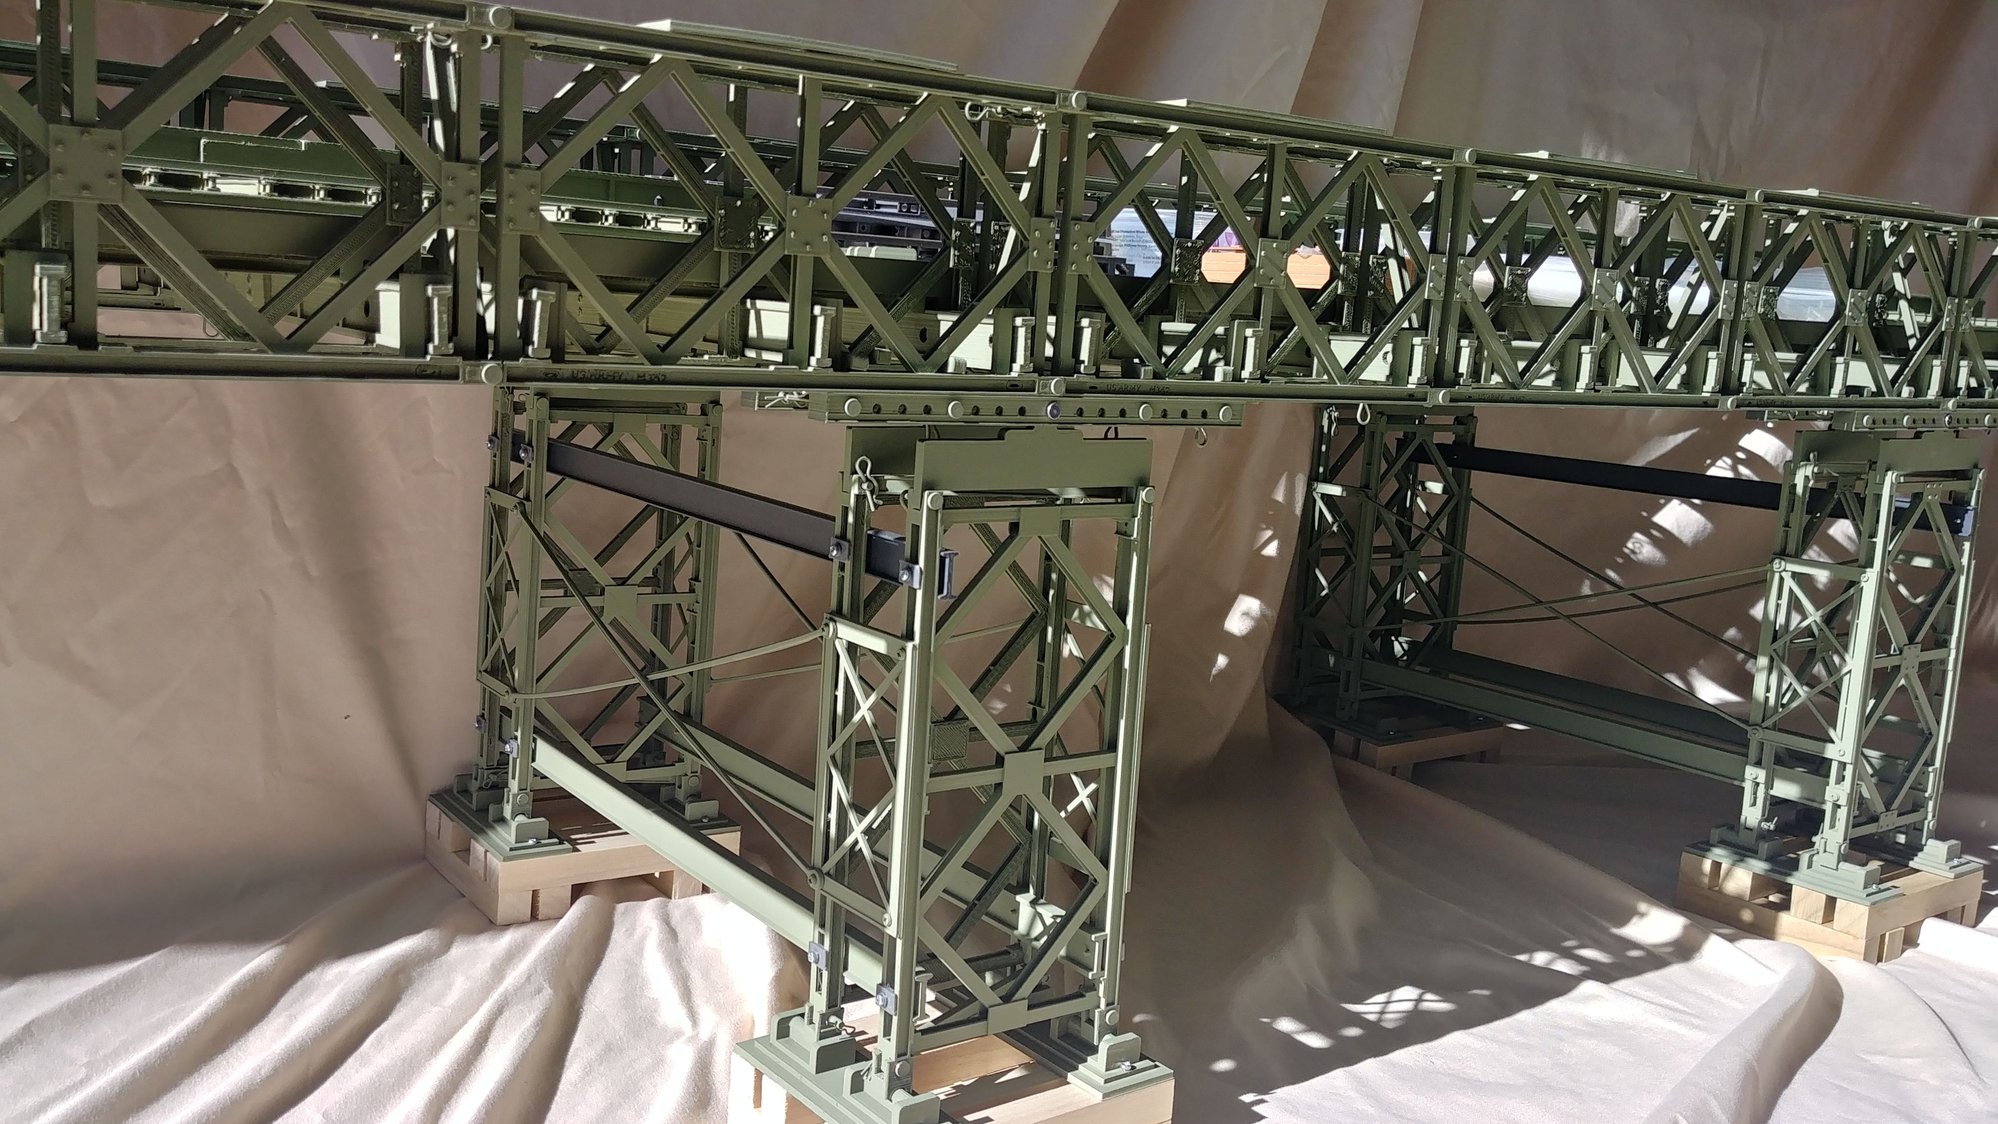
Not all the parts are painted yet. The I beams connecting the two columns are 5/8" ABS from Plastruct. It was quicker to use them, verses 3d printing the parts, and they are very close to the correct size.
Free standing like this, it still holds up the 40 lbs of test weight, but now without the sag.
Cribbing pallets stacked 1, then 2 then 3 high.

I had extended the bridge out to 7 sections and it showed a distinct sag in the middle when the 40 lbs of static weight was applied to the center of the span. It still held up the 40 lbs just fine, but with a 3/8 inch sag. I decided to design mid span columns to support the bridge allowing longer spans to be deployed. I researched historic photos and matched what I saw as best as I could. I don’t think it’s perfectly correct historically, but it’s close, and from an engineering perspective, it works nicely. The new columns required the design of 4 new parts, mostly connectors, but otherwise uses standard existing bridge parts.
The historic photos all show the bridges set up on wood cribbing stacks, so I made up some scale wood cribbing. I did them up as pallets, so they can stack up as high as needed for the particular deployment site. They will be stained a dark brown, but that’s a task for latter.
I haven’t had a chance to set it up outside yet for pictures or movies. It’s big enough now that I need to break it down into sections so it will fit in my truck for transport to the deployment site up at Tankland. There is snow up there now, so when I get around to setting it up, the tanks will be doing a winter scene.
The columns can be set up anywhere along the length of the bridge allowing infinite adjustability to local terrain. The connection point at the column tops will allow the bridge to be off level, while the columns stay plumb.
The cribbing is made of scale 10x10 timbers.
Not all the parts are painted yet. The I beams connecting the two columns are 5/8" ABS from Plastruct. It was quicker to use them, verses 3d printing the parts, and they are very close to the correct size.
Free standing like this, it still holds up the 40 lbs of test weight, but now without the sag.
Cribbing pallets stacked 1, then 2 then 3 high.

The following 2 users liked this post by Pah co chu puk:
ksoc (01-09-2022),
maillemaker (03-19-2024)
01-07-2022, 07:39 PM
#79
Thread Starter
Thanks. I sent you a PM Martin.
01-08-2022, 07:07 AM
#82
It's great projects like this that make me want to have a 3D printer.
 01-31-2022, 02:04 PM
#83
Thread Starter
The Bailey Bridge was deployed to Tankland this weekend. Due to deep snow, the bridge was set up near the Tankland HQ and not out in the proving grounds. The engineers set the bridge up twice as a training exercise. The first deployment used the support piers, the second deployment used no support piers and free spanned the “chasm”.
2nd Deployment
3rd deployment
2nd Deployment
3rd deployment
The following 4 users liked this post by Pah co chu puk:
02-01-2022, 08:41 PM
#85
well, I do have STL files but you should upscale them. they are on thingiverse as far as I know (if you cant find them, just let me know, you can have them)
edit: found the link again: https://www.thingiverse.com/thing:48...pLsWeqZQE4pcK8
was discussed on facebook (you liked the post by the way )
)
edit: found the link again: https://www.thingiverse.com/thing:48...pLsWeqZQE4pcK8
was discussed on facebook (you liked the post by the way
)
Last edited by JeeSib; 02-01-2022 at 09:04 PM.
02-22-2024, 11:33 PM
#87
@Pah co chu puk I know I'm digging up an old post, but now that I have a 3D printer, I was wondering if the STLs were going to be available? 
I downloaded the ones JeeSib posted, but when I import them into my slicer they are really, really tiny. Makes it hard to judge scale and therefore hard to judge how much I need to upscale it to work, but I guess I could just upscale all the parts as big as I want to work with my tanks. My Abrams has the TUSK2 armor on it so it's really wide. I also doubt my E100 or Jagdpanzer E-100 will be able to drive over the bridge. The E100 and Abrams with TUSK2 are just under 30CM (12") wide.
I downloaded the ones JeeSib posted, but when I import them into my slicer they are really, really tiny. Makes it hard to judge scale and therefore hard to judge how much I need to upscale it to work, but I guess I could just upscale all the parts as big as I want to work with my tanks. My Abrams has the TUSK2 armor on it so it's really wide. I also doubt my E100 or Jagdpanzer E-100 will be able to drive over the bridge. The E100 and Abrams with TUSK2 are just under 30CM (12") wide.
02-23-2024, 07:42 AM
#88
Thread Starter
The road deck on my Bailey Bridge is 10 1/2 inches ( 27 cm) wide. I made it wider than a true scale WW2 Bailey bridge so My Abrams and Leopard can use it. They however, don't have that add on armor...
To widen it you would need to make the Transom beams and diagonal braces longer, but everything else can stay the same. I have a 12 inch print bed and the Transom beams just fit printing at a 45 degree angle. To print a bridge as wide as you want you would need a print bed bigger than 12 inch square or split the Transom beam in to two parts. It's the main structural part, so splitting it is possible, but not as good as doing it in one piece. (German tanks shouldn't be using a Bailey bridge!!)
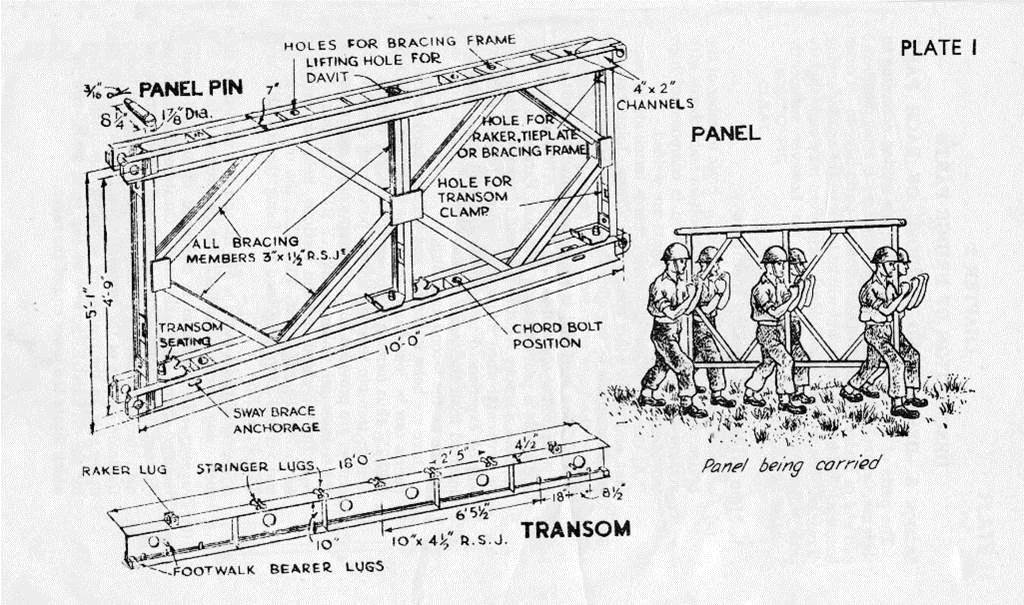
For checking your scaling, my Truss Panels are 19.5 cm long and 9.7 cm tall.
PM me...
To widen it you would need to make the Transom beams and diagonal braces longer, but everything else can stay the same. I have a 12 inch print bed and the Transom beams just fit printing at a 45 degree angle. To print a bridge as wide as you want you would need a print bed bigger than 12 inch square or split the Transom beam in to two parts. It's the main structural part, so splitting it is possible, but not as good as doing it in one piece. (German tanks shouldn't be using a Bailey bridge!!)
For checking your scaling, my Truss Panels are 19.5 cm long and 9.7 cm tall.
PM me...
Last edited by Pah co chu puk; 02-23-2024 at 07:55 AM.
03-19-2024, 07:26 AM
#89
Junior Member
Join Date: Mar 2024
Posts: 1
Likes: 0
Received 0 Likes
on
0 Posts
suddenly i have become very interested in 3d printing a bailey bridge as a gift for my father, whos father served as a colonel in the engineers I want to print him a model of the bailey bridge that his father made for him that he can take apart and put together. if possible, can someone send me a download link to the files, thank you.
Edit: I found the link but I need to know how much to scale up the files as they are really tiny when in the slicer
Edit 2: nvm i found scaling instructions
Edit 3: it seems there are multiple versions fo the files, i have one but is there a way to get the other?
Edit: I found the link but I need to know how much to scale up the files as they are really tiny when in the slicer
Edit 2: nvm i found scaling instructions
Edit 3: it seems there are multiple versions fo the files, i have one but is there a way to get the other?
Last edited by andthatt; 03-19-2024 at 07:32 AM.
03-20-2024, 07:24 AM
#90
Thread Starter
I have not put the Bailey bridge files out as a set to buy yet. I am getting requests, so I will work on doing that.
As for scaling, it is set up to print at 1/16th scale. I have not tried scaling it up or down, so I do not know how well that would work.
The truss panels are 19.5 cm by 9.7 cm when printed at 1/16th scale.
As for scaling, it is set up to print at 1/16th scale. I have not tried scaling it up or down, so I do not know how well that would work.
The truss panels are 19.5 cm by 9.7 cm when printed at 1/16th scale.
The following users liked this post:
ksoc (03-24-2024)
10-03-2024, 10:54 PM
#95
Junior Member
Join Date: Mar 2024
Location: Czech Republic
Posts: 6
Likes: 0
Received 0 Likes
on
0 Posts
10-16-2024, 11:17 PM
#96
@bocektransport here you have free model in 1/25, just rescale it to 1/16 (x 1.5625)
https://www.thingiverse.com/thing:4829409
https://www.thingiverse.com/thing:4829409
10-17-2024, 02:41 AM
#97
Junior Member
Join Date: Mar 2024
Location: Czech Republic
Posts: 6
Likes: 0
Received 0 Likes
on
0 Posts
@Michal_Kaczorowski Thanks - i saw it sooner, but these model is not so detailed and nice as from @Pah co chu puk. Also has simpler construction with less joints and is in smaller scale - after rescaling this all that will be more vissible and there will be problems with holles diameters for pins and screws. I still hope Pah have mercy to me and sell me his great data .
