


I need help
 12-22-2021, 04:10 PM
#26


You can if you want, I've never needed them. It really depends on the size of the fuel line and the tank tubes. Since you're going to be running a .21, you won't need large sized fuel lines. Medium lines should stay on without a problem
 12-23-2021, 04:08 PM
#28
Very much recommended. Stick to the blue or orange as red will make it very difficult to get screws back out.
I use Loctite or locknuts and lockwashers on just about everything:
I use Loctite or locknuts and lockwashers on just about everything:
- Screws and bolts into a threaded hole get Loctite, especially if it's a motor or exhaust part or set screw on a drive shaft
- Screws and bolts going through a hole in wood or metal with easy back side access to the back side get a locknut and thin washer
- Screws and bolts going through a hole in wood or metal without easy access to the back side get either Loctite on the threads or a lockwasher between the head and regular washer
- Prop shafts get a lock nut to prevent the loss of said nut and the prop since props are far from cheap
 12-24-2021, 01:40 PM
#30
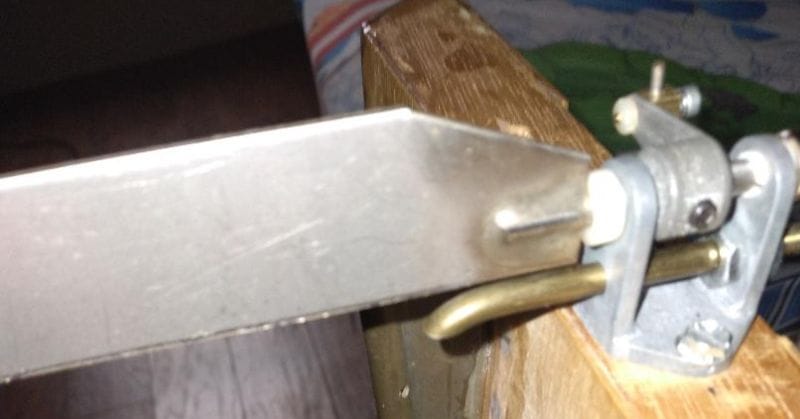
That isn't an outlet, it's an intake scoop. As pictured, it is facing the correct direction.
I'm curious, where is that rudder located and what are you using to turn it?
I'm curious, where is that rudder located and what are you using to turn it?
12-24-2021, 03:42 PM
#32
I know the rudder is on the transom, the picture showed that much. What I was getting at is where on the transom? Is it in the center, behind the prop? Is it offset to the left or the right of the center? A shot of the whole transom would be helpful as rudder location is actually something that can be very important. For example, this is where the rudder bracket is on my scale Elam Plus:
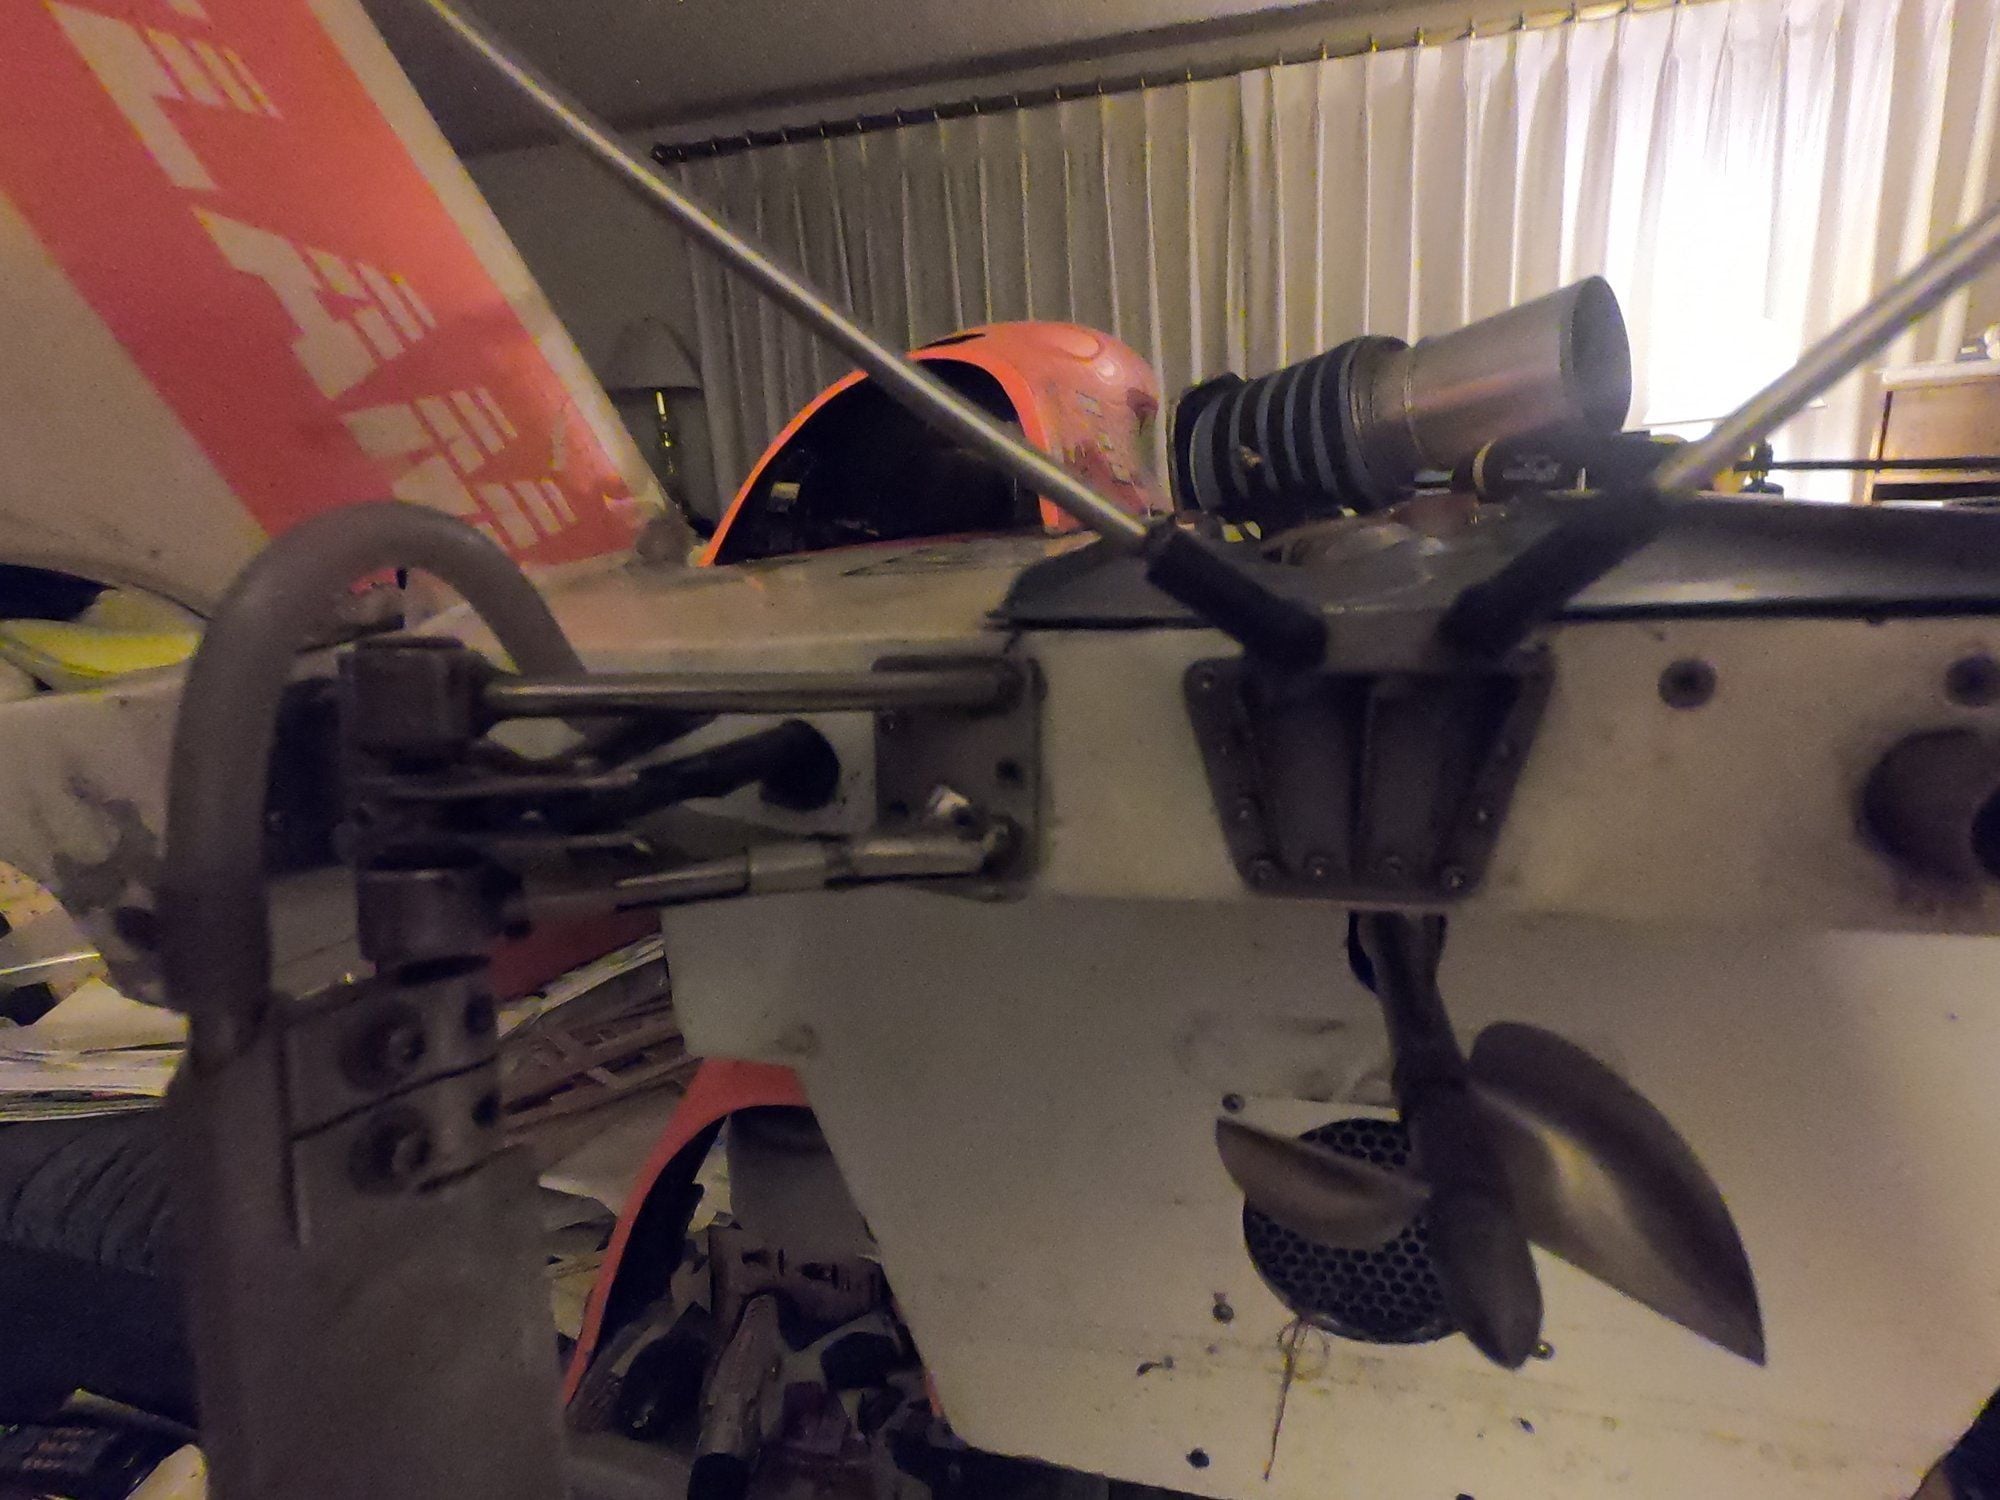
And, by the same point, this is where it is on my redesigned Dumas Pak
In both cases, the rudder is not behind the prop since the prop and shaft need to be removable for replacement and servicing as well as leaving the rudder in "clean" water for better response. The reason I put the rudder on the left side of my Pak is so I pull the pushrod rather than push it. Unless the pushrod is heavily braced, it can bend when pushing it to turn the rudder at speed
Last edited by Hydro Junkie; 12-24-2021 at 03:51 PM.
 12-28-2021, 07:12 PM
#34
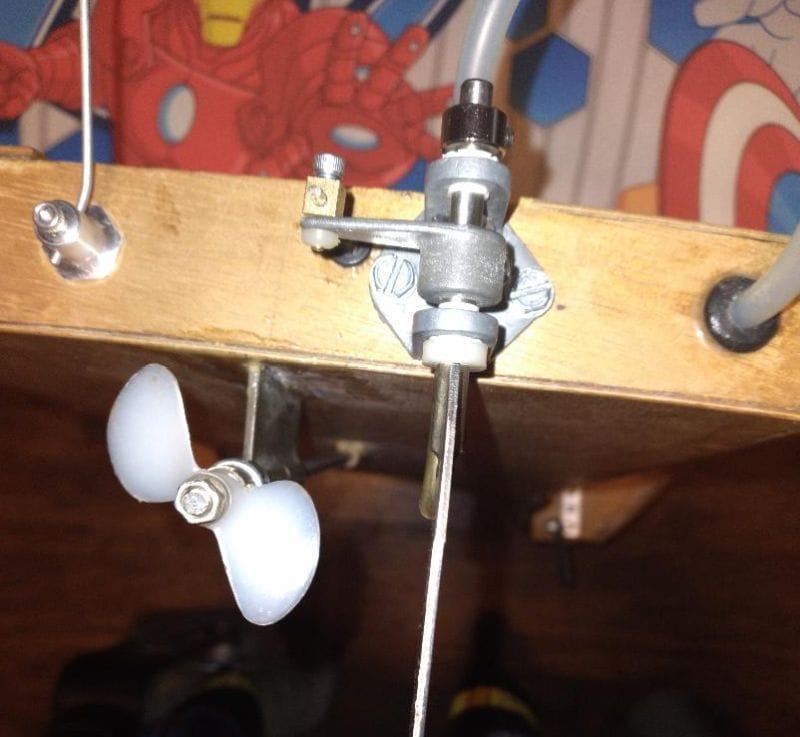
Most definitely, you will need lubrication. I use lithium-based grease automotive grease in the strut and on my drive shaft. That being said, I use a flex cable for a drive shaft instead of the solid shaft you used in your boat. In the case of your boat, I would recommend the same thing HOWEVER, to do so will require you to drill a hole in the strut (if it doesn't already have one) and in the top of the stuffing tube, inside the engine bay, not the radio compartment. You will need to fill both until the grease squeezes between the shaft and the bushings on both ends of the strut and stuffing tube. Another option, for the stuffing tube, would be a fluid type of lubricant like transmissions fluid. The problem here is that a liquid type lubricant will run out and make a mess. You could also use a thicker grade of motor oil but, if you go too thick, it will put an additional load on that little motor that could damage it.
Something else I saw, in your pictures, that needs addressing is the prop. It is well known, in the boating world, that plastic props are junk. I would refer you to Mark Sholund for a prop that will work for your boat. He runs a home business called "Props 4 U" where he does all of the prep work on metal props and sells props that are ready to go. I will guarantee that a metal prop will give you better performance than that plastic one. Plastic props are known to have blades that flex, costing you thrust and speed. A metal prop, such as an Octura 1440, won't flex and will lift the rear of the boat, giving much better performance. I know Mark's props are spendy but, if you compare them to what you have, I think you'll find they are worth it. His website address is:
Props 4 U
12-29-2021, 07:12 AM
#35
Hydro Junkie,I found the Octura 1440 on their website and I checked out Props 4 U website but I'm not sure which one that I should get so I'll probably get the Octura 1440 prop.As for the lube I'll check out the lithium based grease.Where's a good place to look on the internet for it?Is Vaseline a petrolium based lube not the lithium based grease you're talking about?Do you have a brand of grease you like better than others?I noticed from watching some videos that some people use clear radio compartment covers.Would you recommend that and where can I get some of the clear plastic to make it?Thanks for your help and if there's anything else you think that I should know before spring or summer,let me know.
Last edited by dreddbatfan; 12-29-2021 at 10:59 AM.
12-29-2021, 04:59 PM
#36
I had an online chat with Mark yesterday, he has "a good stock" and agreed with the 1440 recommendation. You will need to remove the collar from the drive shaft that you presently have between the strut and drive dog. The 1440 is much longer than the Dumas plastic prop, so it will need more shaft length. The other thing about Mark's props is, as I said, he's done all of the prep work. If you order one of his props, you just install and run. If you buy a raw prop, you would need to sharpen and balance it before you can use it, a long process that requires some special tools, a dust mask/respirator and lots of practice.
As for the clear cover on the radio box, it is a good idea for several reasons:
As for the clear cover on the radio box, it is a good idea for several reasons:
- it is considerably lighter than that low quality plywood cover
- it lets you see what the radio gear is doing if you're having control issues
- it won't absorb water through the screw holes, which you won't need to drill since it will be taped down instead of screwed
12-30-2021, 11:06 AM
#37
Hydro Junkie,Should I put any kind of lube on the push rods so that they don't bind up in the waterproof rubber bushings?Where's a good place on the internet to get the clear cover?I found the wd40 spray you mentioned on Amazons website so I'll order it and the propeller plus whatever else I need next Monday when I get my social security check.While I'm thinking about it,I was looking over the information that came with the engine and it doesn't mention what percentage of nitro to get for the engine.Would you have any thoughts?After I get this boat done and running the way I want it,I was thinking about getting a boat kit from Zippkits.Have you heard of Zippkits?Are they a good boat kit company to buy from?Do you have any suggestions of any other boat kit companies?I like building boats and airplane kits,I may not be the best at it and I'm still learning(at 63)but it's good for the Rheumatoid Arthritis in my hands plus it keeps my mind sharp with the whole building process.
Last edited by dreddbatfan; 12-30-2021 at 11:09 AM.
12-30-2021, 02:56 PM
#38
If you used a rubber bushing, Vaseline would work fine. If you're using a "bellows" type, you don't want to use lubricant as it is made to be fastened to the pushrod. This is one example of a bellows type:
https://www.towerhobbies.com/product...PRB286072.html
Here's one place you can get clear plastic sheets for the radio box cover:
Polycarbonate Plastic Sheet, 11"W X 14"L, 2 Sheets (micromark.com)
They also carry a wide variety of other things, including tools, that you might need for your next build
I run 50% nitro fuel in my engines. I tried 20% helicopter fuel in a Nova Rossi .21 and found it wasn't enough to get it to run.
Zippkitts are a good boat kit. They are, however, very different from the Dumas kit you built. If you are looking at a thunderboat kit, they are twice as at least 50% longer and roughly twice as wide as the Pak kit. They are also made of all birch ply, just like the skin panels of the Pak. This means a high-quality epoxy is a must, not what you can get from a hobby shop. One problem is that, due to a shortage of plywood, all of their kits are out of stock at the moment.
01-01-2022, 12:58 AM
#39
Thought I'd have a little fun and show you my largest project. She's still small, relatively speaking. At only 28 feet long, 12 feet wide and built out of primarily mahogany plywood that was custom cut at 45 degrees, she is dwarfed by the modern boats in just about every respect, except horsepower. She is powered by a 1650 cubic inch Rolls Royce or Packard Merlin that produces around 2000 horsepower. Her "rated" top speed is 175MPH. Almost lost my right leg helping install that engine due to the hoist shifting, pinning my leg between the engine and right side of the engine bay. Would I help do another one? In a heartbeat 
01-01-2022, 01:55 PM
#40
Hydro Junkie,Very cool boat.I was wondering if I'll need to do all that work for the Octura 1440 prop or is it already done for me?If not I think I'll get the prop from Mark at props 4 U.I'm not sure which one of his props to get,any suggestions?I don't want to get the wrong one and not be able to use it.
01-01-2022, 05:42 PM
#41
A prop you would get from Tower, or any other source, is going to be a rough casting, just like it came out of the mold. Due to that, they have blunt edges and are not balanced and can actually cause enough vibration to damage a boat's hull and running gear. All props need to be balanced, sharpened and, for best results, polished. The prop Mark sells are ready to go, no work needed. I have several of his props, as do many I race against, never had an issue.
01-03-2022, 10:22 AM
#42
Hydro Junkie,I'm going to contact Mark at Props 4 U for the prop.I saw your post about re-engineering this kit.I wish I would've known about it before I did mine.In a previous post from you I asked about the gap in my cowl and from your pictures you do have air gaps in yours.I was wondering what can I do if any water does get inside?Should I put drain holes inside and where and how?
01-03-2022, 05:05 PM
#43
I actually have a drain at the rear of both sponsons and one at the rear of the hull on each side, outboard of the engine bay walls. Each one has a threaded insert and that has a screw installed to keep water out. As far as getting water out of the engine bay, I didn't put a drain into the engine bay since mine is a toy boat and has a totally open center with the radio box in the front. If I was going to race it, I would drill a diagonal hole, pointed down and rearward, in the left rear corner of the engine bay and epoxied in a piece of brass tube to prevent the wood from getting water soaked. As far as needing all of the water drains, I may not have needed them, but I also didn't want to get water trapped inside the boat's under-deck areas
01-08-2022, 09:42 AM
#44
Hydro Junkie,I got the right tubing for exhaust from McMaster-Carr but where should I put these tubes to exhaust them out?In your last post you mentioned where you put drain holes for water.Do you have any pictures of them and the type of fittings that I need and where I can get them?
01-08-2022, 05:24 PM
#45
Standard brass tubing, epoxied into the transoms, would work for drains, sealed with radio box tape when running. They are what were installed in the rear of the "shoes" of my scale Elam and yes, they work well. IF your boat was still being built, there are other options you could have used but, with the hull being more or less finished, you don't have too many options. One question I have is did you make any changes to the under-deck frames or are they still solid panels. There is a reason I ask, which I will go into later
01-11-2022, 12:23 PM
#47
You did the same thing I did when I built my first Pak. Unfortunately, it makes the boat much heavier than it should be and no, it's not your fault.
Next question. did you add glue blocks to the joint between the sponson insides and the bottom of the boat or did you just epoxy the bottom to the sponson insides with a fillet of epoxy? I did the later and it didn't hold up.
As far as what size tubing, 3/16 would be more than enough. The threaded inserts I used in my lightened Pak are only 4-40 sized due to its much better build quality and materials than my first Pak. Then again, I have had 30 years to learn and obtain more tools between the first and second builds.
01-13-2022, 10:00 PM
#49
Okay, that means you have a choice to make:
Click image for larger version
Name: Ze85726.jpg
Views: 197
Size: 123.5 KB
ID: 1647752
- Leave the boat alone and run as it is
- take the bottom off and do a little reworking
Click image for larger version
Name: Ze85726.jpg
Views: 197
Size: 123.5 KB
ID: 1647752
01-13-2022, 10:16 PM
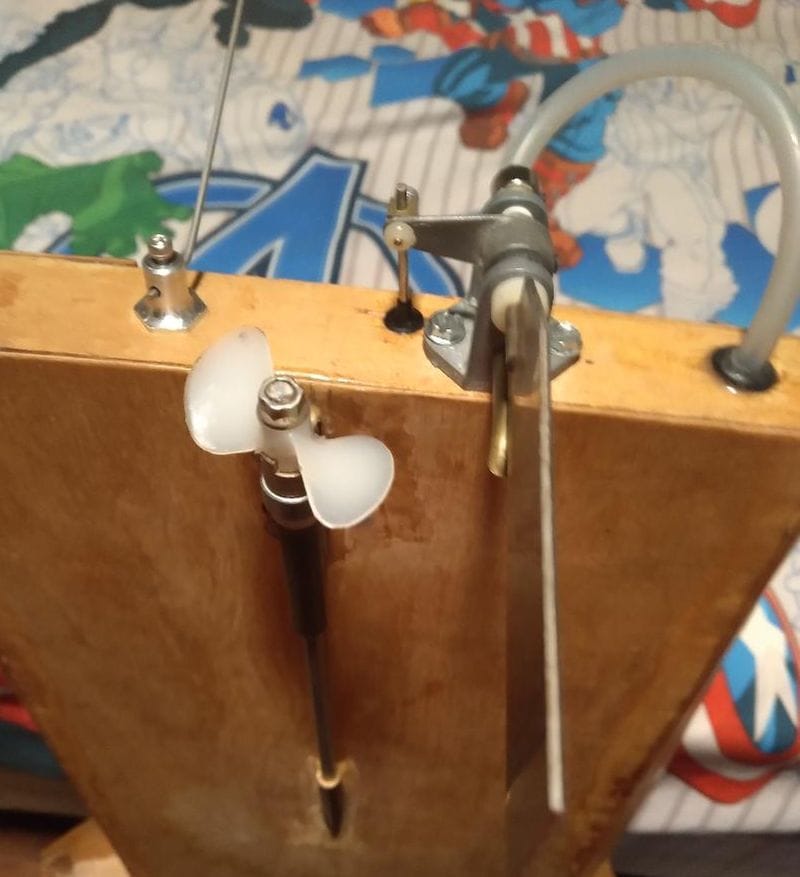
#50
Just remembered, you asked about where I put the drains on the back of the boat. I offset the threaded inserts I used to the left side of the under-deck areas. You can see the screws sticking out the back in this picture. One us right in the corner at the top, above the rudder bracket, the other is just above the bottom of the picture. Both screw heads are black in this case
Click image for larger version
Name: Yt60935.jpg
Views: 247
Size: 88.8 KB
ID: 1647812
Click image for larger version
Name: Yt60935.jpg
Views: 247
Size: 88.8 KB
ID: 1647812