


2C Garage to Ultimate R/C Shop Renovation
 07-31-2007, 06:00 PM
#26
Senior Member
Thread Starter
My Feedback: (1)

Join Date: Jun 2005
Location: Antelope Valley,
CA
Posts: 825
Likes: 0
Received 0 Likes
on
0 Posts
ORIGINAL: KW_Counter
Is all of youe electrical on a GFCI?
Is all of youe electrical on a GFCI?
Mods
 08-04-2007, 11:25 PM
#27
Senior Member
Thread Starter
My Feedback: (1)
Join Date: Jun 2005
Location: Antelope Valley,
CA
Posts: 825
Likes: 0
Received 0 Likes
on
0 Posts
Phase 4: Electrical outlets and lighting cont2...
Summary
Most of the wiring in the south wall is complete. Only need to install the outlet boxes and hook then up to the sub-box.
Construction
There was only one 15A GFCI oulet in the garage when I began this project. After mapping the electrical in my house I discovered that all of the external outlets and the one in the garage were on the same breaker [:@]. This would not do so I removed the outlet and relocated it to the ceiling (figure 1). The outdoor fixtures now feed off of the ceiling GFCI. The relocation of the outlet left about 50 feet of extra cable. This was very good considering I didn't have to use any of my own; saving $$$ [sm=thumbs_up.gif].
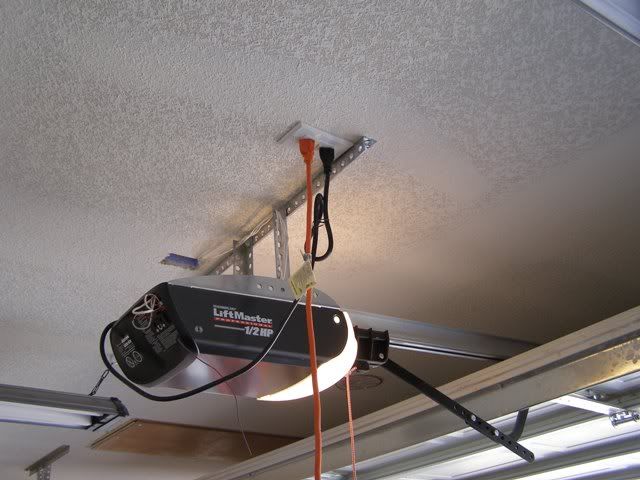
Figure 1
This wall was insulated prior to me installing more outlets so I only needed to remove small sections in order to install the outlets (figure 2). I decided to use cut in boxes due to the placement of the cabinets. The wall studs were too far away to use conventional nail boxes. Drywall is expensive, so I used the same cut-out sections as before (figure 3). Total installation time was 8 hours...not bad [sm=shades_smile.gif].
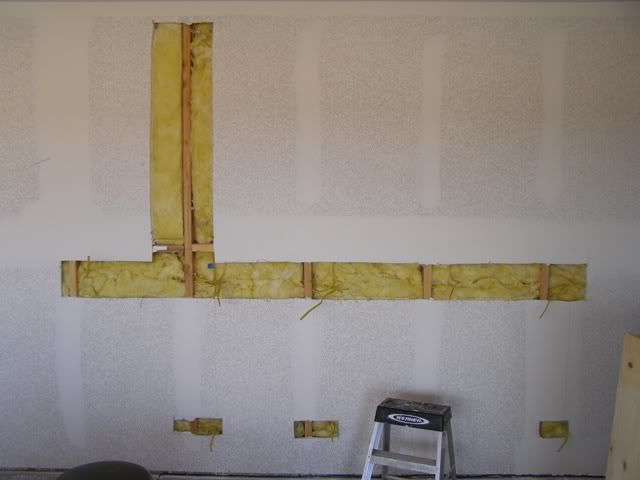
Figure 2
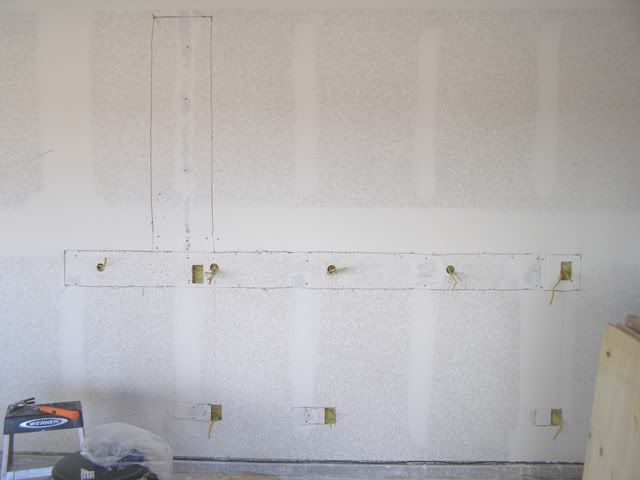
Figure 3
What's Next
1. Wire the lights
2. Wire the East Wall
3. Perform finish checks and final hook-up
Summary
Most of the wiring in the south wall is complete. Only need to install the outlet boxes and hook then up to the sub-box.
Construction
There was only one 15A GFCI oulet in the garage when I began this project. After mapping the electrical in my house I discovered that all of the external outlets and the one in the garage were on the same breaker [:@]. This would not do so I removed the outlet and relocated it to the ceiling (figure 1). The outdoor fixtures now feed off of the ceiling GFCI. The relocation of the outlet left about 50 feet of extra cable. This was very good considering I didn't have to use any of my own; saving $$$ [sm=thumbs_up.gif].
Figure 1
This wall was insulated prior to me installing more outlets so I only needed to remove small sections in order to install the outlets (figure 2). I decided to use cut in boxes due to the placement of the cabinets. The wall studs were too far away to use conventional nail boxes. Drywall is expensive, so I used the same cut-out sections as before (figure 3). Total installation time was 8 hours...not bad [sm=shades_smile.gif].
Figure 2
Figure 3
What's Next
1. Wire the lights
2. Wire the East Wall
3. Perform finish checks and final hook-up
08-05-2007, 10:56 PM
#28

Join Date: Jan 2002
Location: Fort Walton Beach,
FL
Posts: 1,218
Likes: 0
Received 0 Likes
on
0 Posts
Mods,
Nice work.
I can't imagine it is required by code to use the stud plates over the places you pulled wire through drilled holes... ?
Seems to me you could have saved yourself time & money by not bothering with them. Do you think a nail or drywall screw is going to go that deep and pierce a wire?
As a licensed electrician I can honestly say that I've only used them once or twice. I believe the NEC requires their use if the wire passes within an inch and a half of the rough surface. I don't feel like looking it up so it's only a guess.
I'm not picking - just curious.
Once again, Nice Work!
08-06-2007, 11:52 AM
#29
Senior Member
Thread Starter
My Feedback: (1)
Join Date: Jun 2005
Location: Antelope Valley,
CA
Posts: 825
Likes: 0
Received 0 Likes
on
0 Posts
ORIGINAL: Jazzy
Mods,
Nice work.
I can't imagine it is required by code to use the stud plates over the places you pulled wire through drilled holes... ?
Seems to me you could have saved yourself time & money by not bothering with them. Do you think a nail or drywall screw is going to go that deep and pierce a wire?
As a licensed electrician I can honestly say that I've only used them once or twice. I believe the NEC requires their use if the wire passes within an inch and a half of the rough surface. I don't feel like looking it up so it's only a guess.
I'm not picking - just curious.
Once again, Nice Work!
08-13-2007, 06:41 PM
#30
Senior Member
Join Date: Sep 2006
Location: Bradenton,
FL
Posts: 2,057
Likes: 0
Received 0 Likes
on
0 Posts
Is this an airplane thread or a construction thread? Just remod your shop & build a stinking airplane. You've wasted enough time planning- talking- planning- & typing to build 3 airplanes. Get over yourself & put a thread in here about your plane build!!!!!! I just had a thought--- I would bet the farm that you're an engineer.. Am I right?
08-16-2007, 02:54 AM
#31
Senior Member
Join Date: Jun 2004
Location: Antwerp, BELGIUM
Posts: 113
Likes: 0
Received 0 Likes
on
0 Posts
Hello,
I just bought a new house with similar place for making my RC-shop. I'm verry interested in your progress, any news??
I plan on waiting my build-over till you are done, so I have knowledge of all sorts of problems that can accur and possible solutions.
Eager to learn more.
Keep up the good work.
Phil
08-16-2007, 10:33 PM
#32
Senior Member
Thread Starter
My Feedback: (1)
Join Date: Jun 2005
Location: Antelope Valley,
CA
Posts: 825
Likes: 0
Received 0 Likes
on
0 Posts
ORIGINAL: thibor
Hello,
I just bought a new house with similar place for making my RC-shop. I'm verry interested in your progress, any news??
I plan on waiting my build-over till you are done, so I have knowledge of all sorts of problems that can accur and possible solutions.
Eager to learn more.
Keep up the good work.
Phil
Mods
08-27-2007, 12:23 AM
#33
Senior Member
Thread Starter
My Feedback: (1)
Join Date: Jun 2005
Location: Antelope Valley,
CA
Posts: 825
Likes: 0
Received 0 Likes
on
0 Posts
Phase 4: Electrical outlets and lighting
Summary
I can say with unsurpassed joy that the lighting/outlet wiring phase is complete! Most of the time was spent re-running the contractor installed "corner to corner" wires to 90 degree angles going form wall to wall. This was done to make insulating the ceiling much easier. If I had not re-run the wire, I'd have to pick up each wire and slide the insulation under it or cut the insulation to fit around the wire. This would cause me to spend even longer in the 120+ degree attic [:'(].
The lighting plan was modified replacing the bucket lights with six additional 48" fluorescent’s (figure 1). Lowes was offering a really good deal on them for $24/each, so I traded in the bucket lights for these. The sink idea also had to be abandoned due to installation cost and schedule constraints. I plan on having the shop done by December and dropping $1200 on the sink alone would slow down the remodel. I now plan on installing a tool cabinet and water cooler in that location to fill the space. Good thing is now I have more room for R/C plane storage .
.
Construction
Here's a shot of the light switch and garage door opener before modification (figure 2). The garage light switch feeds off of the living room, so I had to separate that circuit and run new wire from the sub-panel, through the switches, to the fluorescents’. The single gauge switch box will be replaced with a 3 gauge plastic box to accommodate two new switches (for center florescent) and a 15A outlet that still feeds the living room (figure 3). The positioning of the living room feeder wire made it difficult to bypass the garage altogether, so I made it into an outlet. Why? You can never have enough outlets [sm=49_49.gif]. I also plan on moving the garage door opener four inches to the left to make room for the cabinets.
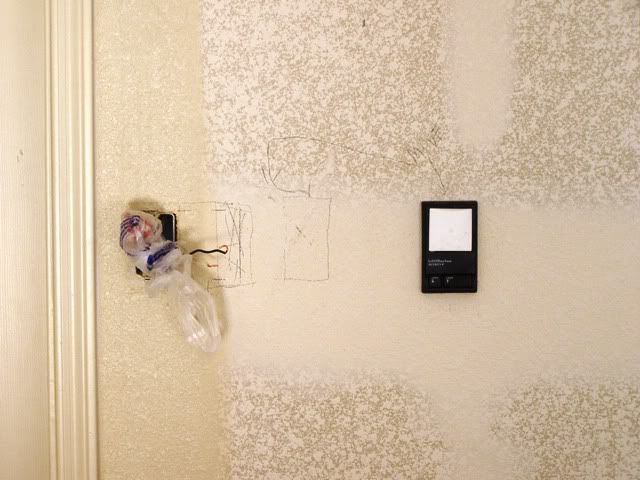
Figure 2- Switch Set Up Prior to Modification
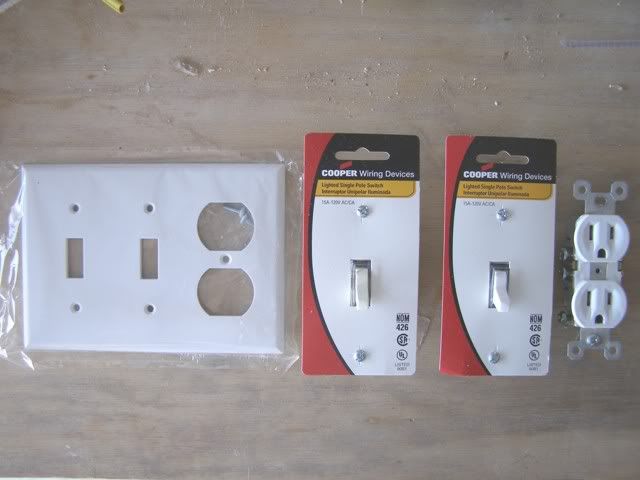
Figure 3-New Lighting/ Receptacle Hardware
Summary
I can say with unsurpassed joy that the lighting/outlet wiring phase is complete! Most of the time was spent re-running the contractor installed "corner to corner" wires to 90 degree angles going form wall to wall. This was done to make insulating the ceiling much easier. If I had not re-run the wire, I'd have to pick up each wire and slide the insulation under it or cut the insulation to fit around the wire. This would cause me to spend even longer in the 120+ degree attic [:'(].
The lighting plan was modified replacing the bucket lights with six additional 48" fluorescent’s (figure 1). Lowes was offering a really good deal on them for $24/each, so I traded in the bucket lights for these. The sink idea also had to be abandoned due to installation cost and schedule constraints. I plan on having the shop done by December and dropping $1200 on the sink alone would slow down the remodel. I now plan on installing a tool cabinet and water cooler in that location to fill the space. Good thing is now I have more room for R/C plane storage
. Figure 1
Construction
Here's a shot of the light switch and garage door opener before modification (figure 2). The garage light switch feeds off of the living room, so I had to separate that circuit and run new wire from the sub-panel, through the switches, to the fluorescents’. The single gauge switch box will be replaced with a 3 gauge plastic box to accommodate two new switches (for center florescent) and a 15A outlet that still feeds the living room (figure 3). The positioning of the living room feeder wire made it difficult to bypass the garage altogether, so I made it into an outlet. Why? You can never have enough outlets [sm=49_49.gif]. I also plan on moving the garage door opener four inches to the left to make room for the cabinets.
Figure 2- Switch Set Up Prior to Modification
Figure 3-New Lighting/ Receptacle Hardware
08-27-2007, 12:44 AM
#34
Senior Member
Thread Starter
My Feedback: (1)
Join Date: Jun 2005
Location: Antelope Valley,
CA
Posts: 825
Likes: 0
Received 0 Likes
on
0 Posts
Phase 4: Electrical outlets and lighting cont...
First, I removed the drywall from the area (figure 1). Note the pattern of the cut; this way I don't have to add extra wood backing to the cut-out section for screws. Next, 12/3 Romex was ran from the sub panel to the cut-in box above the switch (figure 2). Here the 12/3 was split with two 12/2 wires to operate both sets of center room florescent lights. One light switch for the front two and the other for the rear two.
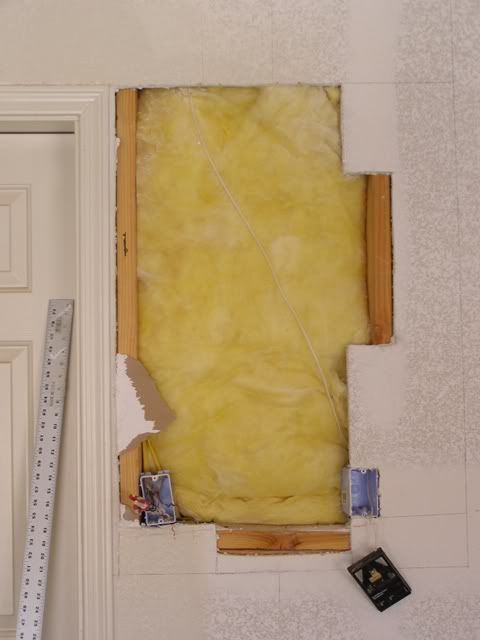
Figure 1: Drywall Removal
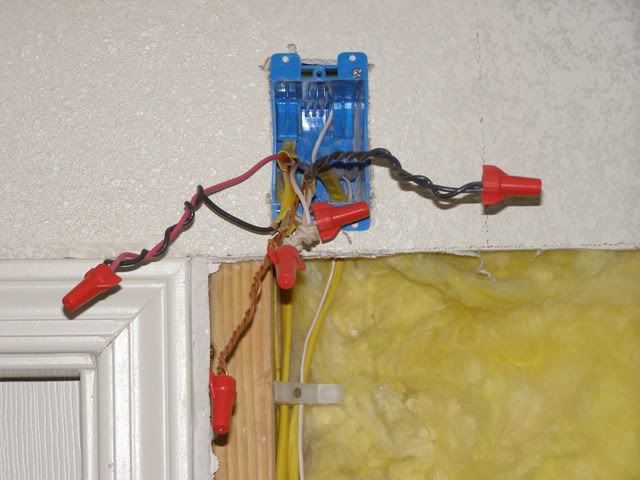
Figure 2: Cut-in Box Splice 12/3 (1) to 12/2 (2)
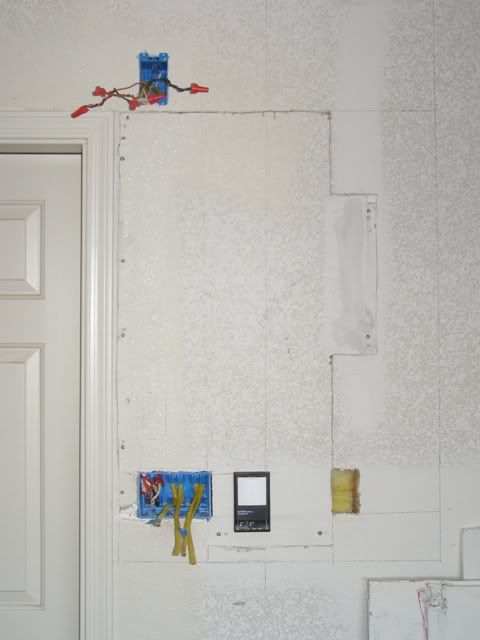
Figure 3: Drywall Section Replaced
One more thing...According to NEC code wire are to be firmly affixed to a stud with some sort of fixture ("stack its", cables boss, etc). I had to reciprocating saw on full blast when I hear a large "POP' and then the garage door closed. This is what happens when you run wires corner to corner (figure 4). I guess the contractor forgot about this one [:@].The damaged wire was then spliced and inserted into the cut-in box. Now I know to never cut blindly into a wall.

Figure 4: Garage door wire damage
First, I removed the drywall from the area (figure 1). Note the pattern of the cut; this way I don't have to add extra wood backing to the cut-out section for screws. Next, 12/3 Romex was ran from the sub panel to the cut-in box above the switch (figure 2). Here the 12/3 was split with two 12/2 wires to operate both sets of center room florescent lights. One light switch for the front two and the other for the rear two.
Figure 1: Drywall Removal
Figure 2: Cut-in Box Splice 12/3 (1) to 12/2 (2)
Figure 3: Drywall Section Replaced
One more thing...According to NEC code wire are to be firmly affixed to a stud with some sort of fixture ("stack its", cables boss, etc). I had to reciprocating saw on full blast when I hear a large "POP' and then the garage door closed. This is what happens when you run wires corner to corner (figure 4). I guess the contractor forgot about this one [:@].The damaged wire was then spliced and inserted into the cut-in box. Now I know to never cut blindly into a wall.
Figure 4: Garage door wire damage
08-27-2007, 01:15 AM
#35
Senior Member
Thread Starter
My Feedback: (1)
Join Date: Jun 2005
Location: Antelope Valley,
CA
Posts: 825
Likes: 0
Received 0 Likes
on
0 Posts
Phase 4: Electrical outlets and lighting cont...
Here's a quick before and after of the West Wall wiring (figures 1 & 2). The wiring was installed the same way as described earlier, except for the three-way light switch to control the side fluorescent’s over the cut/sand/saw/mini-fridge workbenches. There is another three-way in the same spot on the West Wall. This way I have extra light when needed for small, quick modifications.
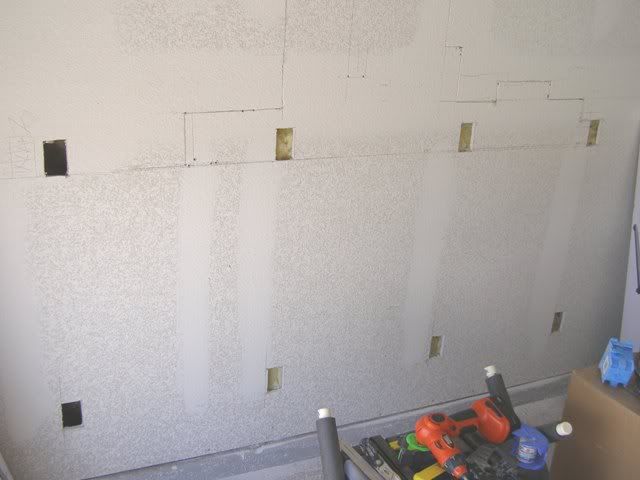
Figure 1: East Wall before Wiring

Figure 2: East Wall after Wiring
Finally, here's a shot of the sub-panel ready for final hook-up. All wires are labeled with their corresponding location.
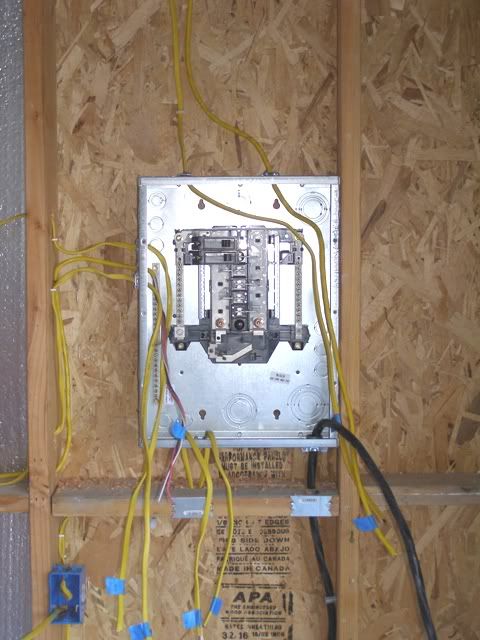
Figure 3: Sub-Panel
Starting to see daylight
Mods
What's Next?
1. Hook-up electricity
2. Insulate Attic and Walls
3. Install A/C
4. Epoxy the Floor
Here's a quick before and after of the West Wall wiring (figures 1 & 2). The wiring was installed the same way as described earlier, except for the three-way light switch to control the side fluorescent’s over the cut/sand/saw/mini-fridge workbenches. There is another three-way in the same spot on the West Wall. This way I have extra light when needed for small, quick modifications.
Figure 1: East Wall before Wiring
Figure 2: East Wall after Wiring
Finally, here's a shot of the sub-panel ready for final hook-up. All wires are labeled with their corresponding location.
Figure 3: Sub-Panel
Starting to see daylight
Mods
What's Next?
1. Hook-up electricity
2. Insulate Attic and Walls
3. Install A/C
4. Epoxy the Floor
08-27-2007, 01:22 AM
#36
Senior Member
Join Date: Aug 2005
Location: merrillville,
IN
Posts: 213
Likes: 0
Received 0 Likes
on
0 Posts
Only comment I have on the whole project is screw the cheap romex and put in EMT conduit. You would never cut through it so easily.
08-27-2007, 01:45 AM
#37
Senior Member
Thread Starter
My Feedback: (1)
Join Date: Jun 2005
Location: Antelope Valley,
CA
Posts: 825
Likes: 0
Received 0 Likes
on
0 Posts
ORIGINAL: waross
Only comment I have on the whole project is screw the cheap romex and put in EMT conduit. You would never cut through it so easily.
Only comment I have on the whole project is screw the cheap romex and put in EMT conduit. You would never cut through it so easily.
08-27-2007, 07:35 AM
#38
Senior Member

Kelvin,nice looking project, coming along very well. The romex if properly installed and sized is more than adequate, E.M.T. electrical metalic tubing would be overkill in this application. Naturally, anything surface mounted should be in an approved raceway, low voltage wiring for door openers, etc. wouldn't need to be though. Ace Hardware stores carry a good assortment of electrical needs, E.M.T. included. You mention the contractor ran some romex diagonally, that to me isn't installed in a "workmanship like manner", I would have changed it also. Are you going to have any sound system for soothing music , in ceiling speakers would be nice. I retired from the electrical trade after 40 years at it, I couldn't have found a better job.
08-27-2007, 09:54 AM
#39
Senior Member
Thread Starter
My Feedback: (1)
Join Date: Jun 2005
Location: Antelope Valley,
CA
Posts: 825
Likes: 0
Received 0 Likes
on
0 Posts
ORIGINAL: DelRay
You mention the contractor ran some romex diagonally, that to me isn't installed in a "workmanship like manner", I would have changed it also. Are you going to have any sound system for soothing music , in ceiling speakers would be nice.
You mention the contractor ran some romex diagonally, that to me isn't installed in a "workmanship like manner", I would have changed it also. Are you going to have any sound system for soothing music , in ceiling speakers would be nice.
08-28-2007, 06:54 AM
#40
Senior Member
Kelvin, glad to put my two cents worth in. You wouldn't necessarily have to install the "master unit" in the wall unless you wanted it, but at least the speakers and the speaker wiring would be concealed. Find a good location for the "boombox" or rcvr/amp and exit the speaker leads in that location. Running romex diagonally is like running a piece of E.M.T. crooked in my mind, just ain't right.[>:] It's just as much fun to help someone else spend money as it is to spend your own.
 09-05-2007, 02:32 PM
#43
Senior Member
Thread Starter
My Feedback: (1)
Join Date: Jun 2005
Location: Antelope Valley,
CA
Posts: 825
Likes: 0
Received 0 Likes
on
0 Posts
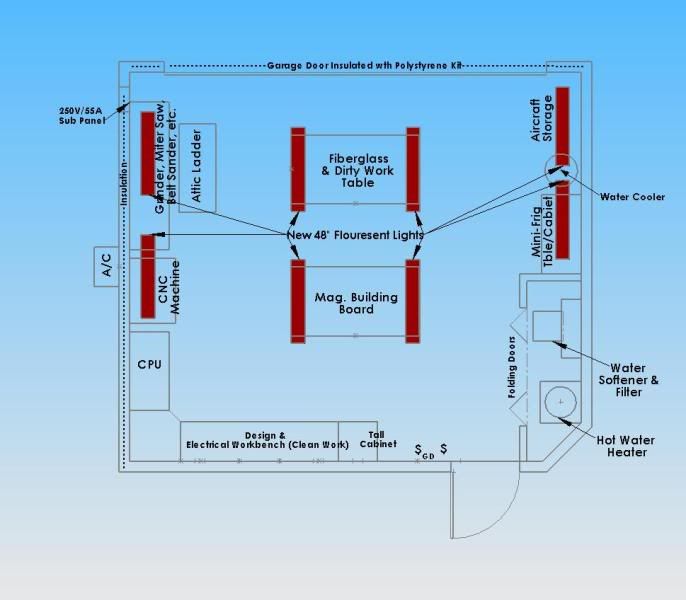
My electrical consultant just left and says everything is good to go for the final hook-up . Now, I'm heading to city hall and apply for my permit. Here's the final wiring diagram for the shop.
EDIT: Got the permit. Total time for approval = 5 min. Total cost = $101
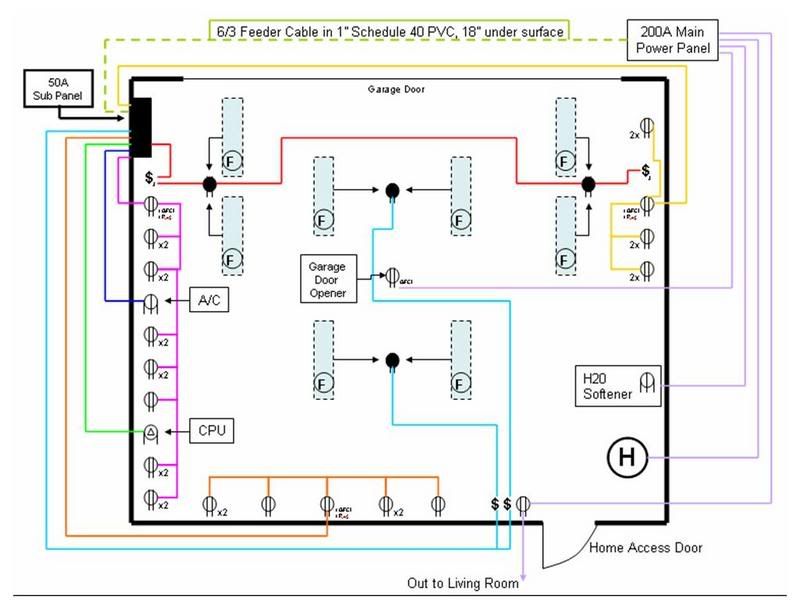
Wiring Diagram
. Now, I'm heading to city hall and apply for my permit. Here's the final wiring diagram for the shop.EDIT: Got the permit. Total time for approval = 5 min. Total cost = $101
Wiring Diagram
09-09-2007, 12:05 PM
#44
Join Date: Jan 2002
Location: Fort Walton Beach,
FL
Posts: 1,218
Likes: 0
Received 0 Likes
on
0 Posts
Wow, lots of work done! Looks good!
Diagonal Romex??? Hack Electric or Amature Electric at its best. The contractor was simply saving money by using less wire. Crooked conduit? - no way!. Nice clean flowing racks, concentric bends, staggered kicks - the only way to go!
Kevin, have you ever considered cutting the drywall down the center of a stud instead of over a dead space? Less mudwork and more durable finished product.
By the way, in a finished wall you don't have to staple or otherwise secure the wiring within the wall! Cut the outlet hole and 'fish' the wire down from above through a hole drilled in the header. Staple in attic. Done. Cut-in boxes or 'wing-backs' etc are designed just for such cases. Sorry, I should have mentioned them earlier... OH yeah, make sure you keep the living room wiring separate from the sub-panel wiring. This includes the neutrals.
BTW, where is the wet (or semi-wet) bar? Some rum, JD, Rumpleminze, and Blackhause would be grand!
Nice work!!
Diagonal Romex??? Hack Electric or Amature Electric at its best. The contractor was simply saving money by using less wire. Crooked conduit? - no way!. Nice clean flowing racks, concentric bends, staggered kicks - the only way to go!
Kevin, have you ever considered cutting the drywall down the center of a stud instead of over a dead space? Less mudwork and more durable finished product.
By the way, in a finished wall you don't have to staple or otherwise secure the wiring within the wall! Cut the outlet hole and 'fish' the wire down from above through a hole drilled in the header. Staple in attic. Done. Cut-in boxes or 'wing-backs' etc are designed just for such cases. Sorry, I should have mentioned them earlier...
OH yeah, make sure you keep the living room wiring separate from the sub-panel wiring. This includes the neutrals.BTW, where is the wet (or semi-wet) bar? Some rum, JD, Rumpleminze, and Blackhause would be grand!
Nice work!!
09-09-2007, 09:47 PM
#45
Senior Member
Thread Starter
My Feedback: (1)
Join Date: Jun 2005
Location: Antelope Valley,
CA
Posts: 825
Likes: 0
Received 0 Likes
on
0 Posts
ORIGINAL: Jazzy
Kevin, have you ever considered cutting the drywall down the center of a stud instead of over a dead space? Less mudwork and more durable finished product.
By the way, in a finished wall you don't have to staple or otherwise secure the wiring within the wall! Cut the outlet hole and 'fish' the wire down from above through a hole drilled in the header.
OH yeah, make sure you keep the living room wiring separate from the sub-panel wiring. This includes the neutrals.
BTW, where is the wet (or semi-wet) bar? Some rum, JD, Rumpleminze, and Blackhause would be grand!
09-10-2007, 10:28 AM
#46
Senior Member
Hey, lookin' good, almost there, when's the grande opening party? Ahh, fishing wire down inside walls, a length of sash chain will surely aid in this proceedure, unless the wall is insulated.[:@] If so, get out the ol' fishtape and have some real fun, er, well, experience. Rum is good for me also with a splash of Coke please.
Ahh, fishing wire down inside walls, a length of sash chain will surely aid in this proceedure, unless the wall is insulated.[:@] If so, get out the ol' fishtape and have some real fun, er, well, experience. Rum is good for me also with a splash of Coke please.
09-10-2007, 10:50 AM
#47
Senior Member
Thread Starter
My Feedback: (1)
Join Date: Jun 2005
Location: Antelope Valley,
CA
Posts: 825
Likes: 0
Received 0 Likes
on
0 Posts
ORIGINAL: DelRay
Hey, lookin' good, almost there, when's the grande opening party? Ahh, fishing wire down inside walls, a length of sash chain will surely aid in this proceedure, unless the wall is insulated.[:@] If so, get out the ol' fishtape and have some real fun, er, well, experience. Rum is good for me also with a splash of Coke please.
Hey, lookin' good, almost there, when's the grande opening party?
Ahh, fishing wire down inside walls, a length of sash chain will surely aid in this proceedure, unless the wall is insulated.[:@] If so, get out the ol' fishtape and have some real fun, er, well, experience. Rum is good for me also with a splash of Coke please.
09-10-2007, 09:40 PM
#48
Senior Member
Thread Starter
My Feedback: (1)
Join Date: Jun 2005
Location: Antelope Valley,
CA
Posts: 825
Likes: 0
Received 0 Likes
on
0 Posts
Phase 4: Electrical outlets and lighting
Quick Update
All outlets have been wired and are ready for inspection on Friday. In the mean time, I've installed six of the eight florescent lights and a 13A, 50ft, retractable extension cord (Figures 1 & 2). Why did I wait so long to install one of these? In only two days it has become the most used item in the entire renovation. I've since wrapped my other extension cords in a box and haven't looked back since.
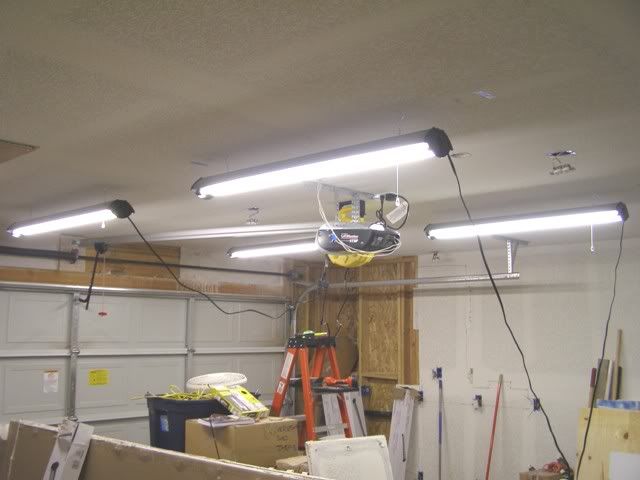
Figure 1: Main Shop Lights
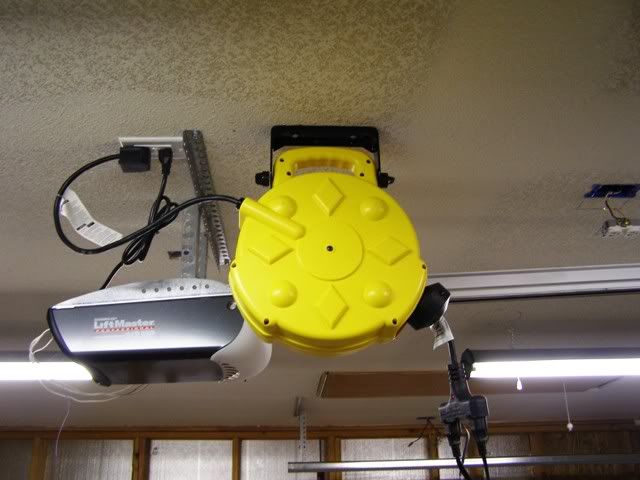
Figure 2: Retractable Extension Cord
What's Next
1. Install all the outlets
2. Install the breakers
3. Turn on the juice! (hopefully this weekend)
Mods
Quick Update
All outlets have been wired and are ready for inspection on Friday. In the mean time, I've installed six of the eight florescent lights and a 13A, 50ft, retractable extension cord (Figures 1 & 2). Why did I wait so long to install one of these? In only two days it has become the most used item in the entire renovation. I've since wrapped my other extension cords in a box and haven't looked back since.
Figure 1: Main Shop Lights
Figure 2: Retractable Extension Cord
What's Next
1. Install all the outlets
2. Install the breakers
3. Turn on the juice! (hopefully this weekend)
Mods
09-11-2007, 07:17 AM
#49
Senior Member
Hey, by the looks of the pic (main shop lights) you can now be inducted into the order of the "Illustrious Illuminators"
The retractable extention cord is a nice addition, they come in handy, and usually no kinks or wrinkles in it when you want to use it.
The retractable extention cord is a nice addition, they come in handy, and usually no kinks or wrinkles in it when you want to use it.
09-11-2007, 01:52 PM
#50
Senior Member
Thread Starter
My Feedback: (1)
Join Date: Jun 2005
Location: Antelope Valley,
CA
Posts: 825
Likes: 0
Received 0 Likes
on
0 Posts
Got good news and possible bad news. Just got a call from a company I've been wanting to work for and they offered me $25,000 more than I'm making now to move [&:]. Decisions, decisions.........