


My T34/76 Progress...
 12-31-2018, 10:37 AM
#1

Thread Starter
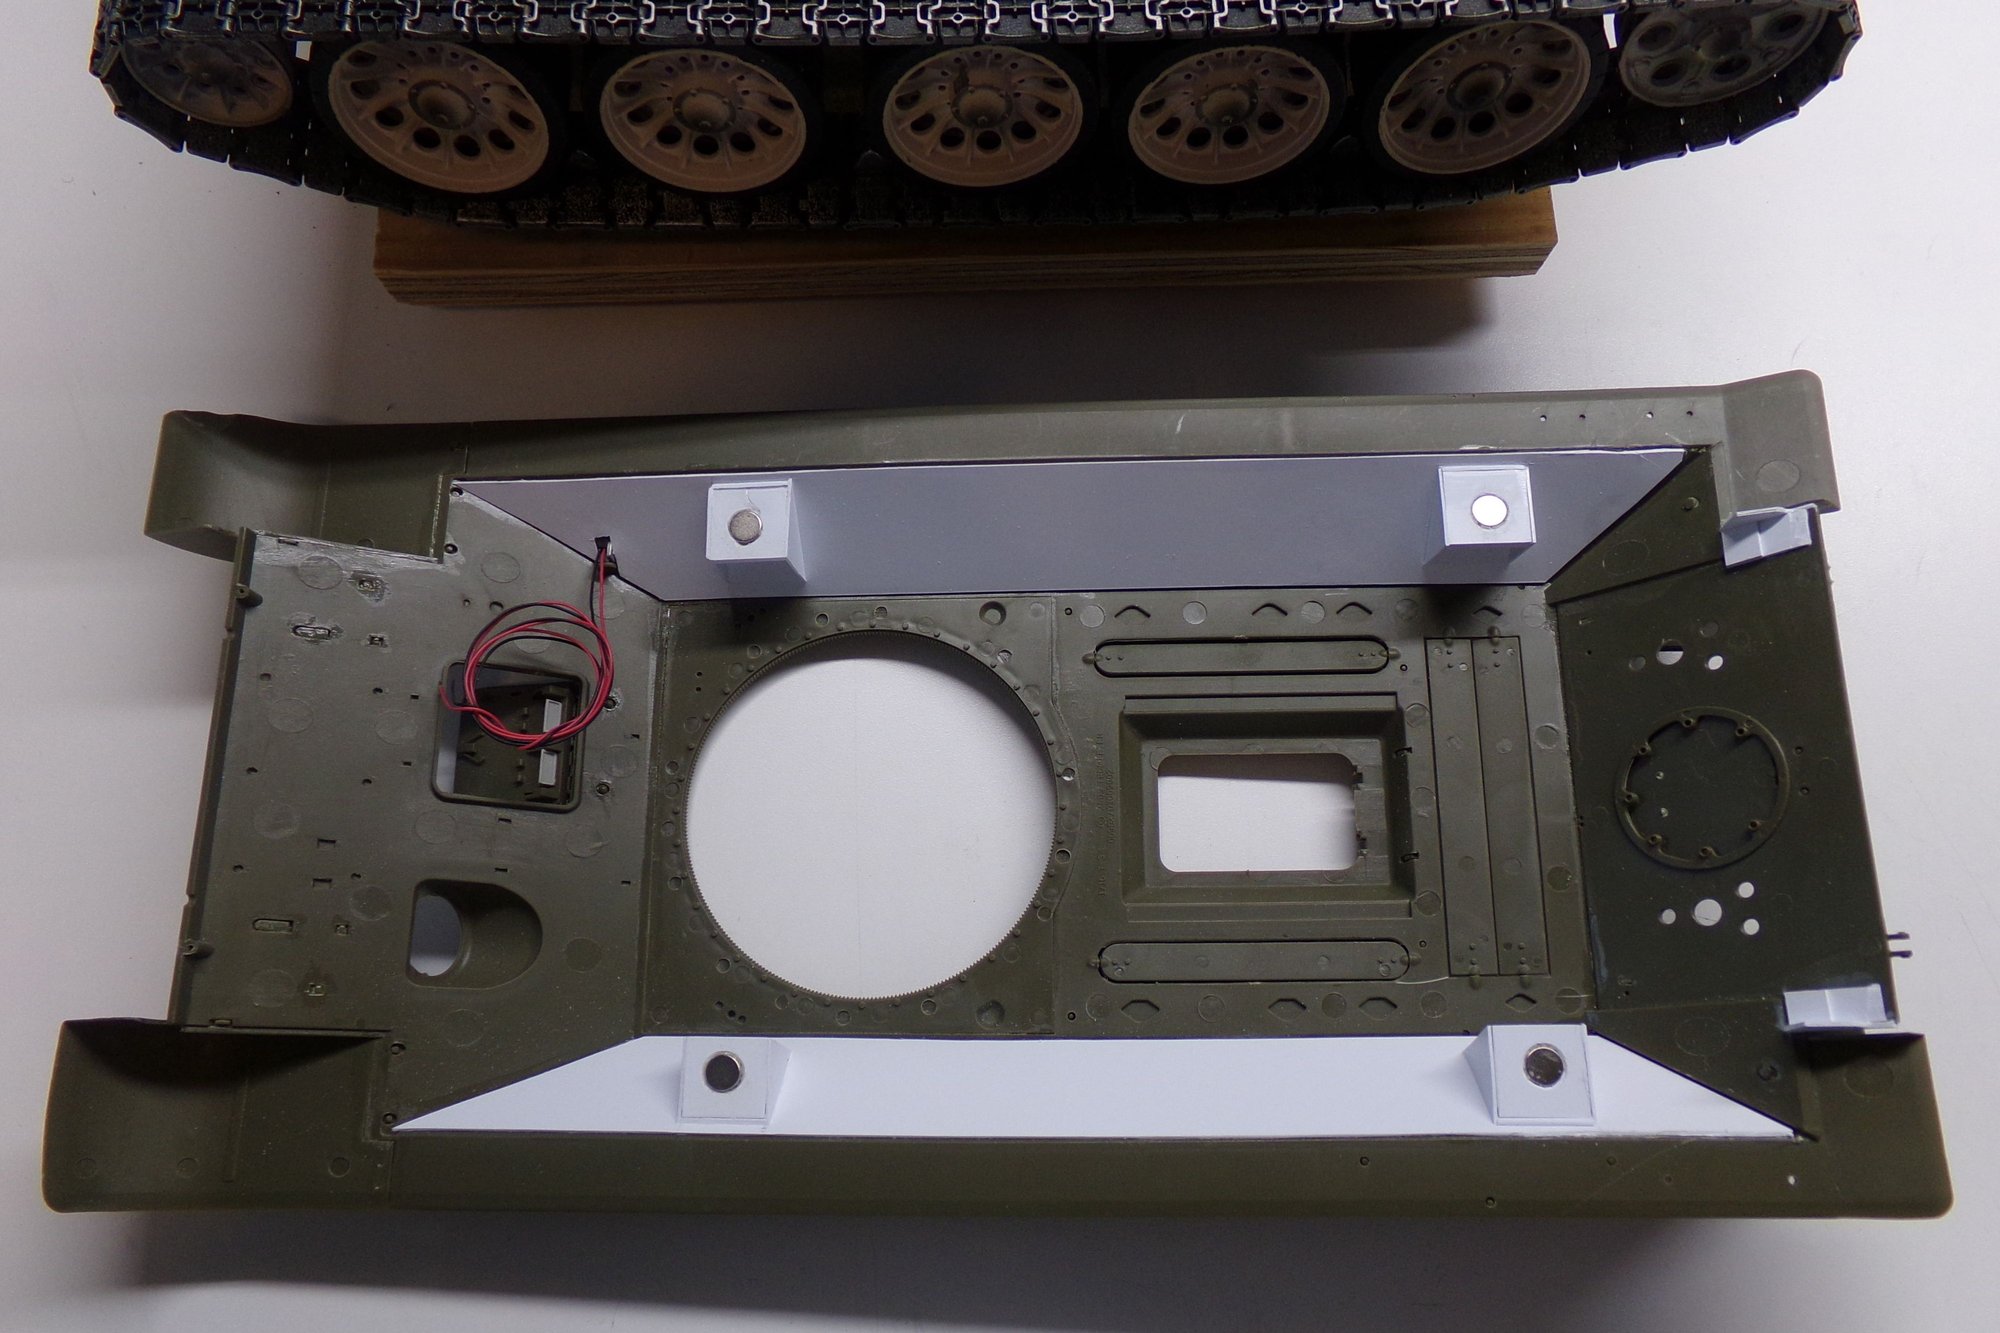
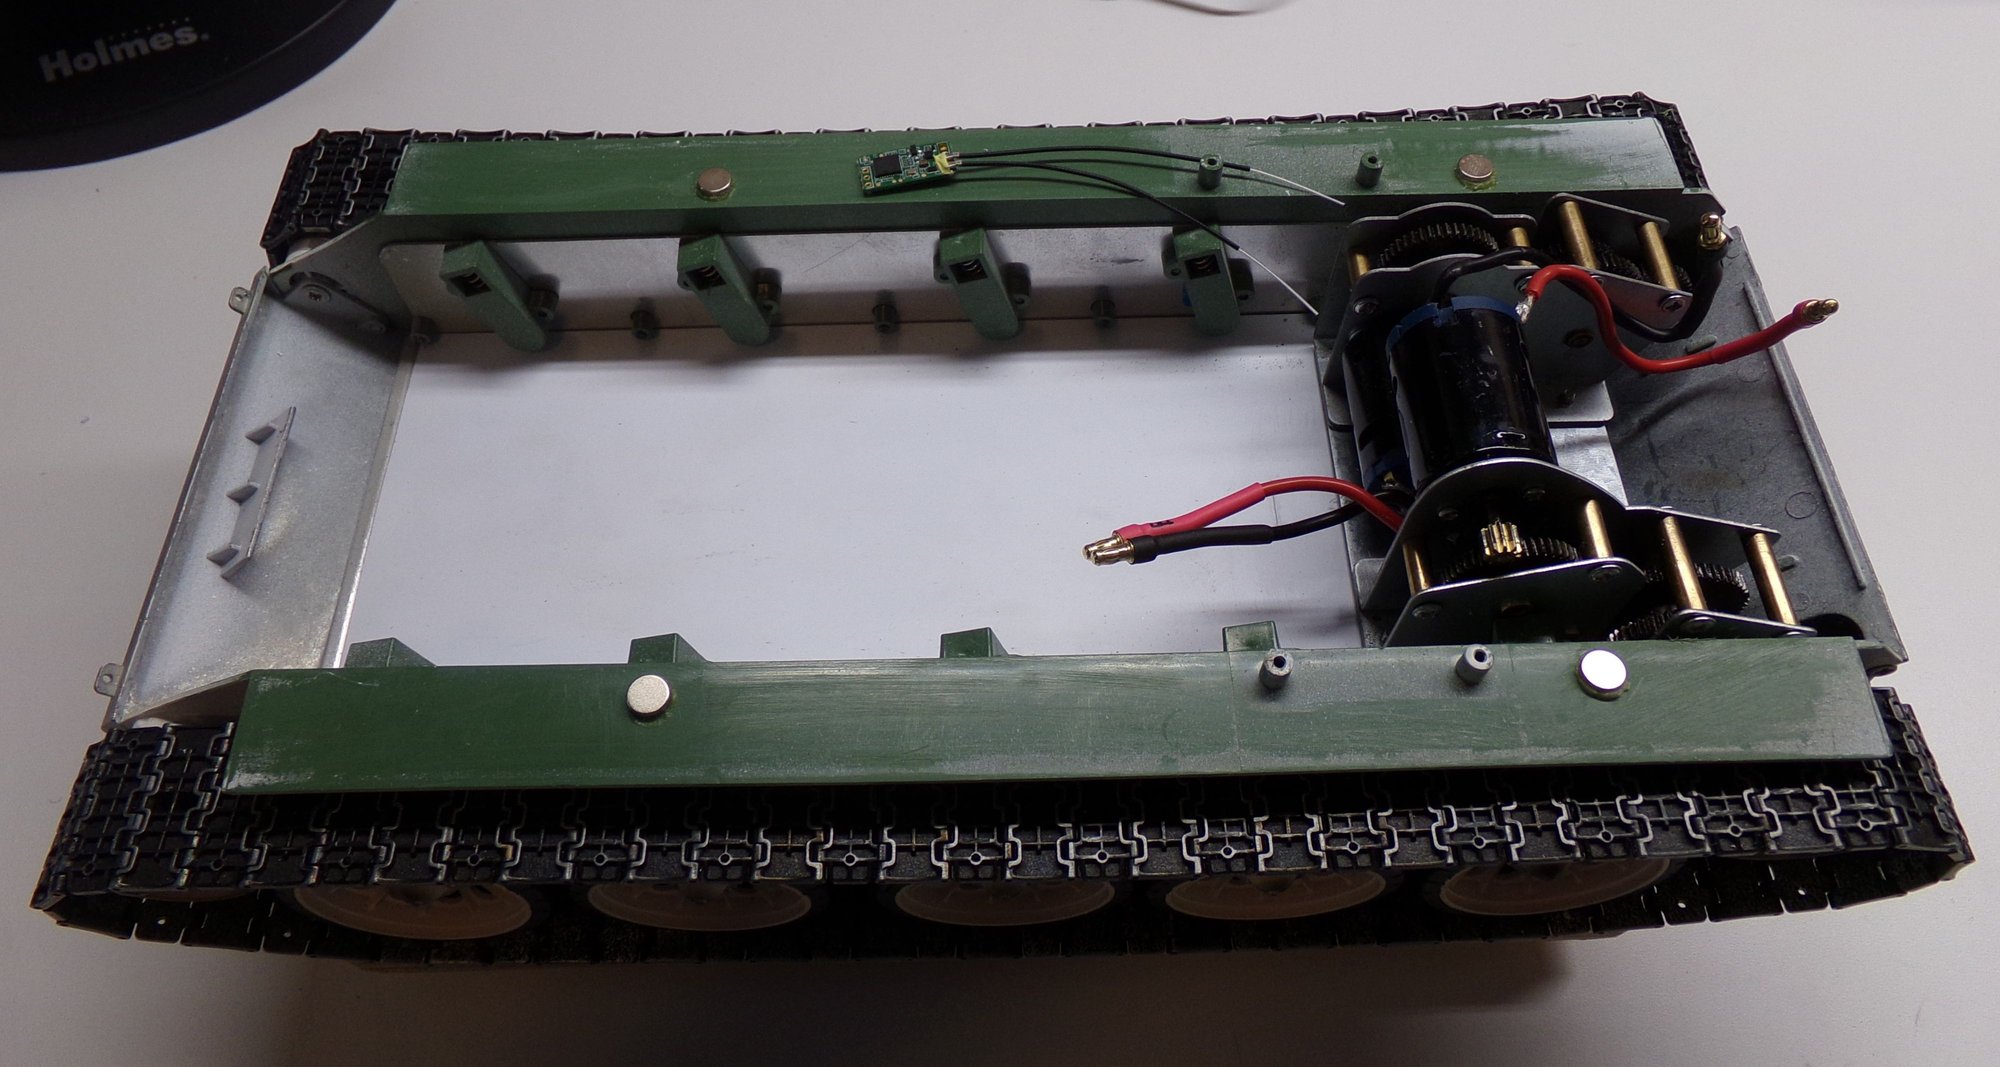
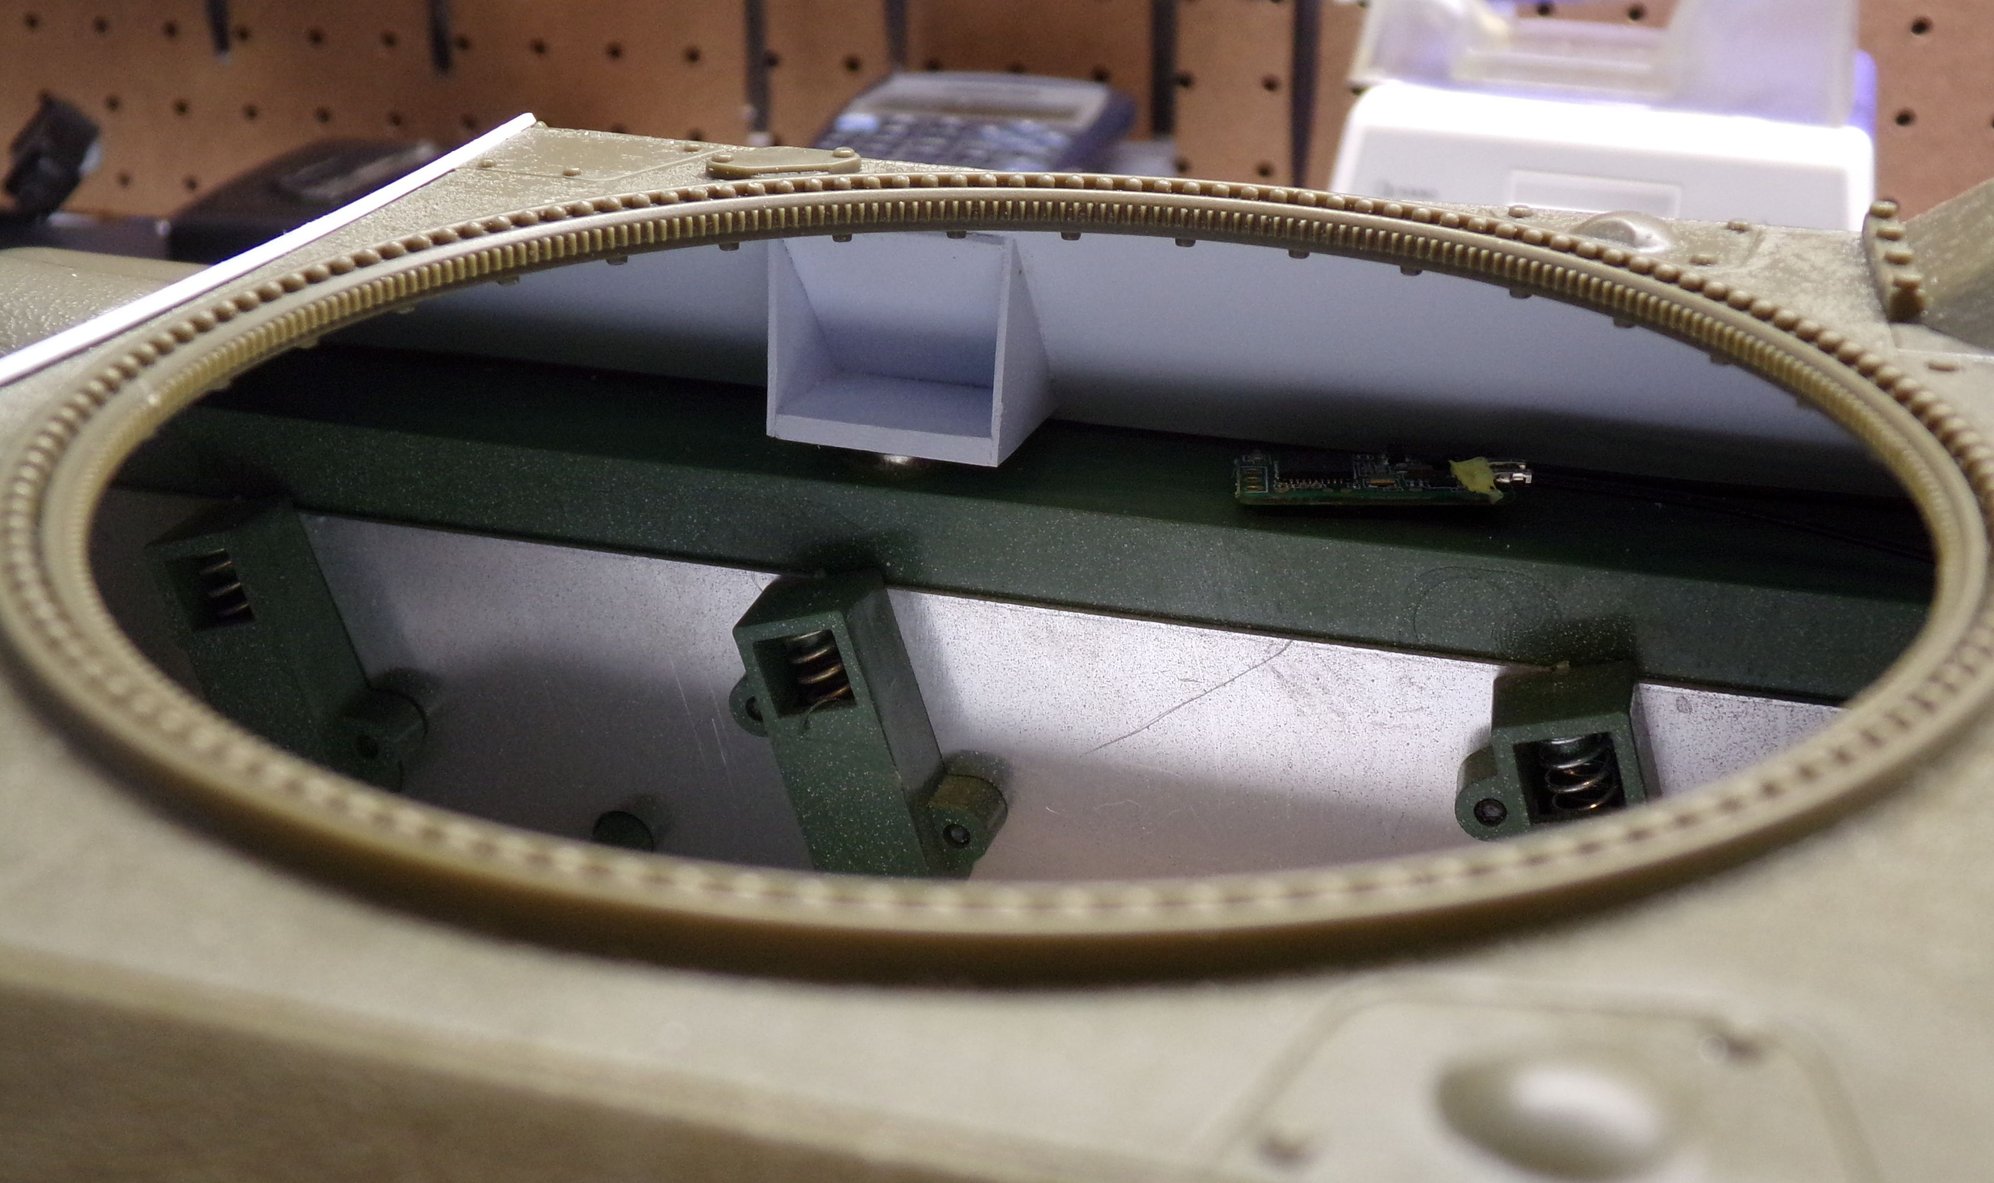
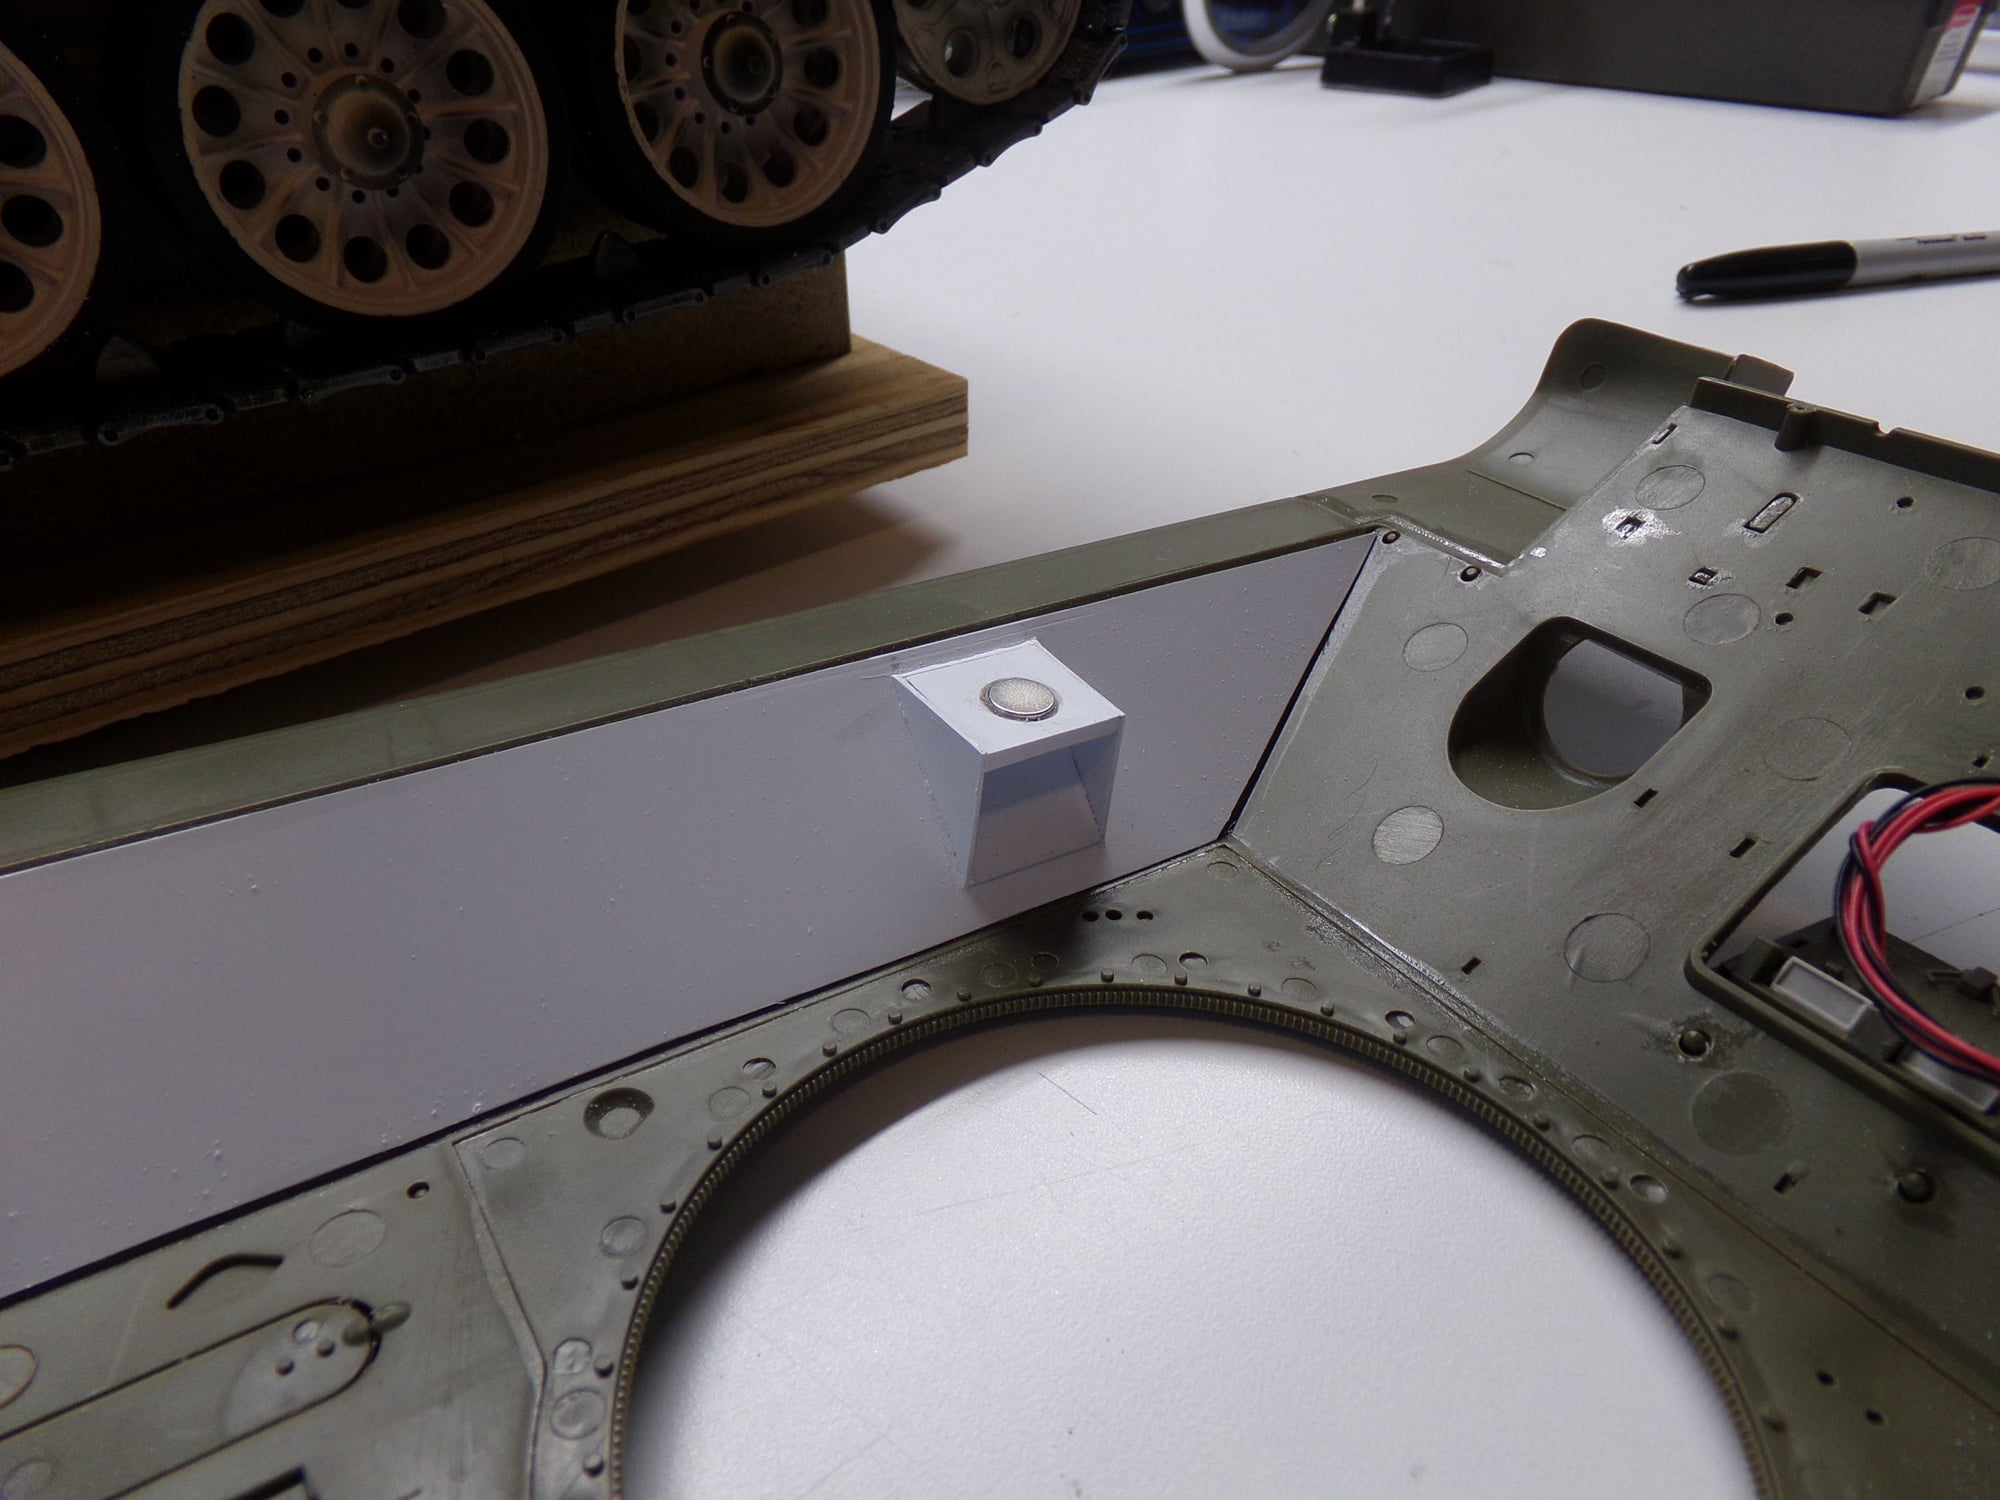
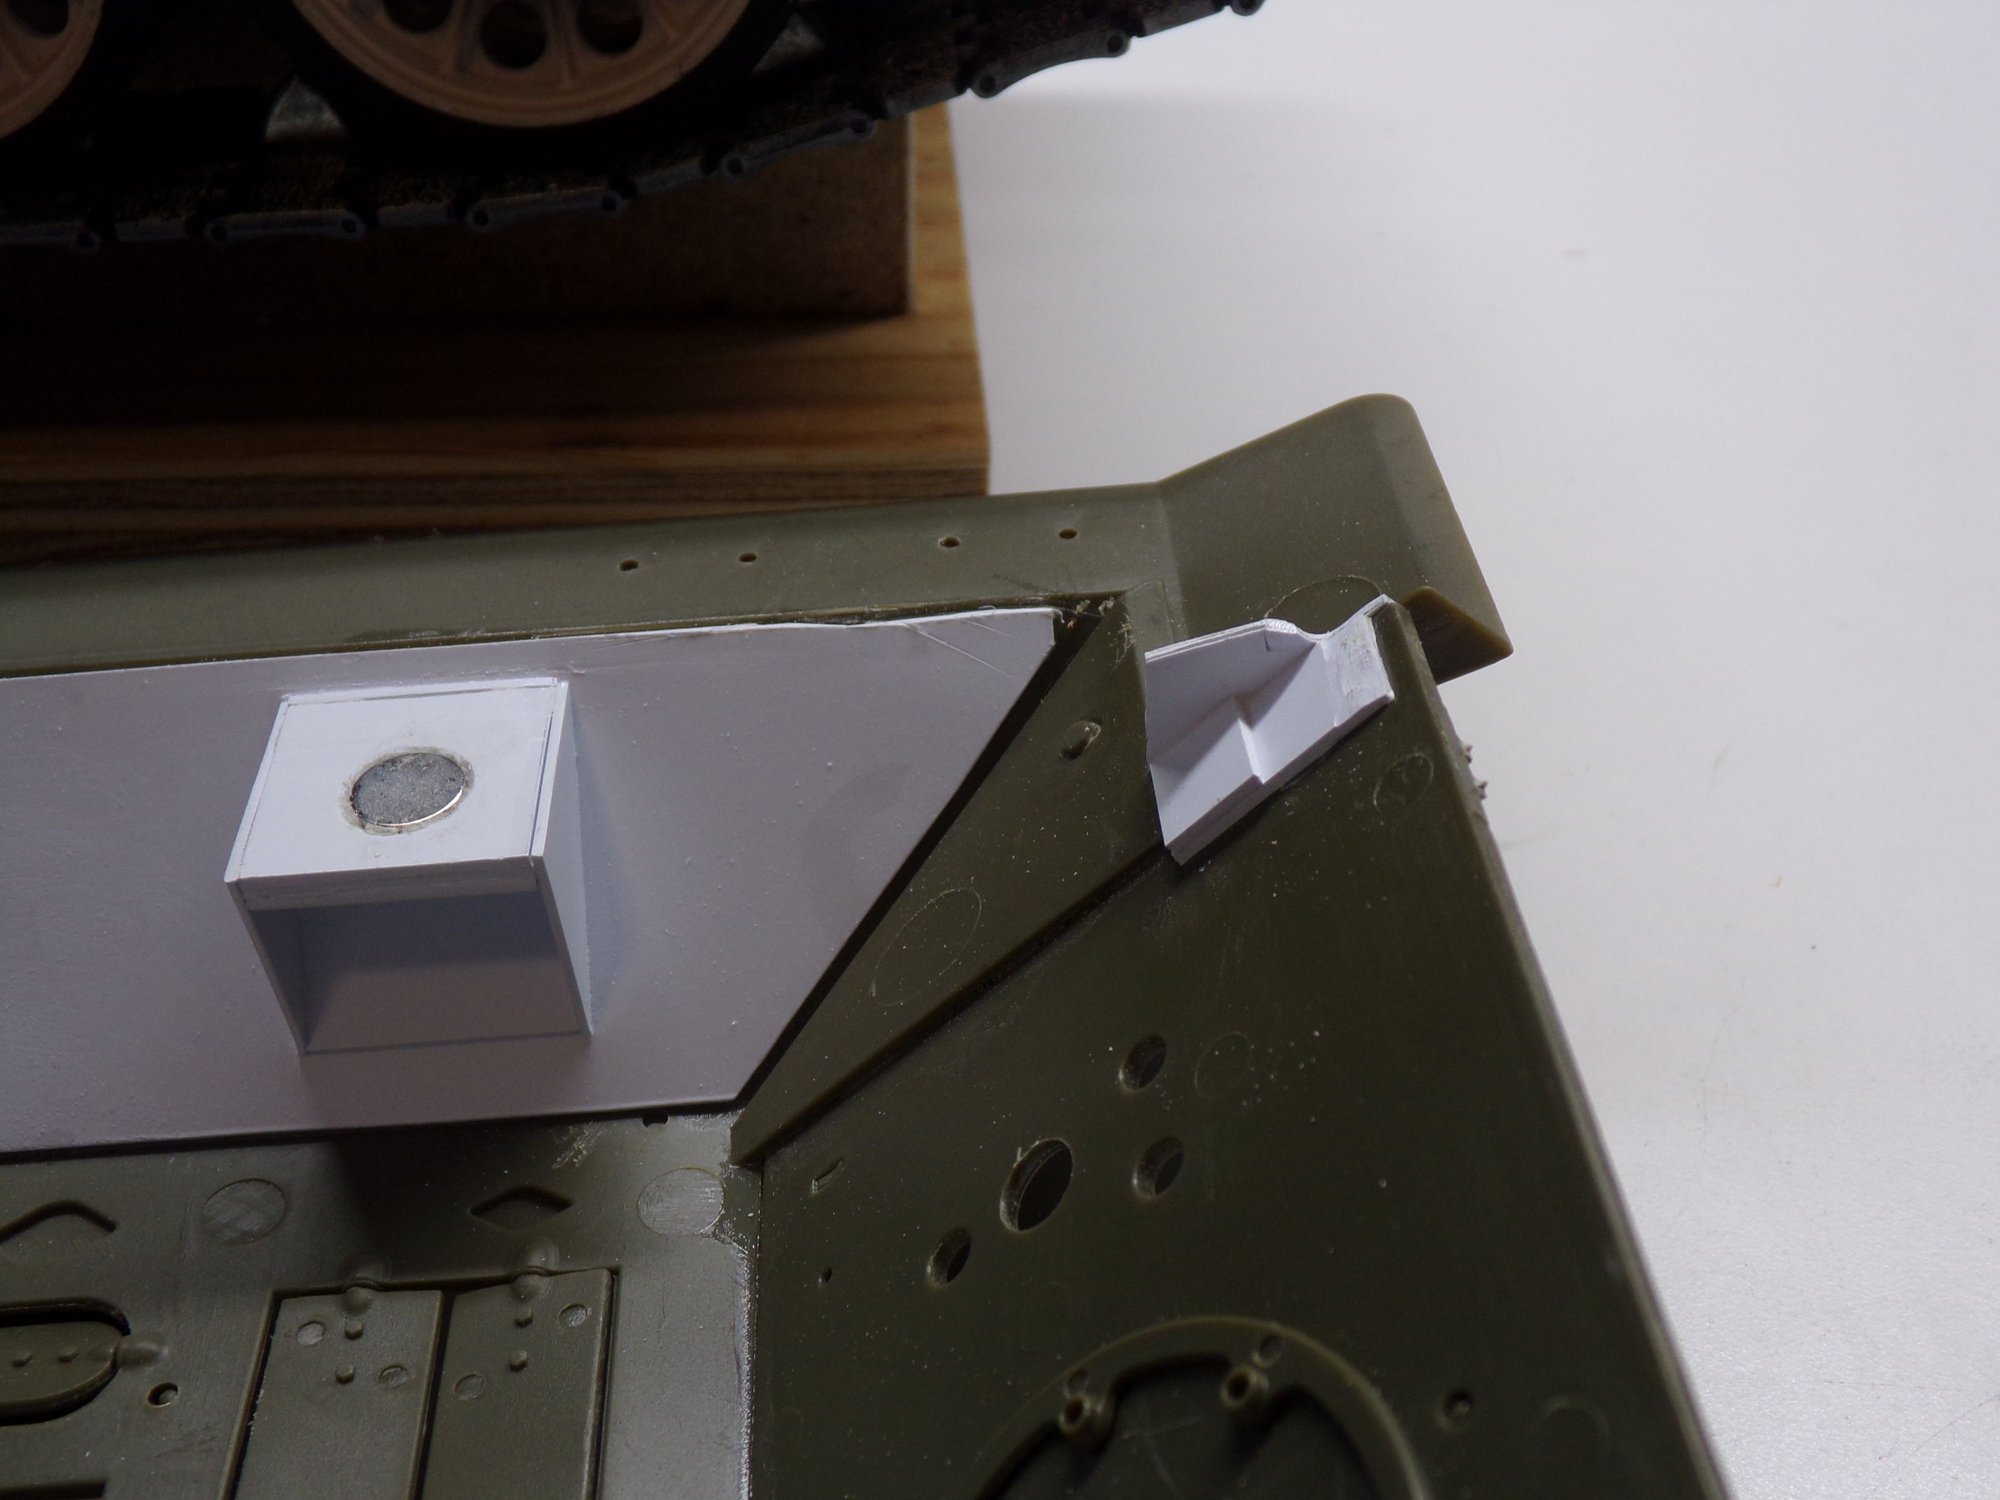
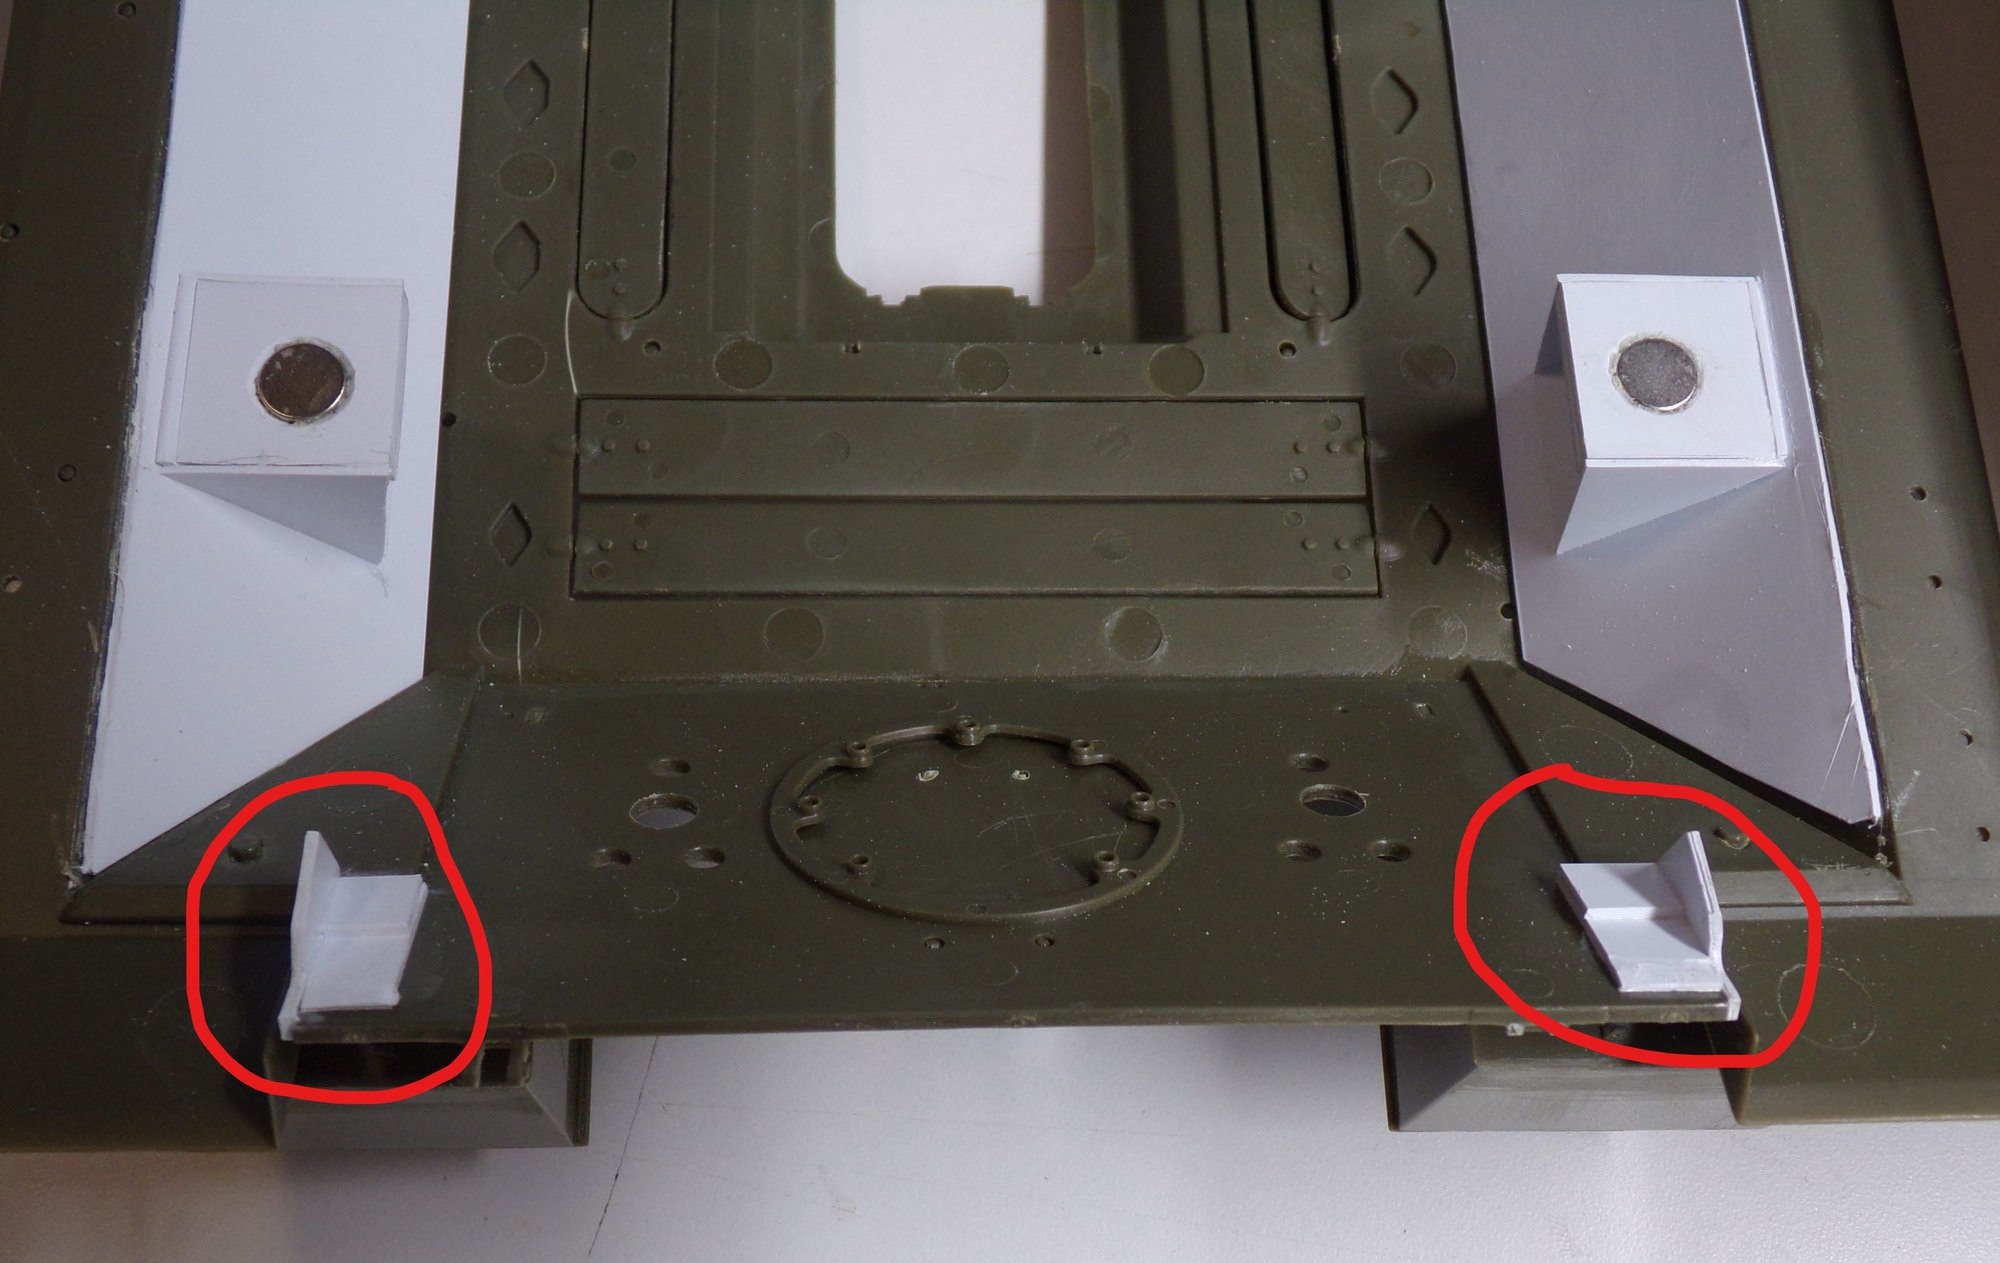
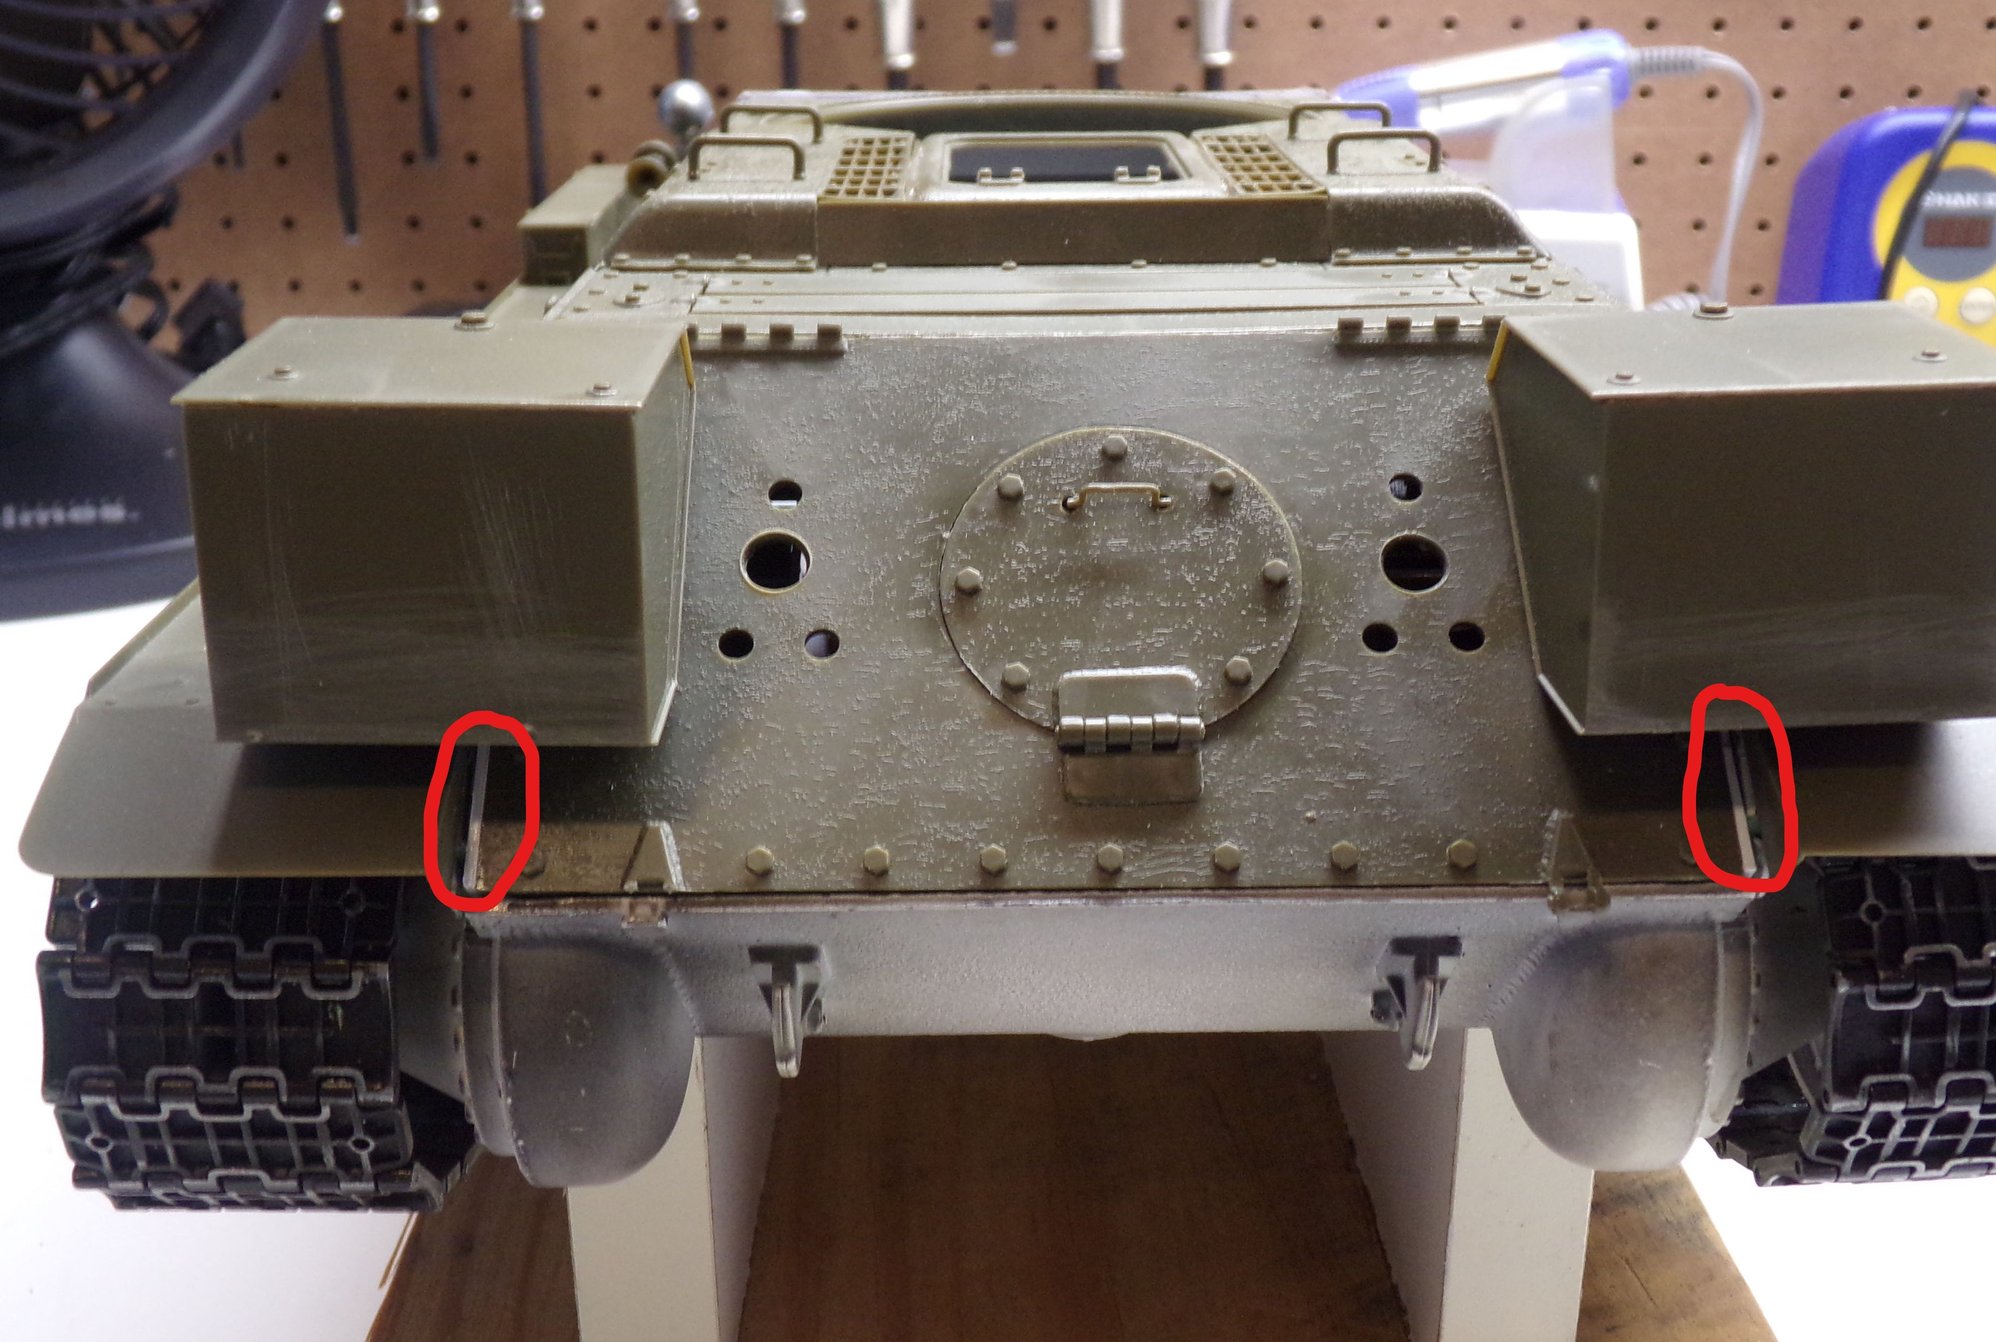
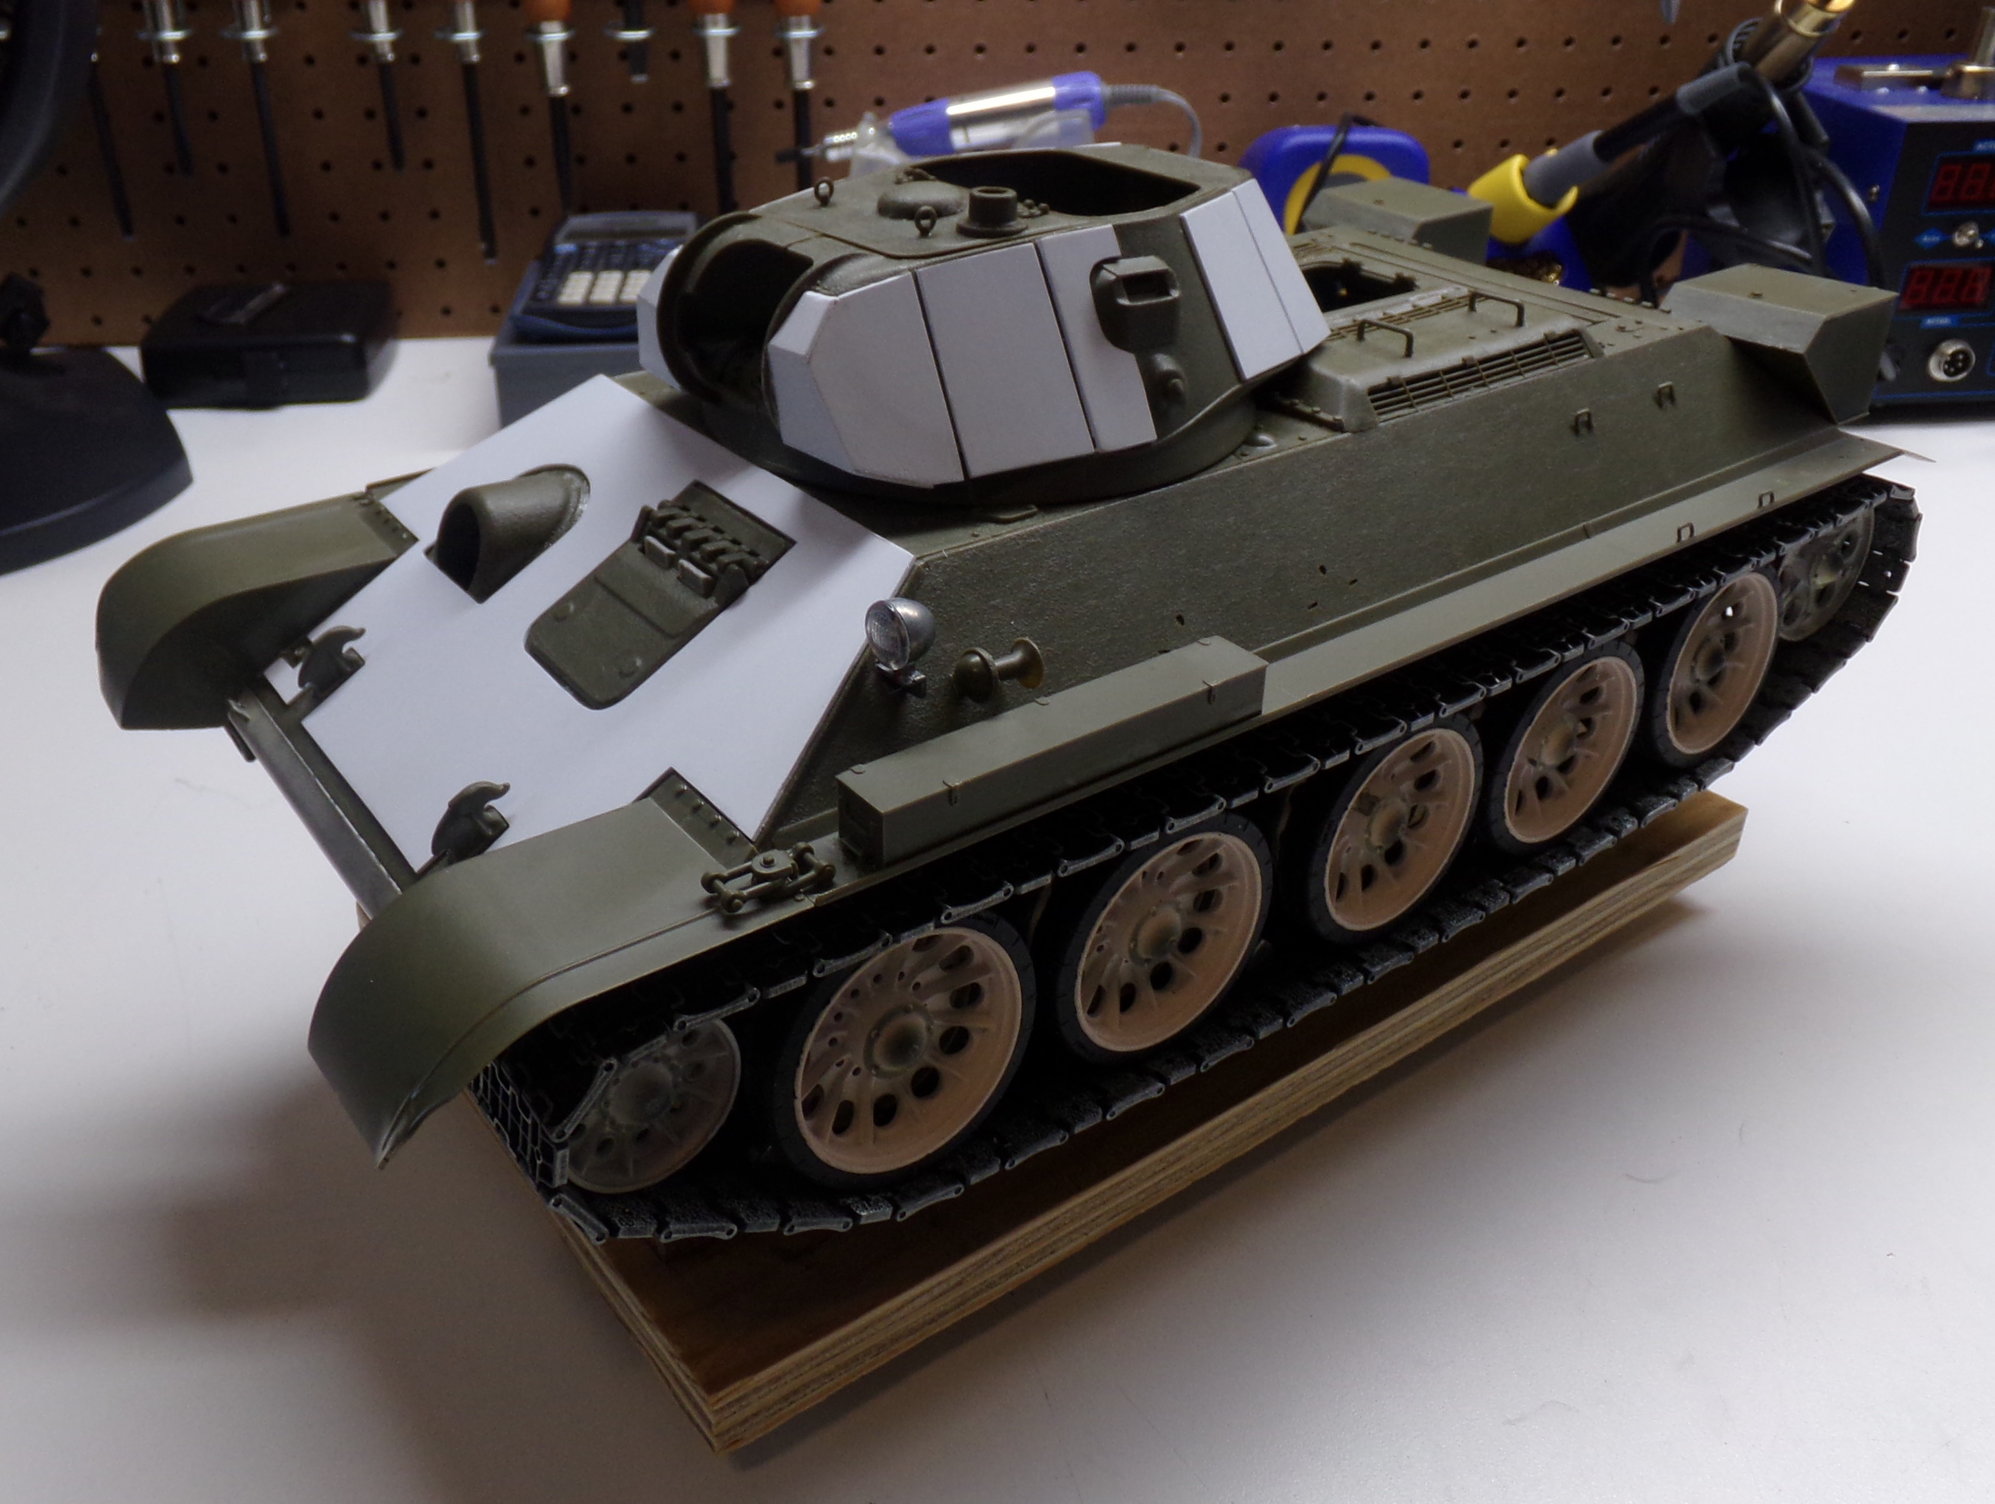
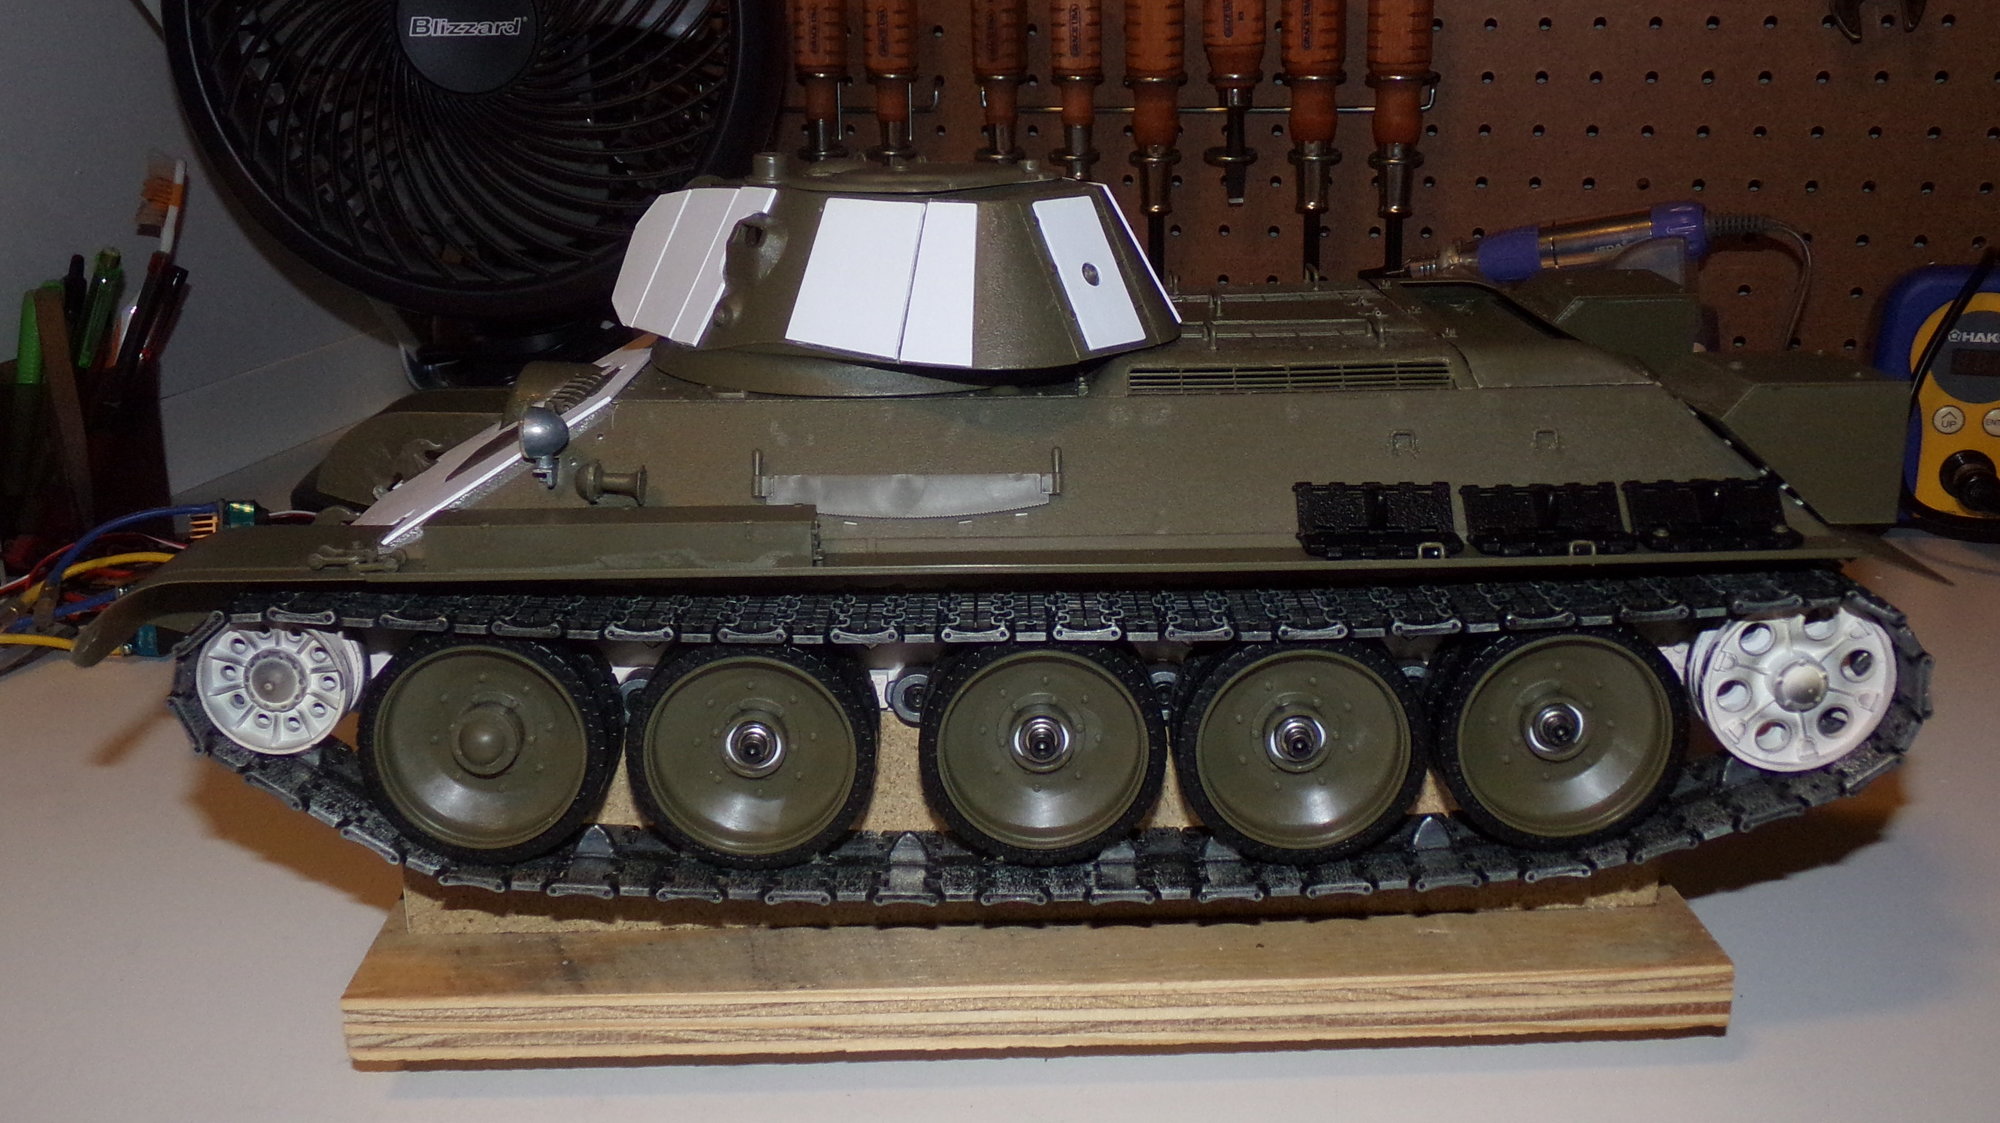
With Dusty posting his I thought I'd share what I've been working on. So far I got the hull mated to the Taigen lower. I used magnets to attach it. Since the upper on the Trumpeter 1/16 kit is not as thick as the Taigen T34/85 upper I glued some polystyrene on the inside to give it some additional structure. The add-on armor plate on the front gave the front some additional structure. Currently the lower has the metal wheels from another tank attached for testing, but eventually I want to use the solid early wheels that came with the Trumpeter kit. There was a space on the back of the hull that had some side to side play when the upper was mated to the lower. The tabs I built fill that space and remove any slop from mating the two different parts. The tiny receiver will be mounted on the sponson as shown. The turret has additional armor added to it. I haven't figured out which recoil/elevation unit I'm going to use yet.

The following users liked this post:
MAUS45 (04-20-2022)
12-31-2018, 03:06 PM
#5
Thread Starter
Magnets are from Harbor Freight. So I did finalize my wheel adaptation plans today. First pic is of the wheel halves stock and then a bearing added to the inner wheel half. I shortened the outer wheel mating shaft enough to push on the inner bearing sealing it in place. I couldn't find a bearing with a 3mm ID and a 12mm OD so a bit of flat styrene wrapped around the bearing makes it fit. Second pic shows the material I removed to install the bearing in the outer wheel half. Third pic is of all the parts I used. The two washers were sanded (polished) since they aren't quite flat from the factory. I epoxied the #10 to the plastic wheel and epoxied the #6 to the swing arm. Didn't want plastic on metal contact. Figured metal on metal would last longer. Last pic shows the whole thing finished. The shaft was cut to length. I used the 55mm long shafts so that the screw threads could be cut off leaving only the smooth shaft to mount the bearings on. The kit hub covers will fit with some minor modifications.

Left - Stock / Right - Modified
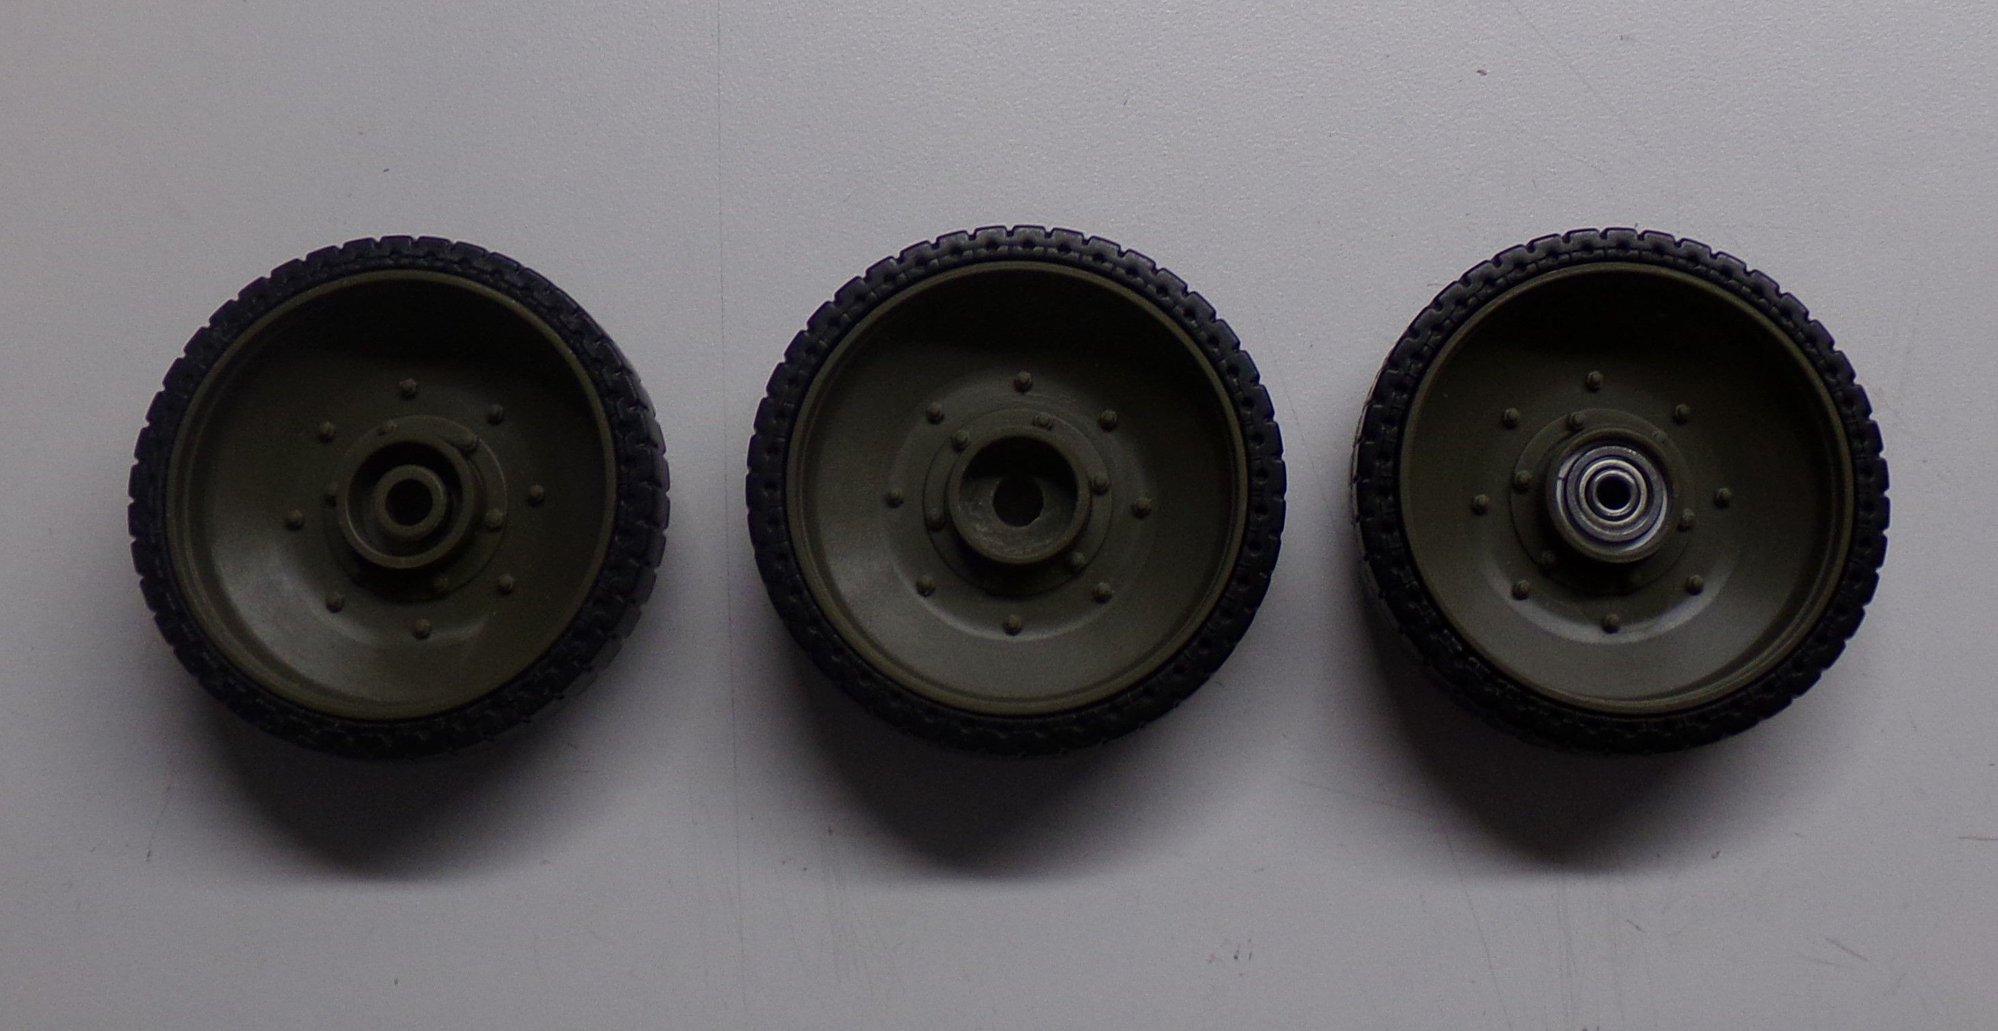
Outer road wheel from left to right - Stock/Modified/Bearing installed
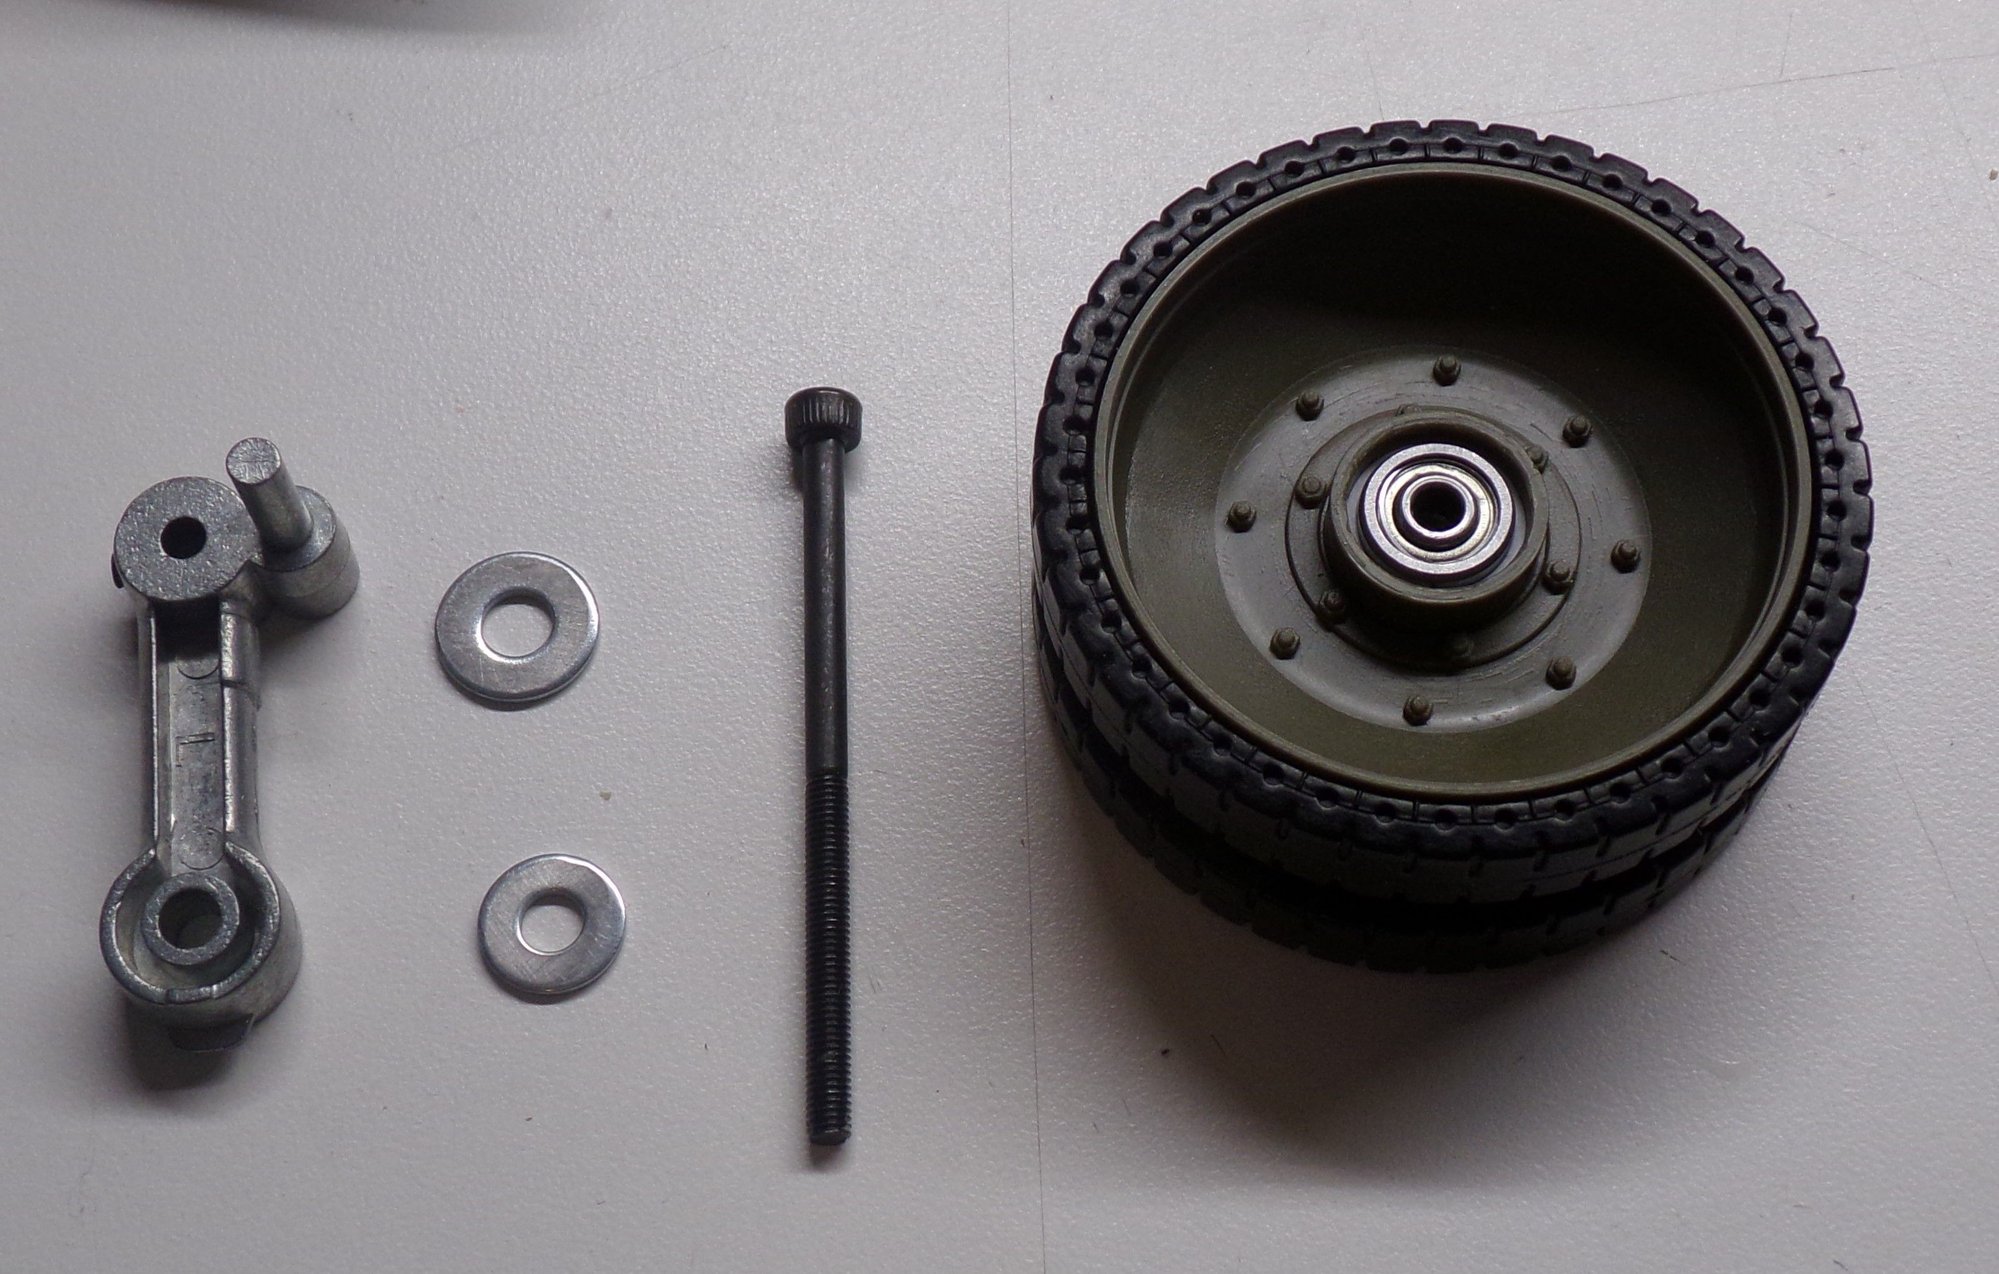
Bearings installed. Parts: Taigen metal swing arm, #10 washer, #6 washer, and 3mm x 55mm cap head machine screw.
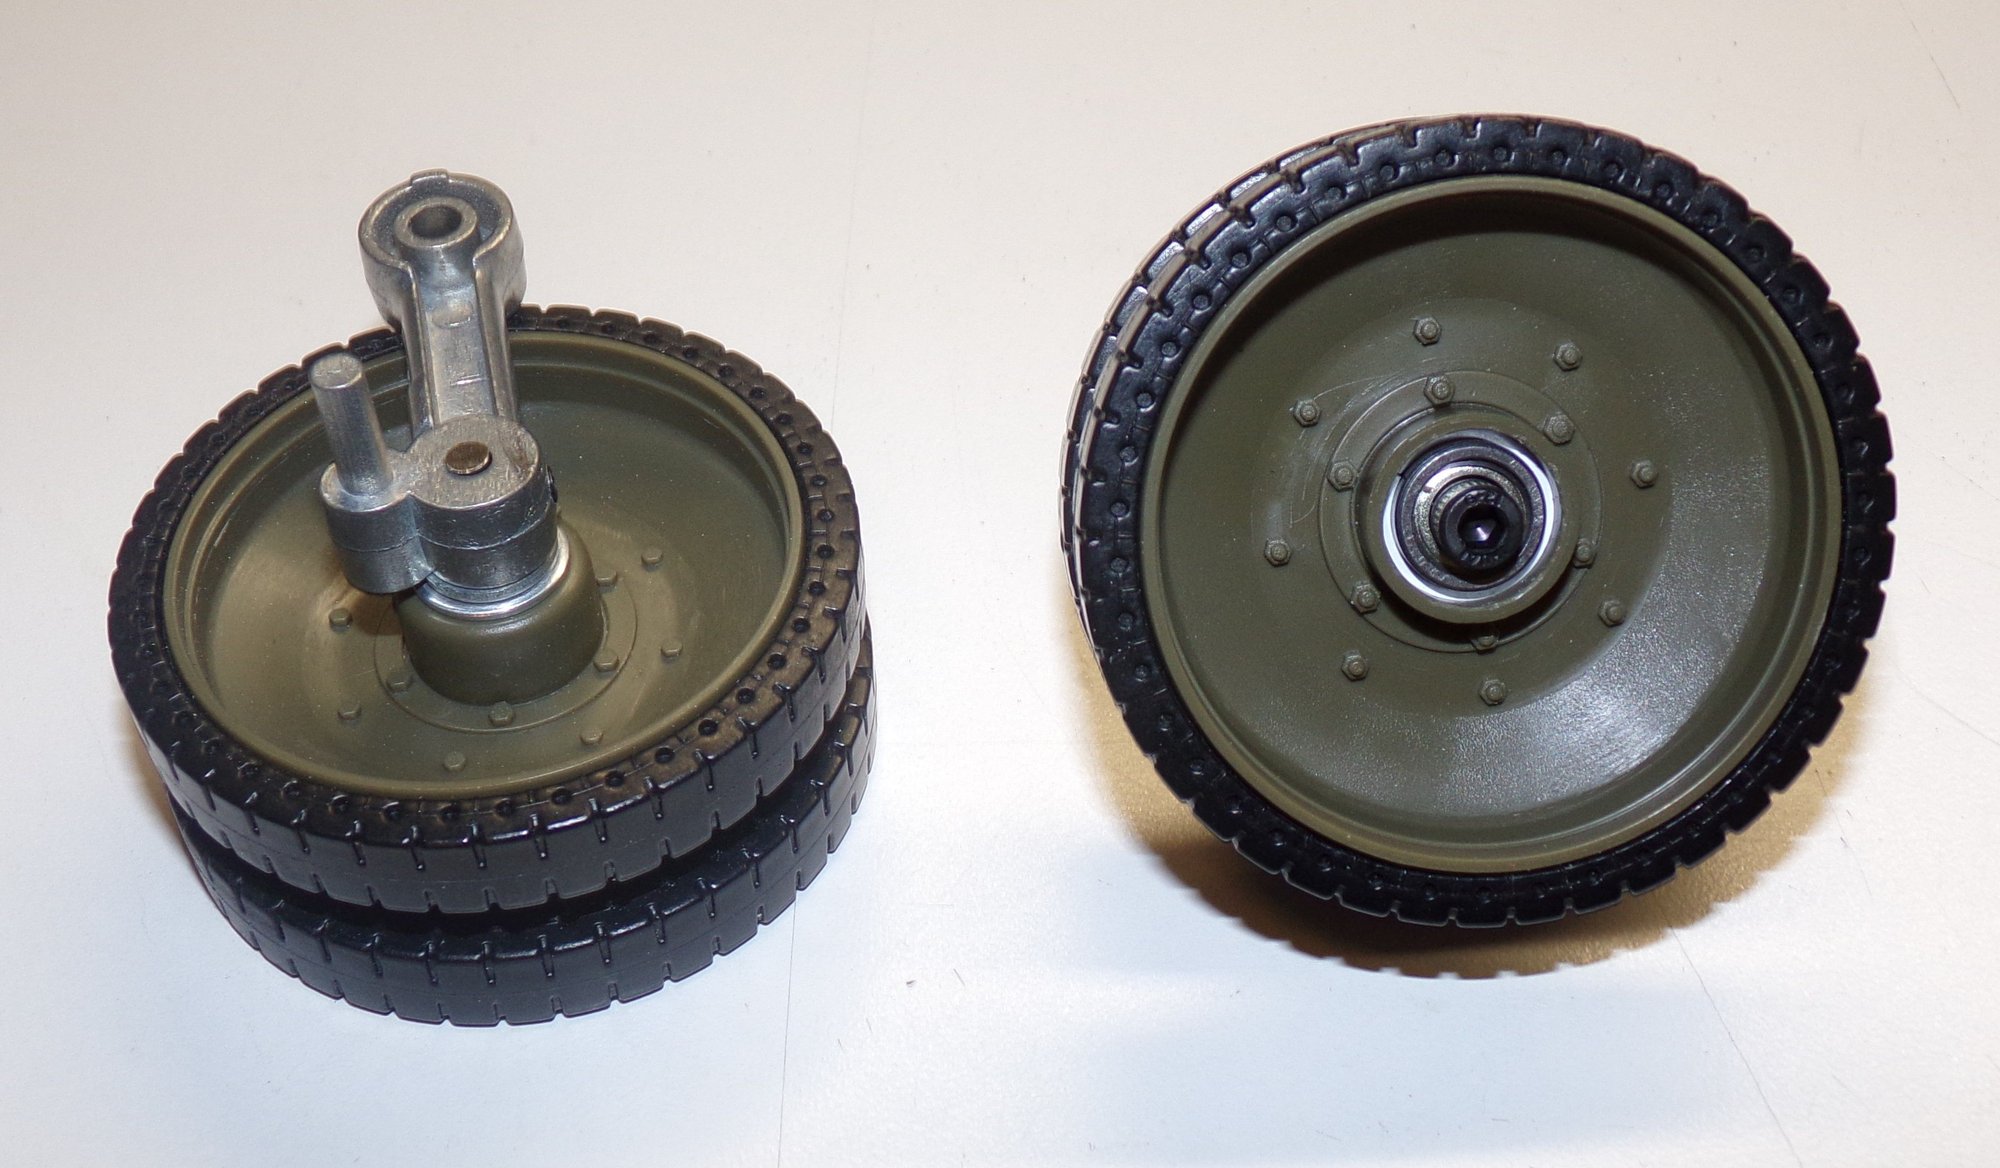
Completed assembly.
Left - Stock / Right - Modified
Outer road wheel from left to right - Stock/Modified/Bearing installed
Bearings installed. Parts: Taigen metal swing arm, #10 washer, #6 washer, and 3mm x 55mm cap head machine screw.
Completed assembly.
The following users liked this post:
MAUS45 (04-20-2022)
01-02-2019, 04:46 PM
#6
Thread Starter
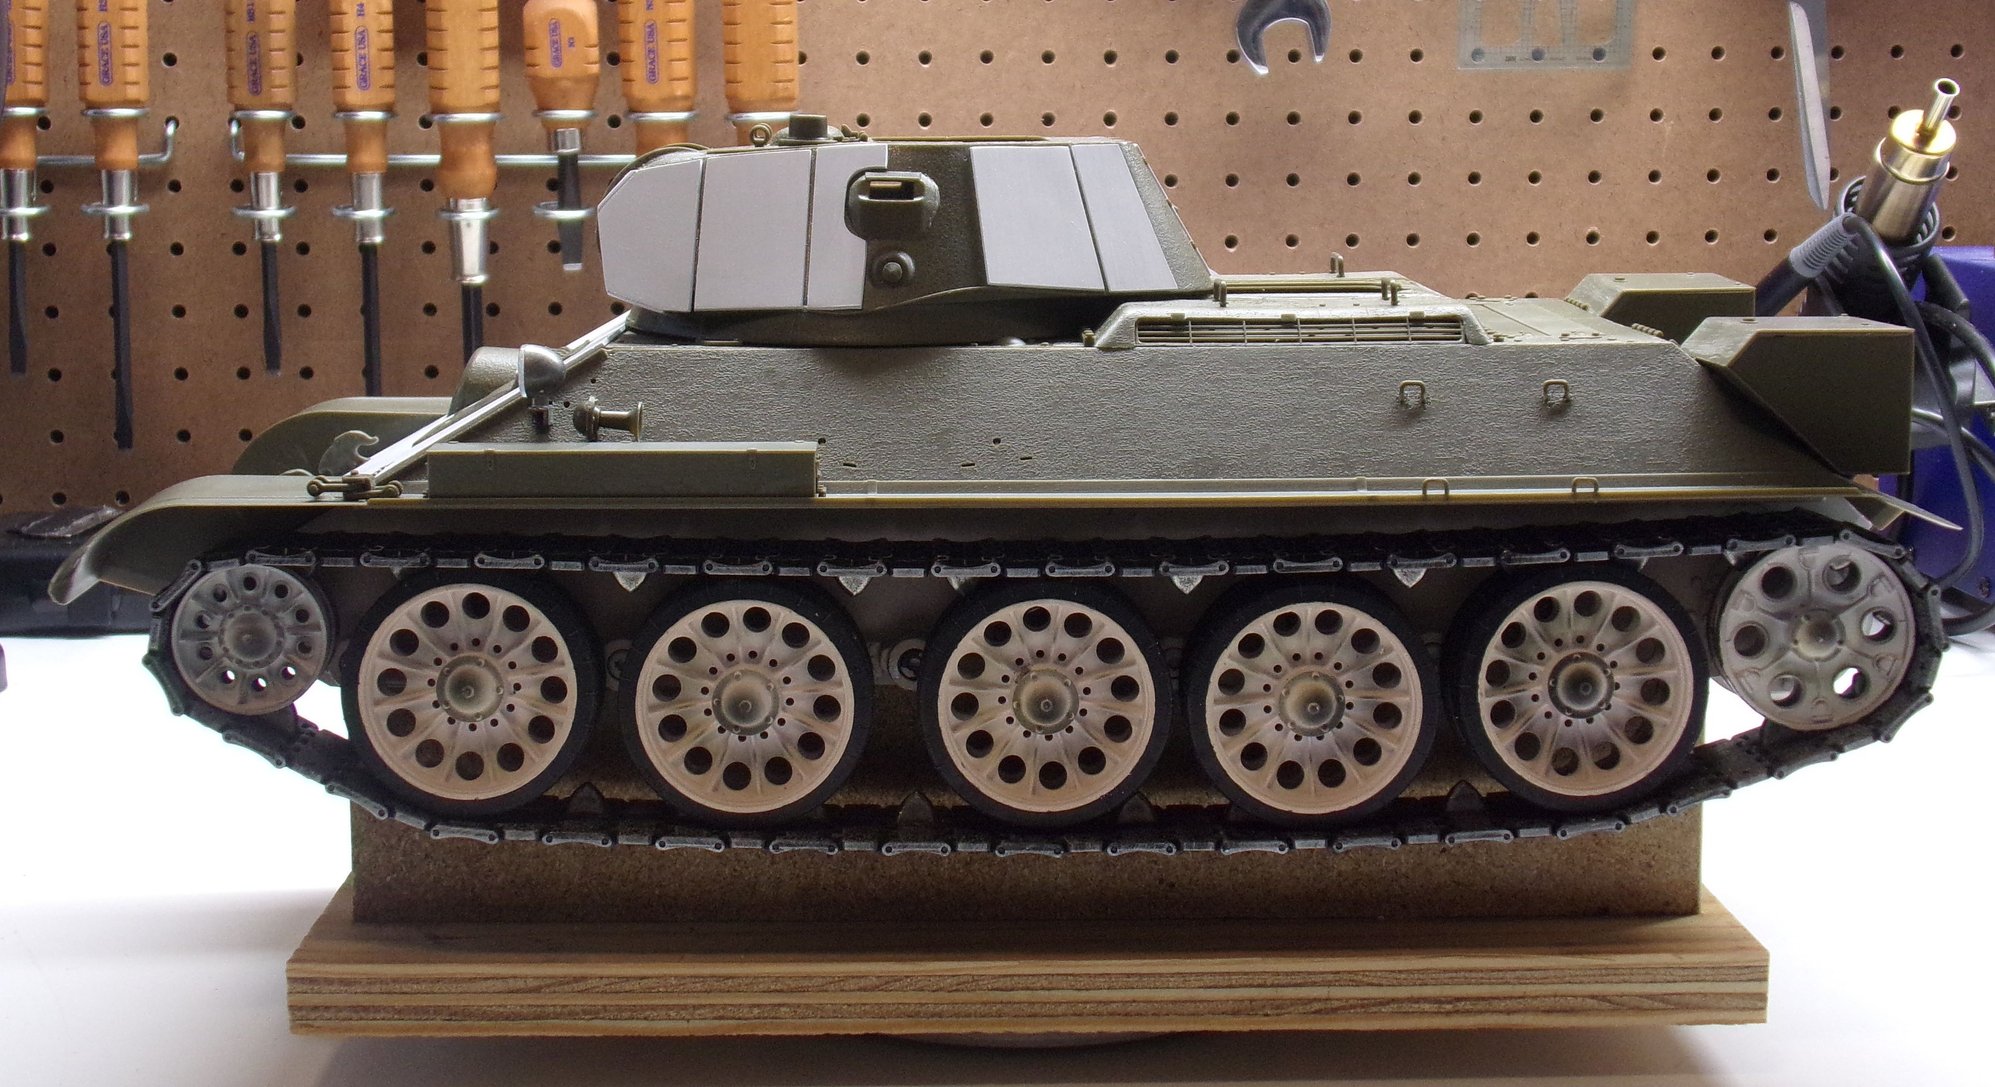
Got all the kit plastic wheels mounted up. She's starting to look the part...
04-17-2022, 02:04 PM
#7
Thread Starter
Been playing around with my recoil idea and haven't updated this thread in a LONG time. Had it hooked up to a servo tester and seems to work pretty well so I'm gonna go ahead with it.
This is the basic mechanism outside of the turret:
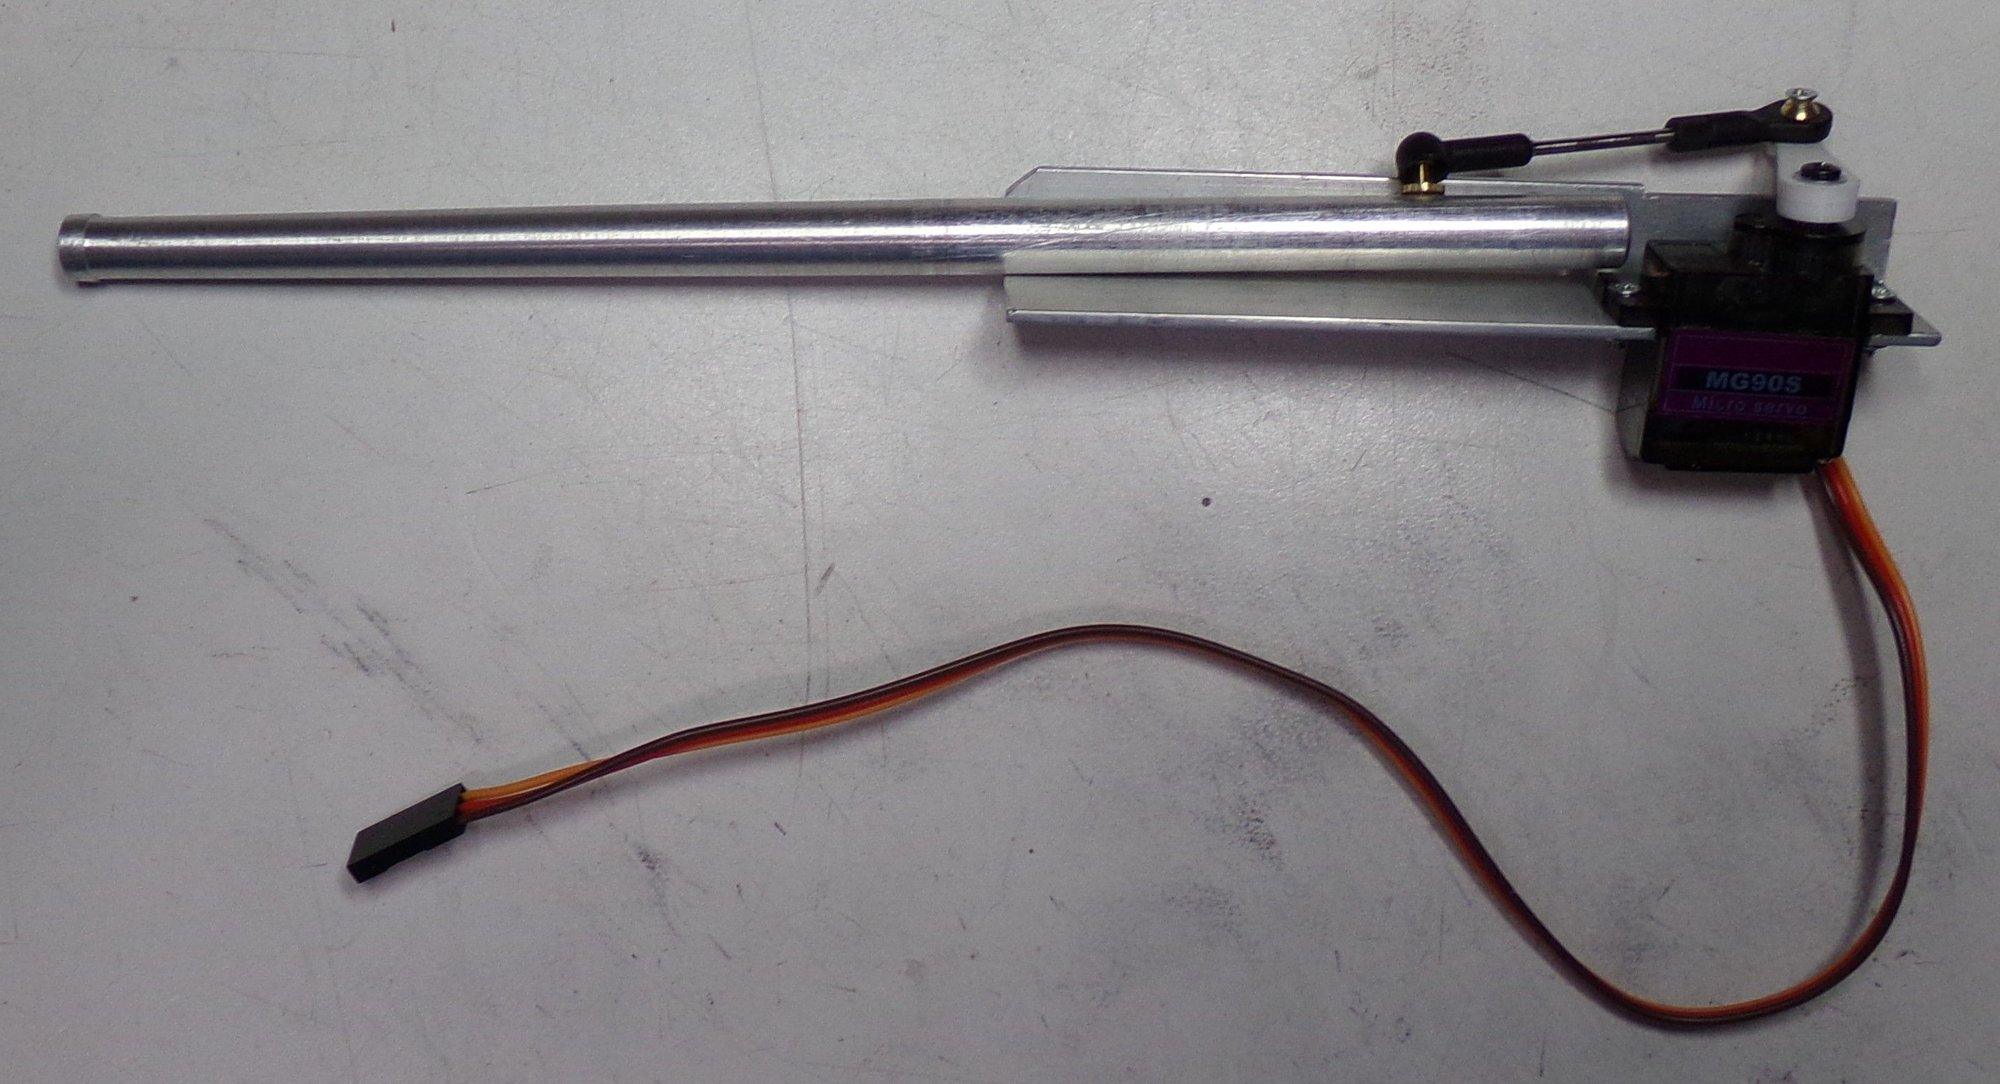
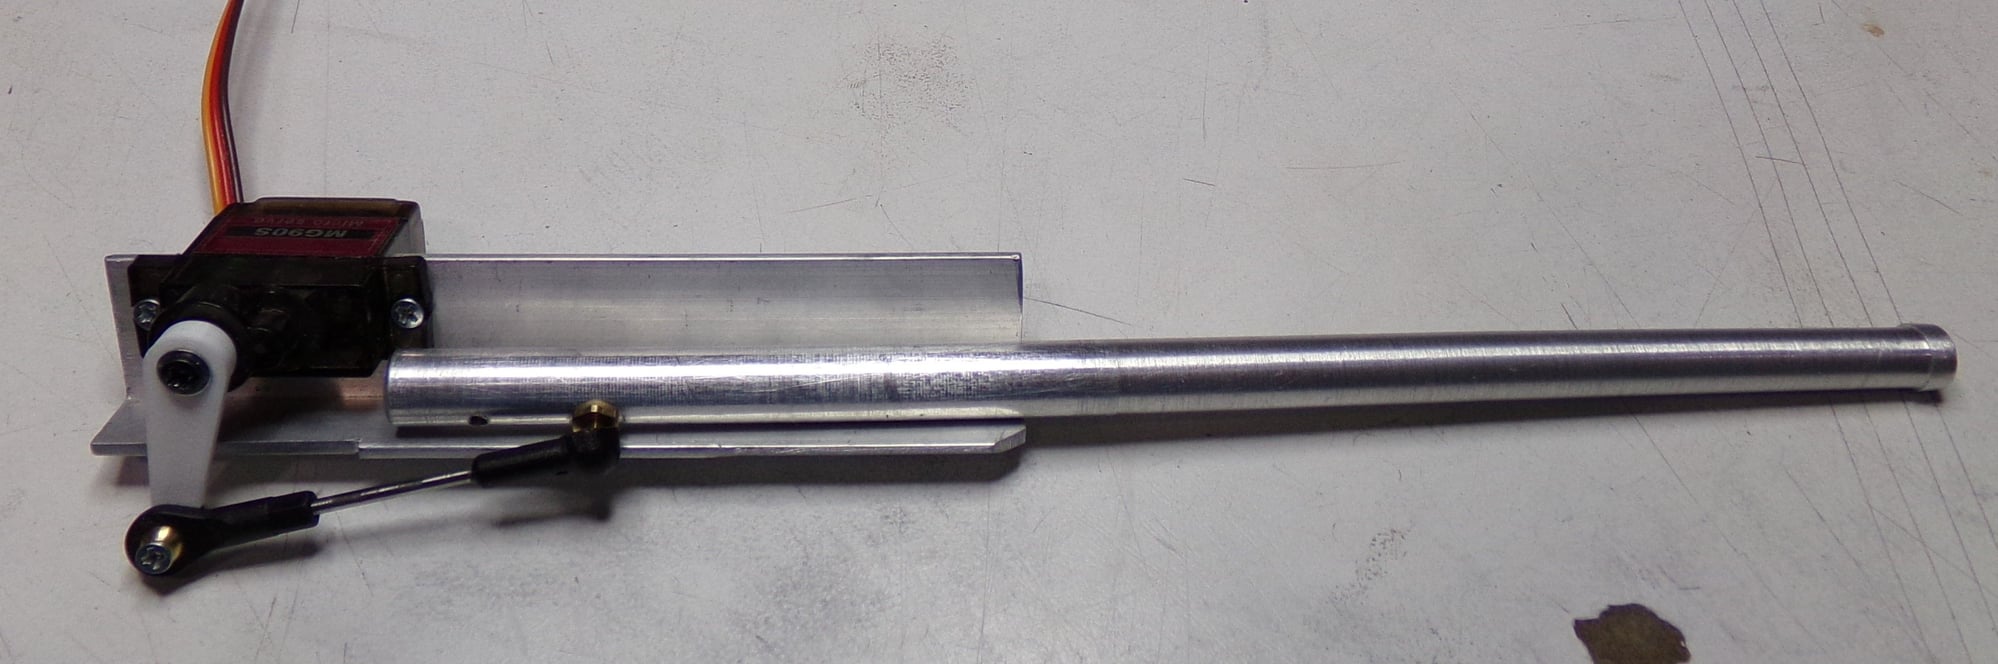
Here is it mocked up on the inside of the turret (some of the pics are of the Micky Mouse turret as it's easier to see how it mounts because that turret is in two pieces) The barrel sleeve that came with the metal 76mm barrels is glued to the inside of the mantlet. The barrel hole had to be reamed out a little to get the aluminum barrels to fit and move smoothly:
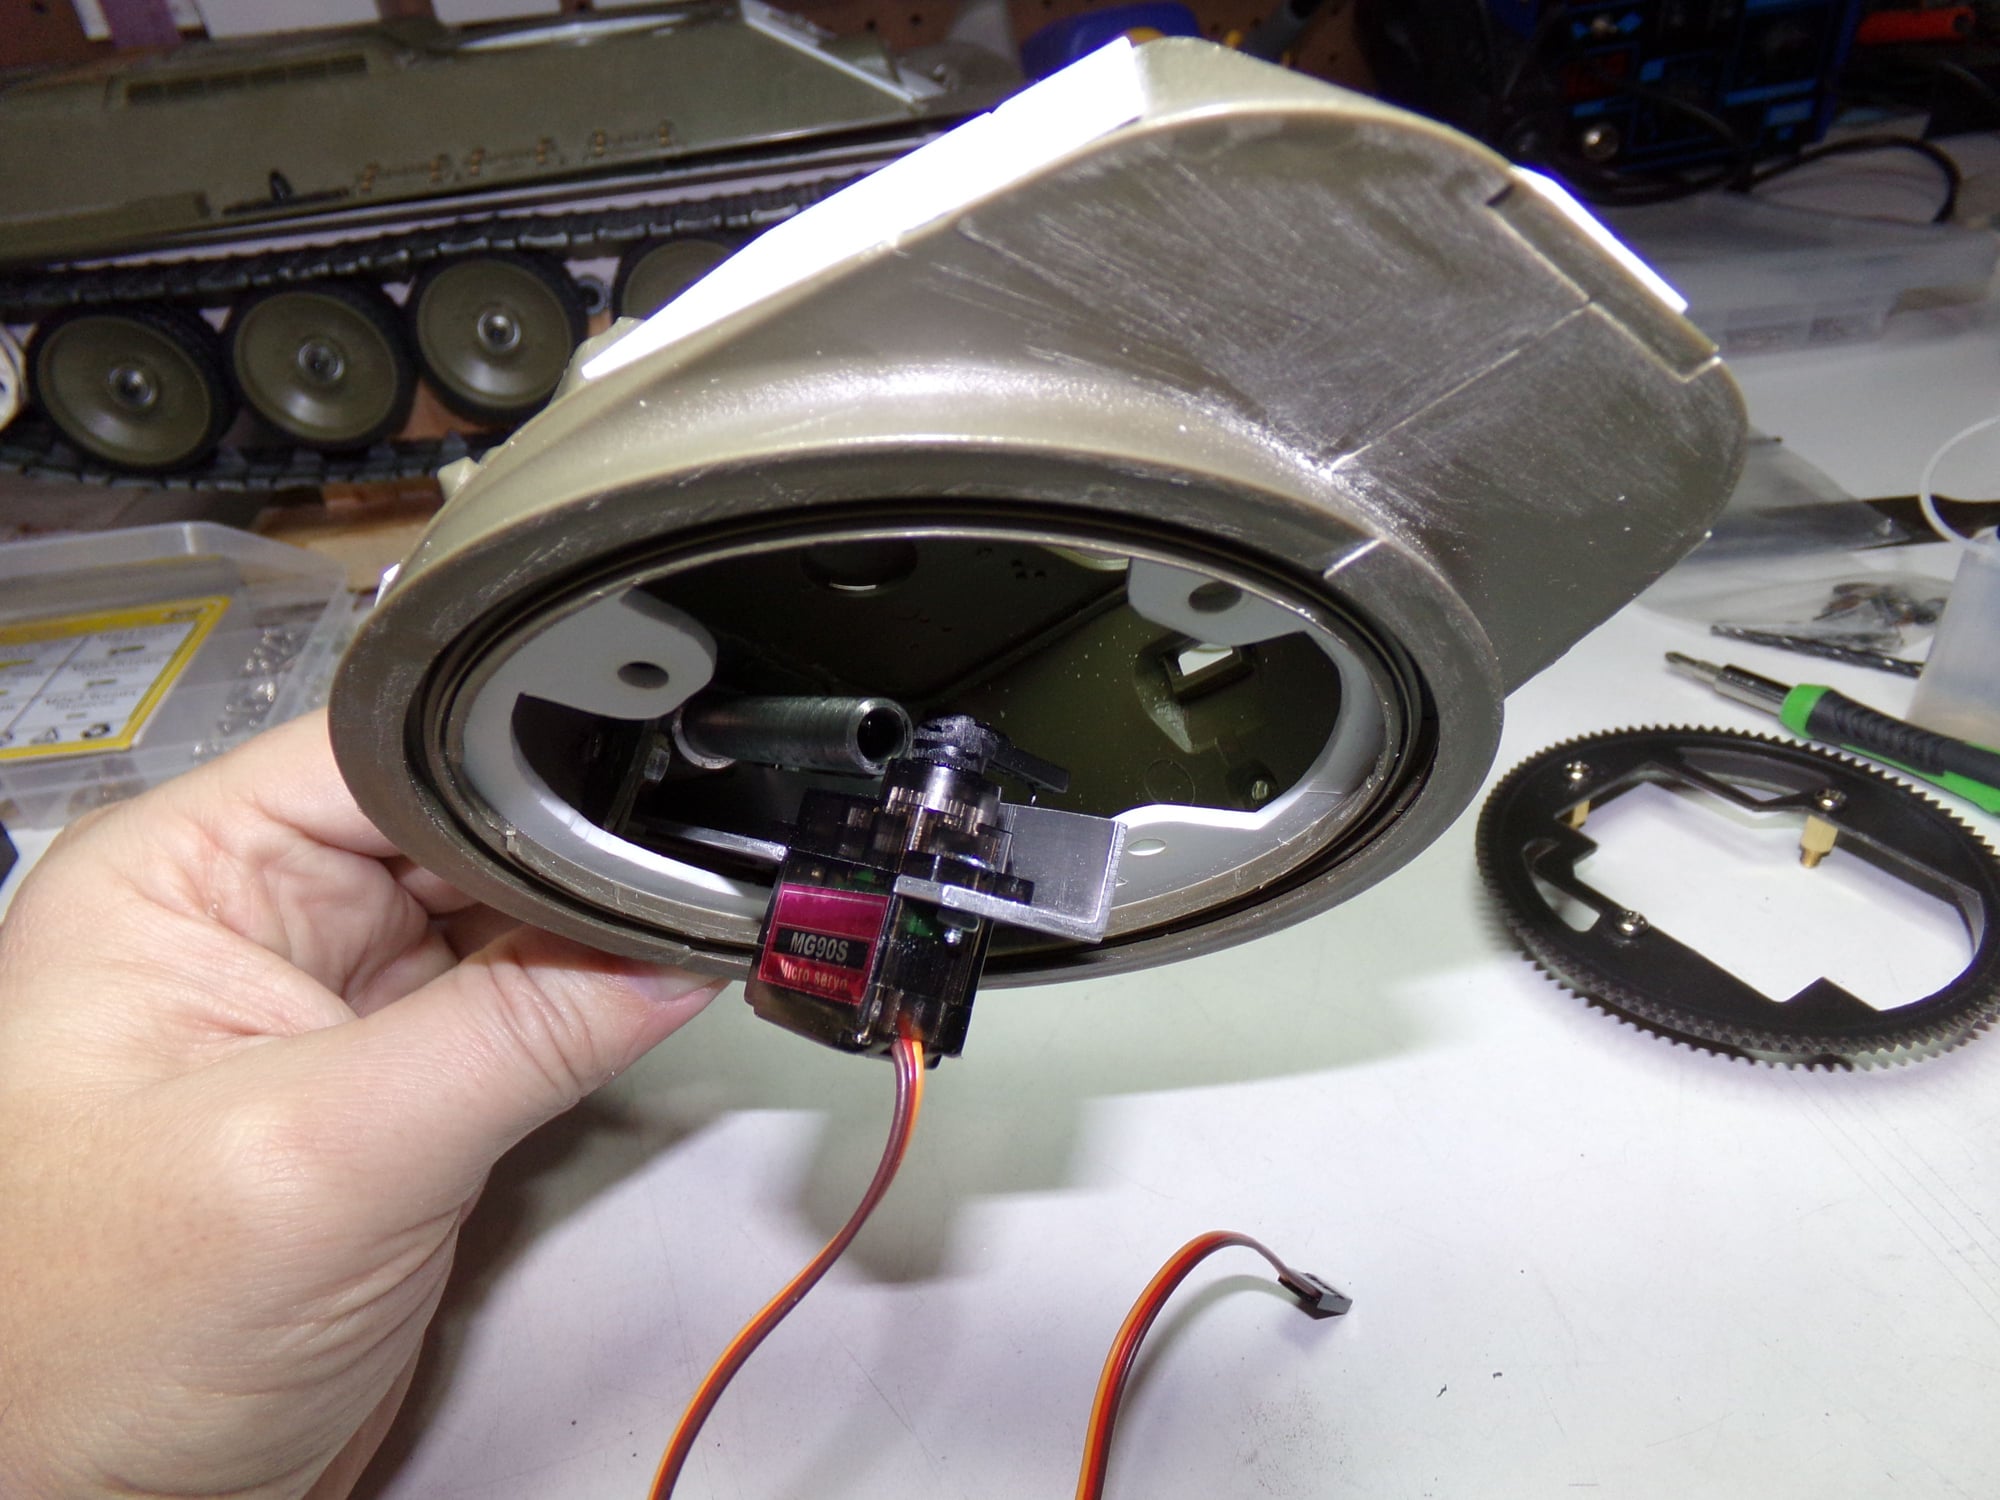
The aluminum angle slips right into the mantlet and will be held in with glue or filled with Miliput to hold it:
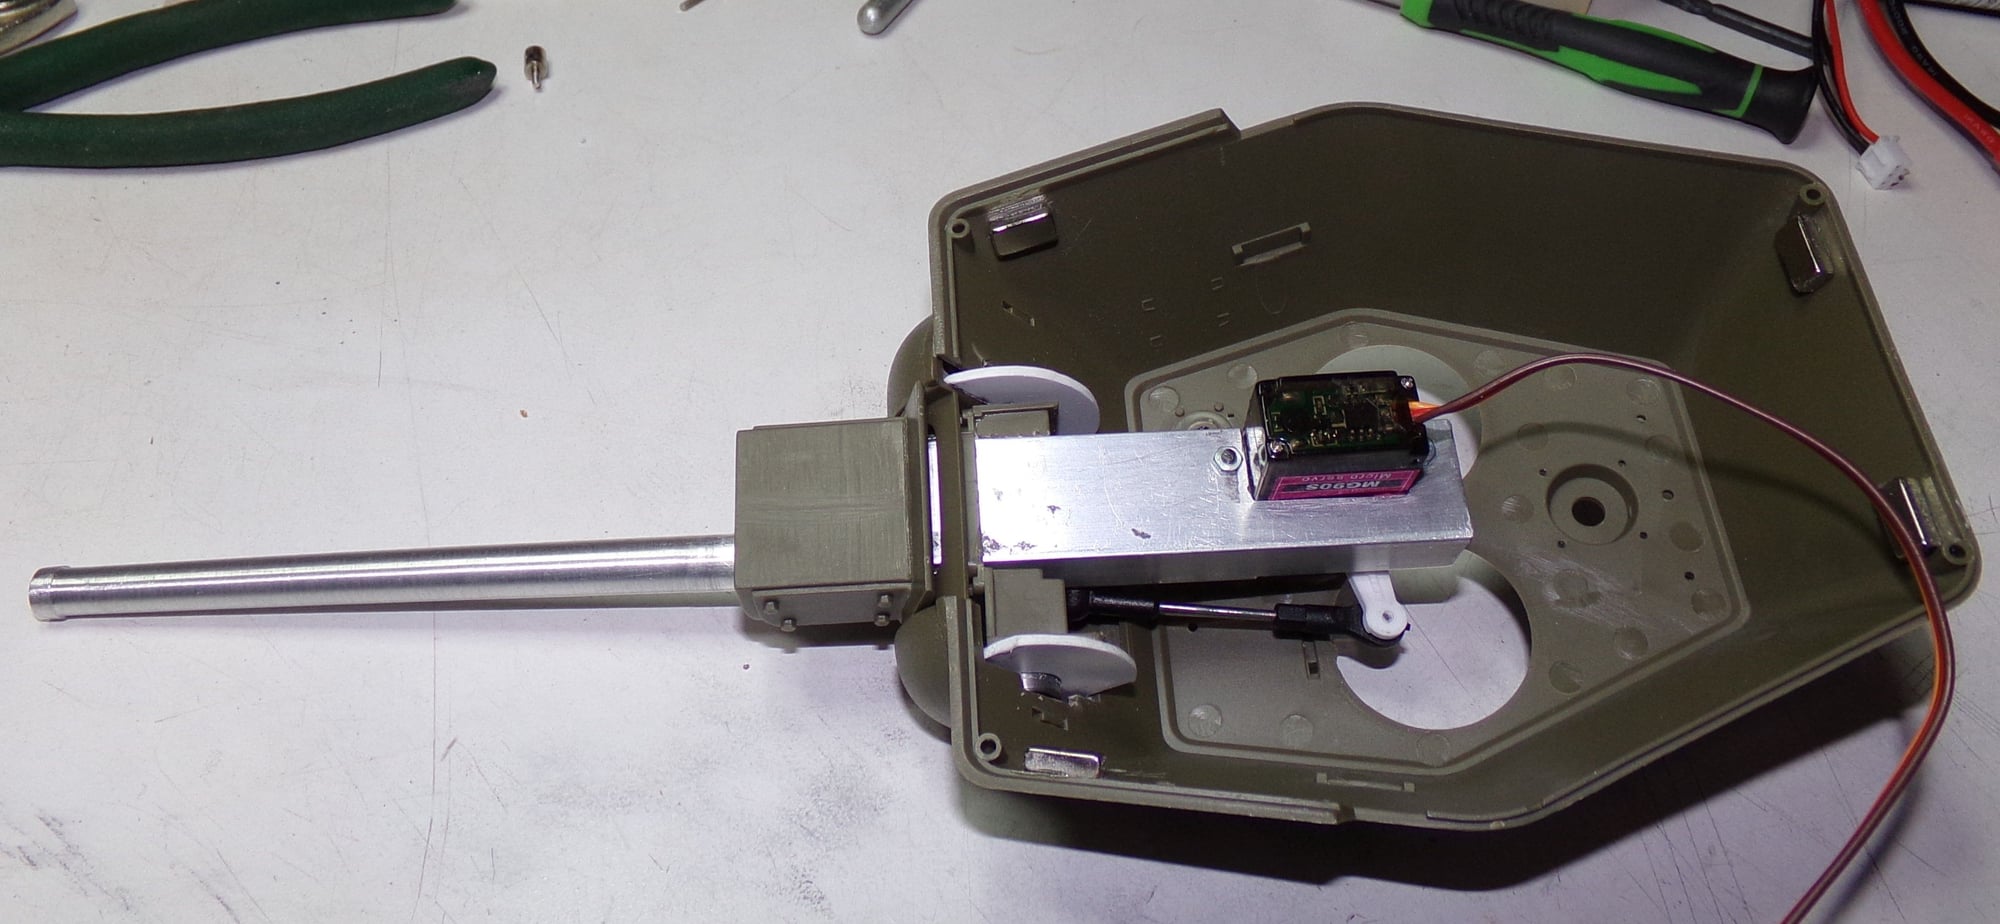
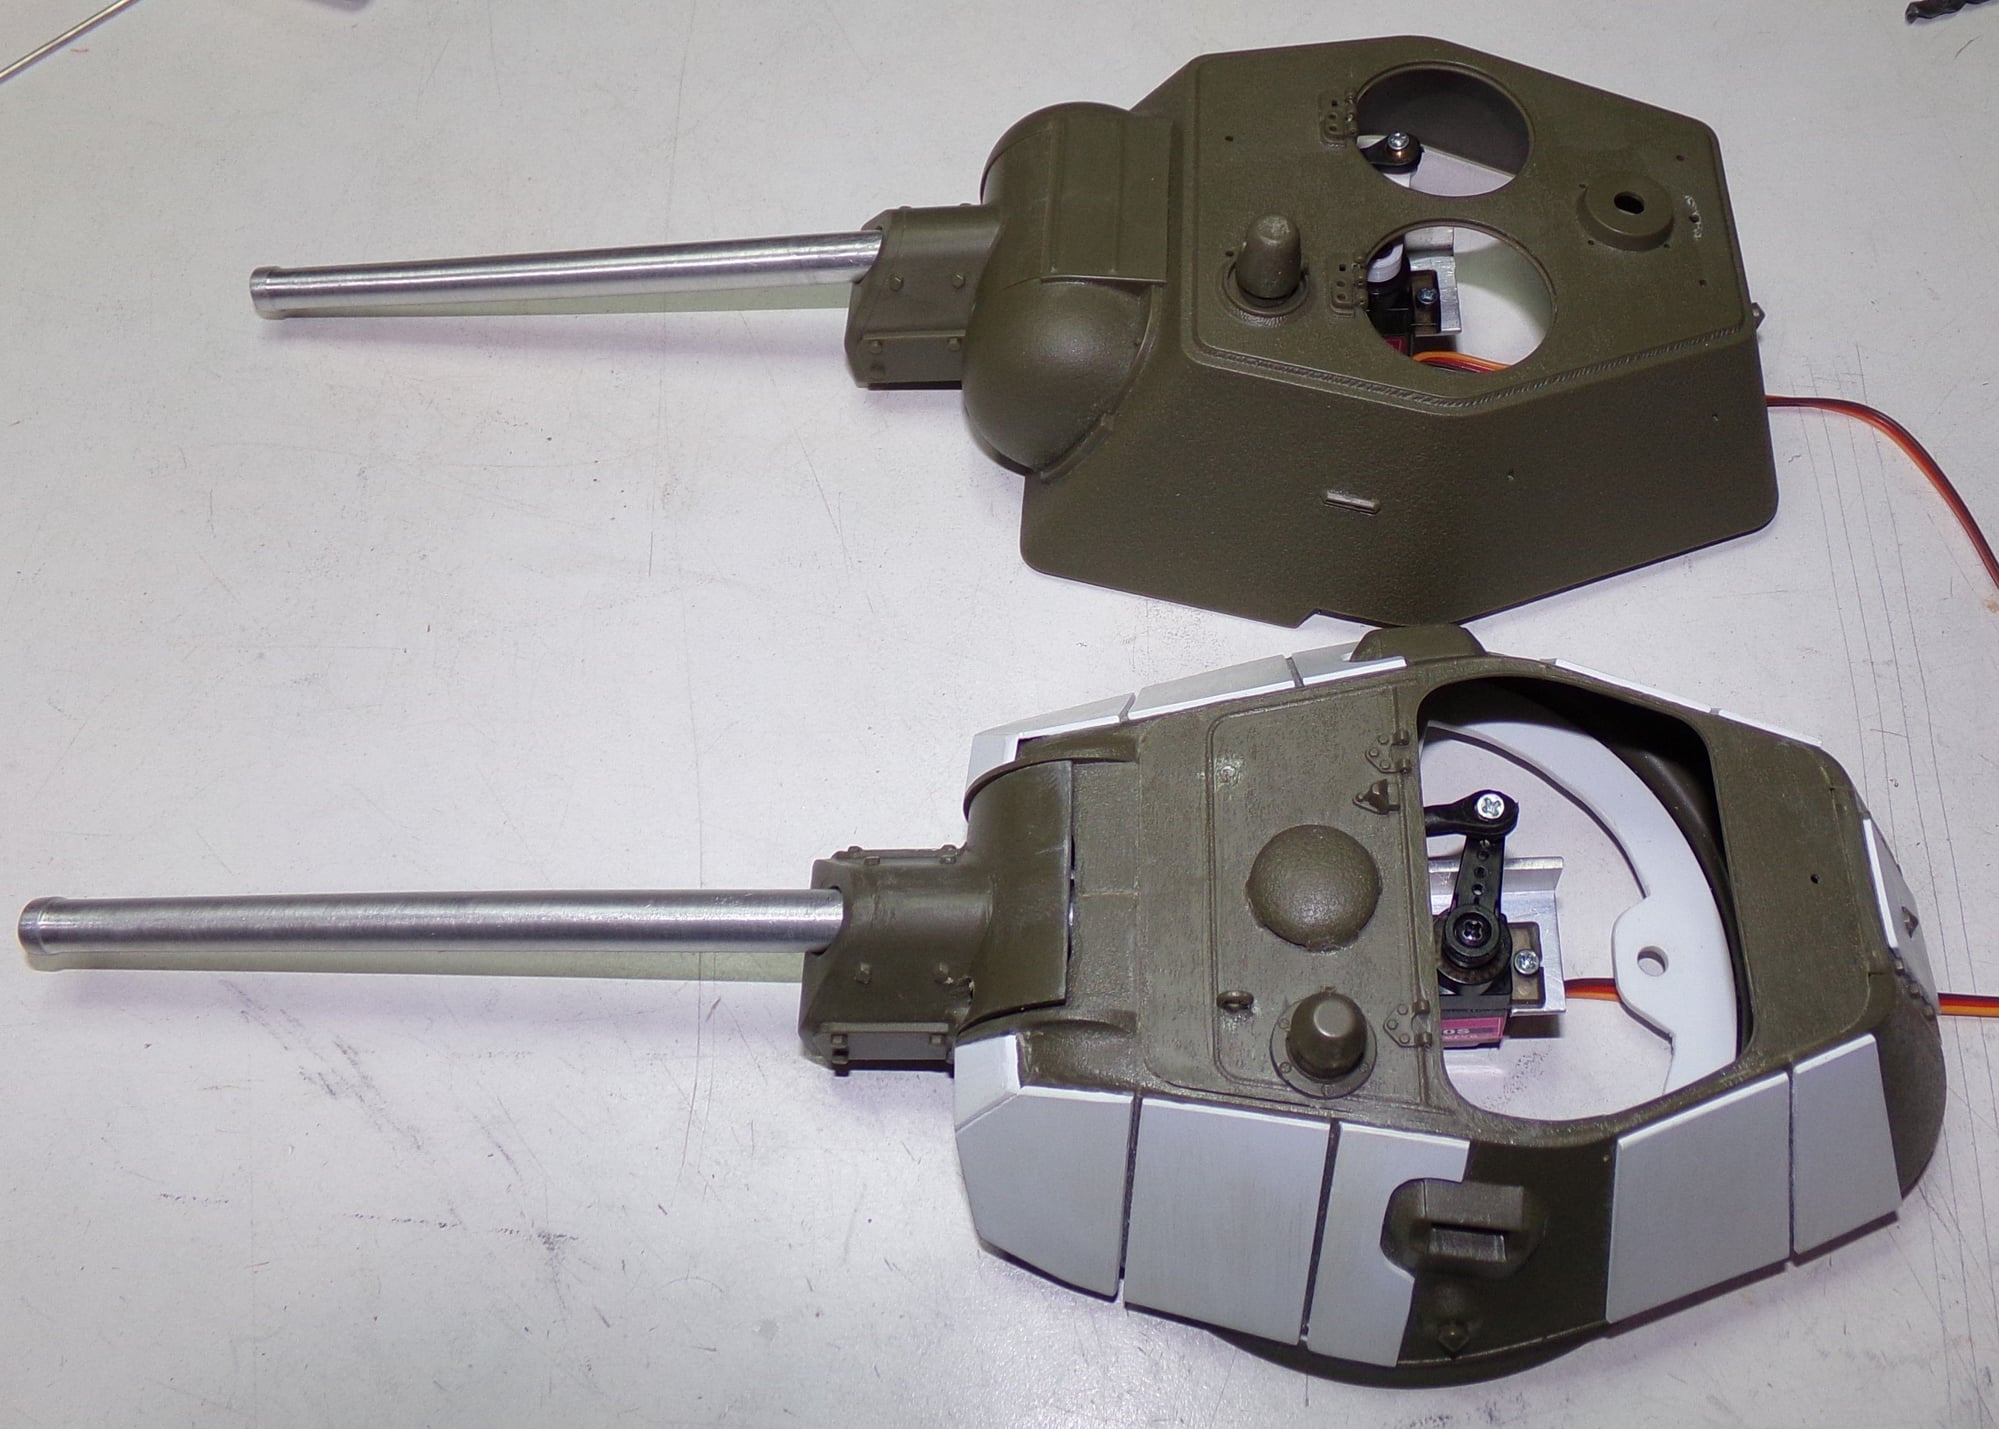
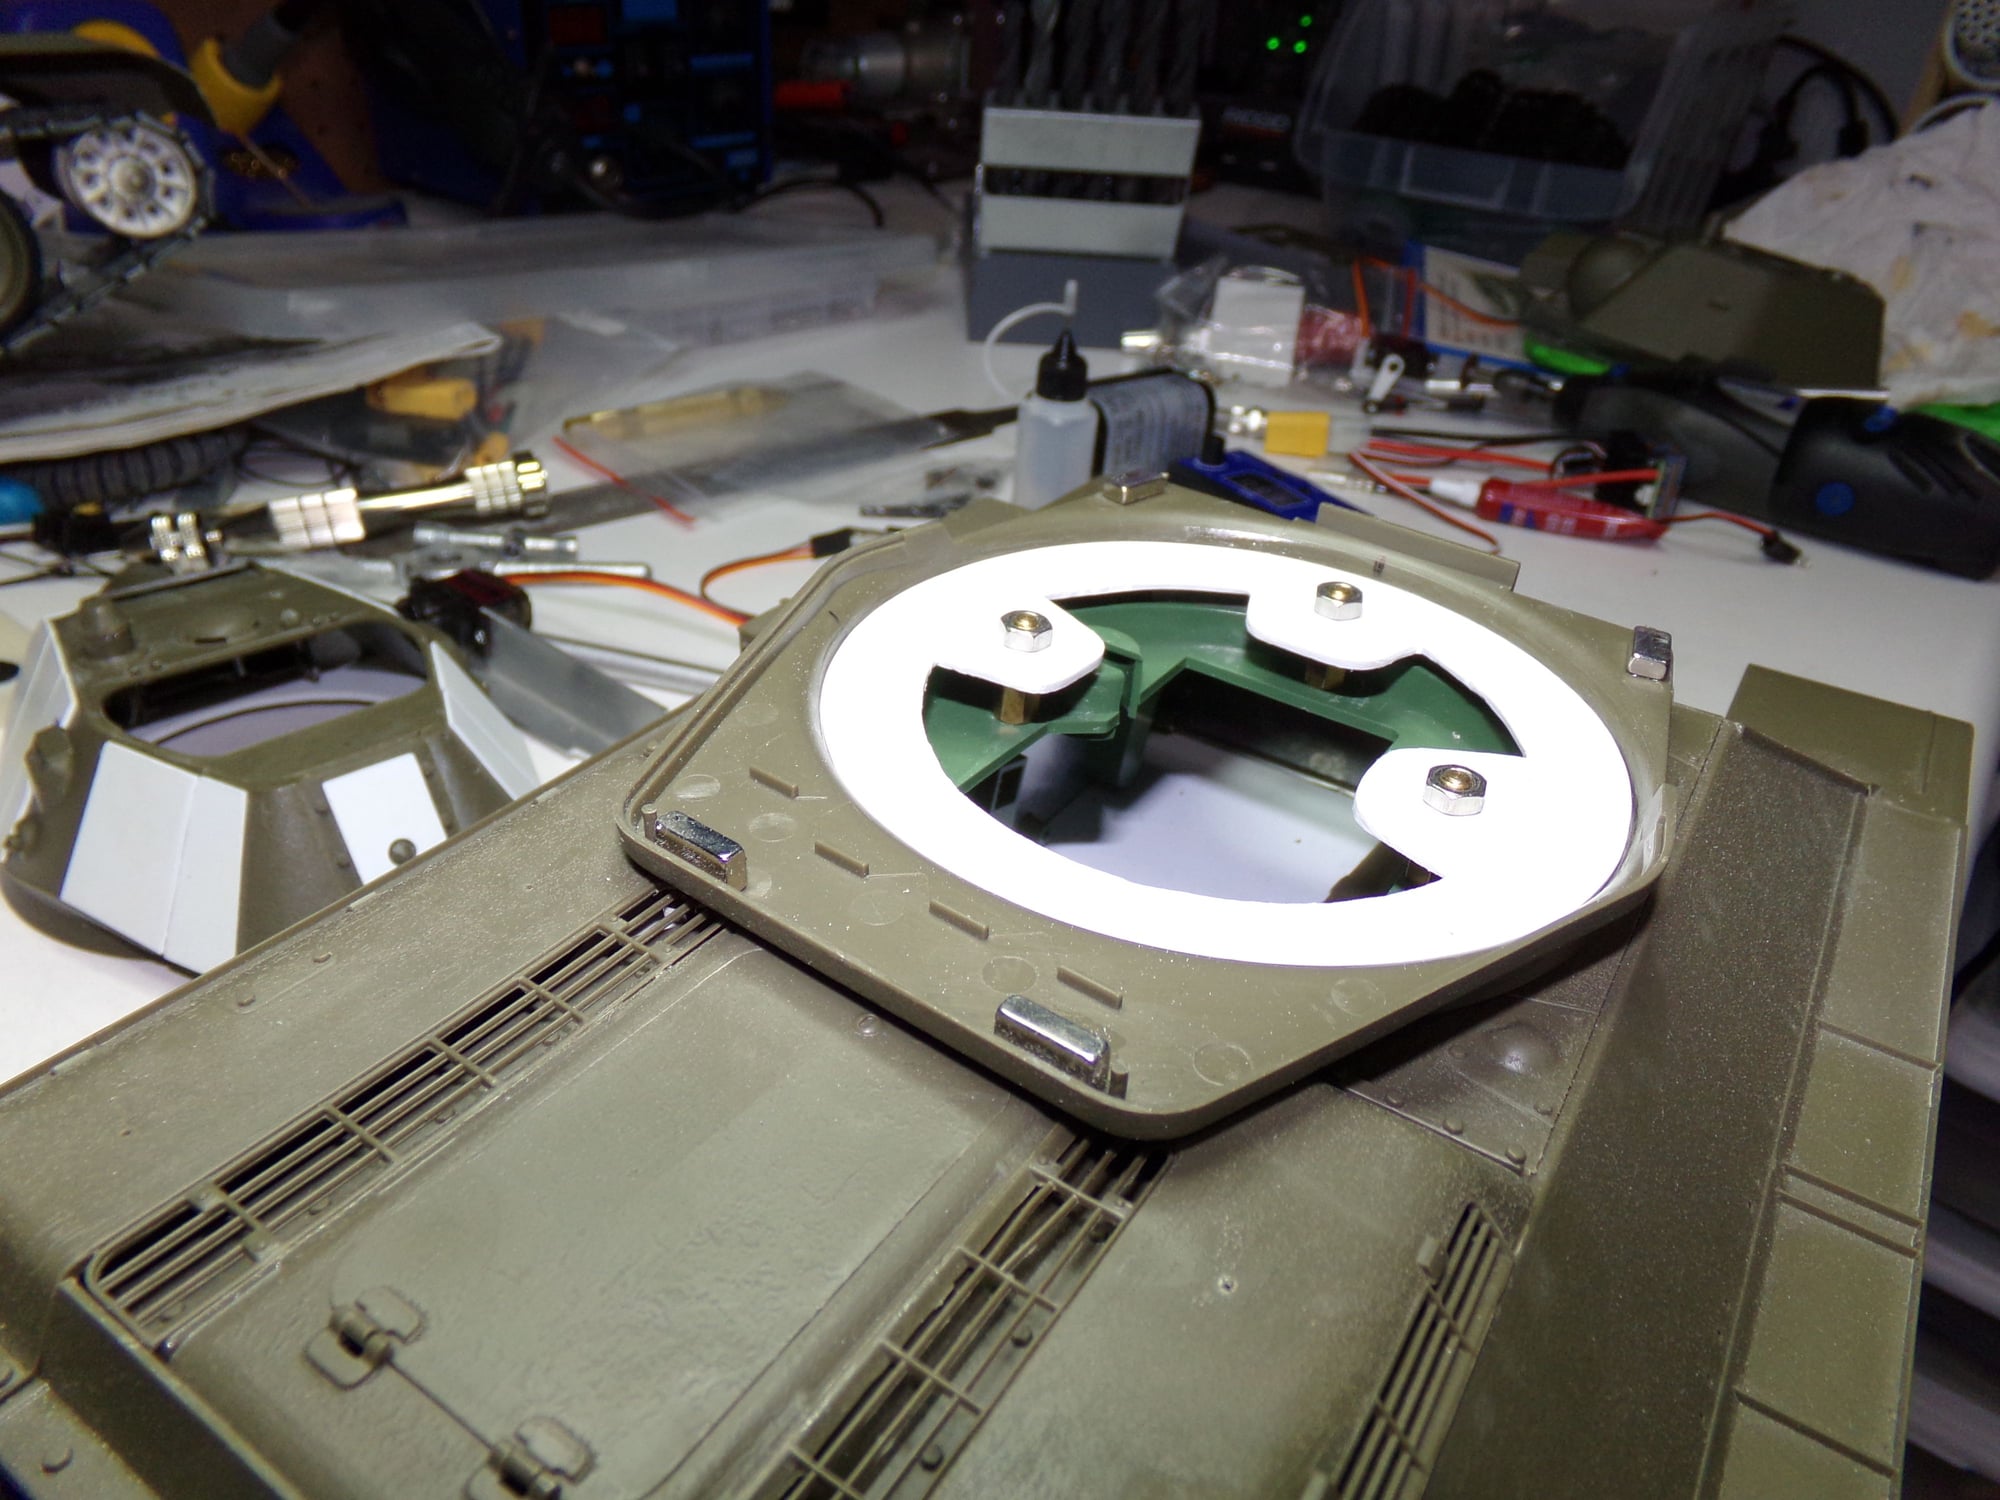
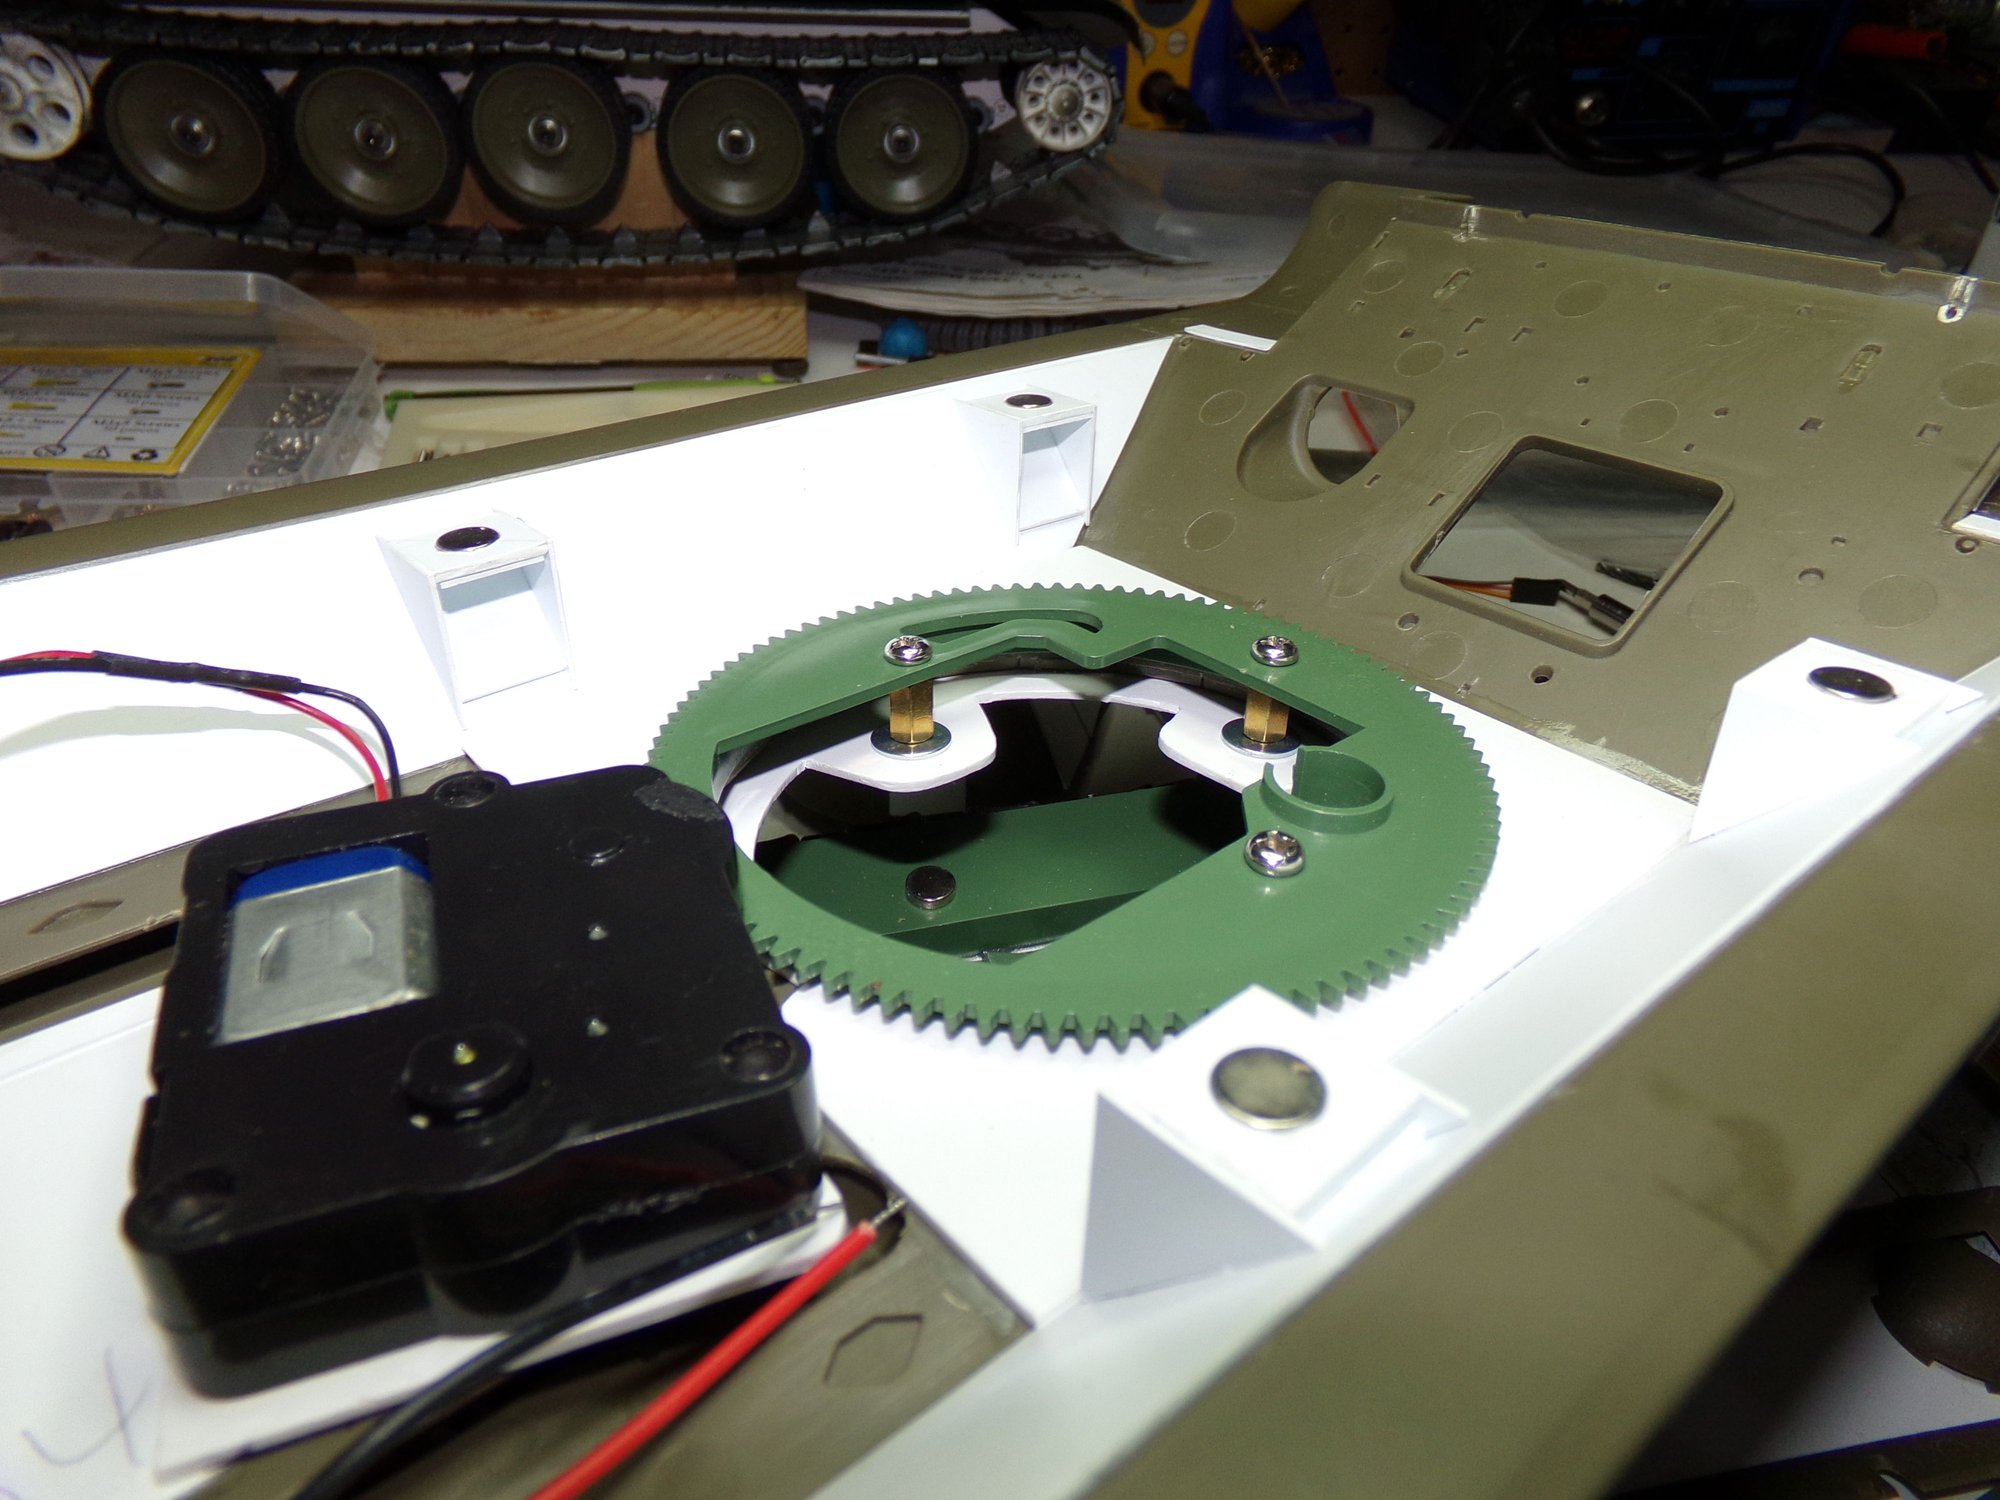
As for the turret rotation, I've gotten both of them installed for the 1942 and the 1943 versions. I first needed to remove all the bolt detail on the bottom of the turret ring to have a smooth surface to glue to. I then glued a piece of styrene to the bottom of the turret race area. I had to add some extra styrene around the ring to give it some more height and position the turret gear in the right place. I used the plastic turret gear as the metal one was slightly smaller in diameter so it shifted around. The plastic one fit much better.

I also removed all the detail stuff along the bottom of the turret to get a smooth gluing surface to create a mounting surface for the turret/turret ring mating. The standoffs used to connect the turret to the gear are M4x15mm.
See my bench does get cluttered when I work...
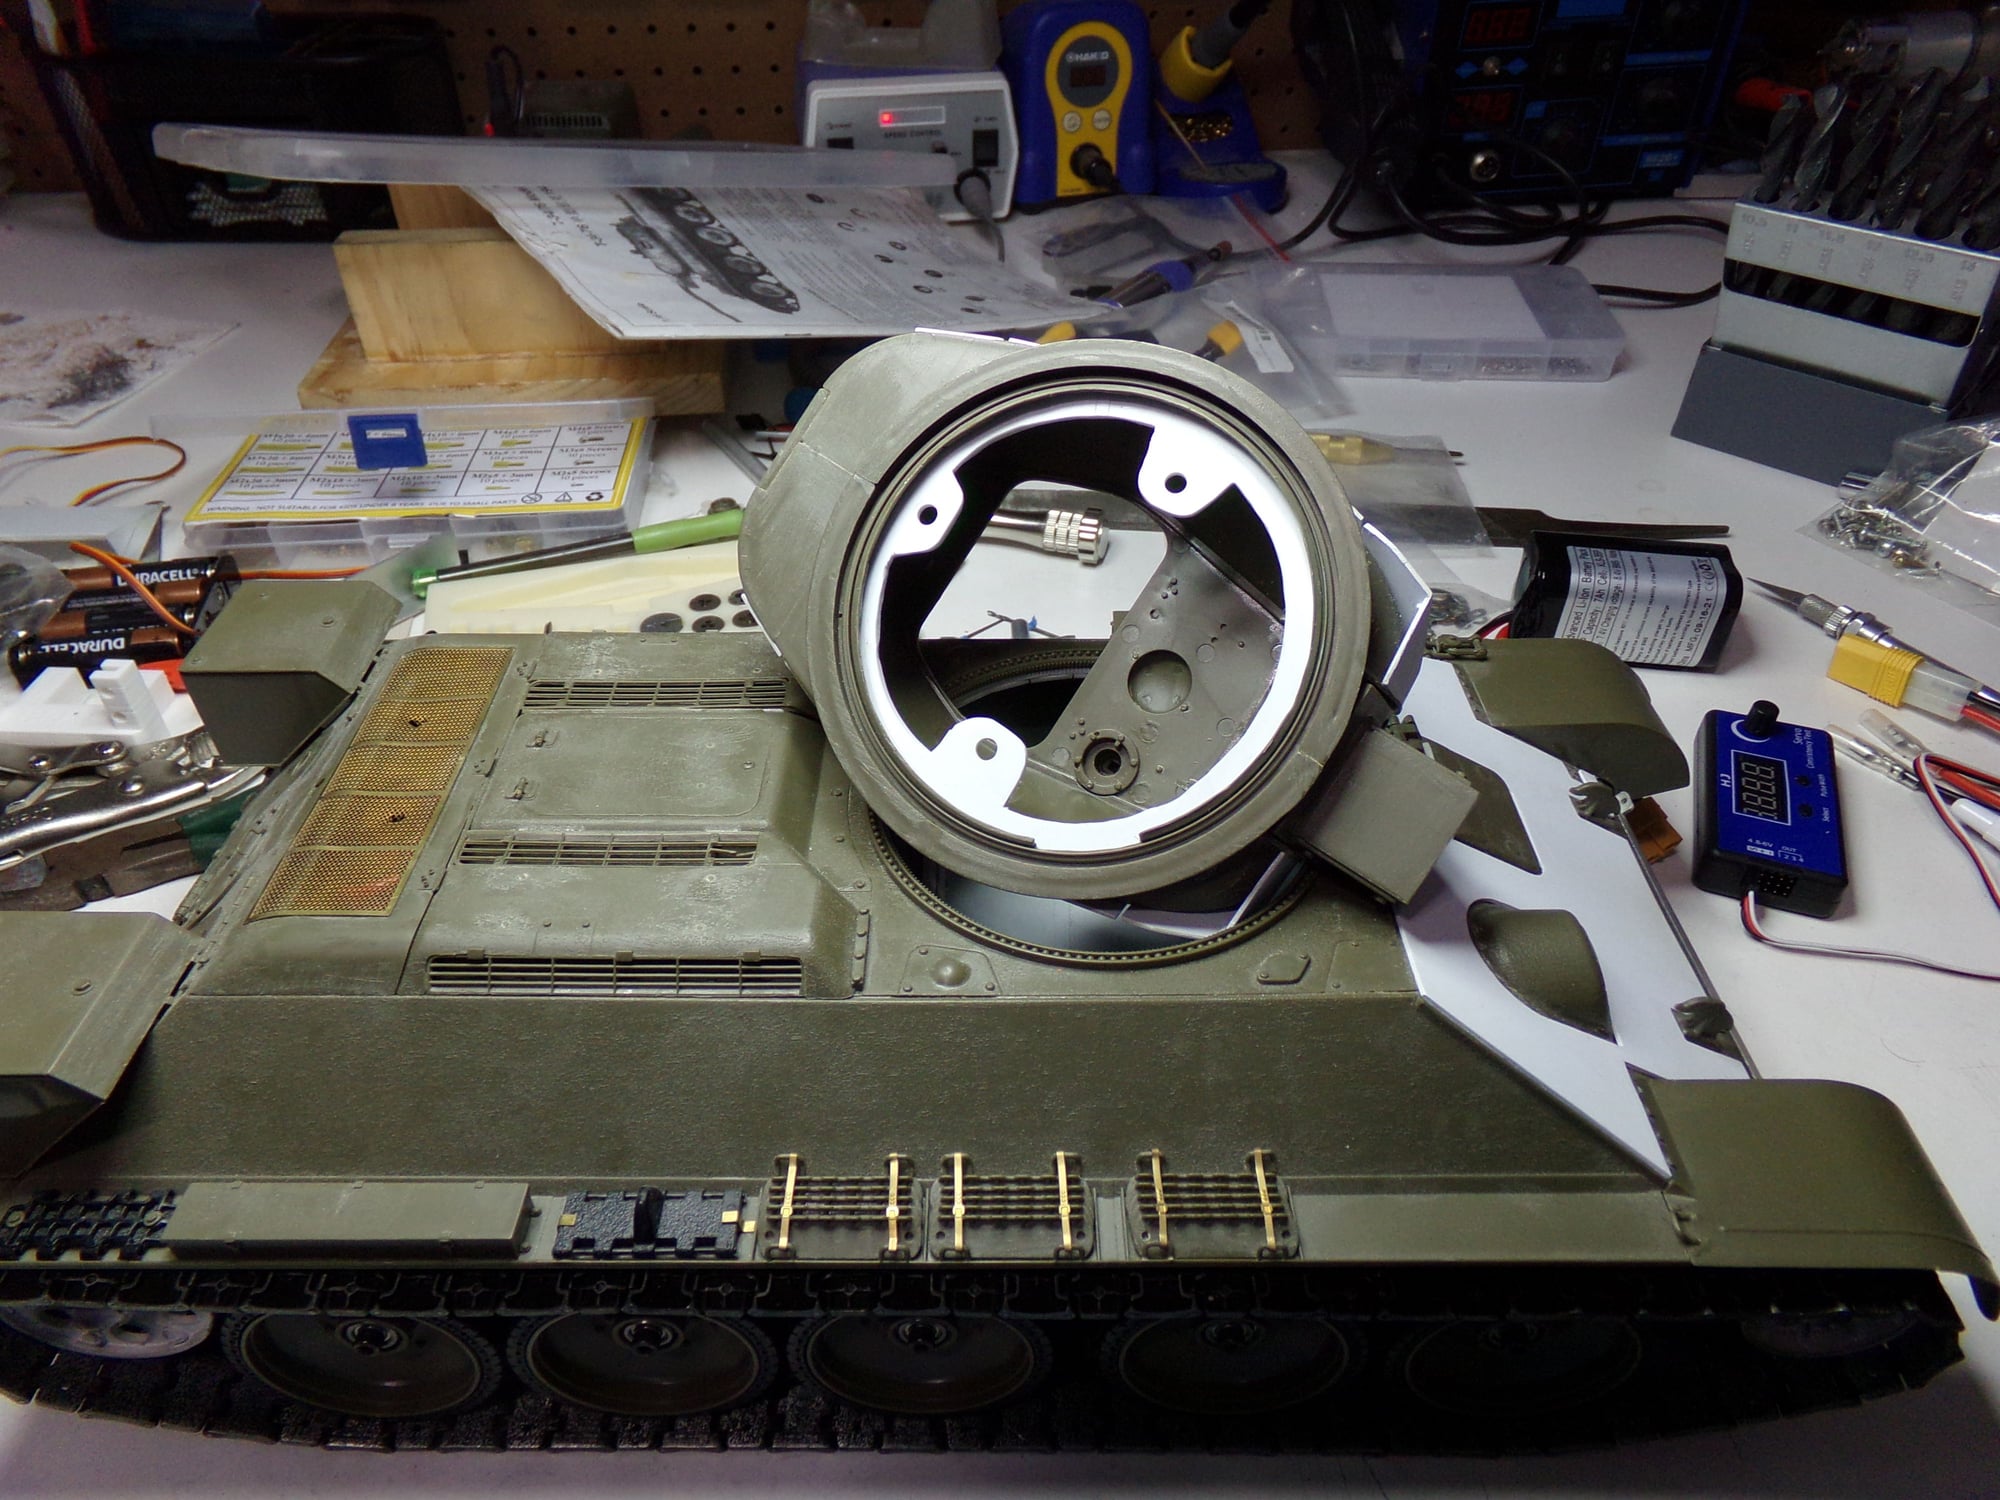
I did have to remove some material from the underside of the turret also to get the gear to sit just right:

At this point I'm building both the 1942 and the 1943 kits as most of the process is the same.
This is the basic mechanism outside of the turret:
Here is it mocked up on the inside of the turret (some of the pics are of the Micky Mouse turret as it's easier to see how it mounts because that turret is in two pieces) The barrel sleeve that came with the metal 76mm barrels is glued to the inside of the mantlet. The barrel hole had to be reamed out a little to get the aluminum barrels to fit and move smoothly:
The aluminum angle slips right into the mantlet and will be held in with glue or filled with Miliput to hold it:
As for the turret rotation, I've gotten both of them installed for the 1942 and the 1943 versions. I first needed to remove all the bolt detail on the bottom of the turret ring to have a smooth surface to glue to. I then glued a piece of styrene to the bottom of the turret race area. I had to add some extra styrene around the ring to give it some more height and position the turret gear in the right place. I used the plastic turret gear as the metal one was slightly smaller in diameter so it shifted around. The plastic one fit much better.
I also removed all the detail stuff along the bottom of the turret to get a smooth gluing surface to create a mounting surface for the turret/turret ring mating. The standoffs used to connect the turret to the gear are M4x15mm.
See my bench does get cluttered when I work...
I did have to remove some material from the underside of the turret also to get the gear to sit just right:
At this point I'm building both the 1942 and the 1943 kits as most of the process is the same.
The following users liked this post:
MAUS45 (04-20-2022)
07-18-2022, 01:41 AM
#8
Thread Starter
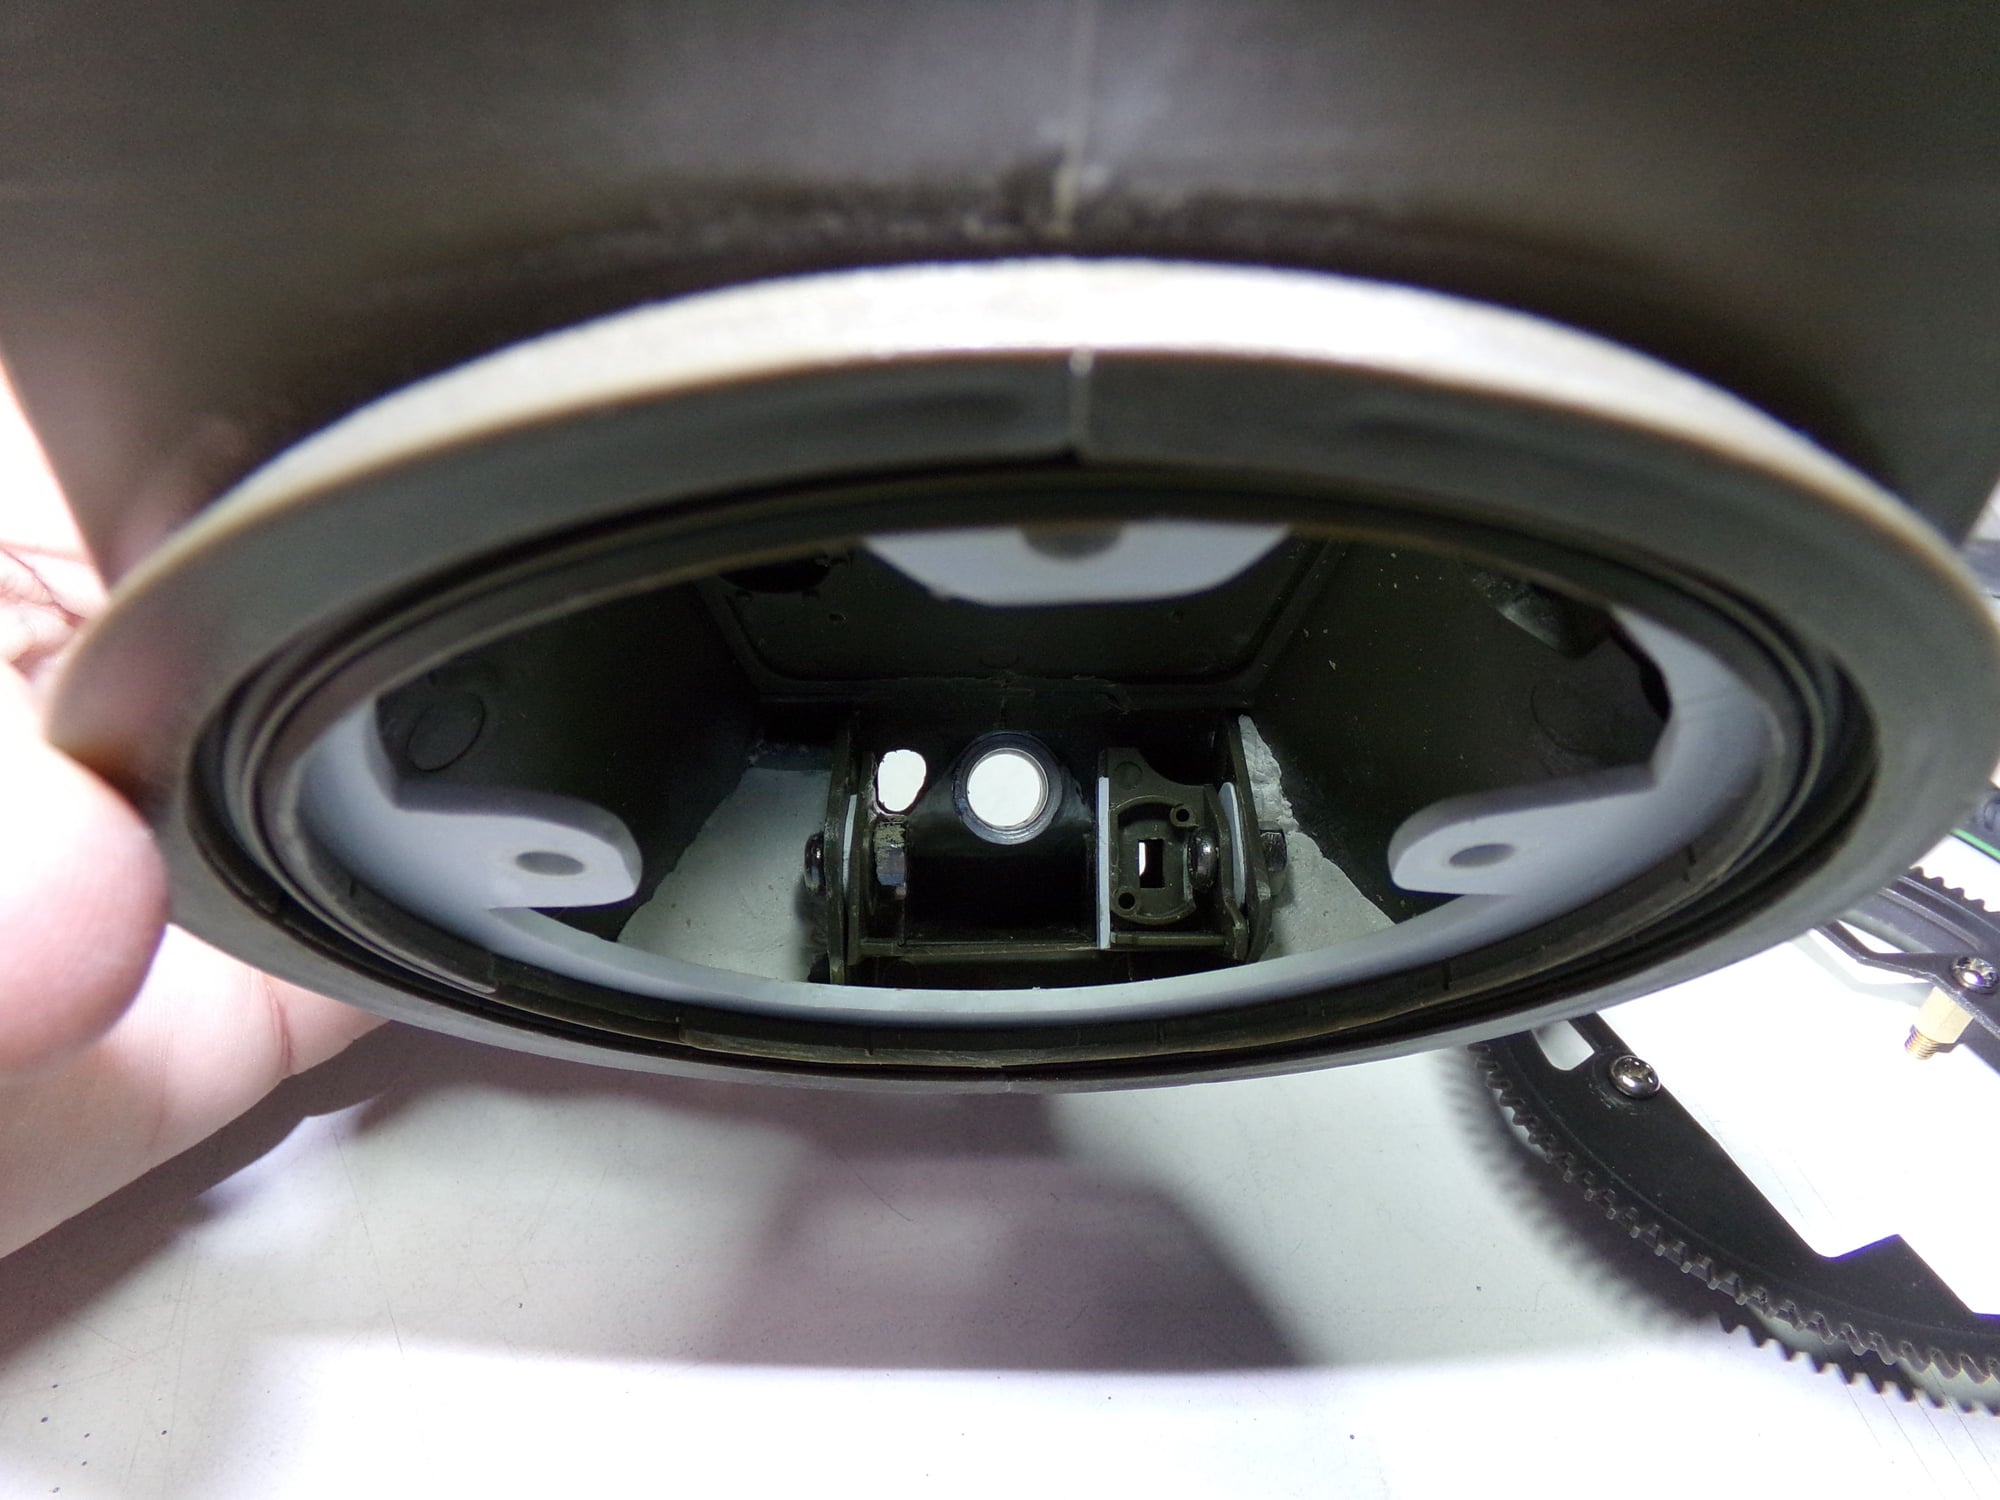
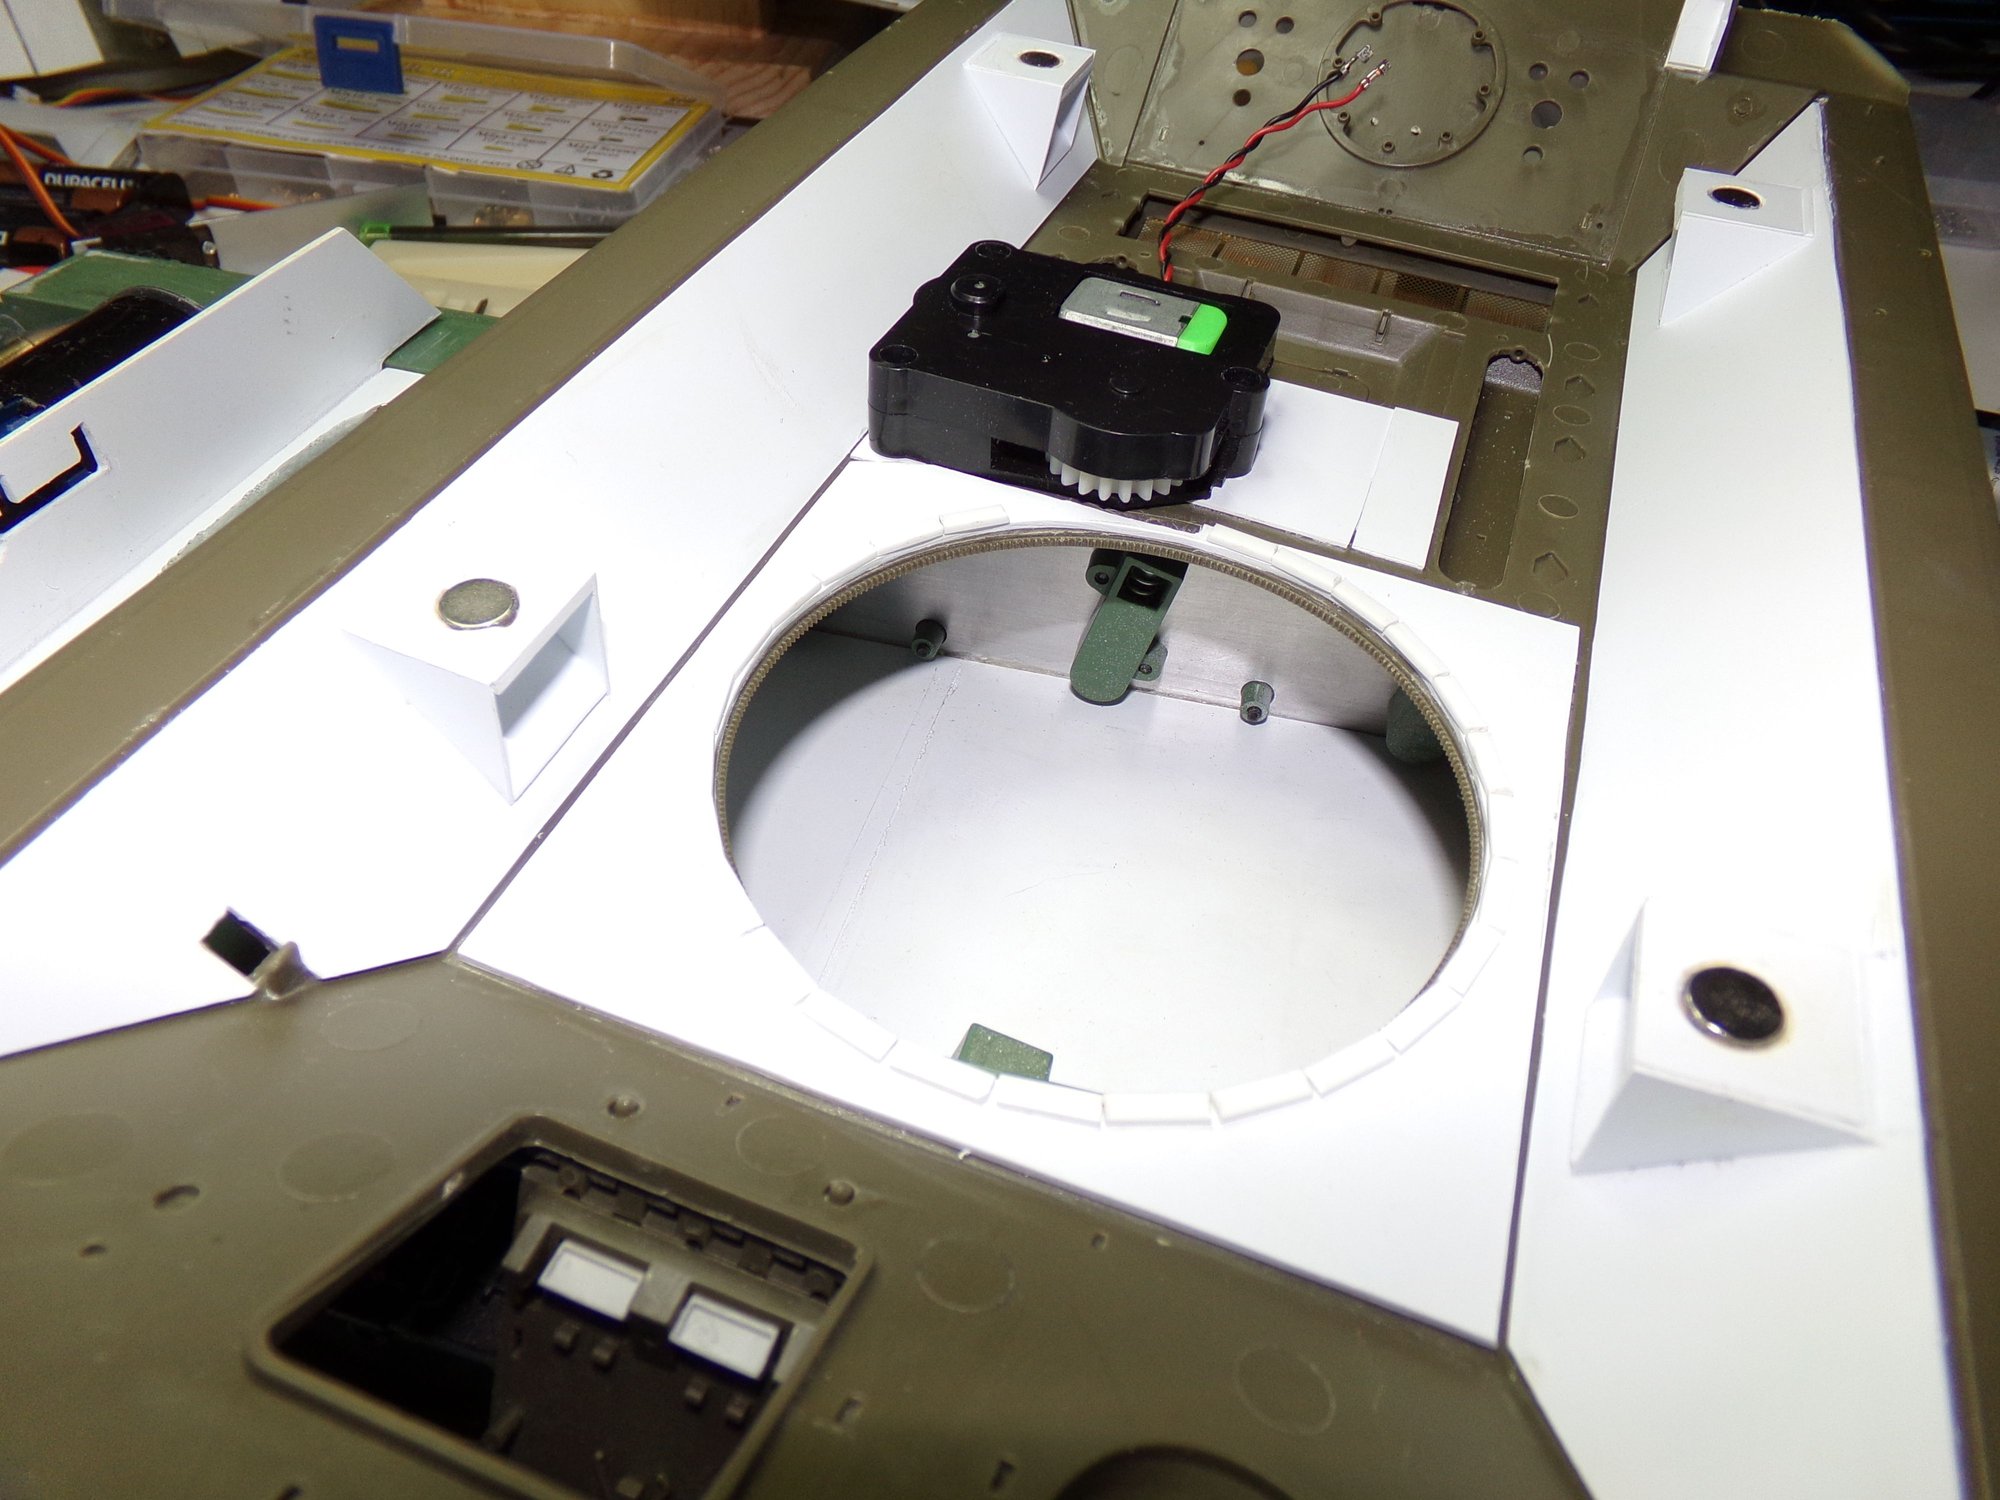
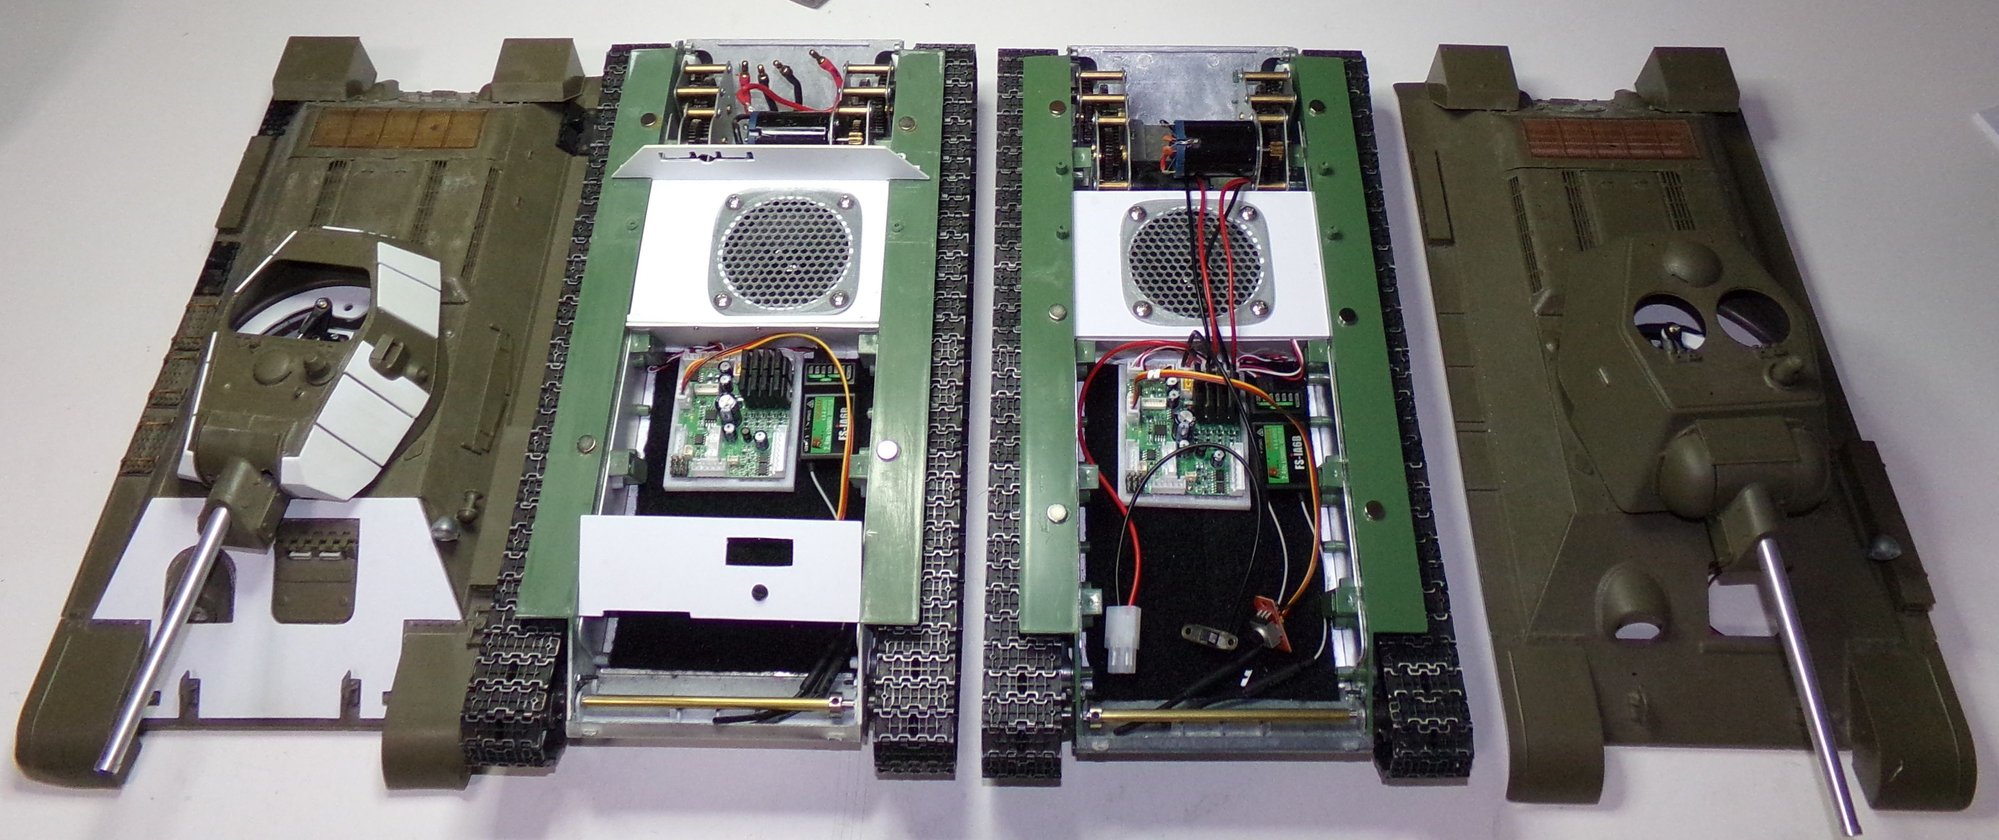
So the twins got a little love tonight. The model 1943 got it's new speaker enclosure built. I had ordered some 4mm ABS sheet for another project so I decided to use some of it to build a speaker enclosure as I ordered extra. I'm using the sides of the T-34 hull as the sides of the speaker box and the suspension towers as forward bracing. Being built between the hull it also serves to stiffen up the lower. The speaker grill is 3D printed from a free file on Thingverse. The speaker will still be removable for maintenance.
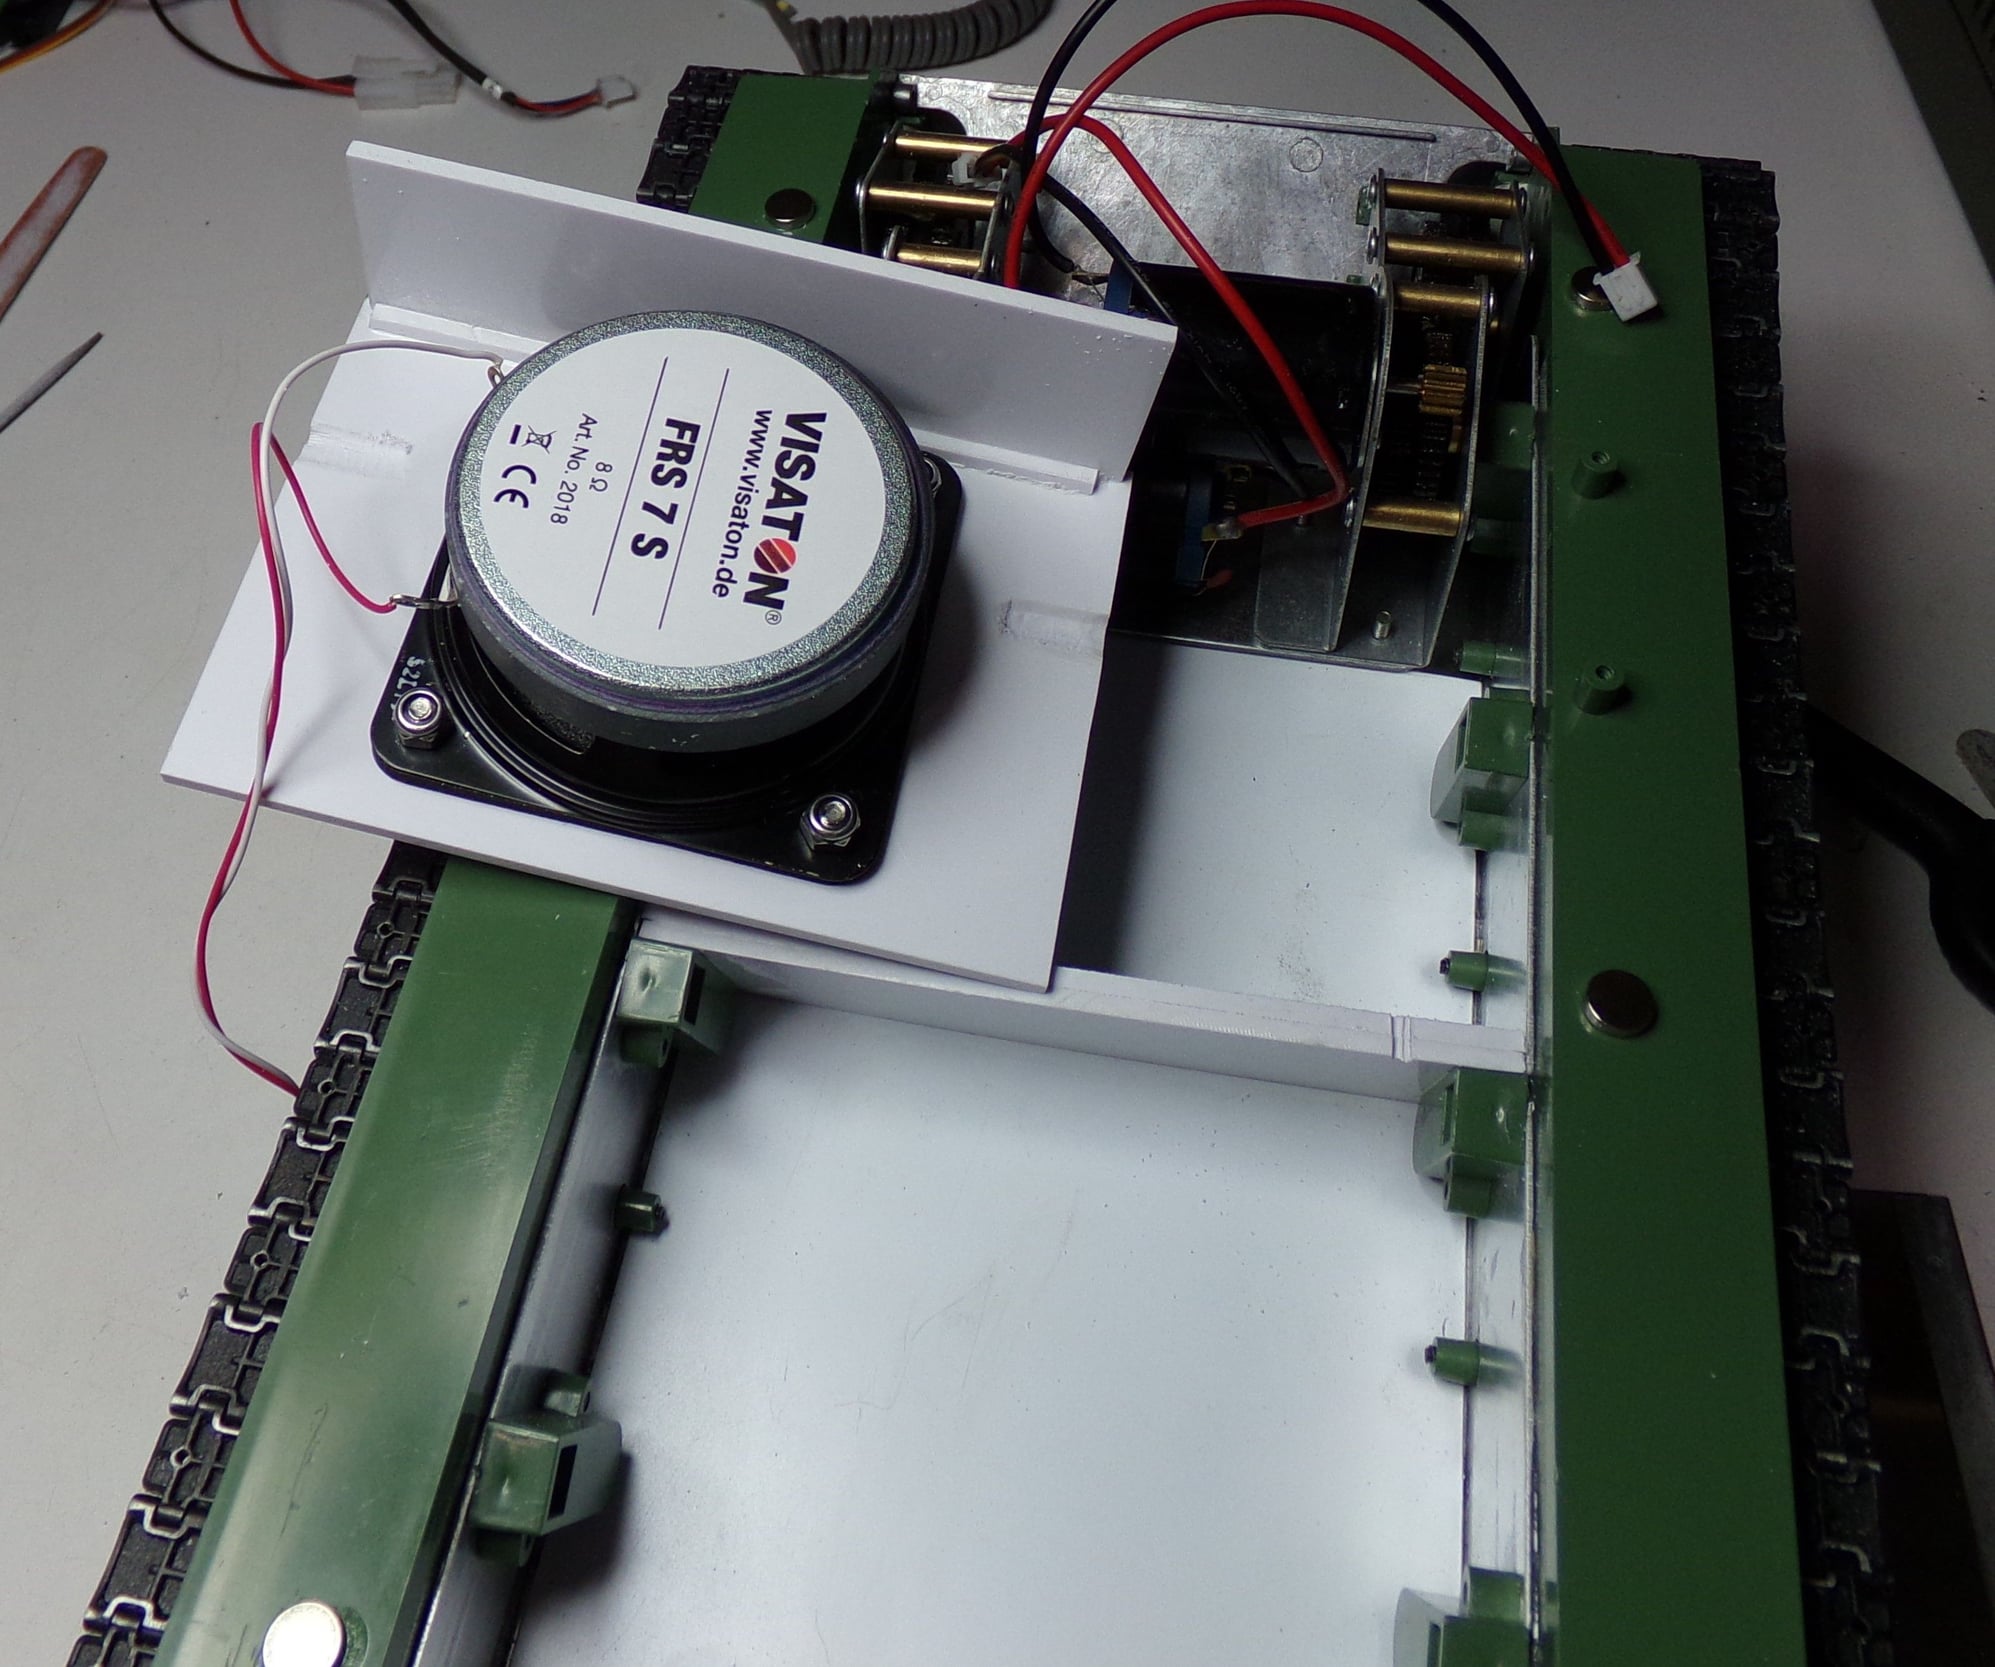
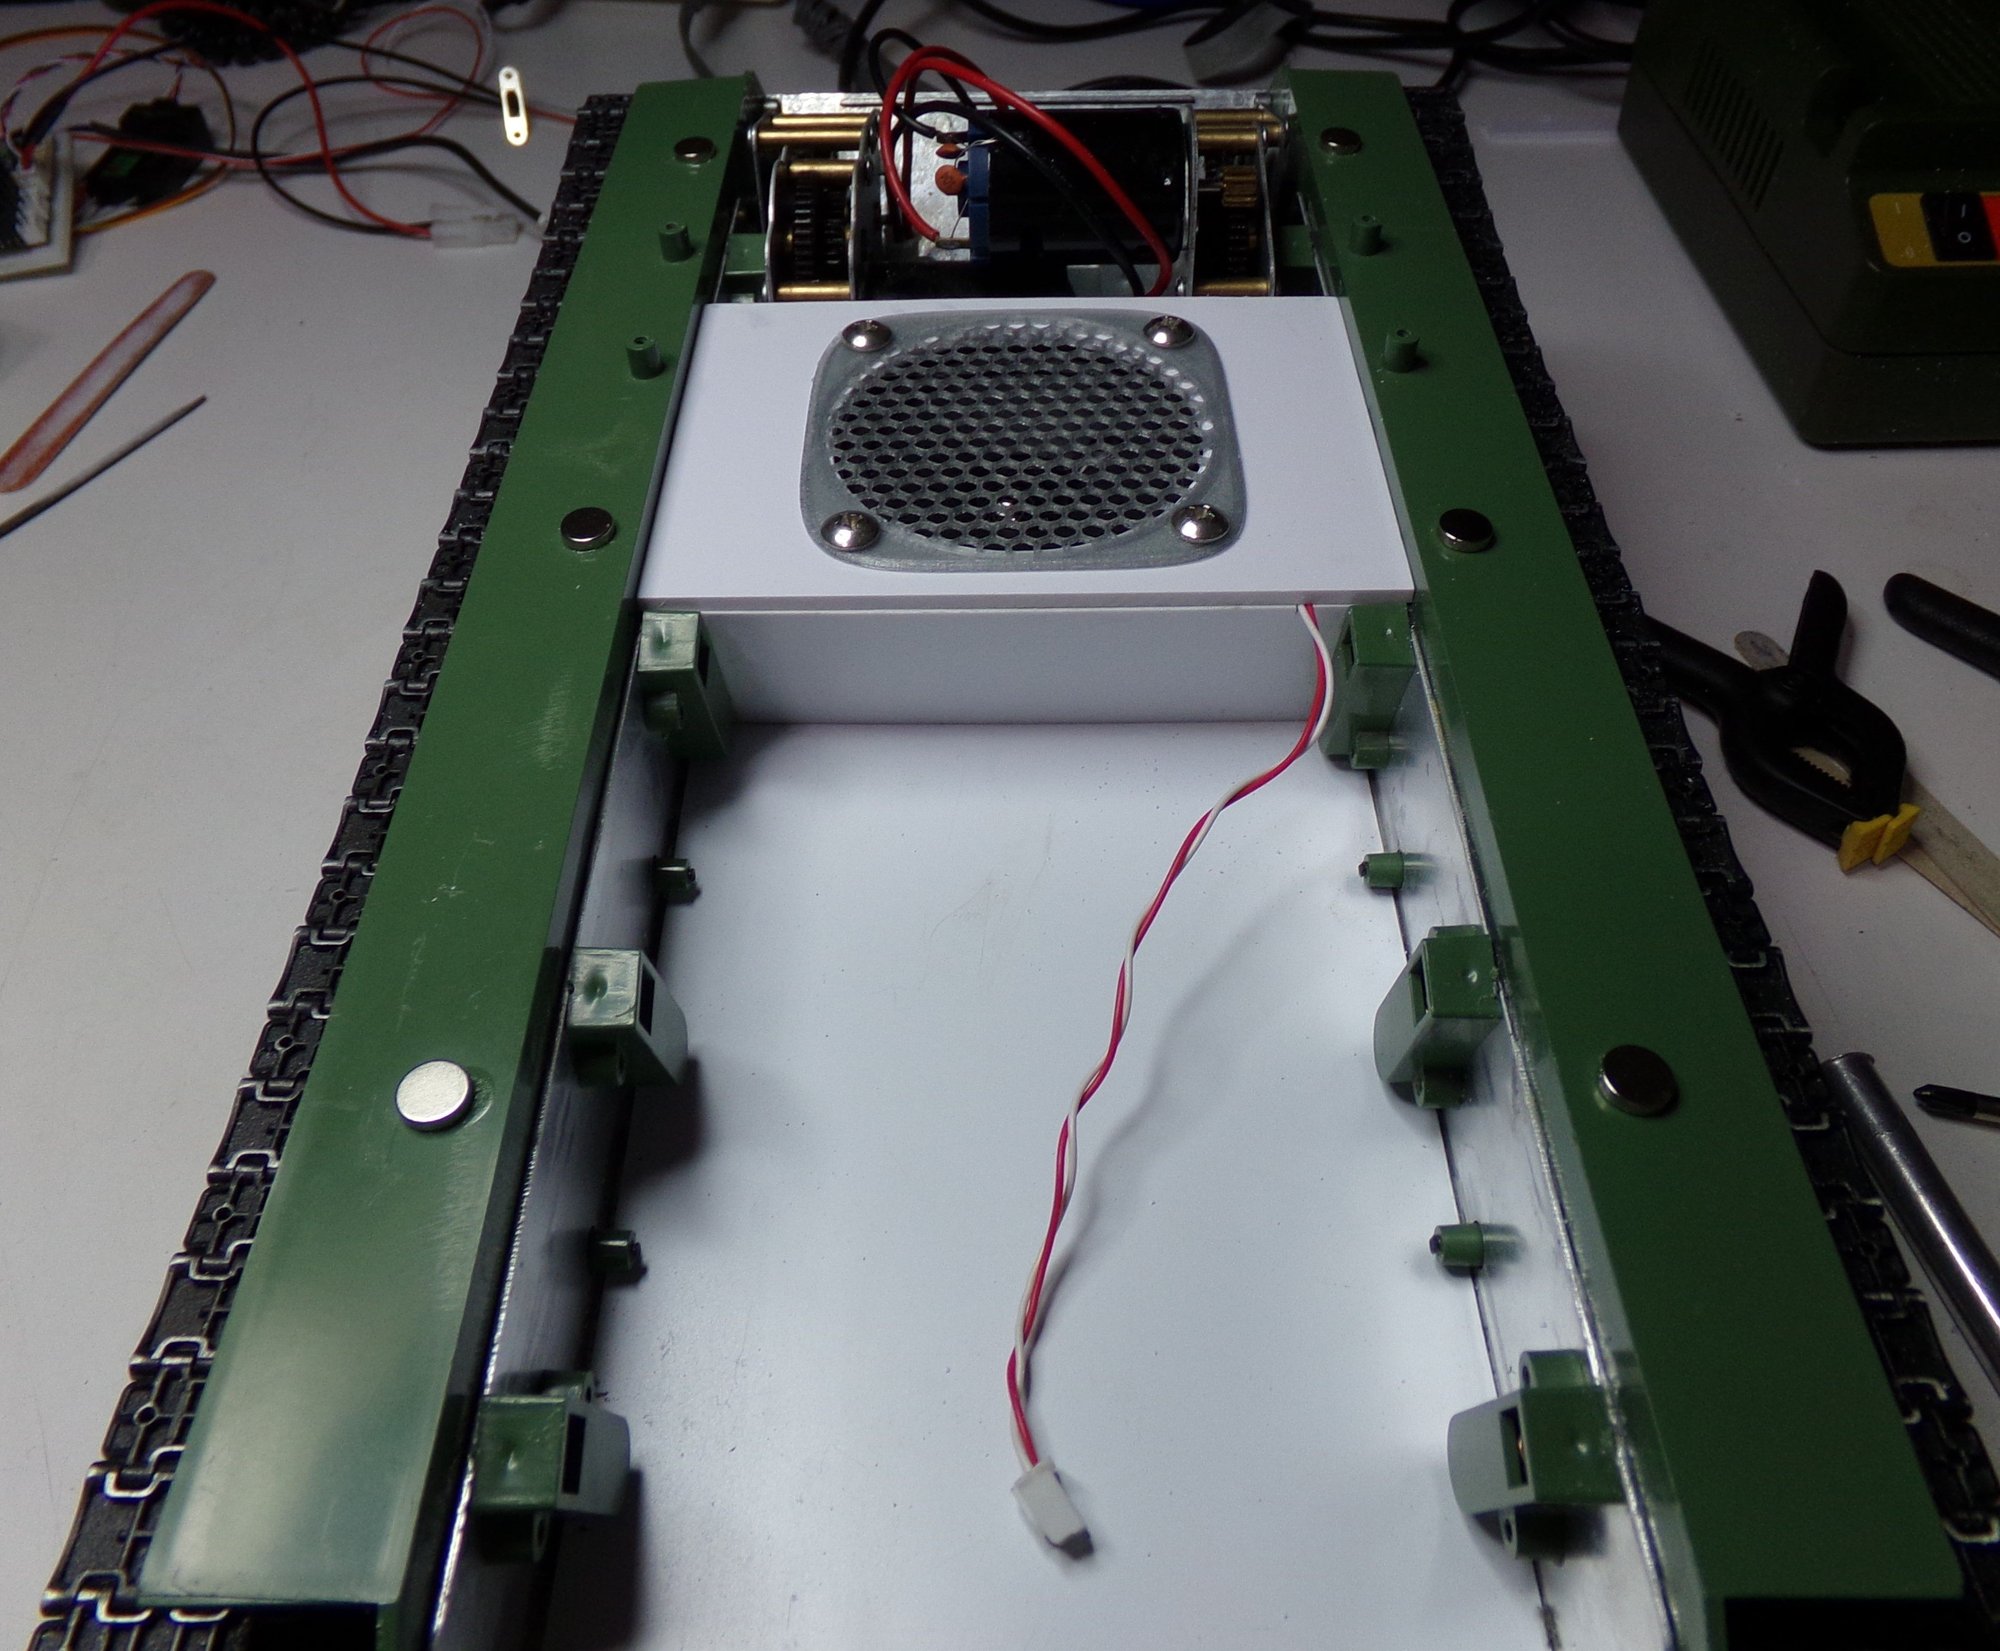
I lined the bottom of both of them with velcro to hold all the components in place. Makes it really easy to replace components or maintain the tanks. Each is getting a Clark TK50SP. I will be building another bridge across the front of the 1943 version to hold the volume and power switch under the driver's hatch. The 2S2P Li-Ion batteries I use fit nicely under the bridge and add some weight to the front of tanks to balance out the weight of the motors. There are some differences between them as I had originally planned and started installing an OpenPanzer TCB until I changed my mind to install the Clarks. Here they are as they sit today:
That's all for now...
07-18-2022, 02:08 PM
#9
Thanks for sharing, both look great so far!!!
01-19-2024, 02:10 PM
#10
Thread Starter
I almost feel like this is going to be an unofficial New Years resolution for me this year...clear out the backlog of old builds. I've got so many old builds piled up that I felt like it was time to do something about it. I grabbed the most complete tank build I had and decided to finish it. It just happened to be the Trumpeter T34/76 1943. Since it doesn't really have it's own build thread and it's been shown here before, here it will stay.
The tank was pretty well complete except for wiring issues. I finished the wiring on the turret rotation, the spot light, the IR LED (mounted below the gun), and the MG LED. I also mounted the 3D printed apple base in one of the hatches. I lowered it enough that I can still put the hatch on when the apple isn't installed. I will be adding a small magnet to the hatch and one on the mount to keep the hatch in place. Russian hatches of this era weren't designed to open fully so removing it was kinda the best option for when the apple is needed for battle.


After the wiring was complete I tested all it's functions and ran it around on the carpet for a few minutes. The barrel position wasn't right for some reason so I adjusted both the servo recoil arm and the elevation servo. I then did a functions check and verified all functions were working on the Clark TK50. You can see the barrel elevation and depression is pretty good now.


Some additional texture was added to the tank on the turret and the MG port as the factory texture in the plastic was a little too consistent. There were a few details that got knocked off during the build like one of the lifting eyes on the turret and the turret hatch stops. All were reinstalled. I put the weld lines in around the towing hooks, the turret air cleaner, and along the mantlet sides. Most of the other weld lines were already present on the tank. They are small, but there none the less. I kinda forgot to get pics of that stage as it is a tad rougher than just the Mr. Surfacer that is on it in the pics.
With so many T34 variants laying around, I decided I needed to mix and match some of the dished road wheels along with the steelies and spoked wheels. They will be grouped on the front right of the tank together. I figured if the tank was hit it's possible both of those wheels took damage and got replaced with whatever was on hand. The wheels that were replaced will be distributed to the T34/76 1942 tank and my SU-122.
And then with great enthusiasm...paint. I actually really hate the painting stage, but since this project has gone so long it was good to see it all in one color. It's now off to the side to cure.

This is the set of decals I will be using. I will be adding the camo pattern as well. When this one is finished I was going to tackle it's sibling, but it seems the sound has died on it's TK50 and there are other mechanical issues to sort out with the turret elevation. Those things will have to wait as there are other vehicles with less issues that can be knocked out first. Gonna get all that low hanging fruit first.

That's all for now...
The tank was pretty well complete except for wiring issues. I finished the wiring on the turret rotation, the spot light, the IR LED (mounted below the gun), and the MG LED. I also mounted the 3D printed apple base in one of the hatches. I lowered it enough that I can still put the hatch on when the apple isn't installed. I will be adding a small magnet to the hatch and one on the mount to keep the hatch in place. Russian hatches of this era weren't designed to open fully so removing it was kinda the best option for when the apple is needed for battle.
After the wiring was complete I tested all it's functions and ran it around on the carpet for a few minutes. The barrel position wasn't right for some reason so I adjusted both the servo recoil arm and the elevation servo. I then did a functions check and verified all functions were working on the Clark TK50. You can see the barrel elevation and depression is pretty good now.
Some additional texture was added to the tank on the turret and the MG port as the factory texture in the plastic was a little too consistent. There were a few details that got knocked off during the build like one of the lifting eyes on the turret and the turret hatch stops. All were reinstalled. I put the weld lines in around the towing hooks, the turret air cleaner, and along the mantlet sides. Most of the other weld lines were already present on the tank. They are small, but there none the less. I kinda forgot to get pics of that stage as it is a tad rougher than just the Mr. Surfacer that is on it in the pics.
With so many T34 variants laying around, I decided I needed to mix and match some of the dished road wheels along with the steelies and spoked wheels. They will be grouped on the front right of the tank together. I figured if the tank was hit it's possible both of those wheels took damage and got replaced with whatever was on hand. The wheels that were replaced will be distributed to the T34/76 1942 tank and my SU-122.
And then with great enthusiasm...paint. I actually really hate the painting stage, but since this project has gone so long it was good to see it all in one color. It's now off to the side to cure.
This is the set of decals I will be using. I will be adding the camo pattern as well. When this one is finished I was going to tackle it's sibling, but it seems the sound has died on it's TK50 and there are other mechanical issues to sort out with the turret elevation. Those things will have to wait as there are other vehicles with less issues that can be knocked out first. Gonna get all that low hanging fruit first.
That's all for now...
 01-29-2024, 12:06 AM
#13
Thread Starter
And it's inching closer to being complete. Camo on and markings on. Markings are a combo of painted (smaller numbers and slogan) and decals (crest, star, large 106). Did a few 4BO touch ups tonight so I'm letting them dry before clear coating. I will probably do a light weathering, but maybe I'll just let it weather on it's own.


That's all for now...
That's all for now...
01-30-2024, 03:25 PM
#14
Thread Starter
The markings and camo are based on a real vehicle as I found a pic of it and it's crew. It seems the slogan means, "Stalinets". The slogan is probably based on where the tank was made. Russia produced Stalinets S60 (Russian: Сталинец-60) and S65 tractors at the Chelyabinsk Tractor Plant between 1933 and 1937.
From Wikipedia:
During World War II seven other industrial entities (including most of Leningrad's Kirov Plant and 15,000 of its workers) were either wholly or partially relocated to Chelyabinsk, the resulting enterprise commonly known as "Танкоград" ('Tankograd', or 'Tank City'). The work force increased to 60,000 workers by 1944, from 25,000 during non-military production; during the conflict the works produced 18,000 tanks, and 48,500 tank diesel engines as well as over 17 million units of ammunition. Production included the KV tank from 1941, T-34 tank from 1942, KV-85 tank and IS tanks from 1943, and T-34/85 tank and SU-85 self-propelled field gun from 1944. By 1945 the plant had been awarded the Order of Kutuzov, 1st Class, the Order of Lenin, the Order of the Red Star, and other honors for its efforts in helping to defeat Nazi Germany.
https://www.google.com/url?sa=i&url=...AAAAAdAAAAABAN
02-05-2024, 02:14 PM
#15
I just bought a Heng Long T34-85 and am waiting for all my paints to come in to start on it.
None of my tanks have a proper recoiling barrel, and I'd like to incorporate that into mine.
Do you need a custom board to support barrel recoil? My HL has the 7.0 series electronics in it.
None of my tanks have a proper recoiling barrel, and I'd like to incorporate that into mine.
Do you need a custom board to support barrel recoil? My HL has the 7.0 series electronics in it.
02-06-2024, 02:56 AM
#16
Thread Starter
Taigen's tanks have a recoiling barrel from the factory using an Asiatam recoil unit. Most of the time people use servo based recoil units and in that case you need an aftermarket board or a TK 6.1 or 7.1 that supports servos. They do have some recoil units out there that use motors, but most of them work pretty poorly as far as realism is concerned (IE: too fast or wrong action).
07-26-2024, 03:27 PM
#17
Thread Starter
I'm calling this project done. Got the magnet mounted in one of the Mickey Mouse ears so that it can be removed to add the apple when needed and hide the mount when not.


Tracks are back on and she's ready for battle. I did add a little bit of panel liner and weathered the decals just a tad so that they weren't so much in your face bright.

I did stack two of the solid wheels on the front of the tank to simulate a wheel replacement. I thought that was a logical location for a tank to be hit. The other wheels will be mounted on my other T34/76 project.

I had it out to our new battlefield in Texas and it performed flawlessly. Well flawlessly after I removed the cotton I had stuck in the emitter tube for painting. Forgot to get pics of it running around the field.
That's it for this build...for now. Never know, it might get some 76mm ammo crates or something in the future. I also have to finish it's cousin so there's that... :haha:
Tracks are back on and she's ready for battle. I did add a little bit of panel liner and weathered the decals just a tad so that they weren't so much in your face bright.
I did stack two of the solid wheels on the front of the tank to simulate a wheel replacement. I thought that was a logical location for a tank to be hit. The other wheels will be mounted on my other T34/76 project.
I had it out to our new battlefield in Texas and it performed flawlessly. Well flawlessly after I removed the cotton I had stuck in the emitter tube for painting. Forgot to get pics of it running around the field.
That's it for this build...for now. Never know, it might get some 76mm ammo crates or something in the future. I also have to finish it's cousin so there's that... :haha:
The following 2 users liked this post by tankme:
dsbc (07-26-2024),
maillemaker (07-26-2024)
The following users liked this post:
tankme (07-31-2024)
