New Clod build *UPDATE (Deathproof look?!)*
 03-22-2008, 03:28 PM
#26
Senior Member
Thread Starter
Join Date: Sep 2007
Location: , PUERTO RICO (USA)
Posts: 381
Likes: 0
Received 0 Likes
on
0 Posts
That was to give an idea....the cage will be made to simulate a steel cage... The build will be fun and best of all I will like it because I build it. Lets see some of your work.
 03-22-2008, 08:02 PM
#27
Senior Member
Thread Starter
Join Date: Sep 2007
Location: , PUERTO RICO (USA)
Posts: 381
Likes: 0
Received 0 Likes
on
0 Posts
For the genius master builder that said my build is going south here are more examples of what Im planning with the rig:


That last one is my inspiration and I hope I get a similar look...BTW my TA has BMW wheels. Mixing parts from other cars has always been a common event among car enthusiasts. Enjoy my build. Here is how the TA looks. Guess also went south...
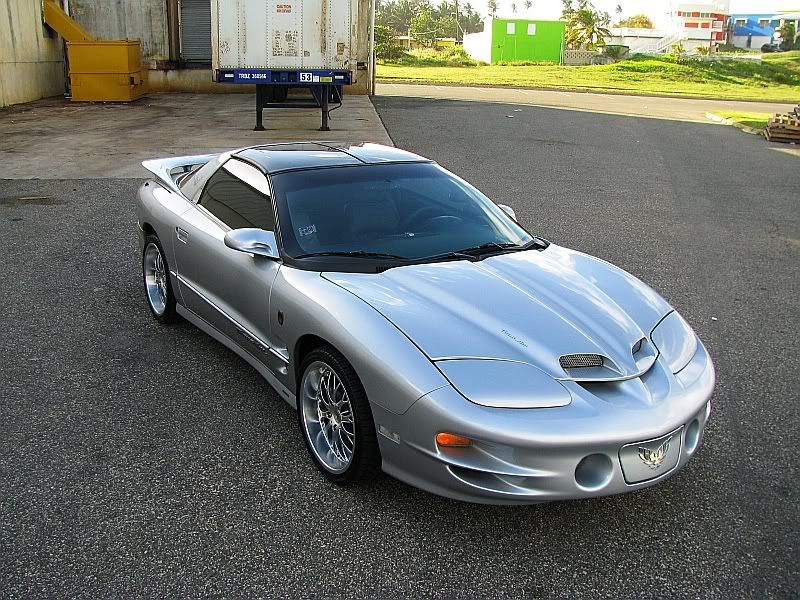
That last one is my inspiration and I hope I get a similar look...BTW my TA has BMW wheels. Mixing parts from other cars has always been a common event among car enthusiasts. Enjoy my build. Here is how the TA looks. Guess also went south...
03-22-2008, 08:28 PM
#28
Senior Member
Thread Starter
Join Date: Sep 2007
Location: , PUERTO RICO (USA)
Posts: 381
Likes: 0
Received 0 Likes
on
0 Posts
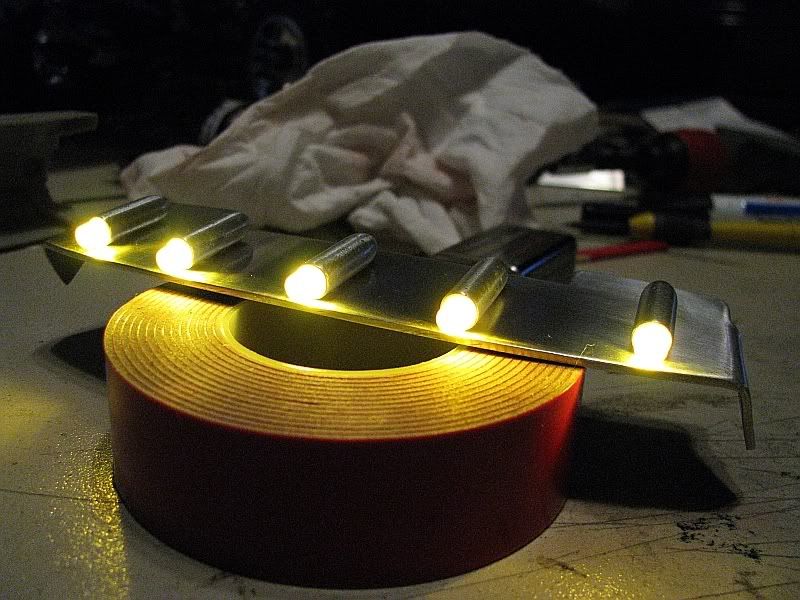
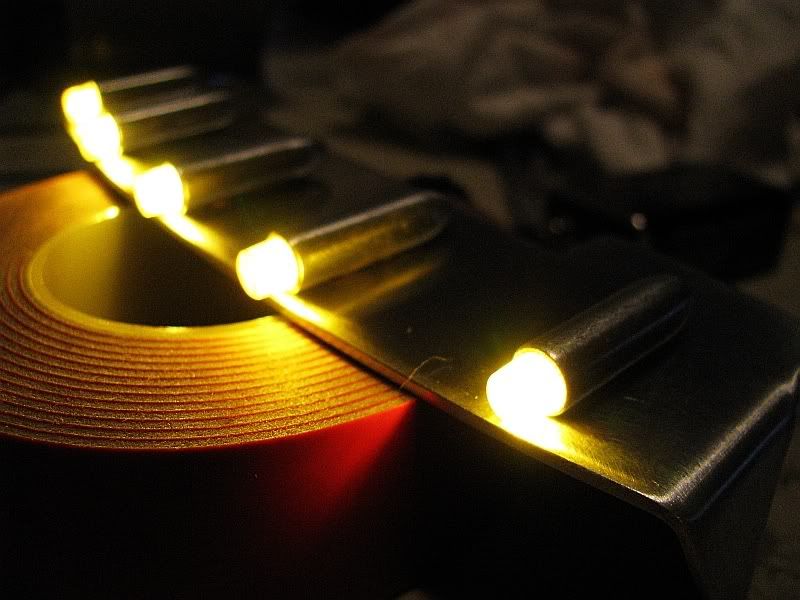
New update....Got the visor cleaned and the lights going. Also started to cover up the original Clod body mounting holes. The dash dials are tested, next will be lightning. Thanks for looking!
03-23-2008, 08:05 PM
#29
Senior Member
Thread Starter
Join Date: Sep 2007
Location: , PUERTO RICO (USA)
Posts: 381
Likes: 0
Received 0 Likes
on
0 Posts
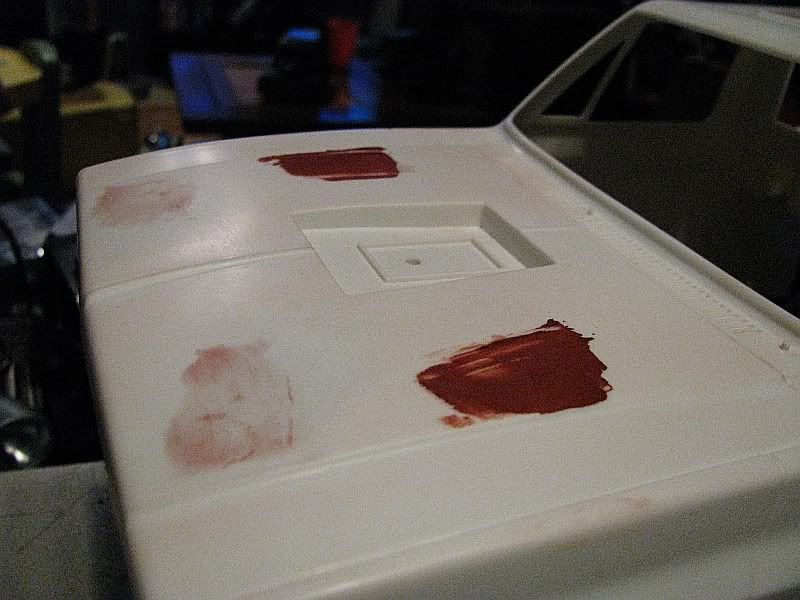
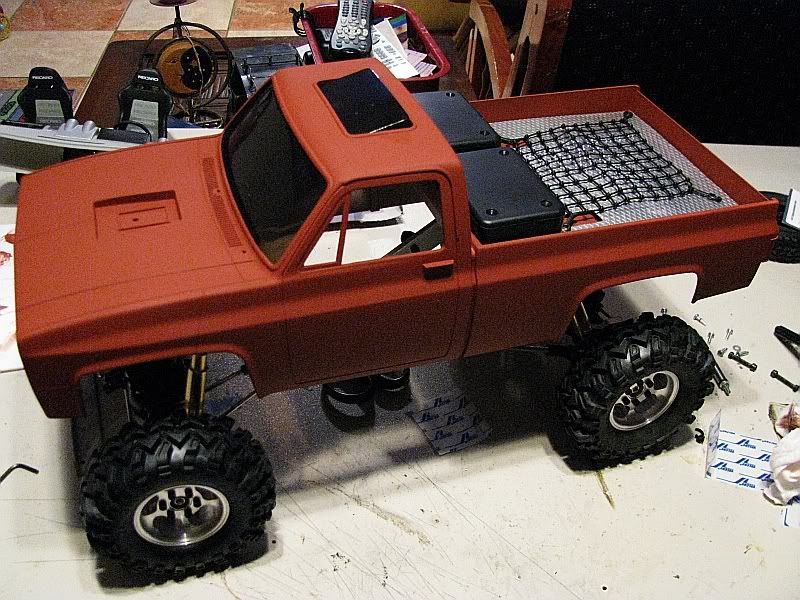
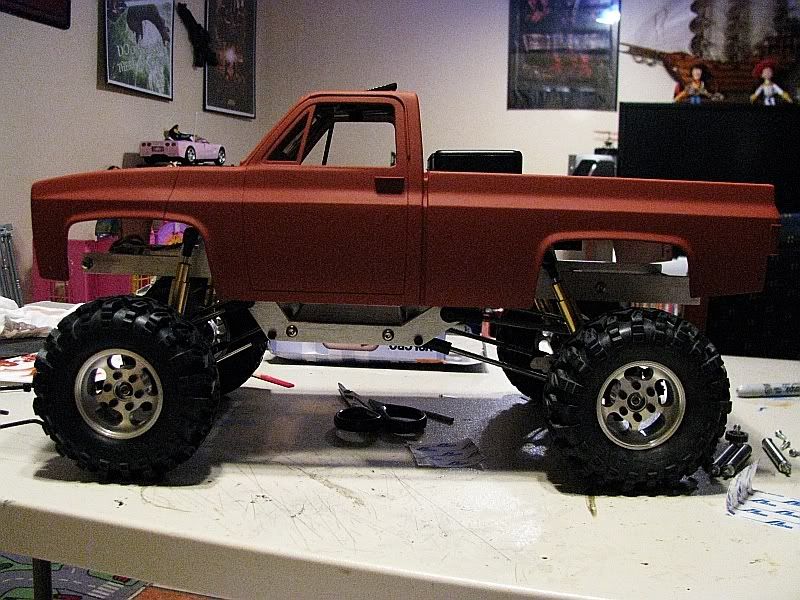
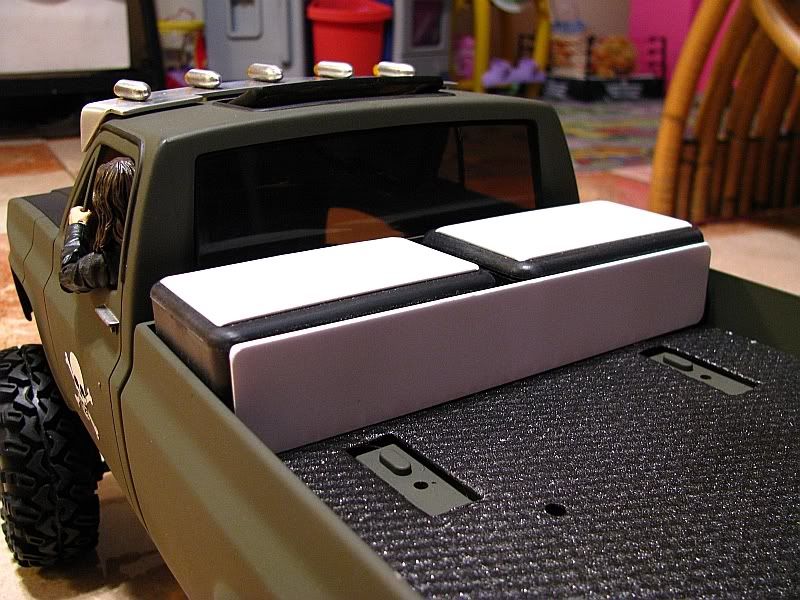
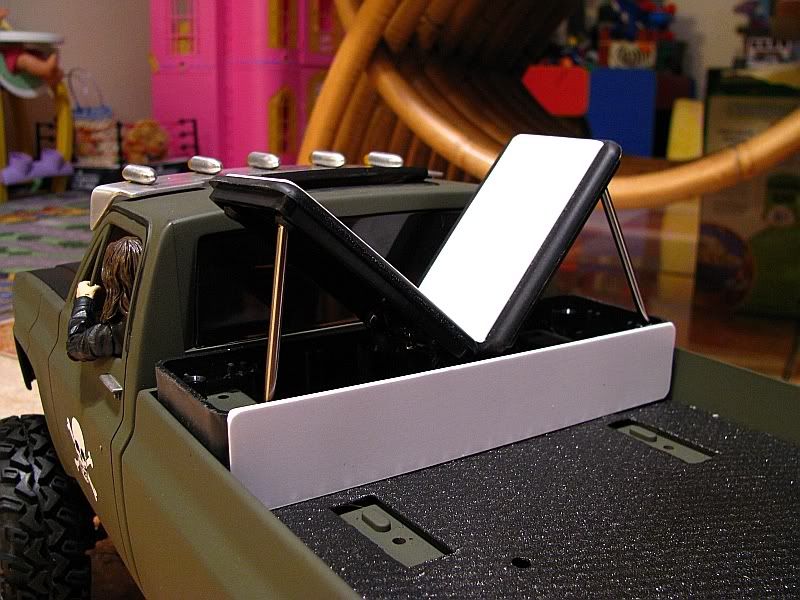
Finished covering mounting holes in the hood and shot the whole thing red oxide primer. Body is also attached to chassis by Velcro. Pics show a few ideas I have been playing with for the bed like the metal bed floor. I need a few hinges to make those bed boxes functional and will probably hide the lightning batteries in them. Styrene material will come this week hopefully. Thanks for looking.
03-23-2008, 09:14 PM
#30
Senior Member
Join Date: Aug 2007
Location: Bridgeton,
NJ
Posts: 119
Likes: 0
Received 0 Likes
on
0 Posts
chaman, man I think the whole rig is amazing. Wish I had the patience and vision to do something like that don't listen to the nay sayers, they're just jealous.
03-23-2008, 10:53 PM
#31
Senior Member
Thread Starter
Join Date: Sep 2007
Location: , PUERTO RICO (USA)
Posts: 381
Likes: 0
Received 0 Likes
on
0 Posts
Thanks man! What I think is some people forget this is just a hobby. Its a very personal thing in the end and these rigs get built to please its very own creator, in this case me! LOL!! I just like to post my work to share with others and share a little. Im glad you liked it! Be sure to keep looking as I try to finish it...or burn it! It will be fun either way!
03-24-2008, 11:48 PM
#33
Senior Member
Thread Starter
Join Date: Sep 2007
Location: , PUERTO RICO (USA)
Posts: 381
Likes: 0
Received 0 Likes
on
0 Posts
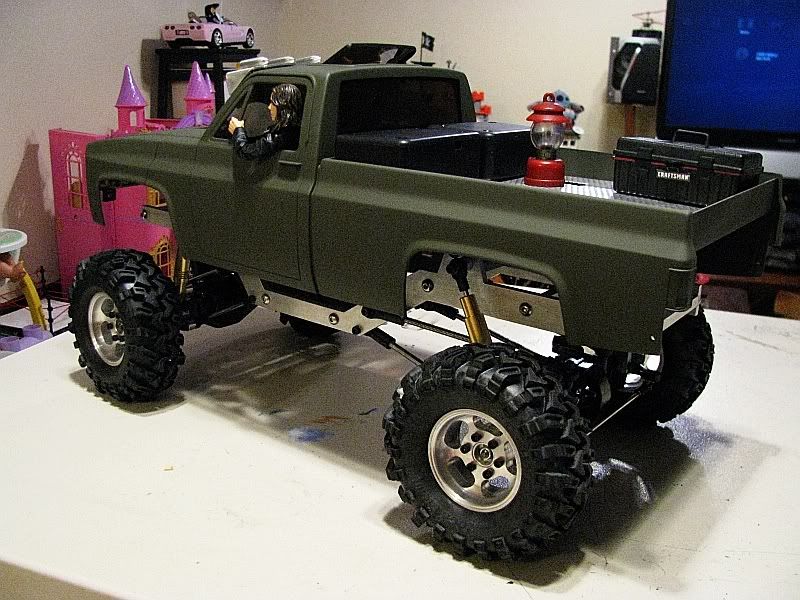
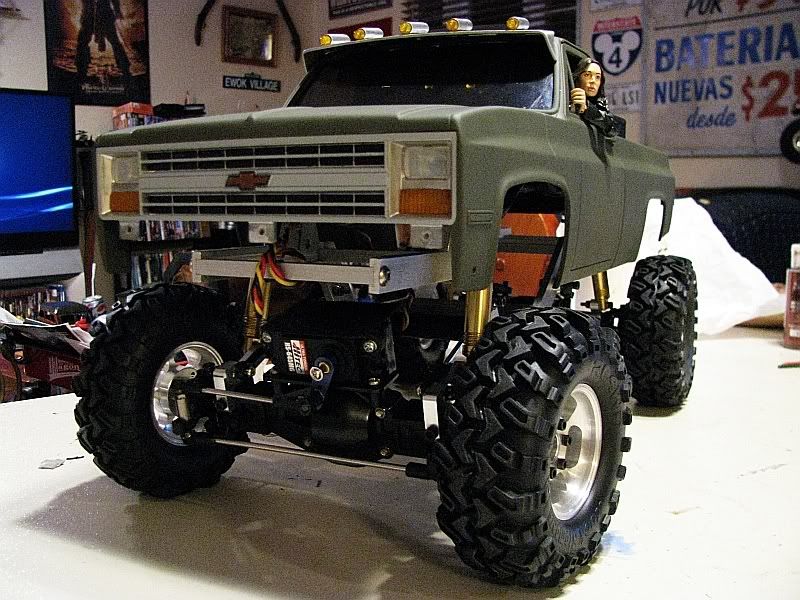
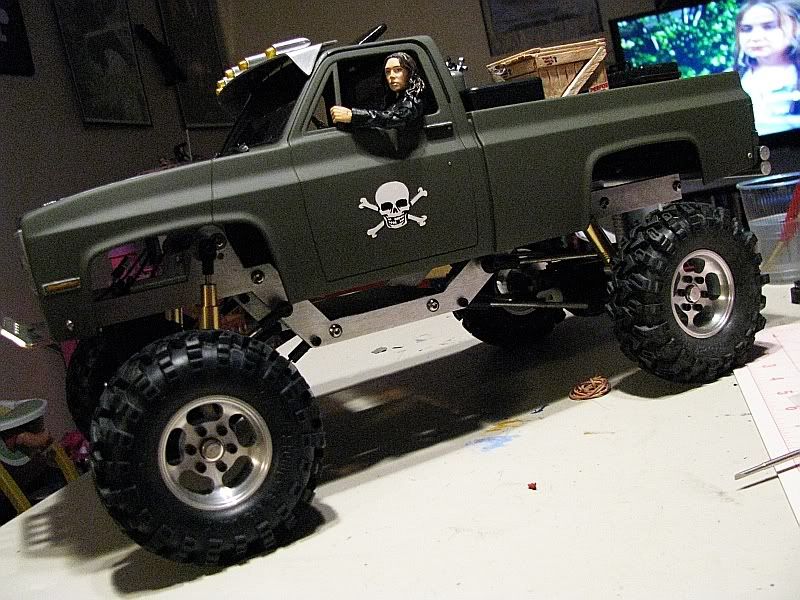
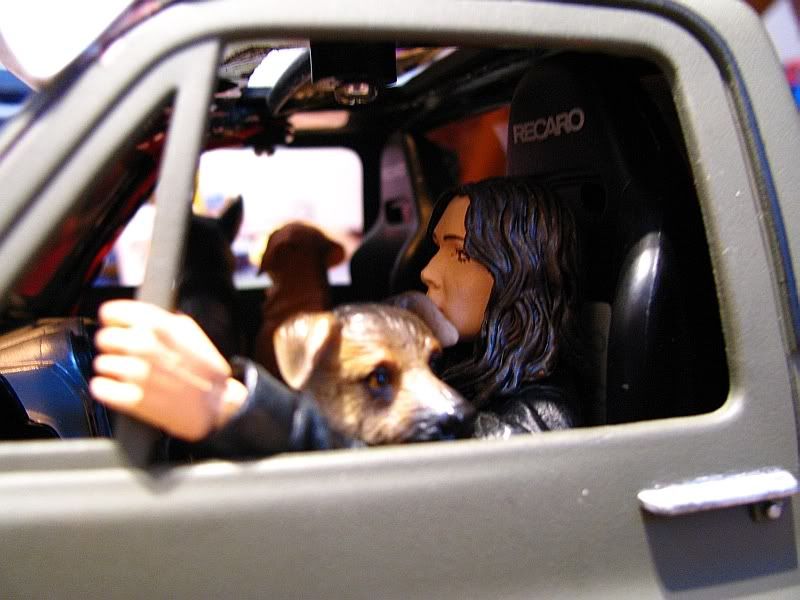
Well I guess is time to show who the driver will be. Guys almost always go to find the toughest, baddest looking dude to drive their rigs. I almost went the same way until...I found the perfect, unique, kick *** driver ever.....meet Krystal:
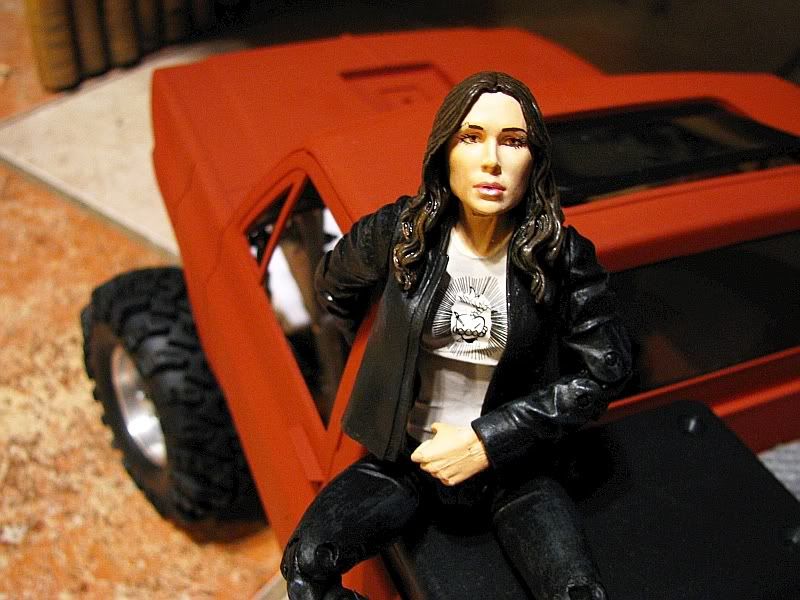
She is a tough looking girl, obviously hot and sexy that will take no crap by no one! She looks just right inside that rig....my wife was kind of jealous BTW!! LOL!!!:crazy:
This is fun....to bad I have to work tomorrow...:blink:
She is a tough looking girl, obviously hot and sexy that will take no crap by no one! She looks just right inside that rig....my wife was kind of jealous BTW!! LOL!!!:crazy:
This is fun....to bad I have to work tomorrow...:blink:
03-25-2008, 08:32 AM
#34


Join Date: Apr 2005
Location: Pacifica,
CA
Posts: 4,719
Likes: 0
Received 0 Likes
on
0 Posts
It's always a good thing to have a chick in the driver's seat [sm=wink_smile.gif]
The truck is looking great! Keep up with the updates [sm=thumbs_up.gif]
The truck is looking great! Keep up with the updates [sm=thumbs_up.gif]
 03-26-2008, 06:35 PM
#37
Senior Member
Thread Starter
Join Date: Sep 2007
Location: , PUERTO RICO (USA)
Posts: 381
Likes: 0
Received 0 Likes
on
0 Posts
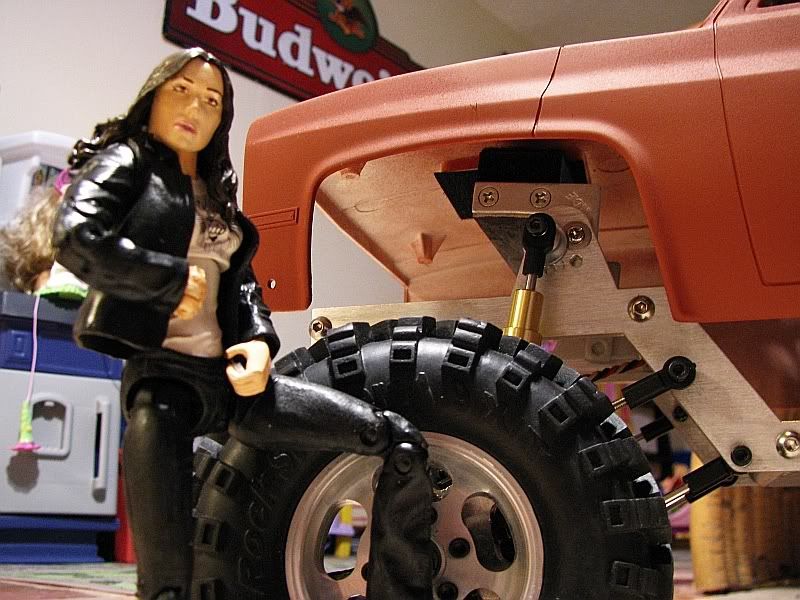
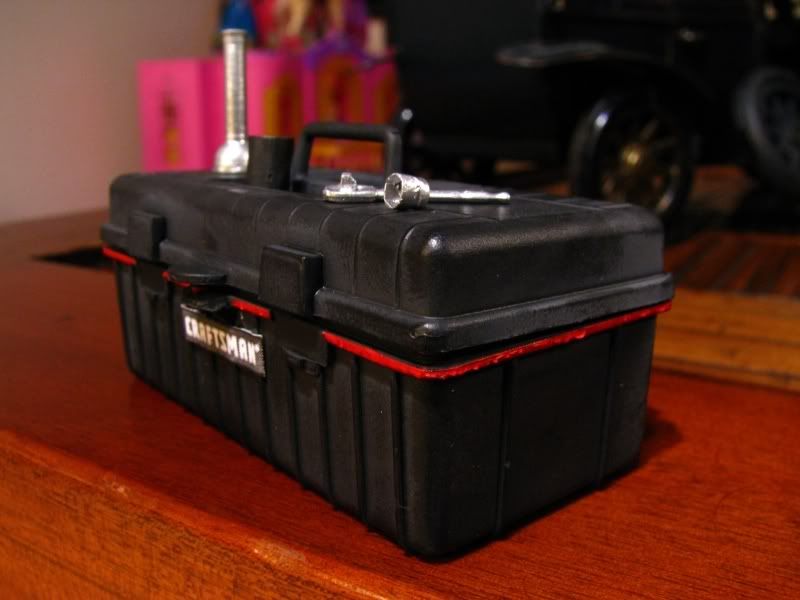
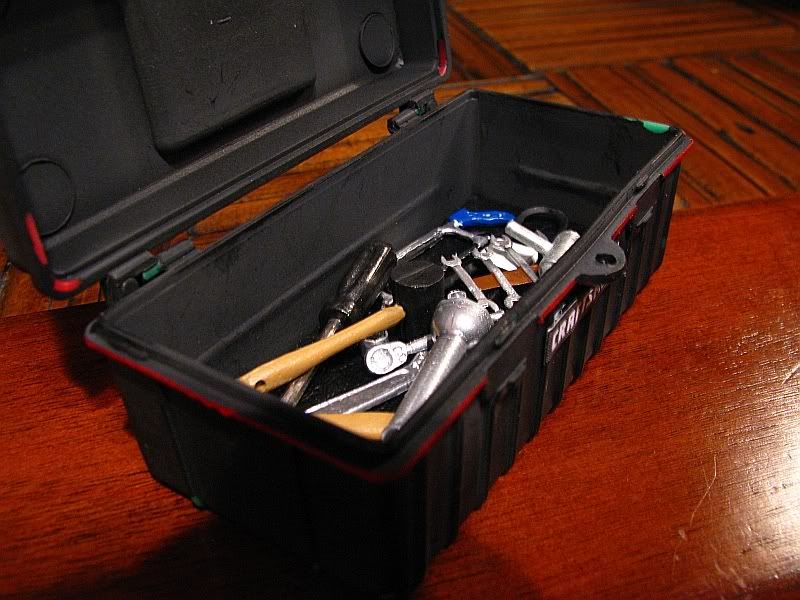
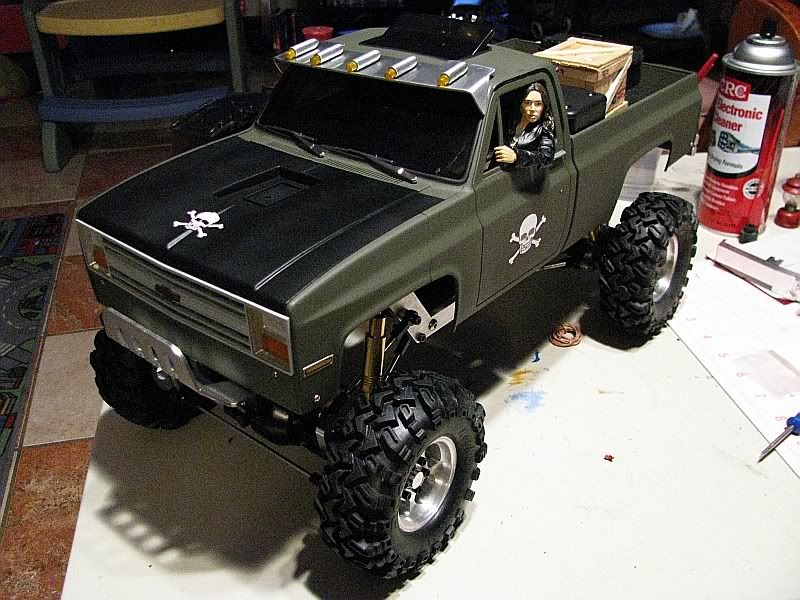
Just found a nice tool box for all my crap....I mean her crap!
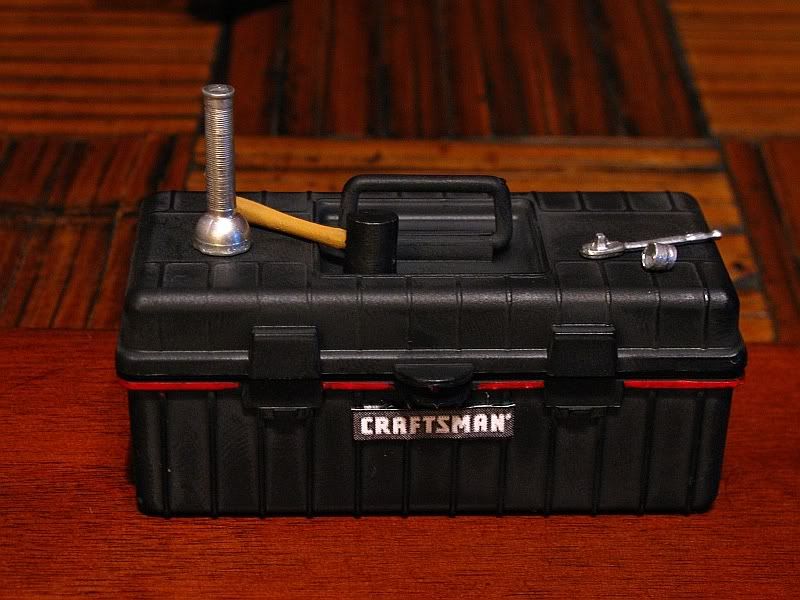
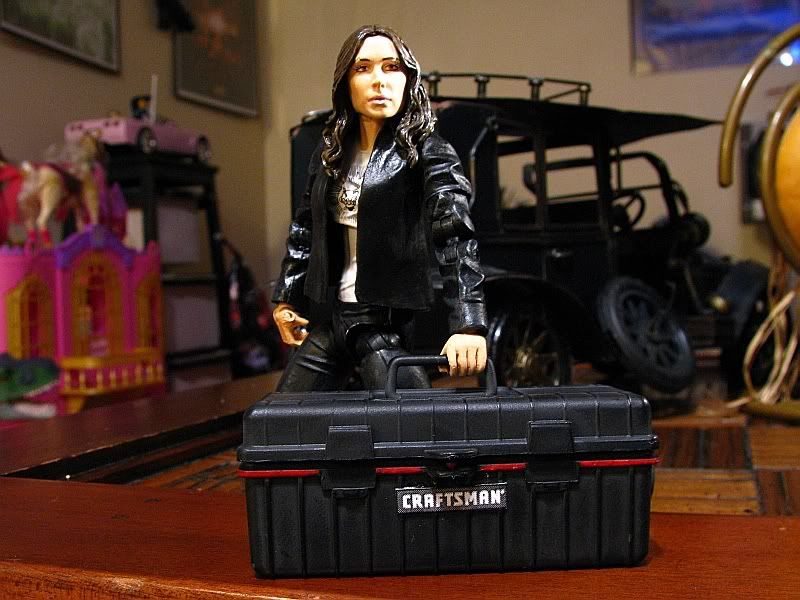
She looks good holding that thing! LOL!
She looks good holding that thing! LOL!
03-29-2008, 08:31 PM
#38
Senior Member
Thread Starter
Join Date: Sep 2007
Location: , PUERTO RICO (USA)
Posts: 381
Likes: 0
Received 0 Likes
on
0 Posts
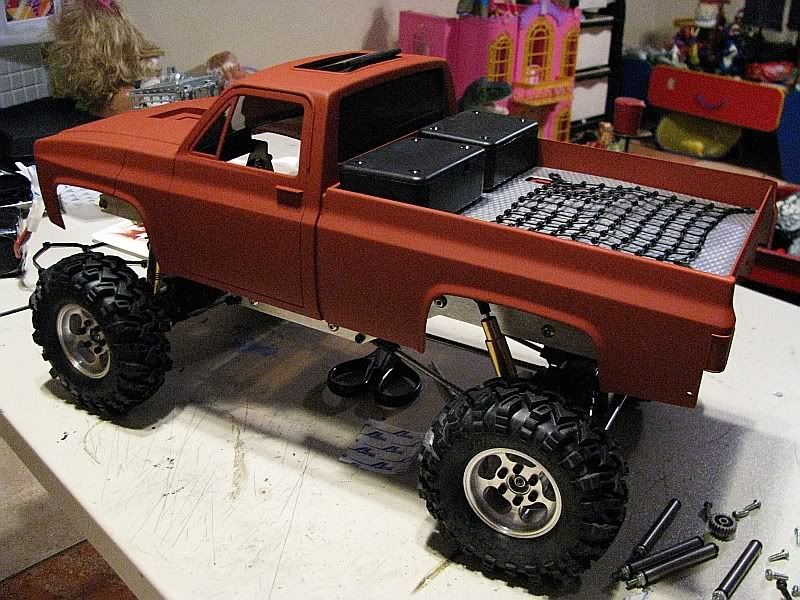
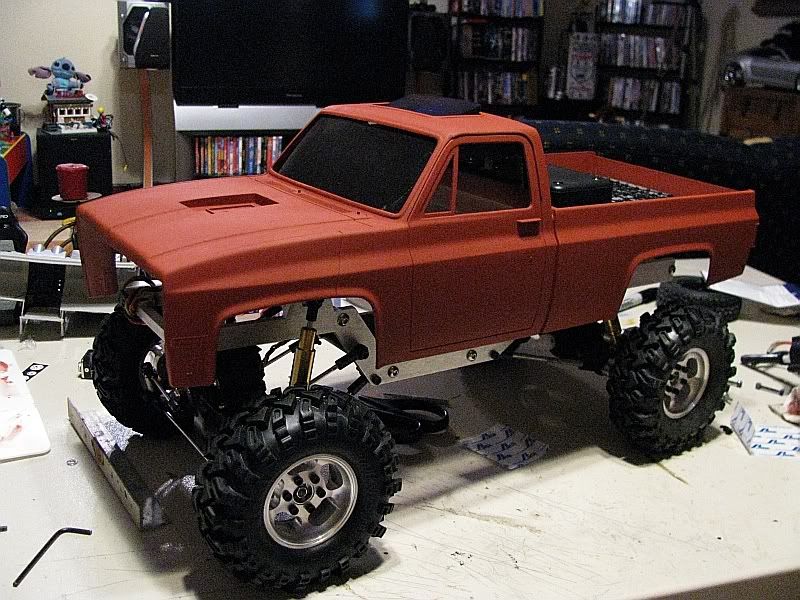
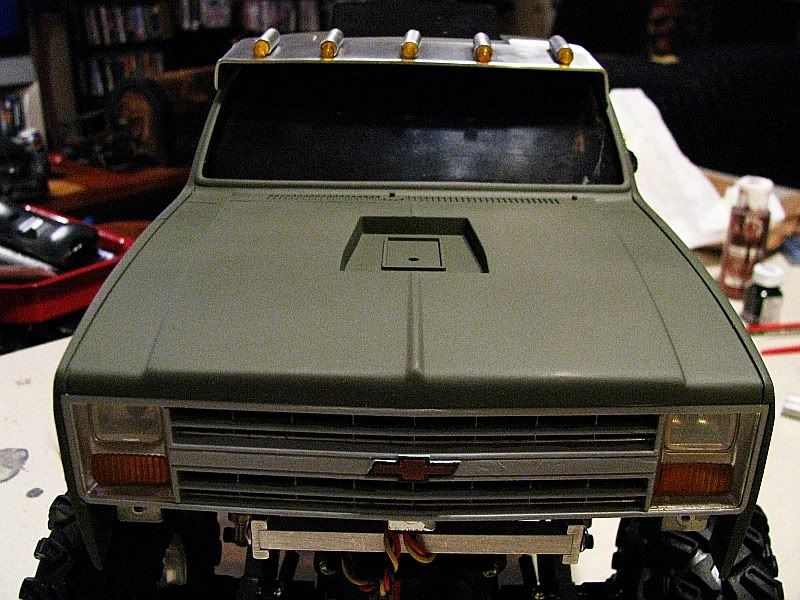
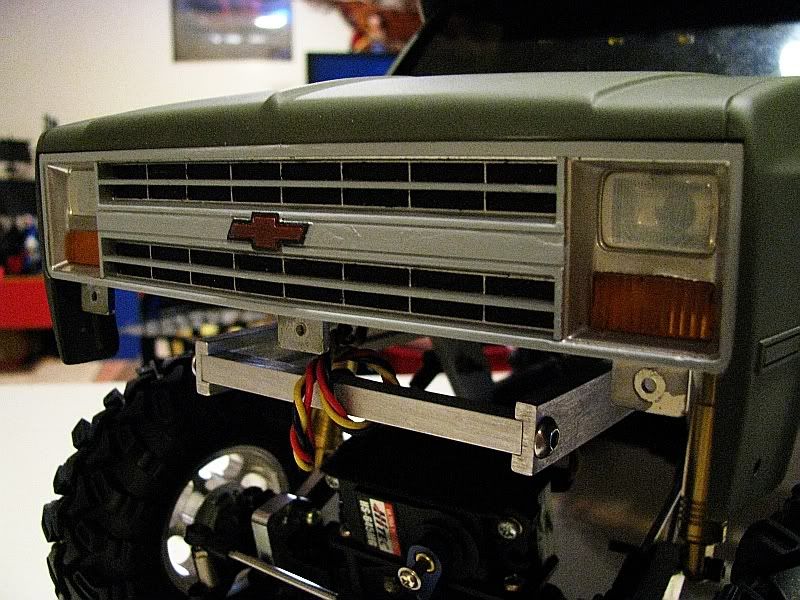
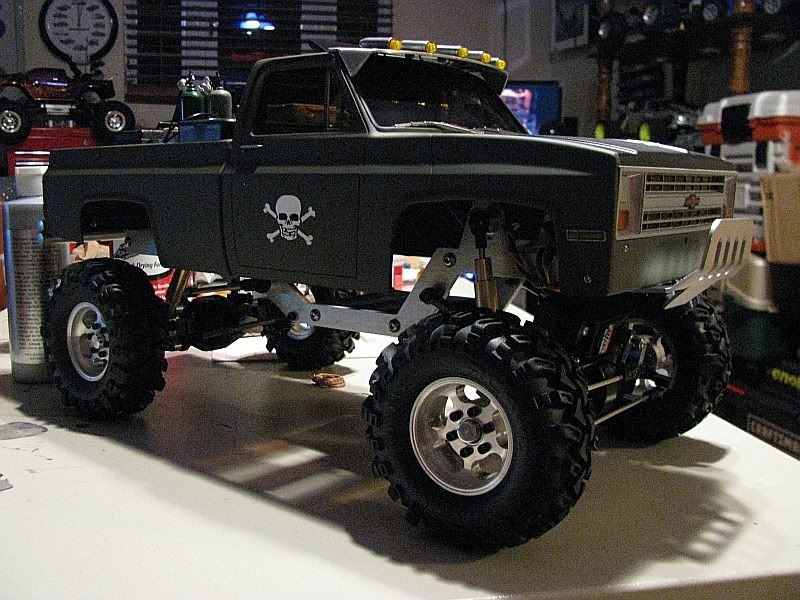
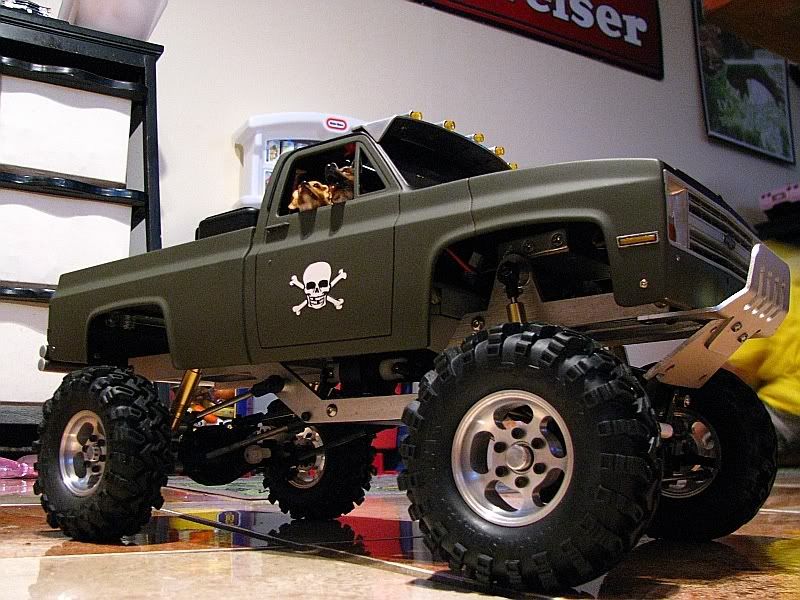
So the final basecoat color is on. The hood will be flat black. Waiting for some styrene to make a hood scoop. I got to work on a vintage Clod grille and made some cool signal lights that will be shining bright soon! Pics above are just a mock to see how is everything looking so far. The roof lights are just sitting there and are not fitted. Scale items in pic also for reference only.
What the hell you looking at!!!?!?!

LOL!
What the hell you looking at!!!?!?!
LOL!
03-30-2008, 11:24 PM
#39
Senior Member
Thread Starter
Join Date: Sep 2007
Location: , PUERTO RICO (USA)
Posts: 381
Likes: 0
Received 0 Likes
on
0 Posts
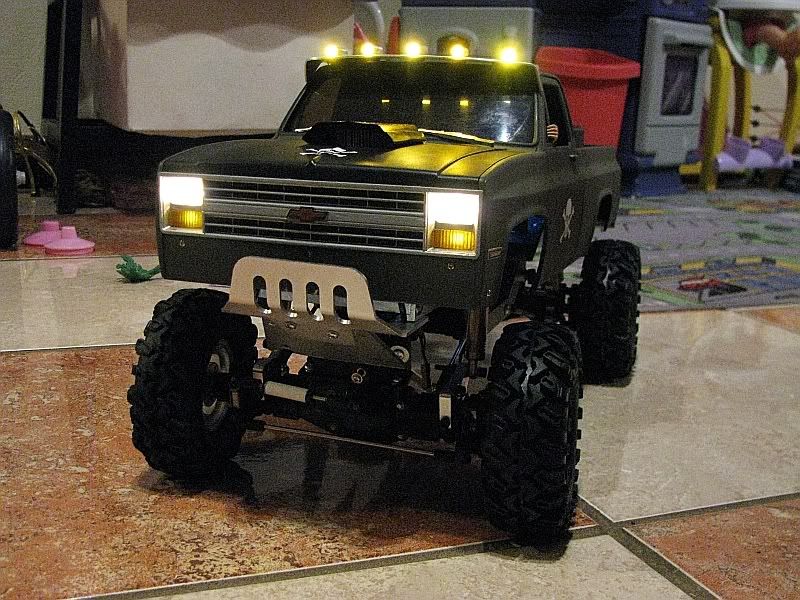
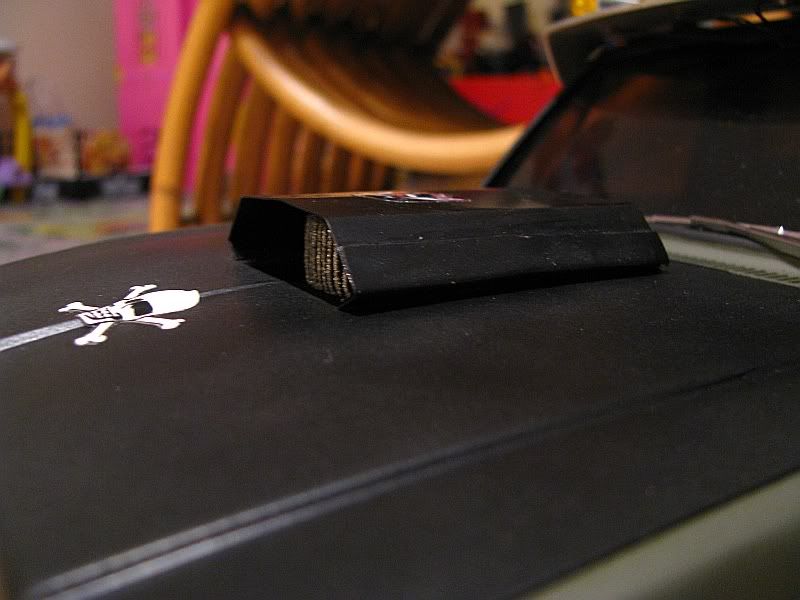
Time for an update!
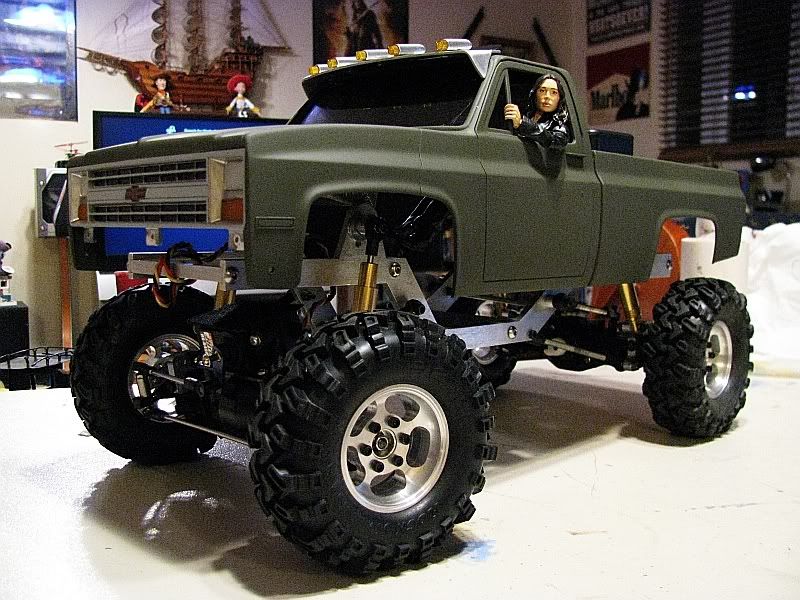
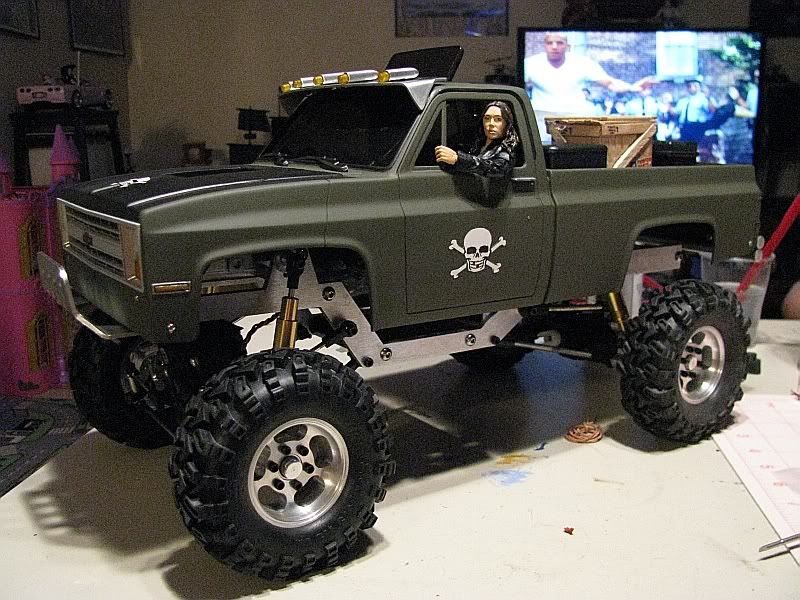
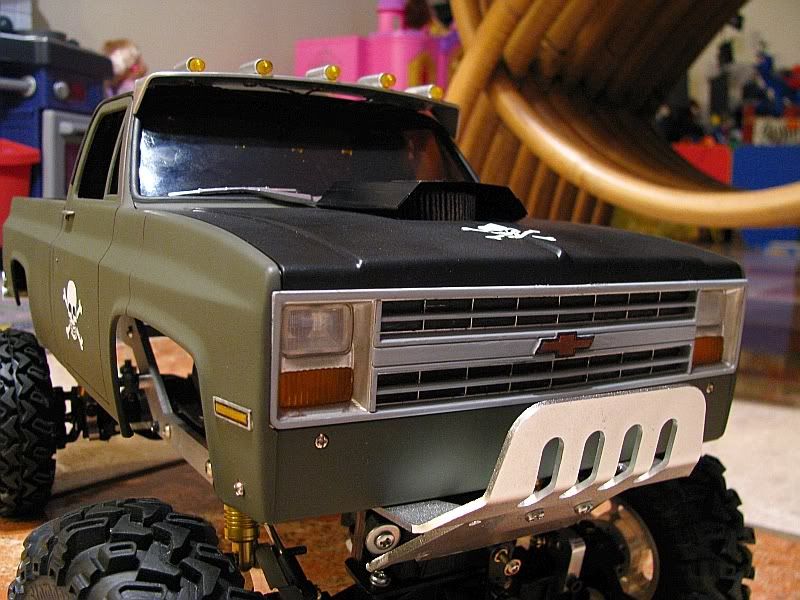
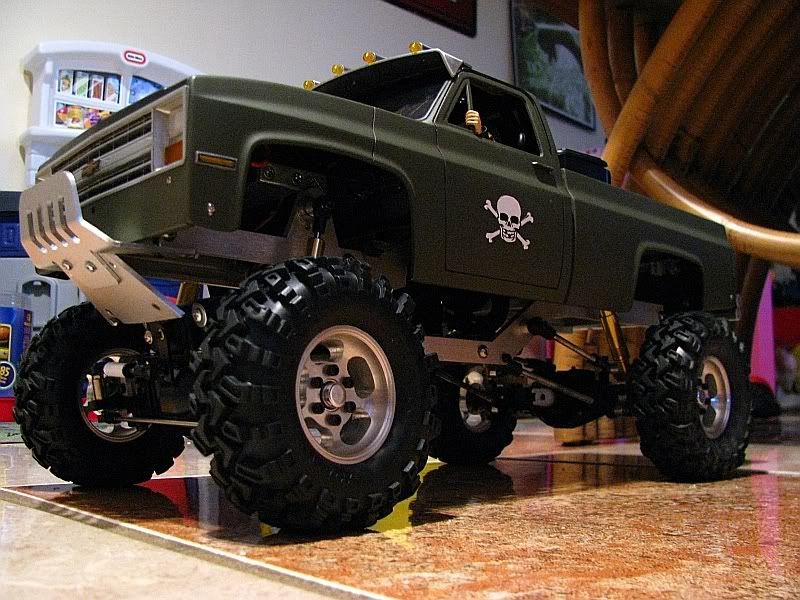
Hood got painted satin black. I will start work on hood scoop and bed cage hopefully next week. Also painted the metal bed floor in a black metallic textured paint. I felt a front bumper was needed and just used what I had laying around. Its part of the TLT Tracer kit. The rear bumper is another vintage Clod accessory I scored. Wheel centers are installed. Had some skull stickers around and thought they look cool. Reminds me of the Deathproof movie...but in female flavor!!
Now to the pics:
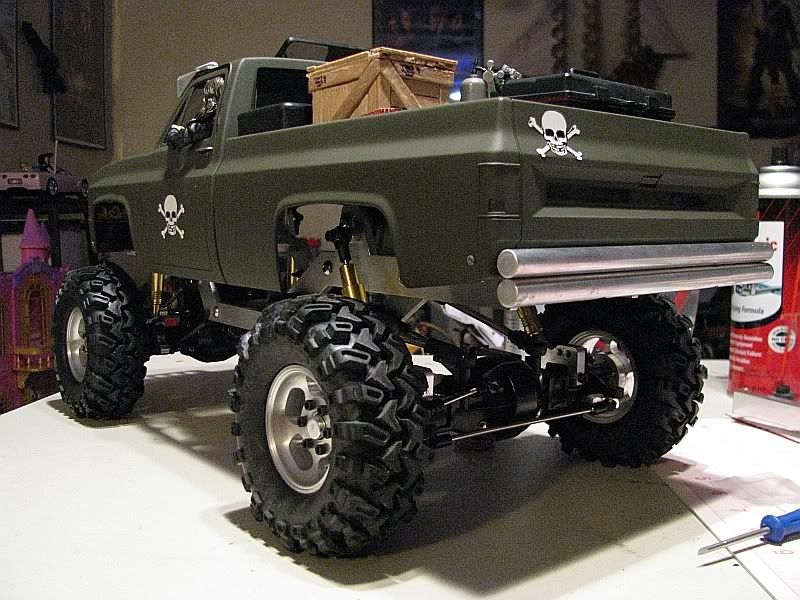
The rear lights will be cut and prepared for final lights installation. That will be the basic look before weathering process starts.
Hood got painted satin black. I will start work on hood scoop and bed cage hopefully next week. Also painted the metal bed floor in a black metallic textured paint. I felt a front bumper was needed and just used what I had laying around. Its part of the TLT Tracer kit. The rear bumper is another vintage Clod accessory I scored. Wheel centers are installed. Had some skull stickers around and thought they look cool. Reminds me of the Deathproof movie...but in female flavor!!
Now to the pics:
The rear lights will be cut and prepared for final lights installation. That will be the basic look before weathering process starts.
04-06-2008, 12:40 AM
#42
Senior Member
Thread Starter
Join Date: Sep 2007
Location: , PUERTO RICO (USA)
Posts: 381
Likes: 0
Received 0 Likes
on
0 Posts
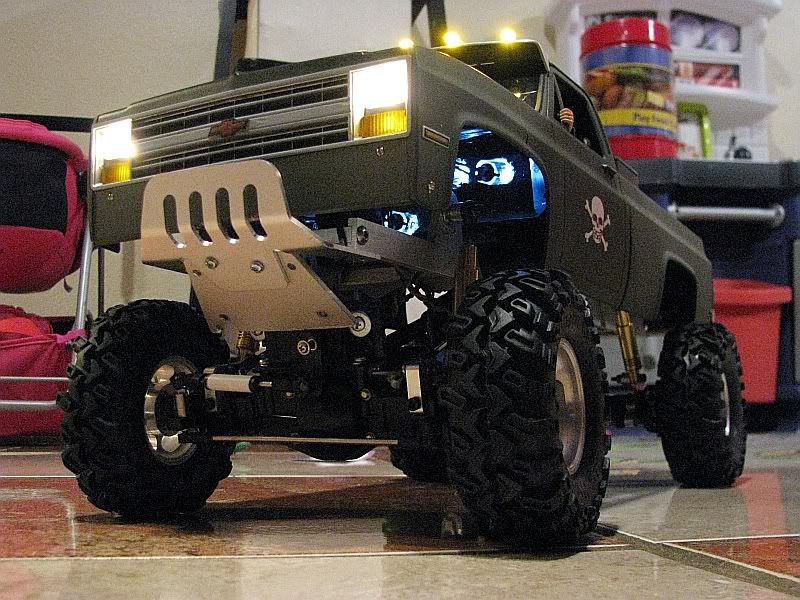
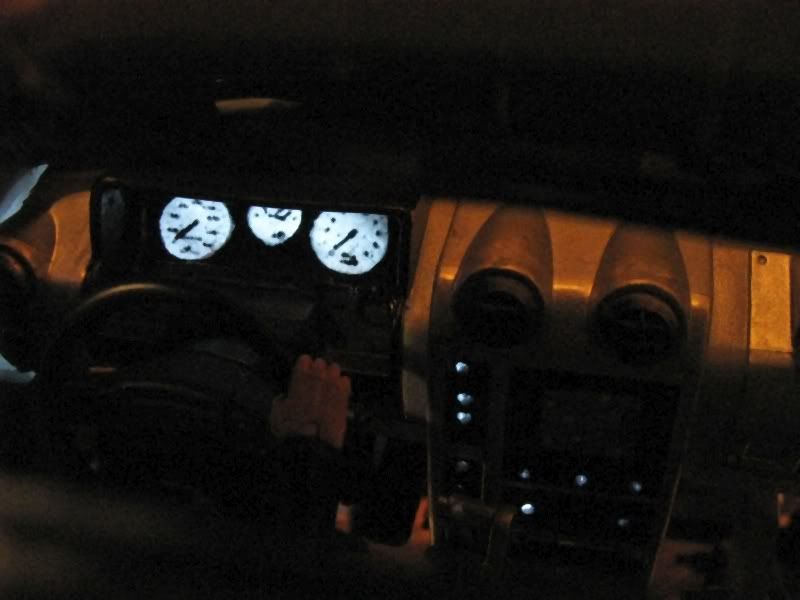
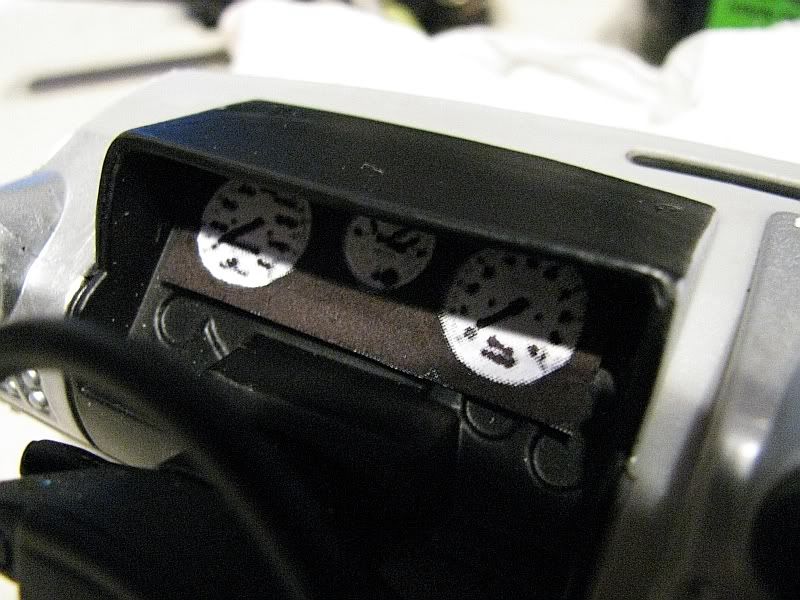
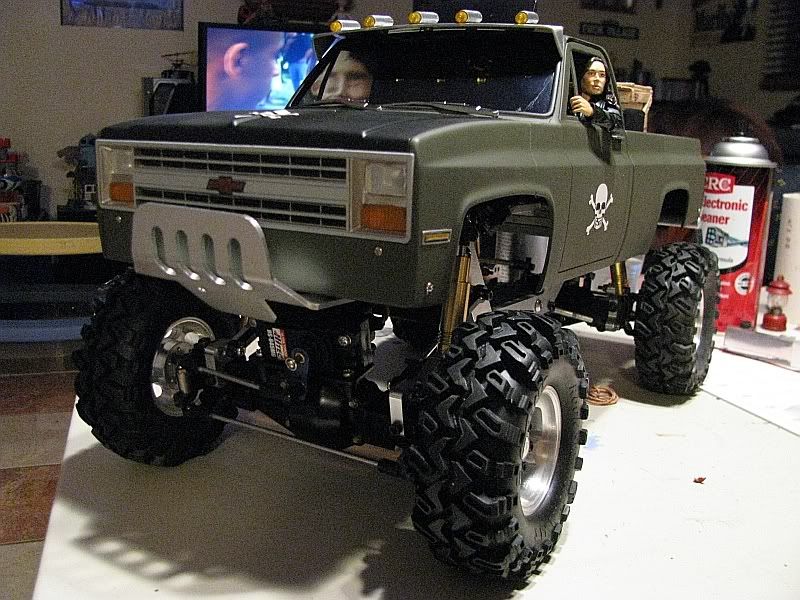
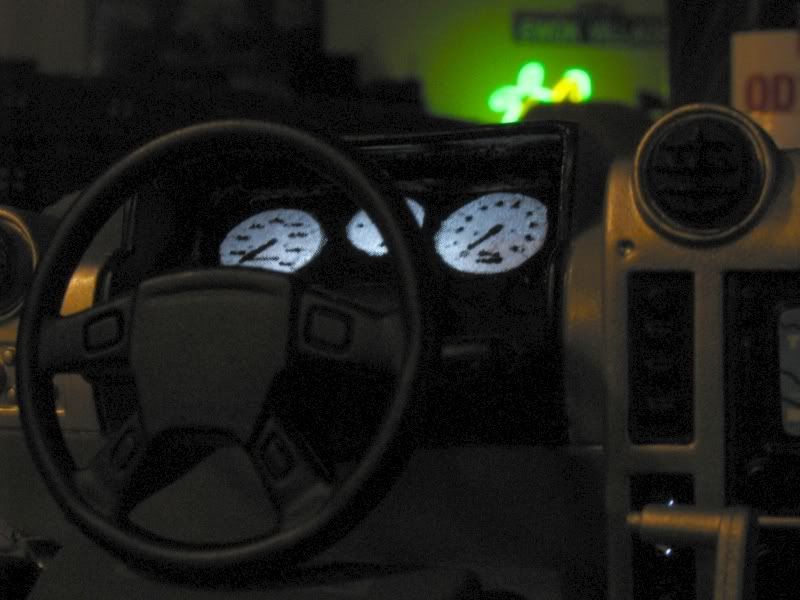
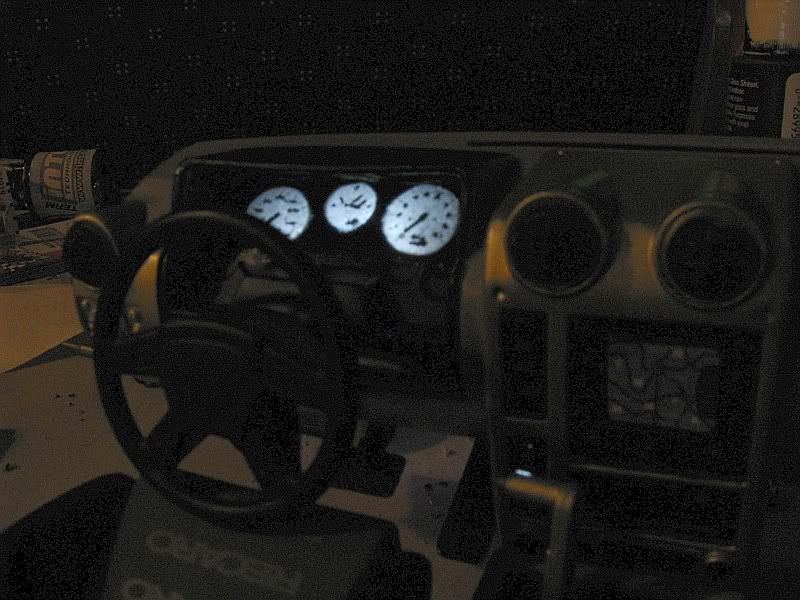
UPDATE:
Dash gauges were finshed and will have an electro-luminiscent look to them.
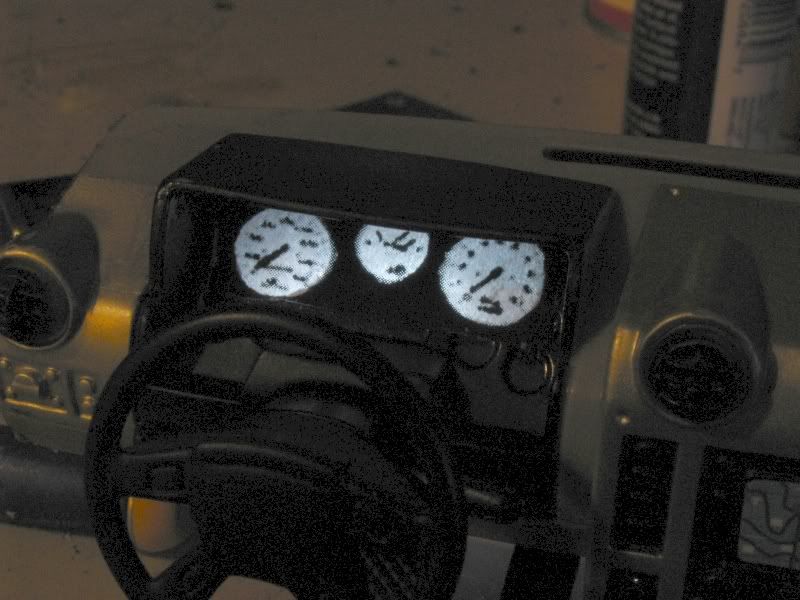
Hood scoop and air cleaner installed.
Tool boxes are prep and ready to paint tomorrow.
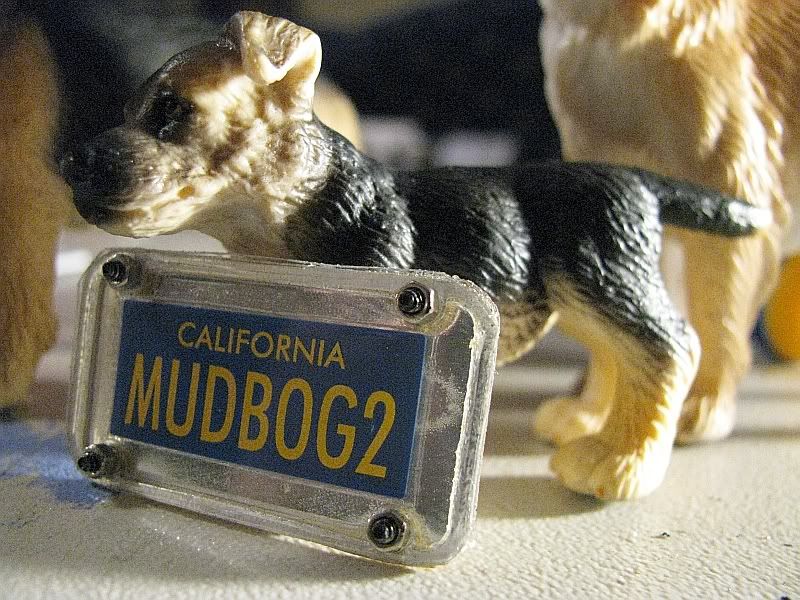
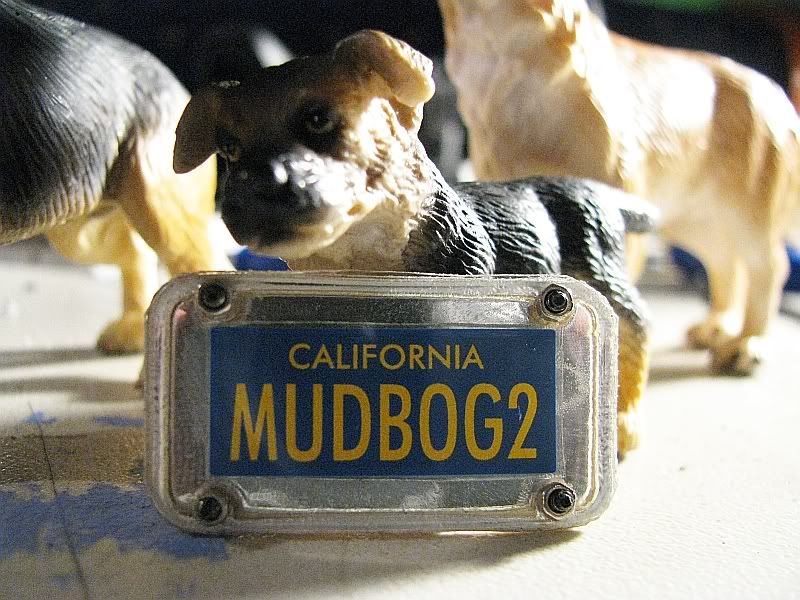
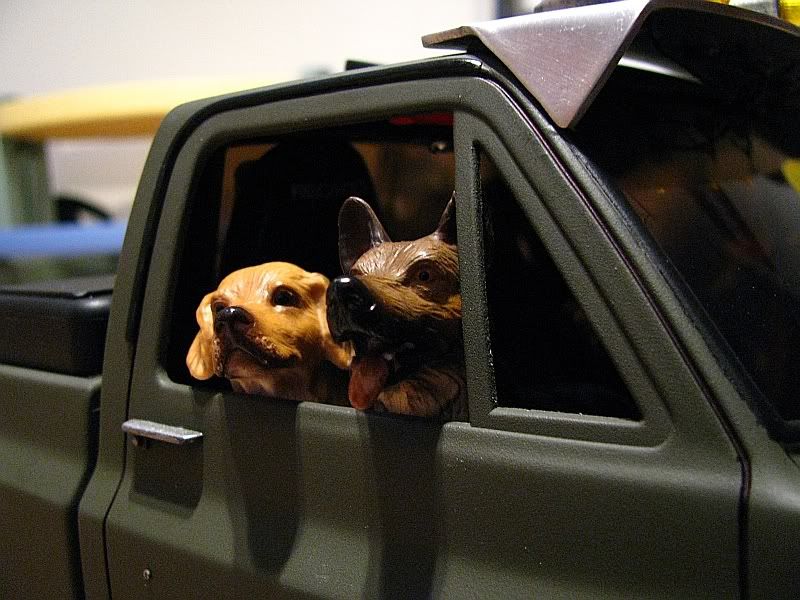
Krystal got somenew friends and a new license plate. The plate was finished withe miniature hexes.

Dash gauges were finshed and will have an electro-luminiscent look to them.
Hood scoop and air cleaner installed.
Tool boxes are prep and ready to paint tomorrow.
Krystal got somenew friends and a new license plate. The plate was finished withe miniature hexes.
04-06-2008, 09:07 AM
#43
im nearly speechless. your rig looks awsome, but also looks like it will perform very well. all the little features youve added are just right. gotta love the chick. the only thing imo is the front bumper, id like a more real looking black bumper on the body itself. but, thats just my opinion, it still is a truely nice truck.

 04-06-2008, 07:00 PM
#46
Senior Member
Thread Starter
Join Date: Sep 2007
Location: , PUERTO RICO (USA)
Posts: 381
Likes: 0
Received 0 Likes
on
0 Posts
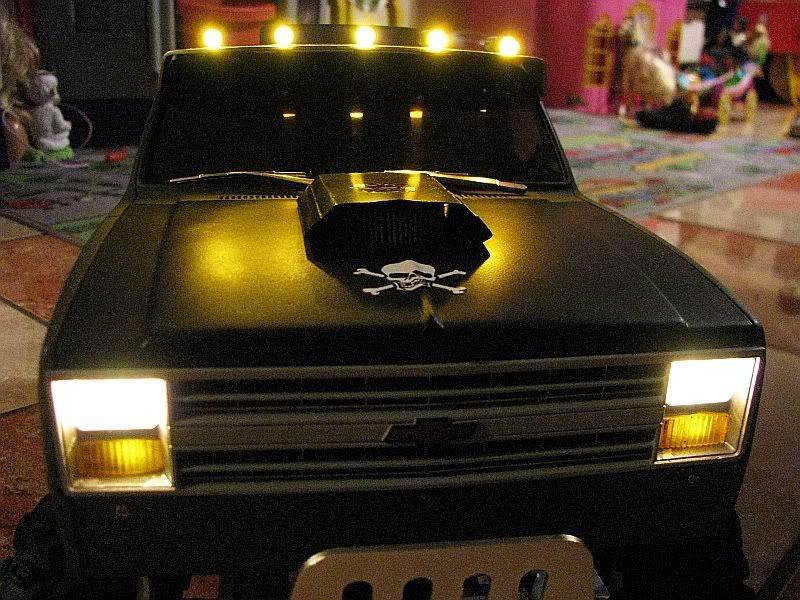
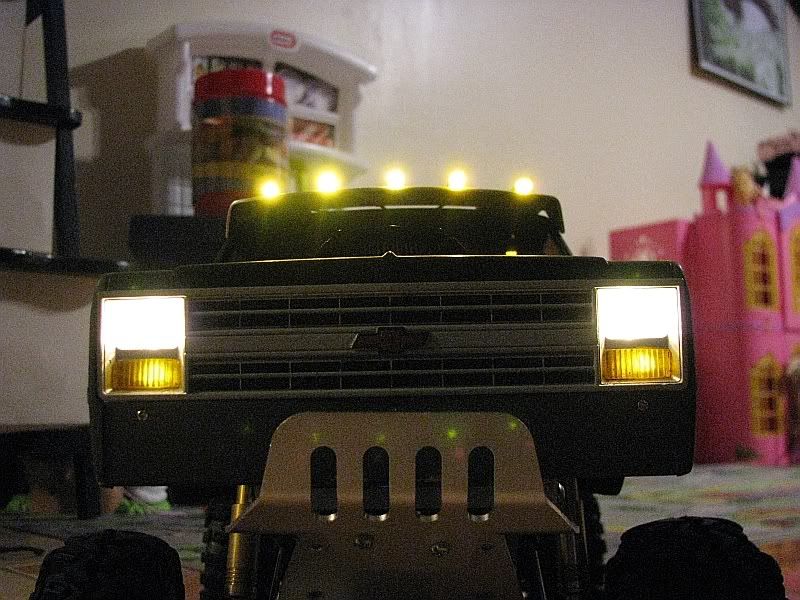
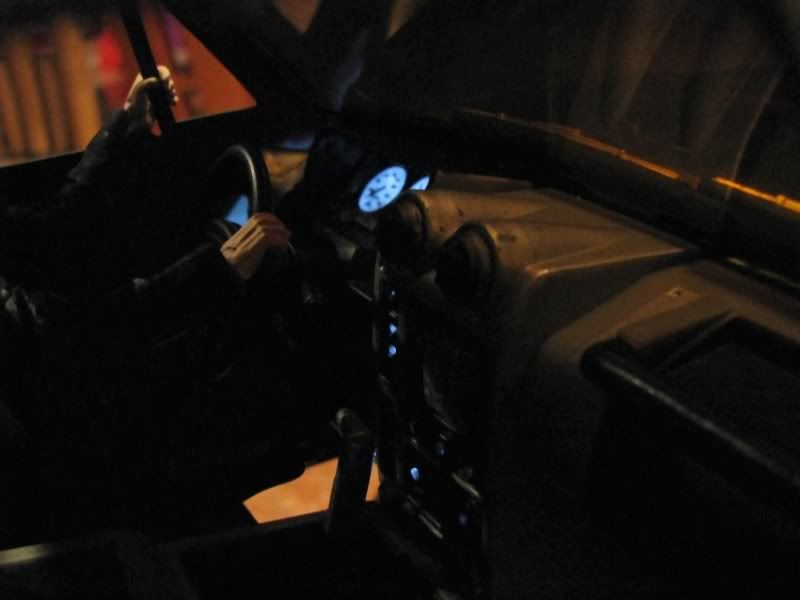
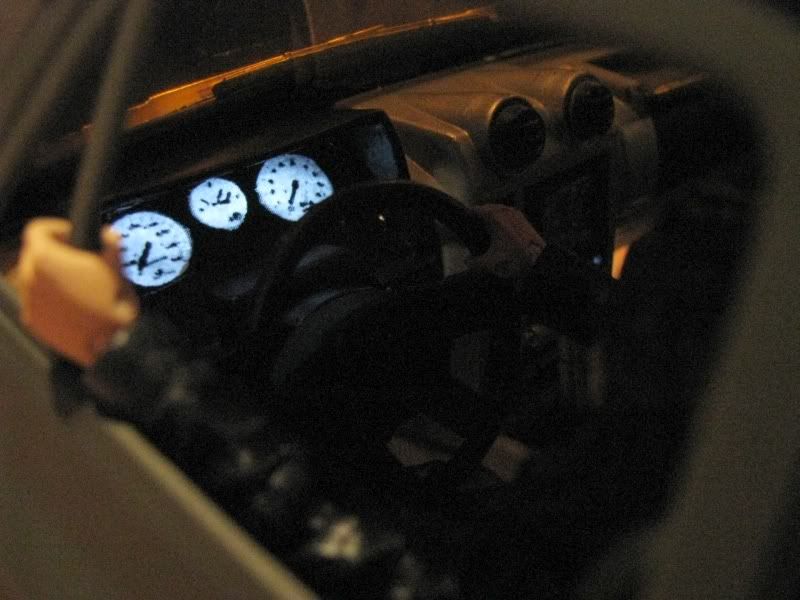
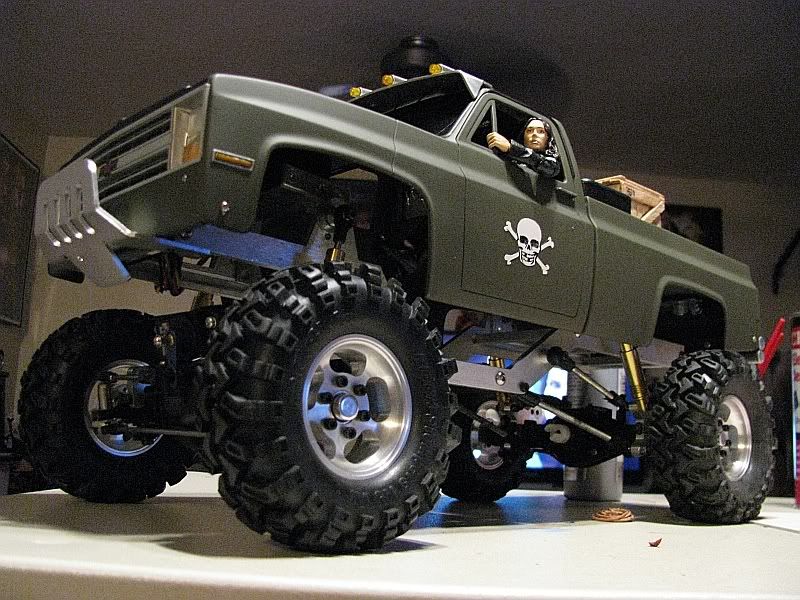
Update:
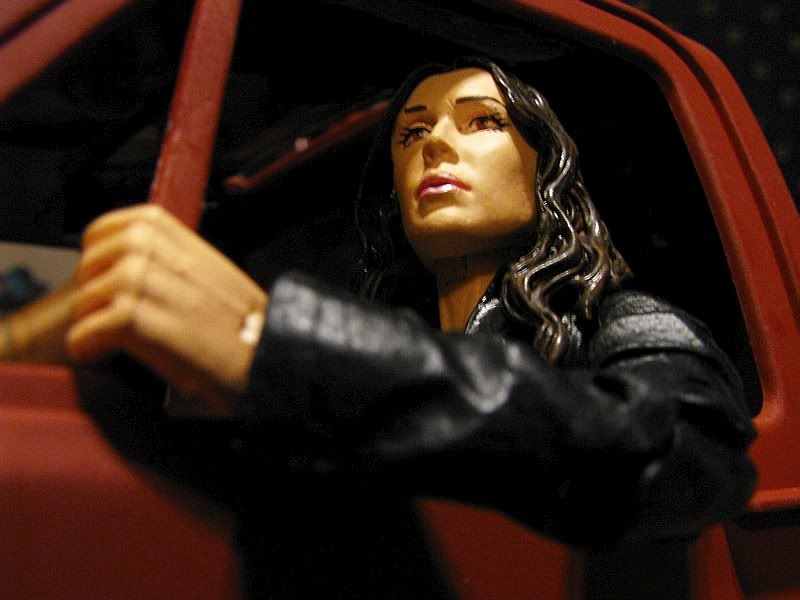
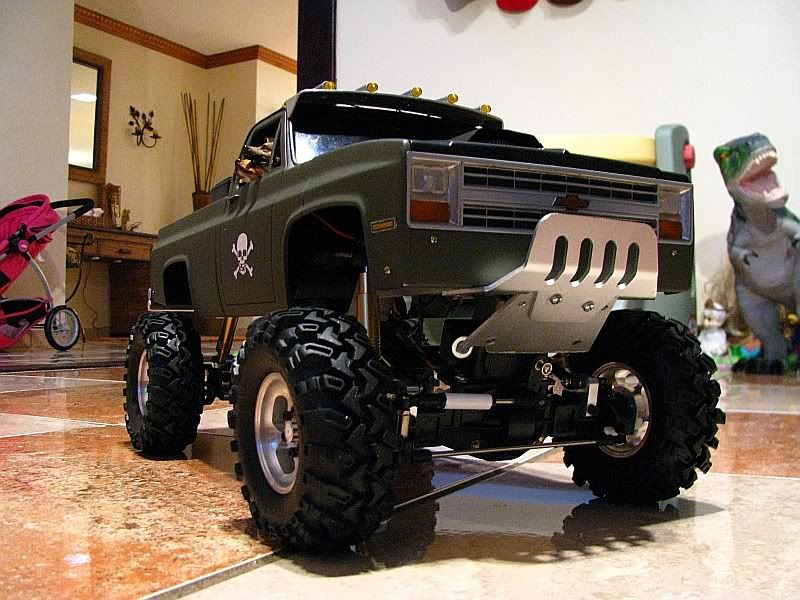
Finished 90% of the lightning work. All front lights, roof and dash are functional. Still need to finished the rear and add the switches. The whole interior is finally in as well as the driver and friends. Also finished the bed tool boxes. Now is a matter of building the bed cage.....so....a lot of work ahead...
Finished 90% of the lightning work. All front lights, roof and dash are functional. Still need to finished the rear and add the switches. The whole interior is finally in as well as the driver and friends. Also finished the bed tool boxes. Now is a matter of building the bed cage.....so....a lot of work ahead...