


How do I prep and what kind of paint?

 01-26-2011, 08:32 PM
#2

Join Date: Jul 2007
Location: North West Indiana
Posts: 12,861
Likes: 0
Received 20 Likes
on
19 Posts
polycarbonate paint.
I like Parma fascolor paints their pretty cheap ($5 a bottle), large variety of colors, require no thinning, works with brushes or sprayers, and has a water cleanup.
As for prepping I cut the body out prior to painting, rinse it out with soapy water, and dry it with paper toweling, and paint. some people lightly scuff the inside of the body for paint to adhere better. I've not had any issues skipping the scuffing part yet in the 12 or so bodies I've painted.
 01-27-2011, 03:47 AM
#4
Senior Member
Thread Starter
My Feedback: (1)
Join Date: Dec 2010
Location: Debary, FL
Posts: 112
Likes: 0
Received 0 Likes
on
0 Posts
my neighbor has a nice airbrush set-up and enjoys doing this sort of thing. I brought the body and decals over to his place last night and he jumped at the chance to paint it. Likely gonna go buy him some paint today. Thanks
01-27-2011, 04:03 AM
#5
Senior Member
Thread Starter
My Feedback: (1)
Join Date: Dec 2010
Location: Debary, FL
Posts: 112
Likes: 0
Received 0 Likes
on
0 Posts
wait... you paint the inside of the body?
and would rinsing it with vinegar after it's good and clean help the paint to adhere better or is that not necessary?
thanks again for any help[8D]
and would rinsing it with vinegar after it's good and clean help the paint to adhere better or is that not necessary?
thanks again for any help[8D]
01-27-2011, 06:31 AM
#6
Senior Member

Join Date: Jan 2005
Location: Stockbridge,
GA
Posts: 8,275
Likes: 0
Received 0 Likes
on
0 Posts
Yes, paint it from the inside.
Just soap and water and be sure it's very dry before painting. Never heard of using vinager, what is that susposed to do??? But anyway, the manufacturer only reccomends soap and water.
If you are painting a design, mark it on the outside of the body (there's a peel away coating on the outside of the shell) then mask off on the inside.
There's liquid masking and tape to mask with as well. Be careful not to score the plastic with a hobby knife when trimming the mask as that will cause weak areas.
Paint dark colors first, then lighter colors as the dark colors will bleed/show throught if you do light colors first.
Be sure one color has dried before you start the next.
Patience is critical, rushing WILL ruin the job.
Once the paint job is done back the entire interior with a solid color. Dark backing colors will darken the end product, light colors will lighten the end product. I like backing light colors with silver as I think it gives the final look a kind of sheen.
If you want to practice before you start on a $30+ body you can cut a 2 liter soda bottle in half. It really helps to get used to painting from the inside-out and give you the feel of painting lexan.
01-27-2011, 06:36 AM
#7
Senior Member
Thread Starter
My Feedback: (1)
Join Date: Dec 2010
Location: Debary, FL
Posts: 112
Likes: 0
Received 0 Likes
on
0 Posts
ok thanks for breaking it down like that.
I've used vinegar before painting various metals, mainly to remove any residual oils, etc. It cuts pretty well and leaves behind a good clean dry surface. I guess it couldn't hurt anything in any case.
I would never have guessed to paint from the inside. I was figuring on doing it from the outside with a heavy clear coat afterward.
01-27-2011, 07:00 AM
#8
Join Date: Jul 2007
Location: North West Indiana
Posts: 12,861
Likes: 0
Received 20 Likes
on
19 Posts
ORIGINAL: Telecaster
ok thanks for breaking it down like that.
I've used vinegar before painting various metals, mainly to remove any residual oils, etc. It cuts pretty well and leaves behind a good clean dry surface. I guess it couldn't hurt anything in any case.
I would never have guessed to paint from the inside. I was figuring on doing it from the outside with a heavy clear coat afterward.

My recommendation is do the colors you want and put a coat of white on last to bring out the paint color. Some colors can look REALLY dull if not backed by white.
01-27-2011, 08:08 AM
#9
Senior Member
Join Date: Jan 2005
Location: Stockbridge,
GA
Posts: 8,275
Likes: 0
Received 0 Likes
on
0 Posts
ORIGINAL: SyCo_VeNoM
My recommendation is do the colors you want and put a coat of white on last to bring out the paint color. Some colors can look REALLY dull if not backed by white.
My recommendation is do the colors you want and put a coat of white on last to bring out the paint color. Some colors can look REALLY dull if not backed by white.
I've backed with black, white, red, yellow and silver. It all depends on what you want when you're done. I did one body in silver with blue flames and backed it in black and that silver had the deepest look to it. I've backed orange with red to darken the orange a bit. I've done some in white to brighten the paint job a bit. But I really like what backing lighter colors with silver. I think that it can really make the paint job pop out at you.
You can also vary how much the backing affects the final look by how many coats of the body colors you apply.
Anyway, that's why I said to practice on soda bottles. You can get the look you want before doing a body and thinking "that's not what I wanted"
01-27-2011, 08:19 AM
#10
Join Date: Jul 2007
Location: North West Indiana
Posts: 12,861
Likes: 0
Received 20 Likes
on
19 Posts
ORIGINAL: DaveG55
Backing color can reallly make a big difference to the final look of the paint job.
I've backed with black, white, red, yellow and silver. It all depends on what you want when you're done. I did one body in silver with blue flames and backed it in black and that silver had the deepest look to it. I've backed orange with red to darken the orange a bit. I've done some in white to brighten the paint job a bit. But I really like what backing lighter colors with silver. I think that it can really make the paint job pop out at you.
You can also vary how much the backing affects the final look by how many coats of the body colors you apply.
Anyway, that's why I said to practice on soda bottles. You can get the look you want before doing a body and thinking ''that's not what I wanted''
ORIGINAL: SyCo_VeNoM
My recommendation is do the colors you want and put a coat of white on last to bring out the paint color. Some colors can look REALLY dull if not backed by white.
My recommendation is do the colors you want and put a coat of white on last to bring out the paint color. Some colors can look REALLY dull if not backed by white.
I've backed with black, white, red, yellow and silver. It all depends on what you want when you're done. I did one body in silver with blue flames and backed it in black and that silver had the deepest look to it. I've backed orange with red to darken the orange a bit. I've done some in white to brighten the paint job a bit. But I really like what backing lighter colors with silver. I think that it can really make the paint job pop out at you.
You can also vary how much the backing affects the final look by how many coats of the body colors you apply.
Anyway, that's why I said to practice on soda bottles. You can get the look you want before doing a body and thinking ''that's not what I wanted''
I'll be honest I mainly recomended white seeing he has no paints.
Now in my case my shelf is starting to look like my hobby shops paint display so I got the colors to play with
01-27-2011, 08:35 AM
#11
Senior Member
Join Date: Jan 2005
Location: Stockbridge,
GA
Posts: 8,275
Likes: 0
Received 0 Likes
on
0 Posts
ORIGINAL: SyCo_VeNoM
Now in my case my shelf is starting to look like my hobby shops paint display so I got the colors to play with
Now in my case my shelf is starting to look like my hobby shops paint display so I got the colors to play with
Once you start painting these things it gets a bit addictive. At one time I was a decent painter but I never was able to reach the level of some guys. It's just amazing what some people can do with an airbrush!!
I mostly listed the other color combos to get his imagination going, maybe give him something to think about before he goes out and buys paint.
01-27-2011, 08:52 AM
#12
Senior Member

Join Date: Dec 2005
Location: Batavia,
IL
Posts: 10,314
Likes: 0
Received 0 Likes
on
0 Posts
Dave, do you normally back with clearcoat (like something from duplicolor, found in automotive sections of stores)? I've done that before in hopes that it helps prevent flaking.
01-27-2011, 09:02 AM
#13
Senior Member

Join Date: Mar 2007
Location: Boston,
MA
Posts: 446
Likes: 0
Received 0 Likes
on
0 Posts
The process I follow is pretty close to what others have mentioned. I do the following, using masking tape and rattle cans:
1. I use a sharpie to sketch out the design I want to follow on the outside of the shell. The lexan (body material) is covered with a thin film, so all marks will come off when you peel that away towards the end.
2. Cut out the body- wheel wells, mounting holes, antenna hole, any vent holes you'll need if it's a nitro car. It's so much easier to get everything lined up when you can see right through the body.
3. Wash the inside of the body with soap and water, dry with paper towels, and give it some time to air dry completely. Some people put on gloves to avoid getting fingerprints or debris on the car after cleaning it.
4. I apply the window masks, as well as any masking tape to mask off areas for my design. You want to paint the darker colors FIRST, so you'll be taping off the sections of the car that will be lighter. This is an important step: how sharp your edges are depends on how carefully you mask, and making sure that the tape edges are completely flat against the body. At this stage, I also tape across the wheel wells and over the holes I've cut on the outside of the body. The film is there, but paint can seep in at the edges of the film if you just cut there.
5. Since I don't wear gloves for that step, I get a paper towel a little bit damp and wipe down any sections I might have touched, and dry them again.
6. I take the shell somewhere nicely-ventilated and start with my first coat. To keep things even, you want to start spraying before you come across the body, and keep your coats nice and light. Pay special attention to "deep" corners of the shell, since paint has a harder time getting in there. Set the shell somewhere where it won't get dust or debris on it, and wait 15 minutes before going back for the second coat.
7. The number of coats you do depends on how deep you want your color to be, and the look you're going for. For a 200mm body that I do in 2 colors (with about equal area for each), I do about 5 coats and it usually finishes off the can.
8. I let the first color dry for a few hours (3+) before coming back for the other color. Remove your masking tape (but not your window masks or hole covers), and repeat steps 6 and 7 with your second color.
9. The bodies I've done ended with either white or silver, which were in themselves good backing colors. As others have suggested, you can back the entire body with another color to get a different result at this point.
10. With all of your painting done, you can peel off the window masks and all tape. You can also remove the film on the outside of the body.
11. Apply all body detail stickers and whatever else you want. Bolt on your wing, and you should be good to go!
I followed these exact steps for my last two bodies, which are the 2nd and 3rd I've ever done. I'm really happy with how they turned out. I had some paint bleed at points where I didn't get the tape down firmly, but it's not very noticeable and I like them anyway.
01-27-2011, 09:13 AM
#14
Senior Member
Join Date: Jan 2005
Location: Stockbridge,
GA
Posts: 8,275
Likes: 0
Received 0 Likes
on
0 Posts
No, never have and would not try. The R/C specific paints are made to be flexable to a certain extent. Automotive clear coat is not flexable and, to be honest, I don't know if it's even compatable with R/c paints. You say you have tried it? Did it help any?
It's been my experience that, as long as the body is clean and preped well, you won't get any cracking or flaking. I've only ever had one do it and I have to admit it was my fault for rushing the job.
If memory serves one of the R/C paint companies (Parma or FasKolor maybe) made a product speciffically designed to be the final coat on the inside. It came in a rattle can and was susposed to give the paint a protective backing to protect it.
01-27-2011, 09:26 AM
#15
Senior Member
Join Date: Dec 2005
Location: Batavia,
IL
Posts: 10,314
Likes: 0
Received 0 Likes
on
0 Posts
ORIGINAL: DaveG55
No, never have and would not try. The R/C specific paints are made to be flexable to a certain extent. Automotive clear coat is not flexable and, to be honest, I don't know if it's even compatable with R/c paints. You say you have tried it? Did it help any?
It's been my experience that, as long as the body is clean and preped well, you won't get any cracking or flaking. I've only ever had one do it and I have to admit it was my fault for rushing the job.
If memory serves one of the R/C paint companies (Parma or FasKolor maybe) made a product speciffically designed to be the final coat on the inside. It came in a rattle can and was susposed to give the paint a protective backing to protect it.
01-27-2011, 01:05 PM
#16
Senior Member

Join Date: Aug 2010
Location: Akron, OH
Posts: 2,604
Likes: 0
Received 0 Likes
on
0 Posts
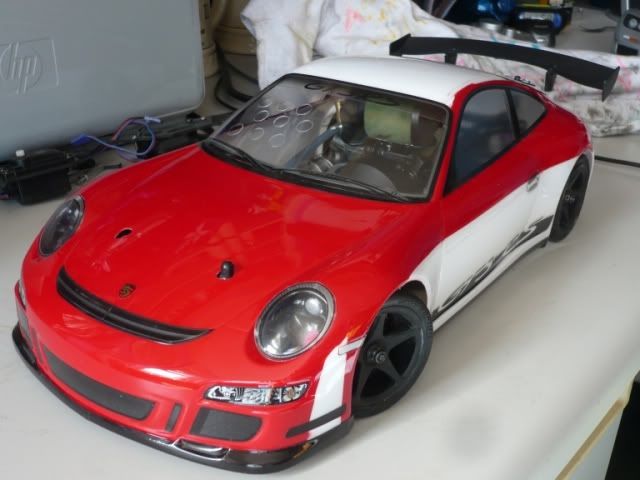
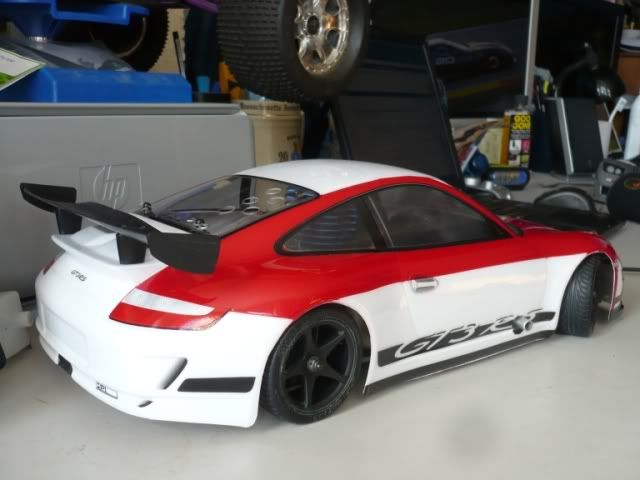
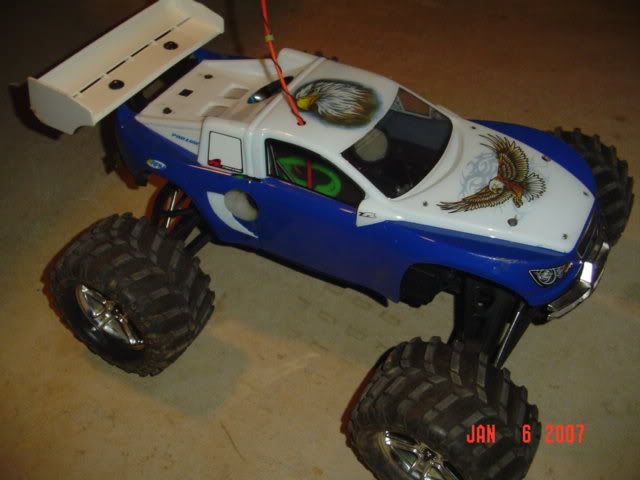
Nice paints, i use pretty much the same techniques, but 90% isoprpyl alcohol instead of water, gets ALL finger oil and debris off of it. Here are a couple I have done with rattle can and masking tape. The second one (black one) is my newest, just done a couple weeks ago. There is a guy at the track running red/green/white cars because he is Italian so I thought I would show my German heritage in my paint:
01-27-2011, 03:44 PM
#17
Senior Member
Thread Starter
My Feedback: (1)
Join Date: Dec 2010
Location: Debary, FL
Posts: 112
Likes: 0
Received 0 Likes
on
0 Posts
cerial and magnus, those are some sweet looking jobs you got there, nicely done [8D]
I was talking with my neighbor and he really doesn't want to do it from the inside. He's old and set in his ways so I won't argue and besides, this is more for his enjoyment than mine. He loves any excuse to pull out the airbrush and he's been dying to put flames on something so it's gonna have those cliche old flames all over it I'm sure
I think the paints that he already has will work but I need to look at them more closely. He said he thought they were Parma paints but I'm sure they make different types(?)
I'm diggin all the suggestions and photos. thanks
01-27-2011, 04:13 PM
#18
Senior Member
Join Date: Dec 2006
Location: milbrae,
SK, BANGLADESH
Posts: 3,538
Likes: 0
Received 0 Likes
on
0 Posts
if he's not going to paint the inside of the body, he's not doing you any favors
you're going to put your RC on it's lid like all the rest of us do, and if the paint is on the outside then it'll be ruined almost immediately
you're going to put your RC on it's lid like all the rest of us do, and if the paint is on the outside then it'll be ruined almost immediately
01-27-2011, 04:36 PM
#19
Join Date: Jul 2007
Location: North West Indiana
Posts: 12,861
Likes: 0
Received 20 Likes
on
19 Posts
ORIGINAL: sloppyG
if he's not going to paint the inside of the body, he's not doing you any favors
you're going to put your RC on it's lid like all the rest of us do, and if the paint is on the outside then it'll be ruined almost immediately
if he's not going to paint the inside of the body, he's not doing you any favors
you're going to put your RC on it's lid like all the rest of us do, and if the paint is on the outside then it'll be ruined almost immediately
BTW Parma makes more than just lexan paints so it might not be a polycarbonate paint.
If its not a polycarbonate paint it WILL flake off.
01-27-2011, 04:45 PM
#20
Senior Member
Join Date: Aug 2010
Location: Akron, OH
Posts: 2,604
Likes: 0
Received 0 Likes
on
0 Posts
This is one of those things where there is only one way to do it and if it aint done right then its not worth doing at all. Youll TRASH that paint in zero time flat if its on the outside, and if its not polycarbonate
01-27-2011, 04:58 PM
#21
Senior Member
Join Date: Jan 2005
Location: Stockbridge,
GA
Posts: 8,275
Likes: 0
Received 0 Likes
on
0 Posts
ORIGINAL: SyCo_VeNoM
+1
BTW Parma makes more than just lexan paints so it might not be a polycarbonate paint.
If its not a polycarbonate paint it WILL flake off.
ORIGINAL: sloppyG
if he's not going to paint the inside of the body, he's not doing you any favors
you're going to put your RC on it's lid like all the rest of us do, and if the paint is on the outside then it'll be ruined almost immediately
if he's not going to paint the inside of the body, he's not doing you any favors
you're going to put your RC on it's lid like all the rest of us do, and if the paint is on the outside then it'll be ruined almost immediately
BTW Parma makes more than just lexan paints so it might not be a polycarbonate paint.
If its not a polycarbonate paint it WILL flake off.
His enjoyment is going to cost you a wasted body shell and paint!!!
It will look like crap the first time you get into and decent wreck.
Wasted time, effort and money.
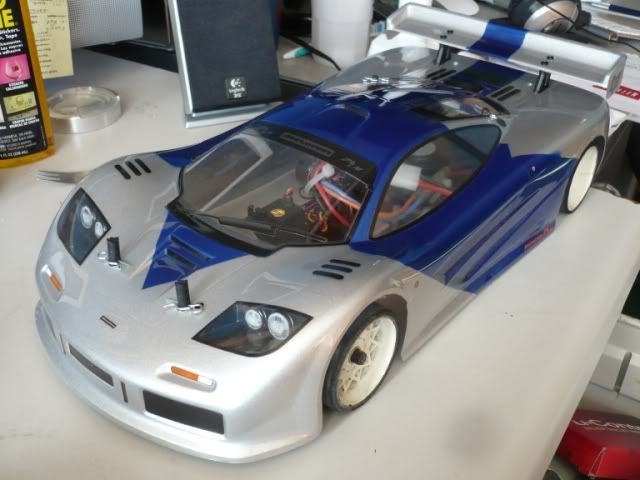
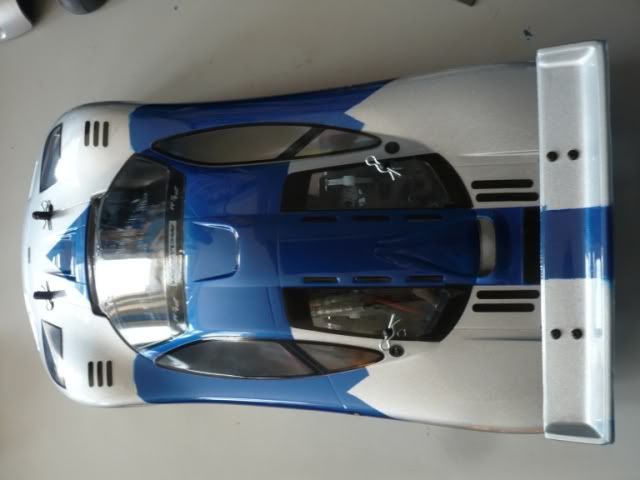
As long as we're posting pics...
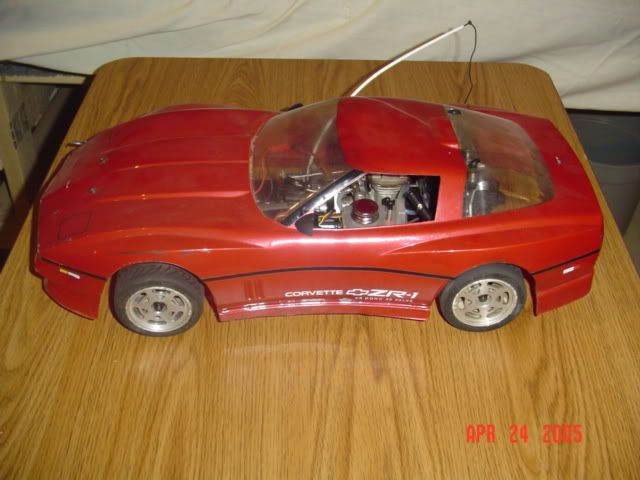
That's my first one ever, it's 26 years old now
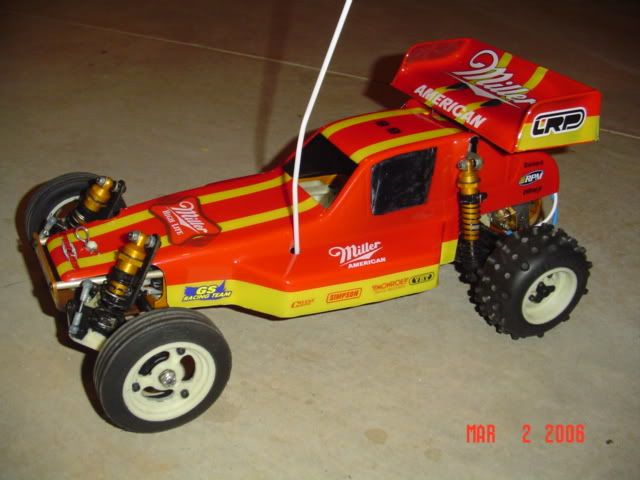
one of my favorites
 01-27-2011, 05:11 PM
#22
Join Date: Jul 2007
Location: North West Indiana
Posts: 12,861
Likes: 0
Received 20 Likes
on
19 Posts
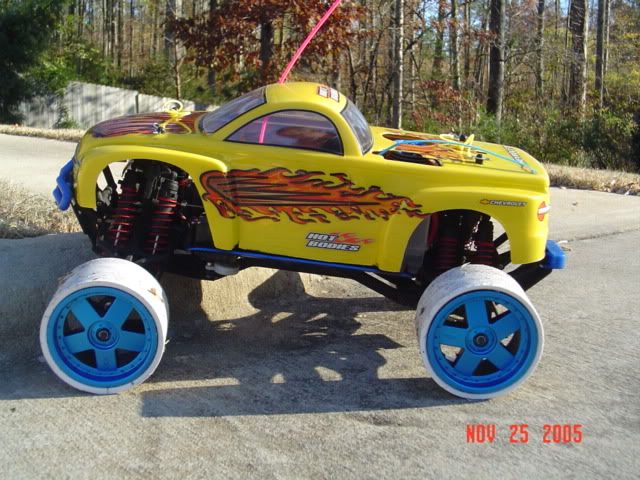
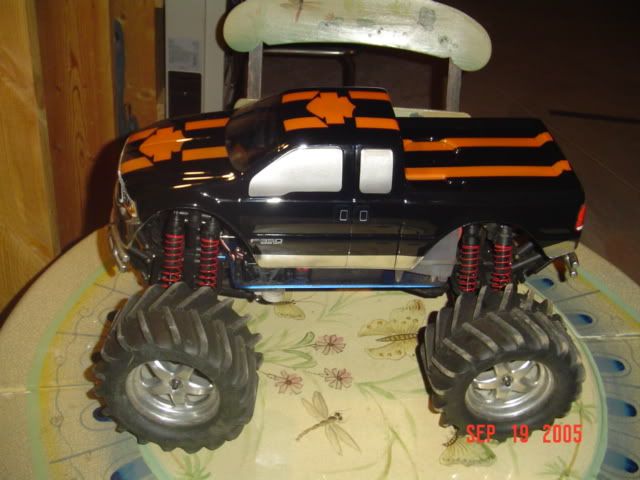
Well here is one I did by hand.
Tools used
Fine tipped Paintbrush
Roll of Tamiya thin masking tape
lots of rubbing alcohol
I actually painted the full thing black originally BUT the damn yellow, orange-yellow, and orange tamiya stickers started coming off so I tried shoe goo, which did not work. I also noticed that the bars were supposed to have crappy stickers on them to make them look metal...
So I stripped most the paint from the body, and got cracking.
The silver bars are Faschrome paint (I actually like how this one looks)
Stripes I used yellow, and orange paint for the middle stripe I custom mixed yellow and orange in equal parts.
I was going to paint the tamiya name on the side, along with the hornet logo, but decided not to seeing the stickers were on damn good. I did paint a white square behind the hornet logo to make the picture look brighter.
So in all honesty you do NOT need an air compressor. My 1st 3 bodies were all done by hand like this one was. I actually find finer details way easier to do with brushes.
01-27-2011, 05:12 PM
#23
Senior Member
Thread Starter
My Feedback: (1)
Join Date: Dec 2010
Location: Debary, FL
Posts: 112
Likes: 0
Received 0 Likes
on
0 Posts
Oh I totally believe you guys about crashing and ruining the paint and what not. Honestly though, this body came with a huge lot of r/c stuff for way cheap and I don't really care what comes of it. If he does a really nice job on it than I just won't go bashing with it. Maybe just drive it easy and get some photos and such.
Now if I get really serious about wanting to paint a body, like a Cobra 427 or something, I'll follow these suggestions to the letter starting with the 2 liter bottle practice.
Now if I get really serious about wanting to paint a body, like a Cobra 427 or something, I'll follow these suggestions to the letter starting with the 2 liter bottle practice.
 01-27-2011, 06:32 PM
#25
Senior Member
Join Date: Dec 2006
Location: milbrae,
SK, BANGLADESH
Posts: 3,538
Likes: 0
Received 0 Likes
on
0 Posts
ORIGINAL: Telecaster
Oh I totally believe you guys about crashing and ruining the paint and what not. Honestly though, this body came with a huge lot of r/c stuff for way cheap and I don't really care what comes of it. If he does a really nice job on it than I just won't go bashing with it. Maybe just drive it easy and get some photos and such.
Now if I get really serious about wanting to paint a body, like a Cobra 427 or something, I'll follow these suggestions to the letter starting with the 2 liter bottle practice.
I myself only go ghetto style on my bodies, one can of parma polycarb paint per body, one color and done.
