


JMB MB339 composite 1:6 PNP
 10-15-2021, 10:17 PM
#1

Thread Starter
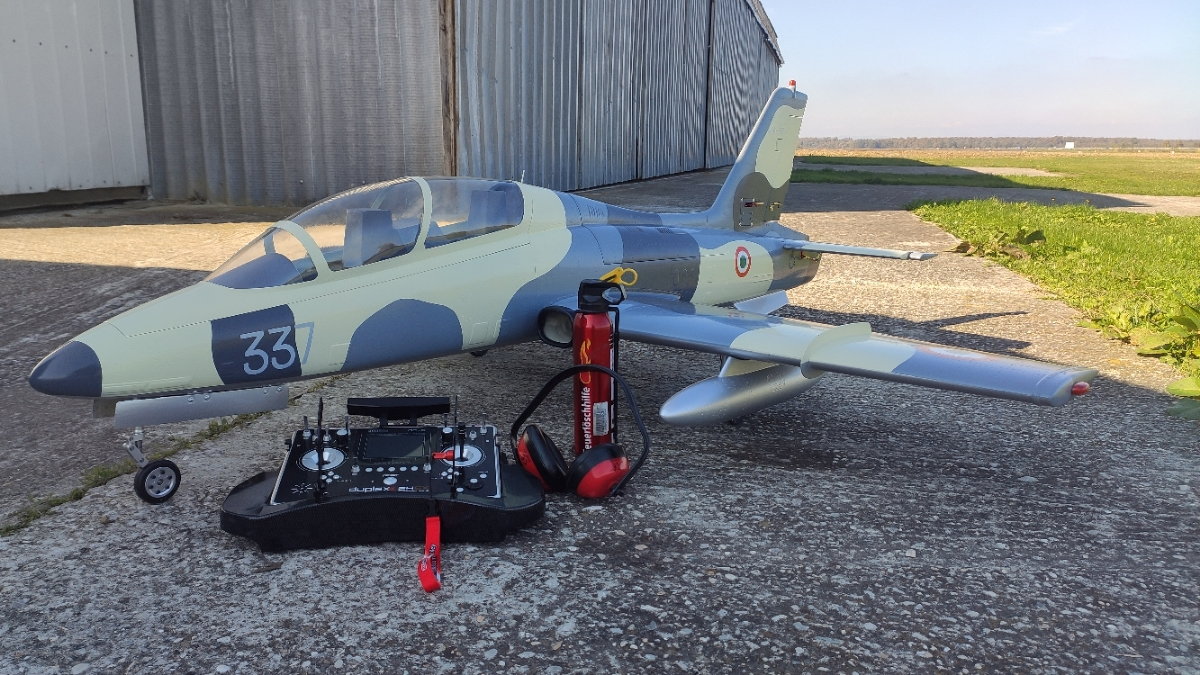
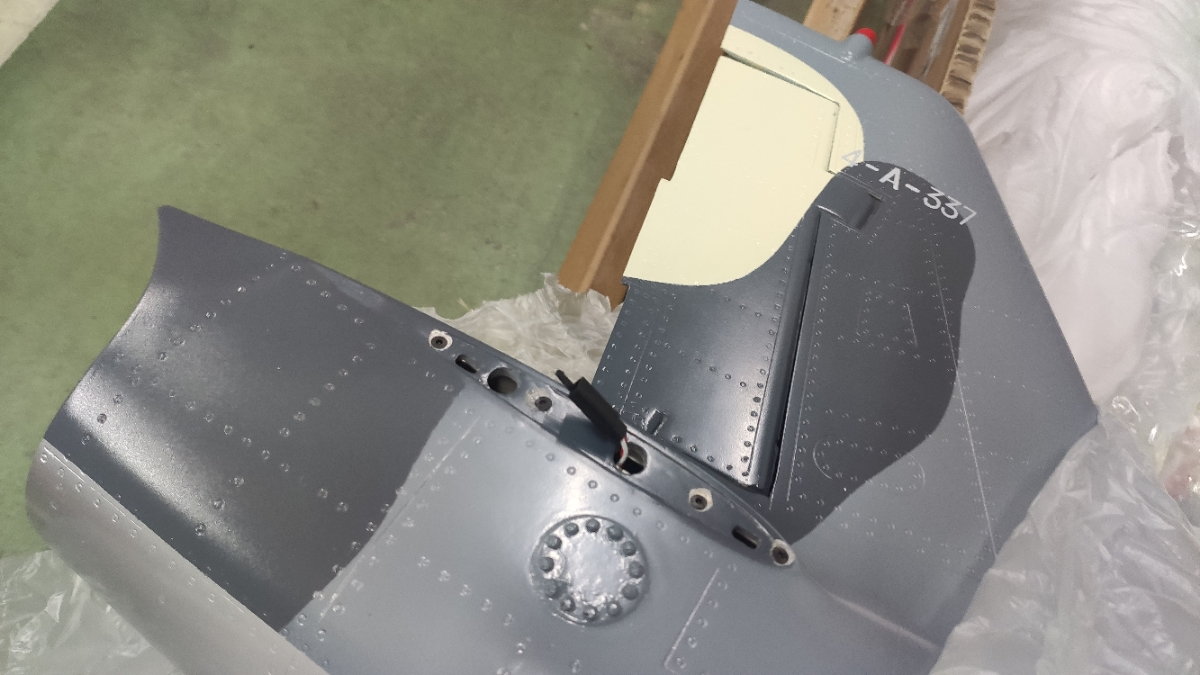
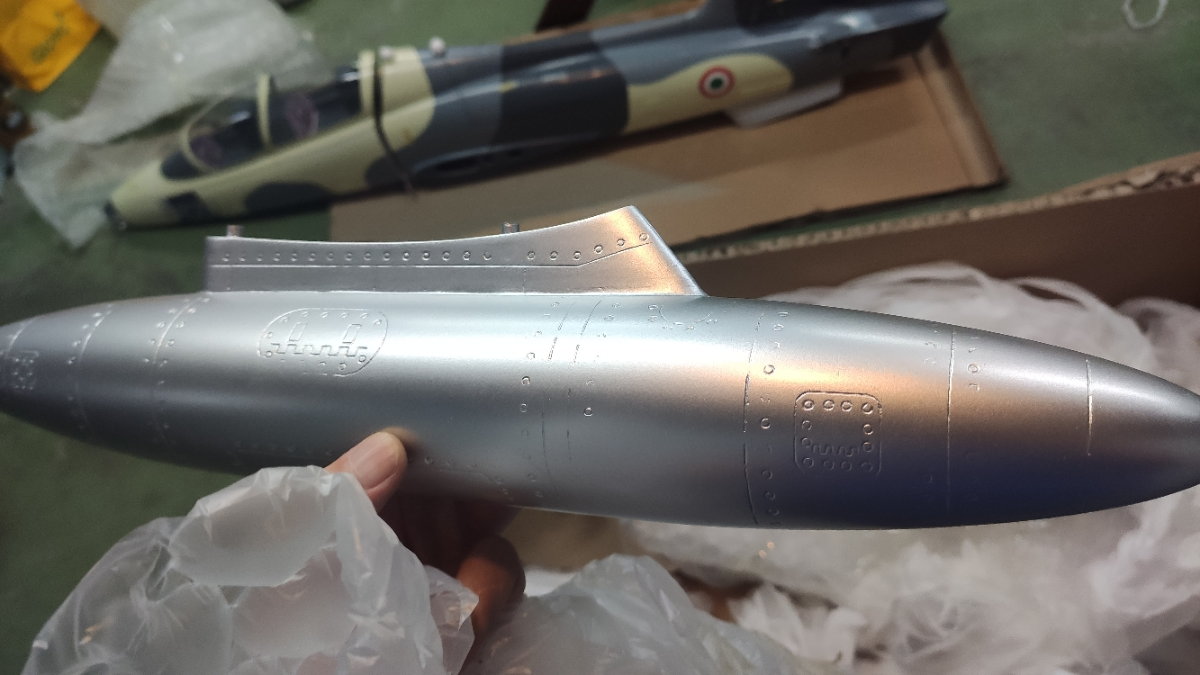
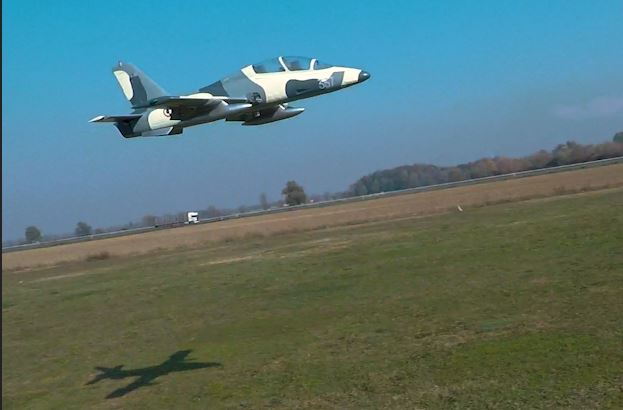
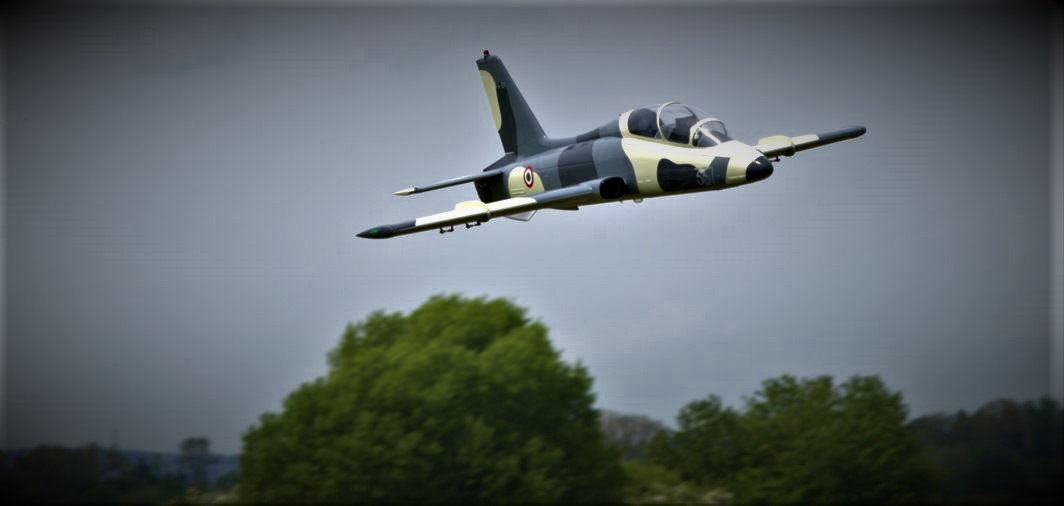
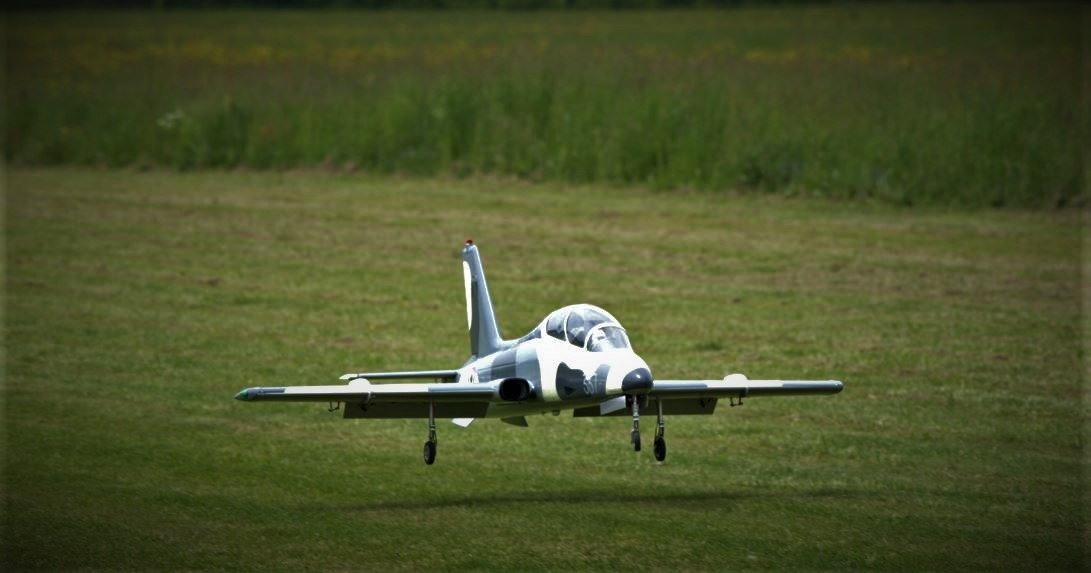
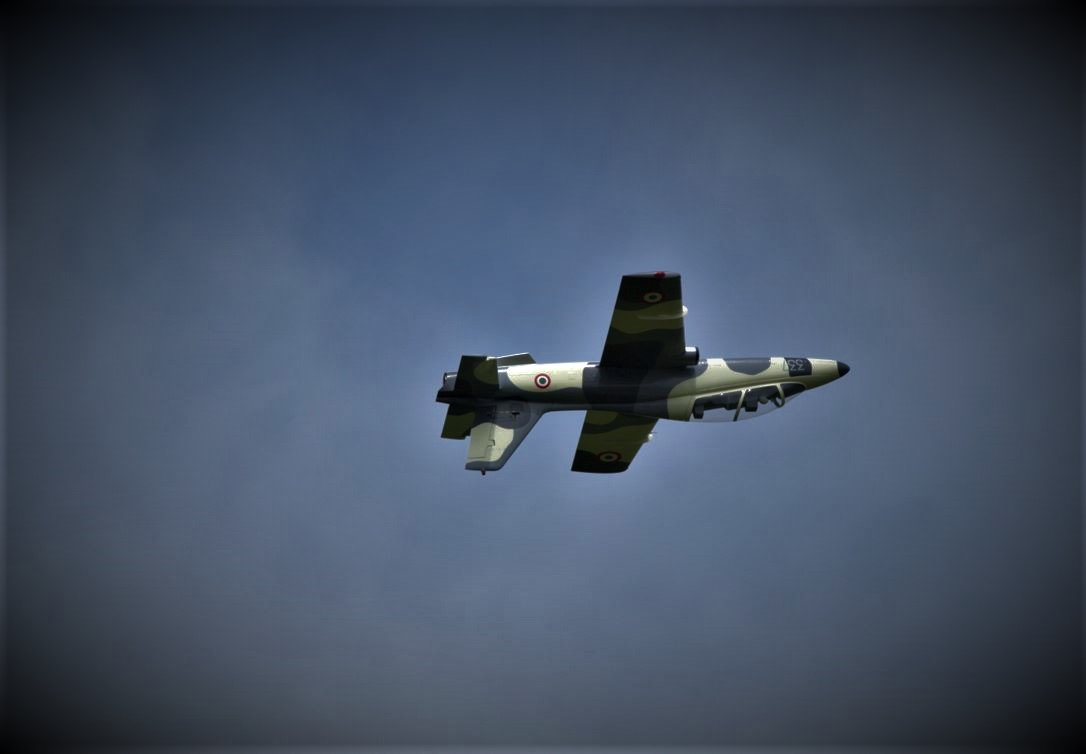
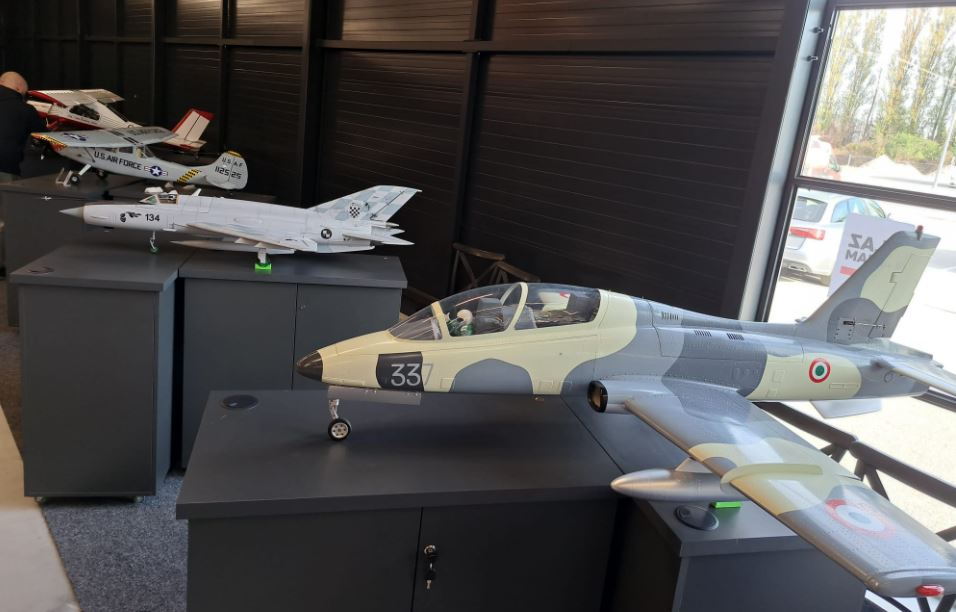
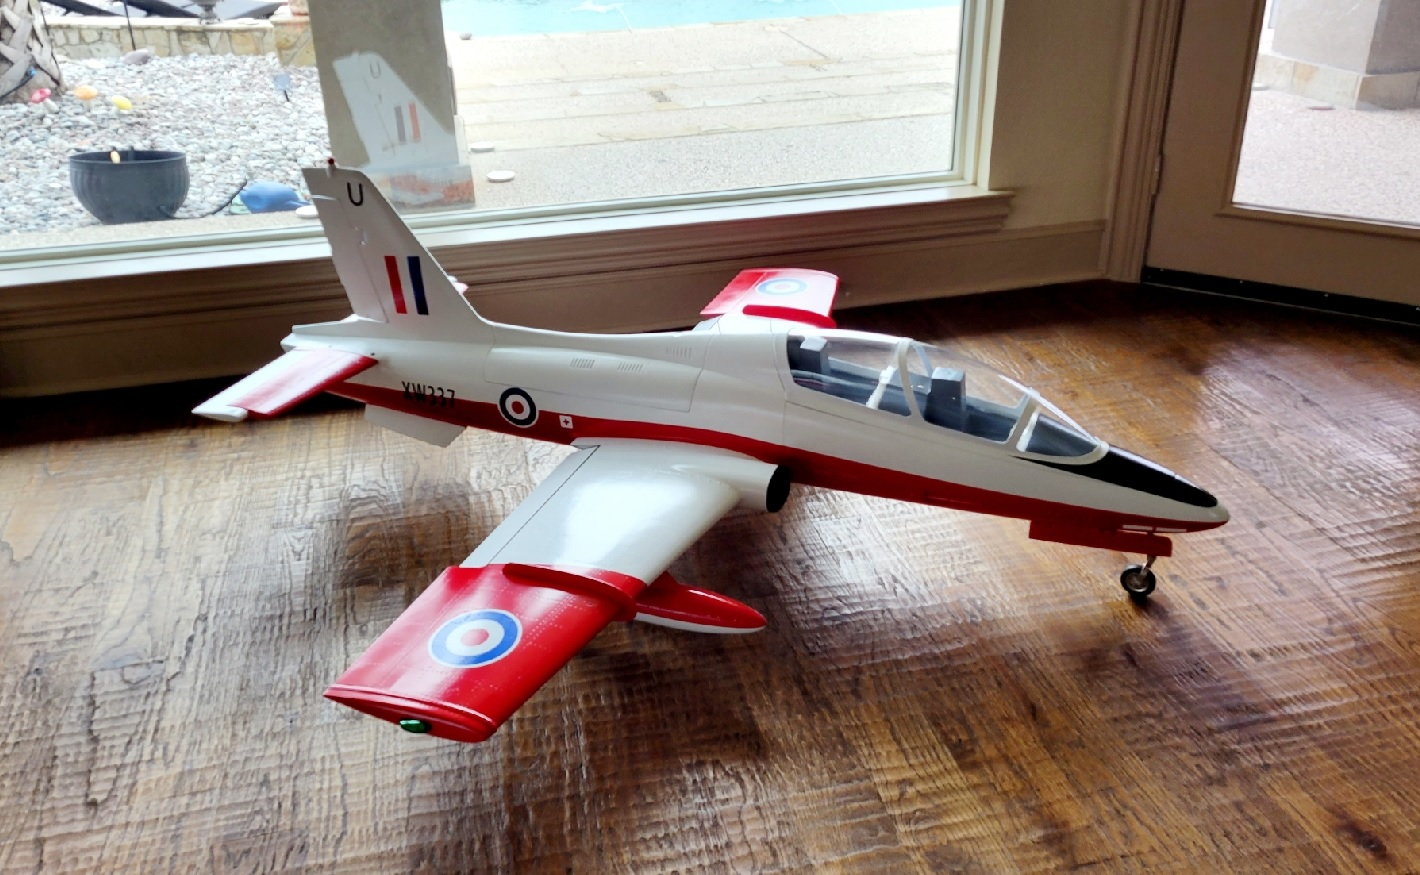
JMB MB339 is a small full composite/airex jet with awesome flight qualities
and the best it comes in PNP all ready installed , servos MG Digital, electric retracts, door servos, pipe, tank UAT
you need only to install your engine and receiver
New V3 (metal control horns,servo arms, ball links, rigid round UAT, lighter tail section so without factory glued 180g ballast lead in the nose cone)
Length 1850mm
Wingspan 1790mm
Dry weight all installed 7,8kg
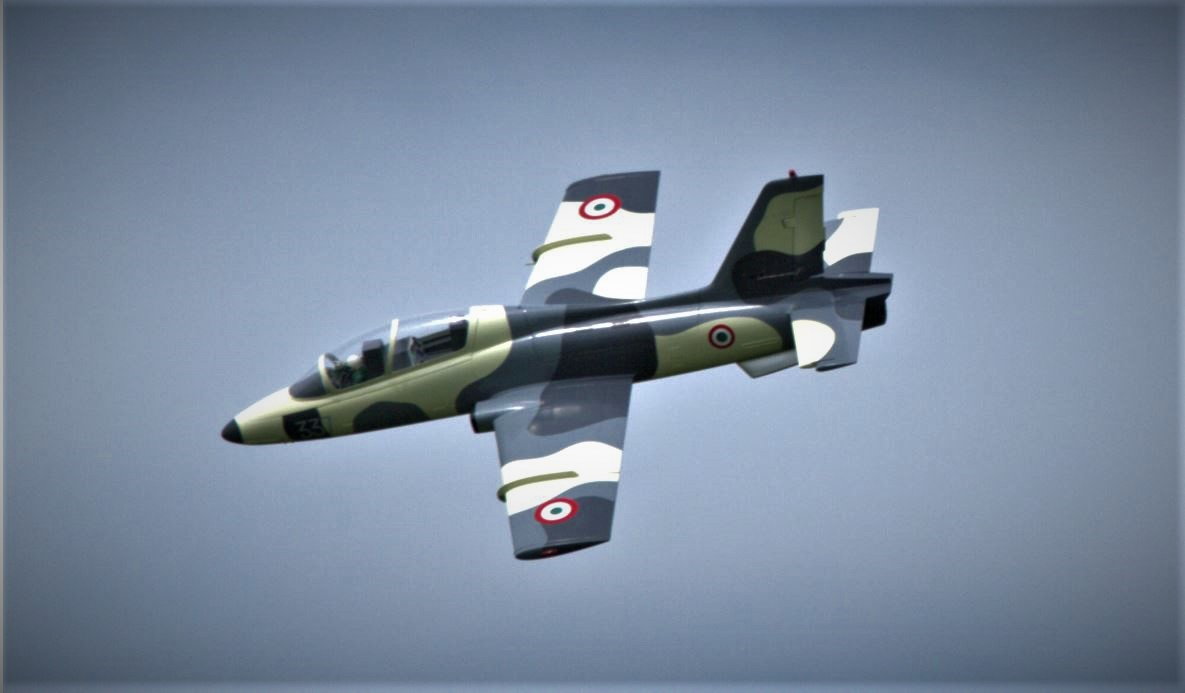
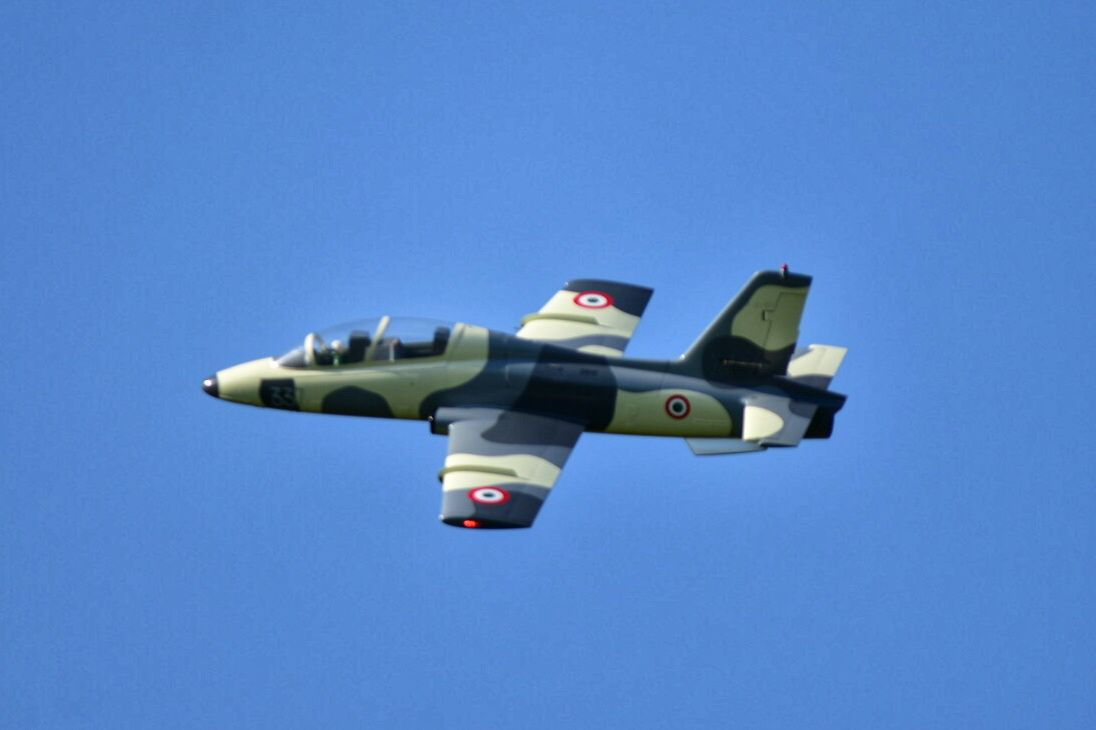
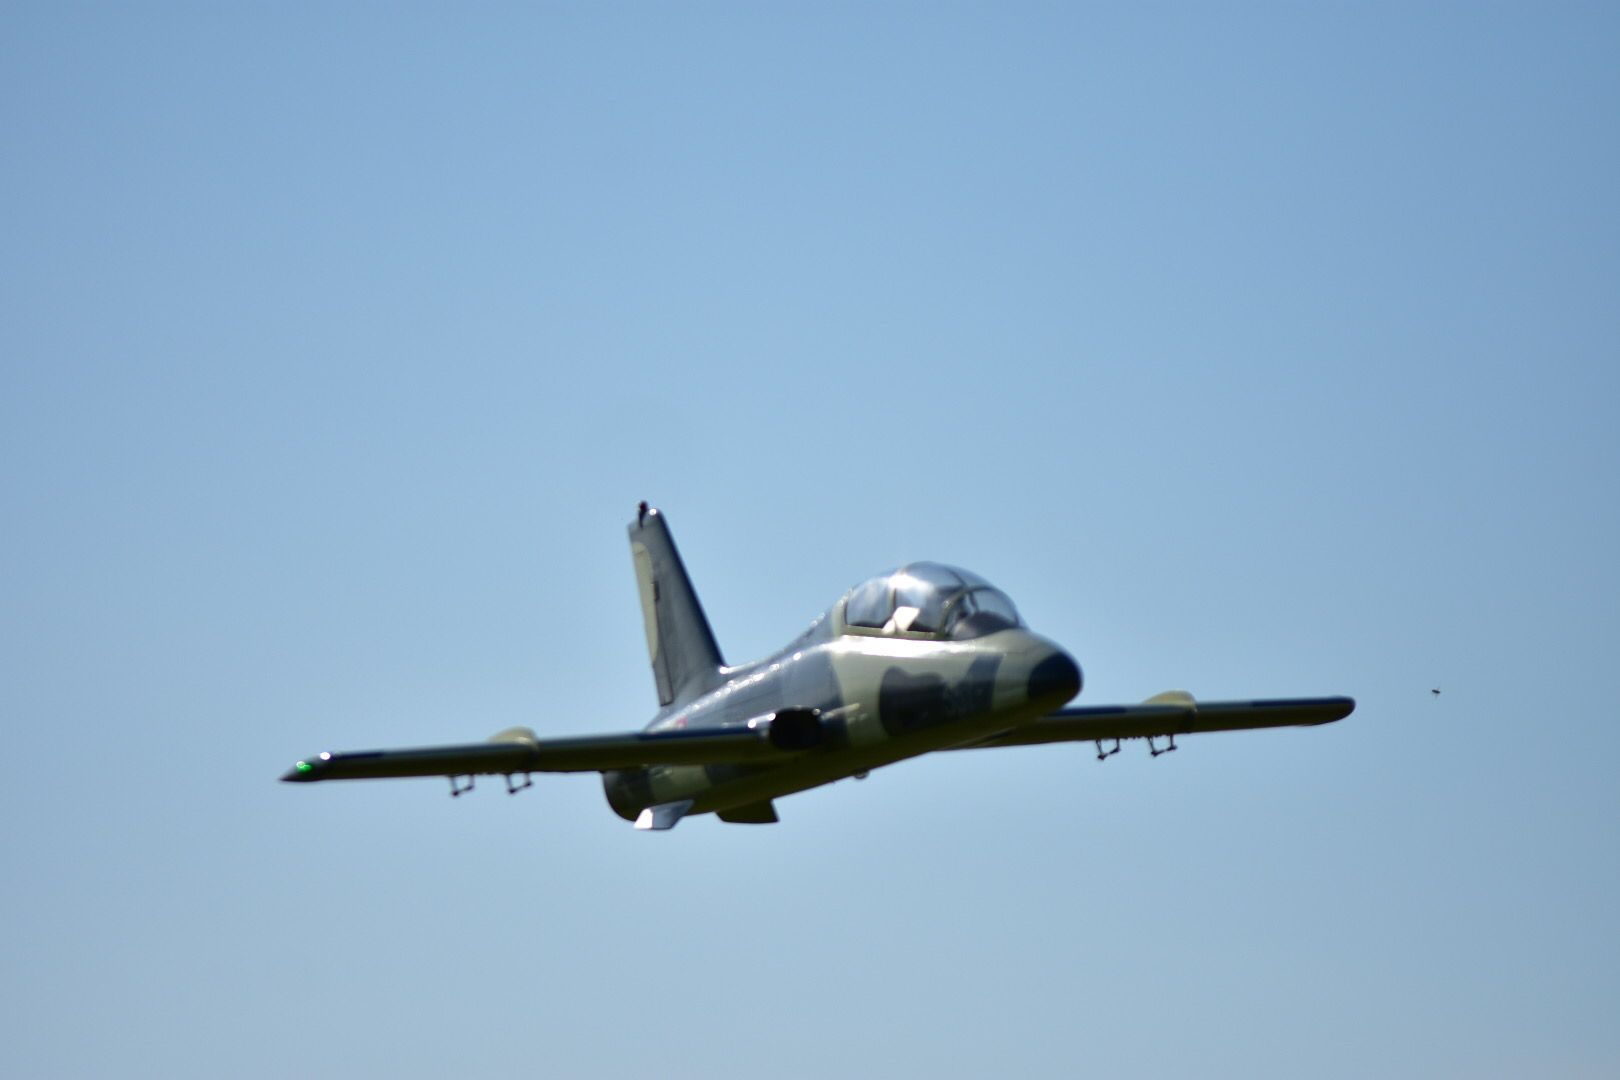
4 colour schemes (tricolori/blue, swiss/white-red, silver camo, saudi arabia/brown camo)
For Engines like K60, K70 K85 - k100 for speed junkies

and the best it comes in PNP all ready installed , servos MG Digital, electric retracts, door servos, pipe, tank UAT
you need only to install your engine and receiver
New V3 (metal control horns,servo arms, ball links, rigid round UAT, lighter tail section so without factory glued 180g ballast lead in the nose cone)
Length 1850mm
Wingspan 1790mm
Dry weight all installed 7,8kg
4 colour schemes (tricolori/blue, swiss/white-red, silver camo, saudi arabia/brown camo)
For Engines like K60, K70 K85 - k100 for speed junkies
Last edited by dr.tom; 10-16-2021 at 02:18 AM.

The following users liked this post:
Flyboy12@ (03-14-2022)

The following users liked this post:
dr.tom (04-24-2022)
The following users liked this post:
jcterrettaz (05-07-2022)

 11-12-2022, 10:10 AM
#12
Thanks for detailed photos and videos! I just bought one.
Where is your CG? I noticed you are using 4 batteries, what size are they and did you have to add any weight anywhere?
Where is your CG? I noticed you are using 4 batteries, what size are they and did you have to add any weight anywhere?
11-14-2022, 12:20 PM
#13
Thread Starter
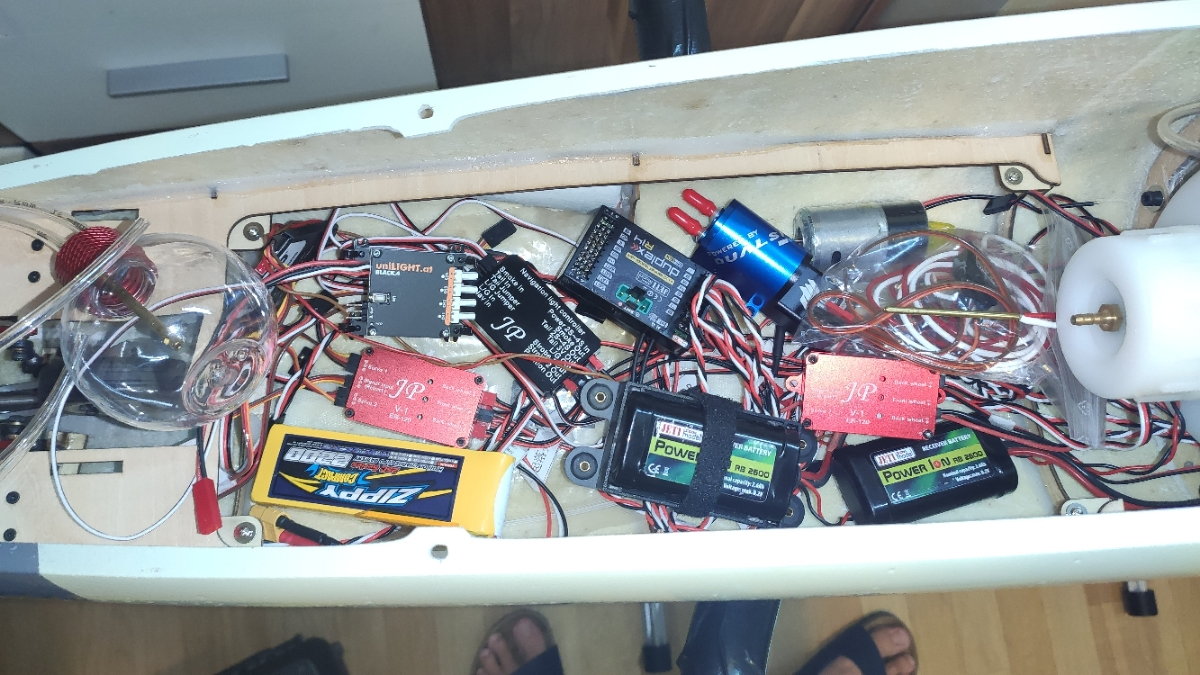
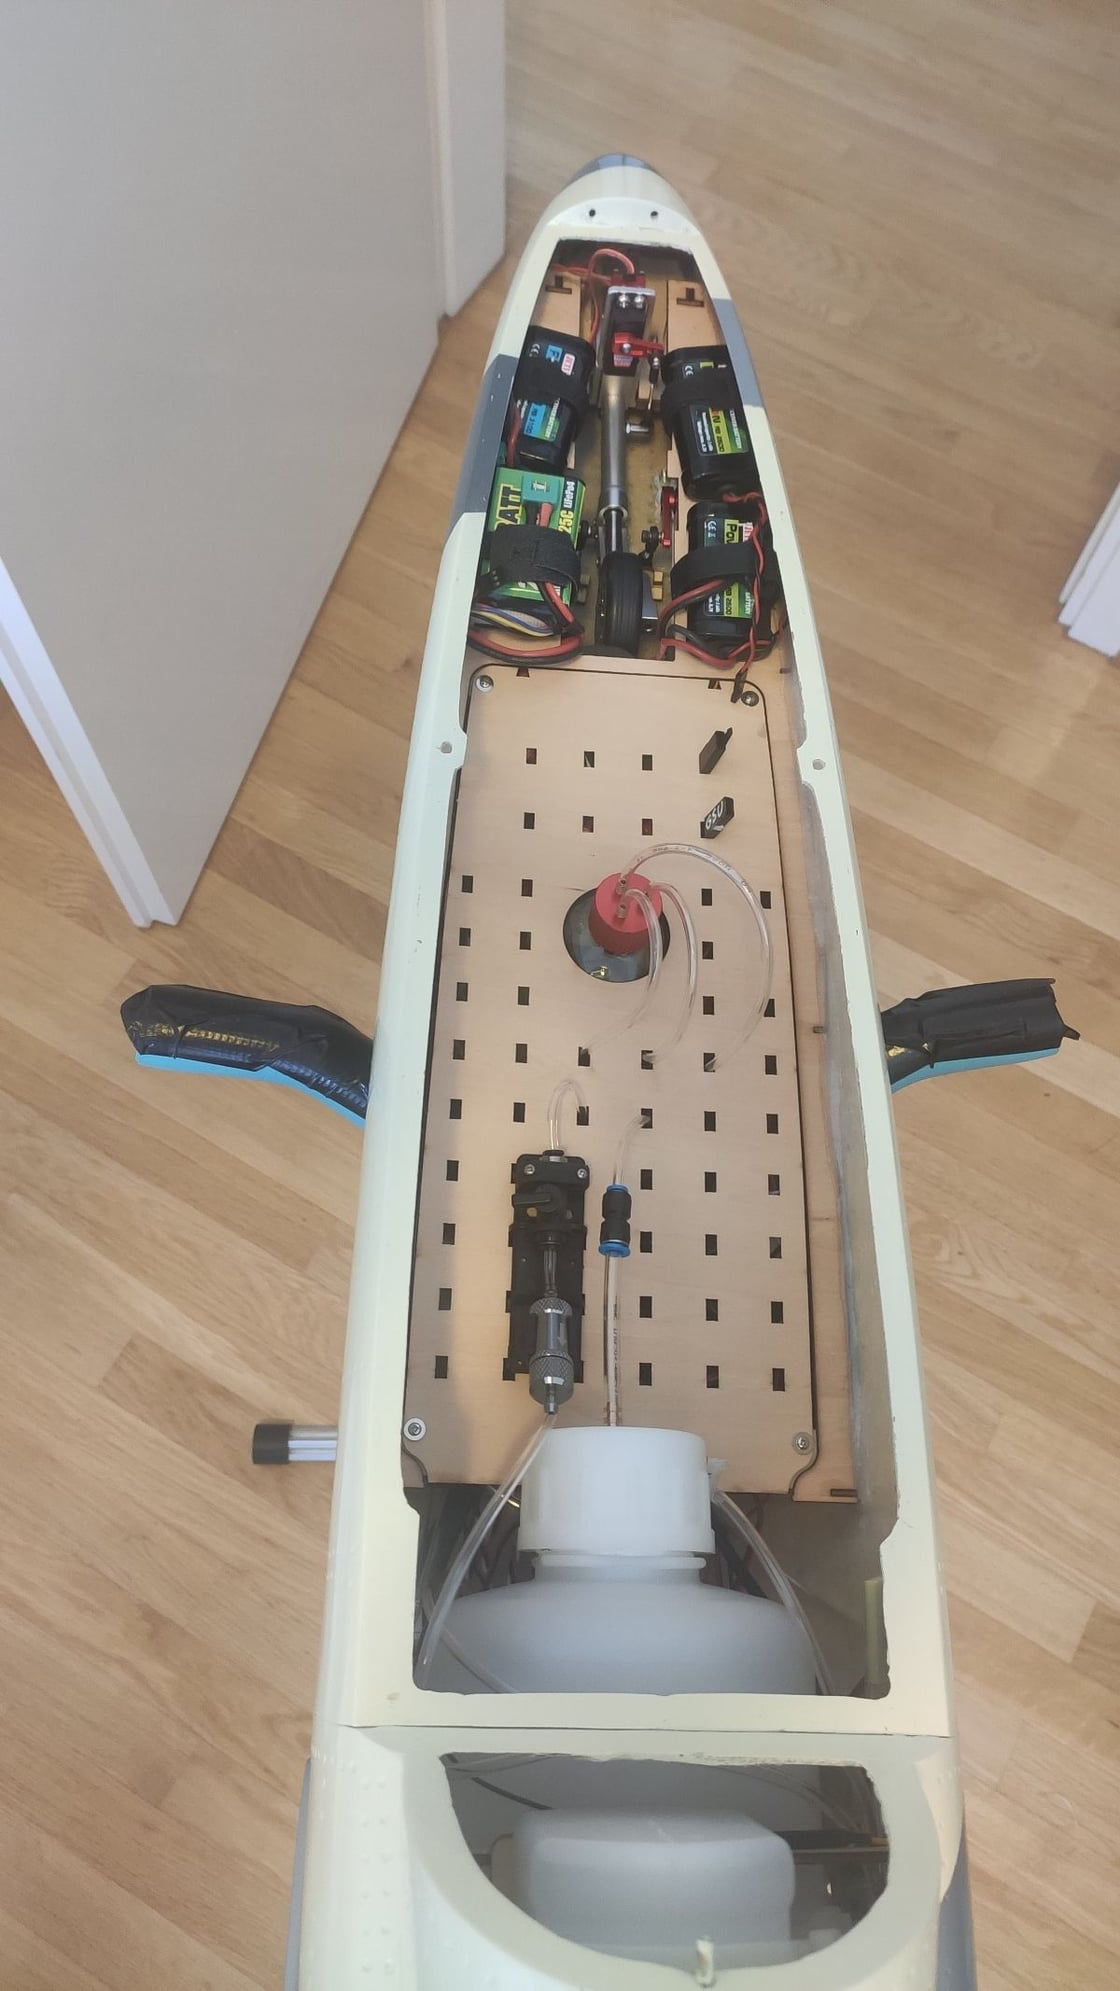
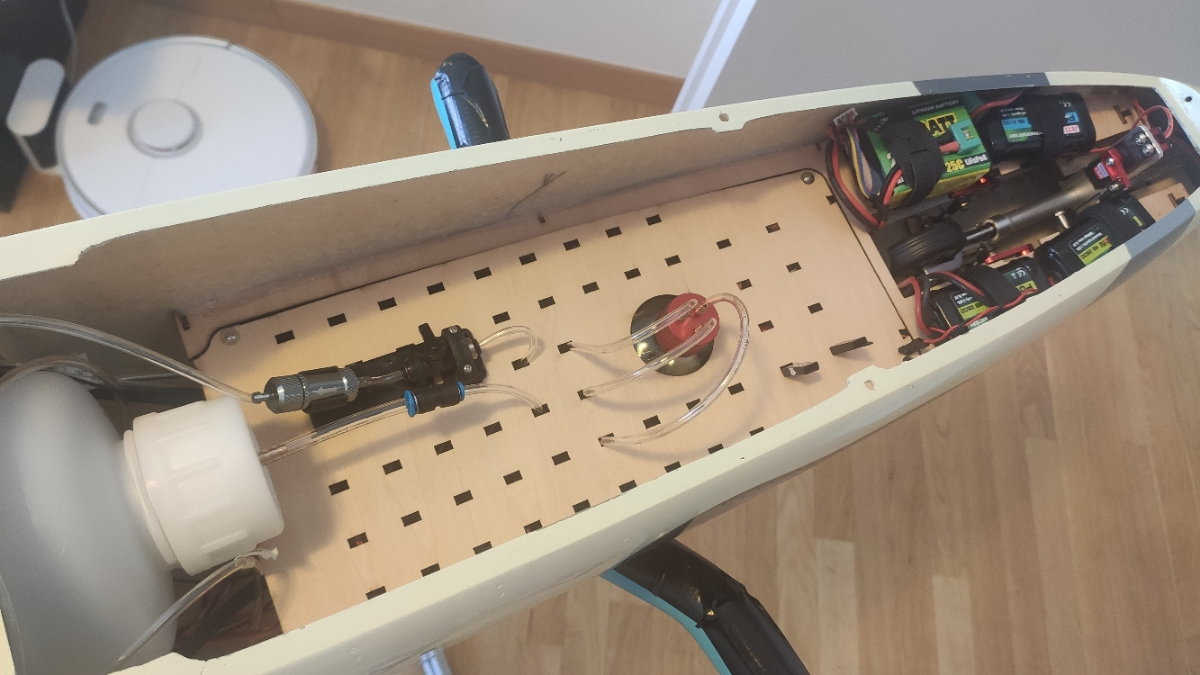
nice! post photos of your setup here too please, would like to see how others made it ( I've put all below deck but if I need to change something it takes longer)
my CG is 155mm, but first try the 145mm and go slowly to 150mm if you feel a need.
there is a bigger thread about this model at german forum but google translate can help you out a lot,
it's worth scrolling over.
https://www.rc-network.de/threads/jm...macchi.725229/
Yes, I started with 4 batteries,
2 for RX/servos LiIon 2S (Jeti Central box 220 - 2 inputs)
1 for turbine LiFe 3S
and third LiIon 2S for lights/retracts
but later removed 1 LiIon and I use retract channel (from CB220 ) which gives a PWM signal to retract controller, also to power it
same with lights, that channel from CB220 with PWM signal for OFF/ON, also gives power to that controller
and smoke pump ch also gives power to smoke pump (all those 3 devices have stock separated PWM input for RX side and PW input for +/- 8V, but since CB220 has fused protected outputs, I have great trust in it, so if somethings shorts out, it won't bring the whole plane down, only that channel on CB220 will go off until power is restarted....
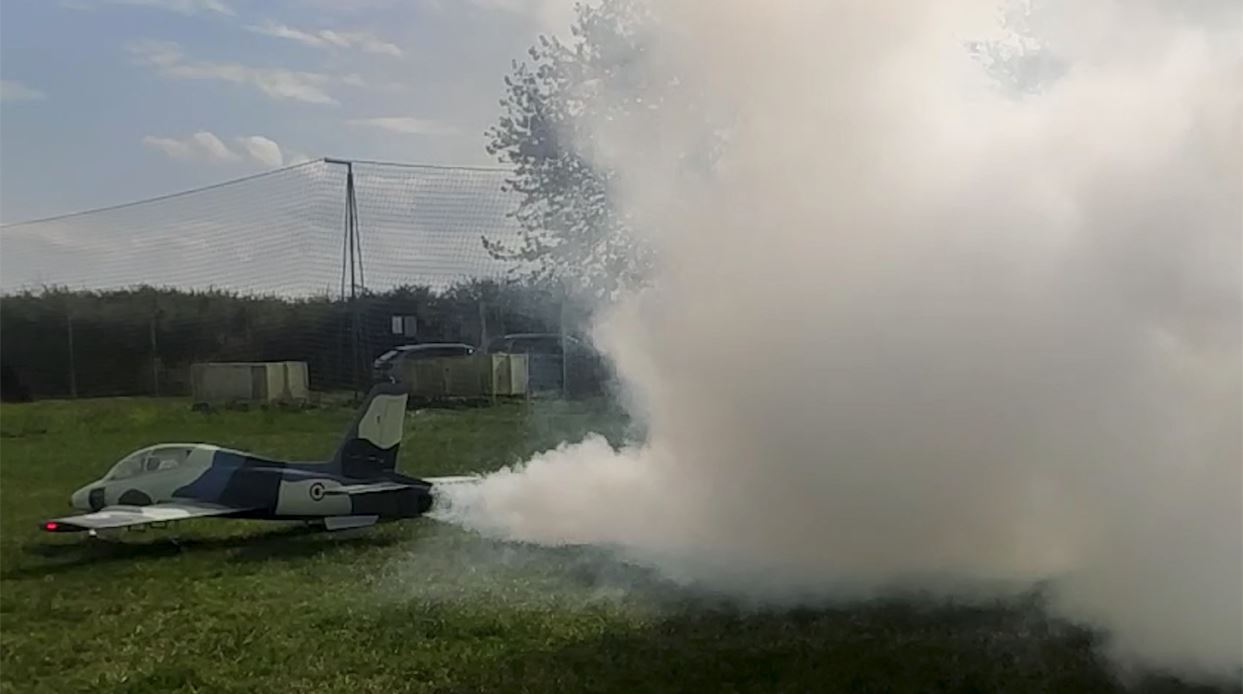
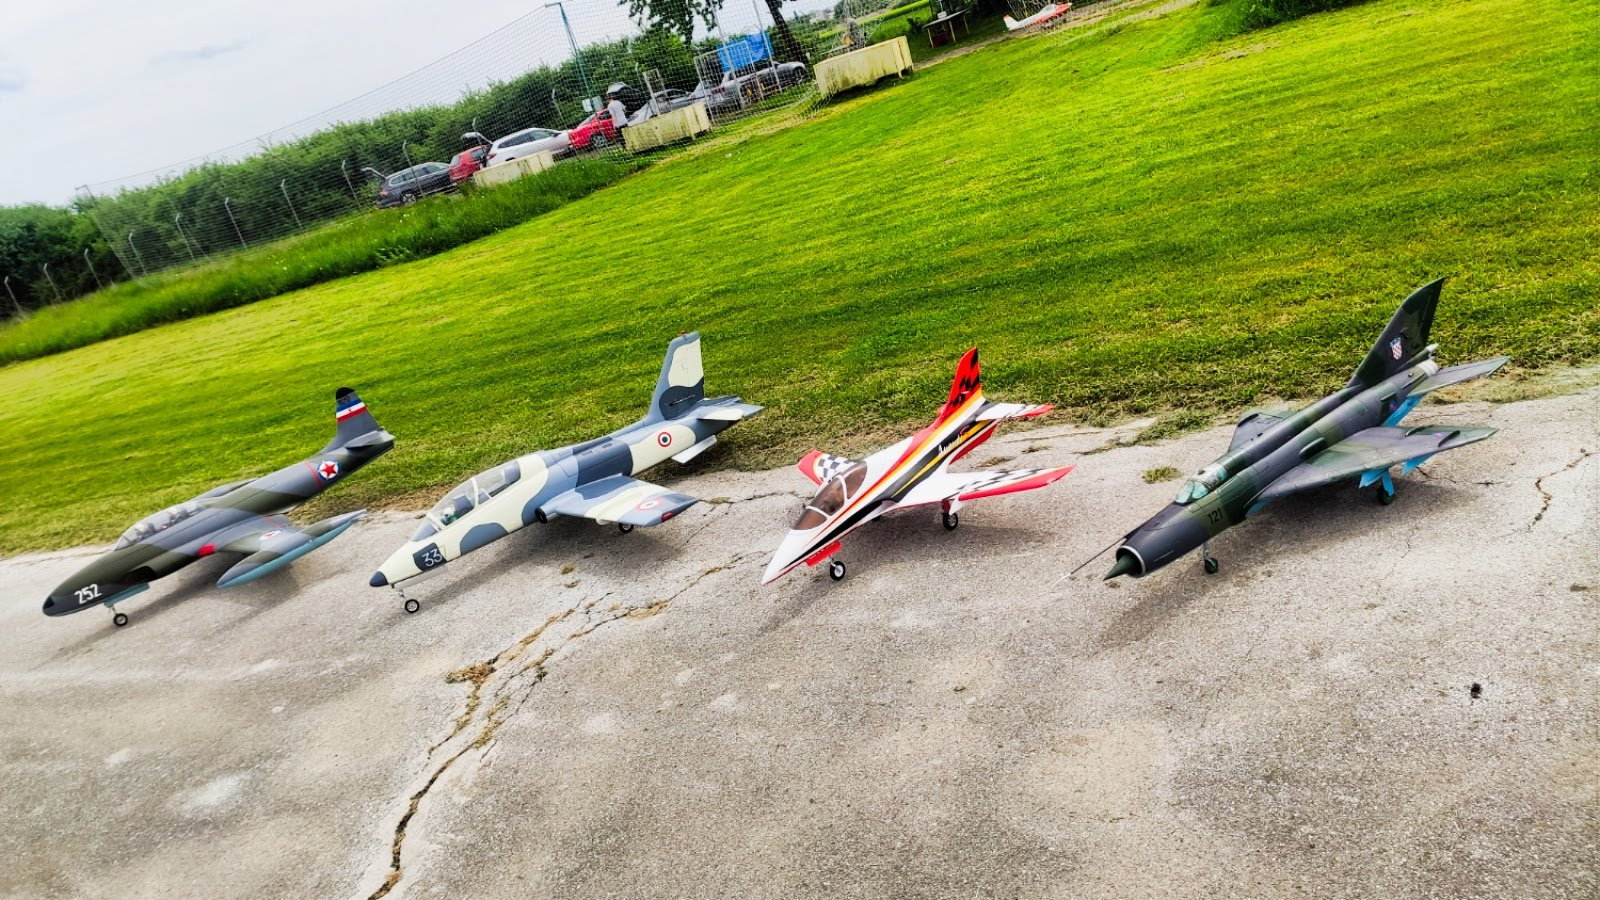
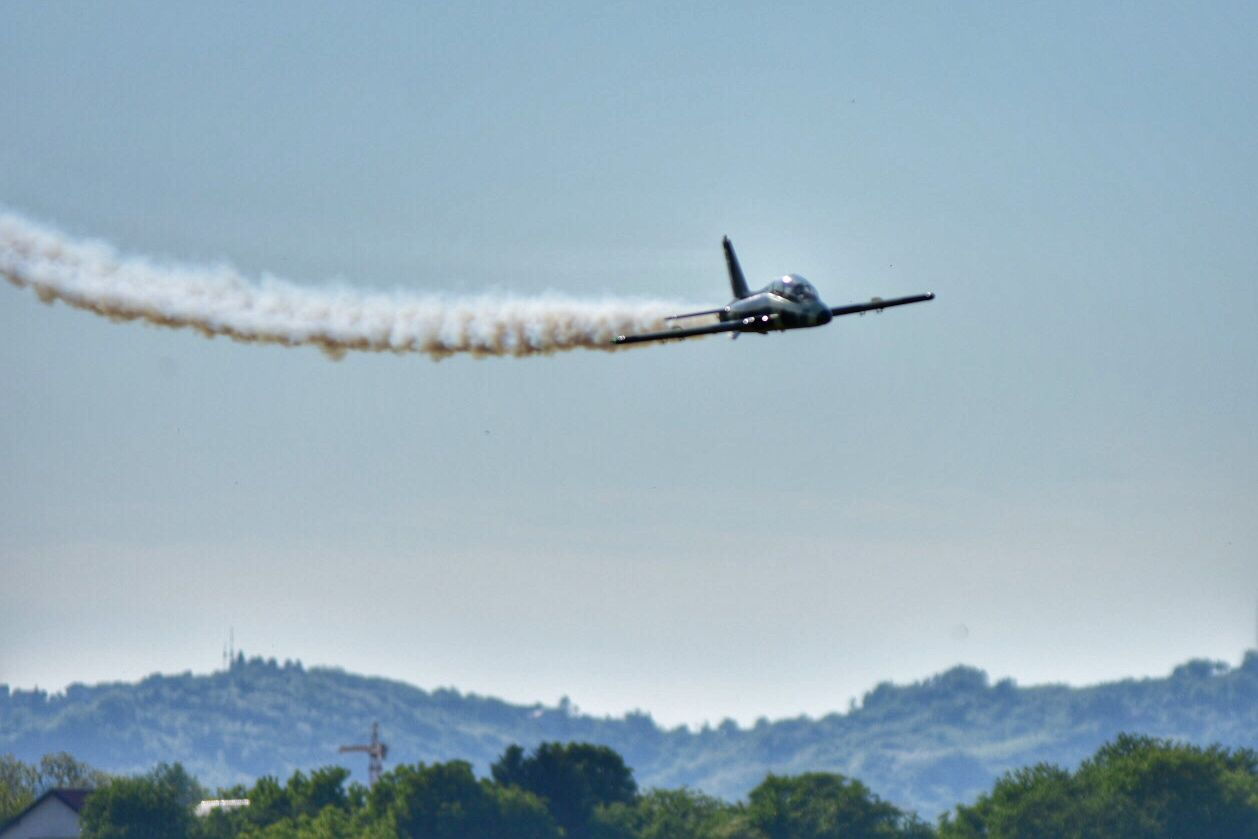
we just had a small exhibition of RC planes here for 2 days, around 15-16.000 people came and this small MB was most advanced jet there, 80's something right? , next to it was mig21 from 60'
https://youtu.be/-6wp0xXEMxQ
my CG is 155mm, but first try the 145mm and go slowly to 150mm if you feel a need.
there is a bigger thread about this model at german forum but google translate can help you out a lot,
it's worth scrolling over.
https://www.rc-network.de/threads/jm...macchi.725229/
Yes, I started with 4 batteries,
2 for RX/servos LiIon 2S (Jeti Central box 220 - 2 inputs)
1 for turbine LiFe 3S
and third LiIon 2S for lights/retracts
but later removed 1 LiIon and I use retract channel (from CB220 ) which gives a PWM signal to retract controller, also to power it
same with lights, that channel from CB220 with PWM signal for OFF/ON, also gives power to that controller
and smoke pump ch also gives power to smoke pump (all those 3 devices have stock separated PWM input for RX side and PW input for +/- 8V, but since CB220 has fused protected outputs, I have great trust in it, so if somethings shorts out, it won't bring the whole plane down, only that channel on CB220 will go off until power is restarted....
we just had a small exhibition of RC planes here for 2 days, around 15-16.000 people came and this small MB was most advanced jet there, 80's something right?
, next to it was mig21 from 60'Last edited by dr.tom; 11-14-2022 at 11:08 PM.
11-14-2022, 08:53 PM
#14
Thank you for the information! Your jet looks and flies great!
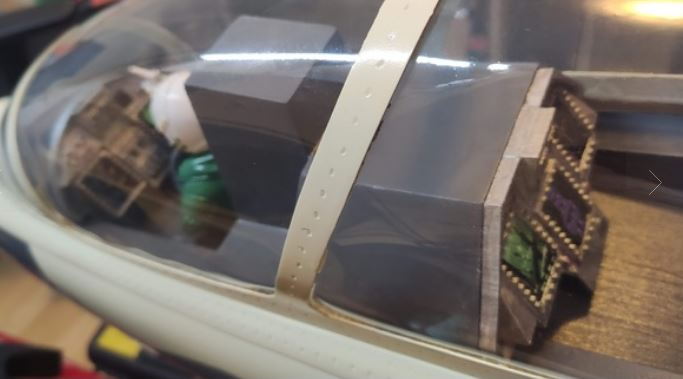
I printed the cockpit you designed and they look fantastic! Thank you for making the files available. I am almost done with my jet and will post photos soon.
I printed the cockpit you designed and they look fantastic! Thank you for making the files available. I am almost done with my jet and will post photos soon.
11-18-2022, 03:43 AM
#16
Thread Starter
Thanks for your interest,
it is free
https://www.thingiverse.com/thing:5137073
you only need to print it and plastic for that costs less than 1$

it is free
https://www.thingiverse.com/thing:5137073
you only need to print it and plastic for that costs less than 1$
Last edited by dr.tom; 11-18-2022 at 03:45 AM.
11-18-2022, 07:15 AM
#17
Thanks for your interest,
it is free
https://www.thingiverse.com/thing:5137073
you only need to print it and plastic for that costs less than 1$
it is free
https://www.thingiverse.com/thing:5137073
you only need to print it and plastic for that costs less than 1$
Thanks,
Tone
11-18-2022, 07:31 AM
#18
Thread Starter
Use it freely!
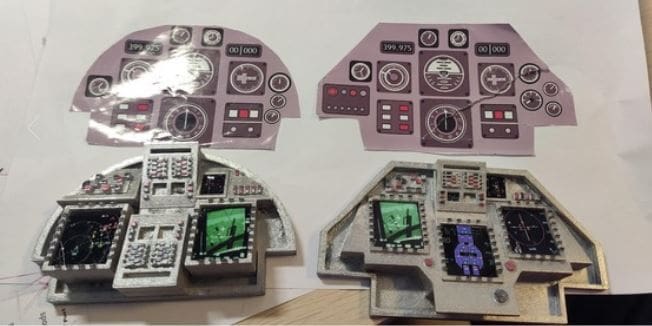
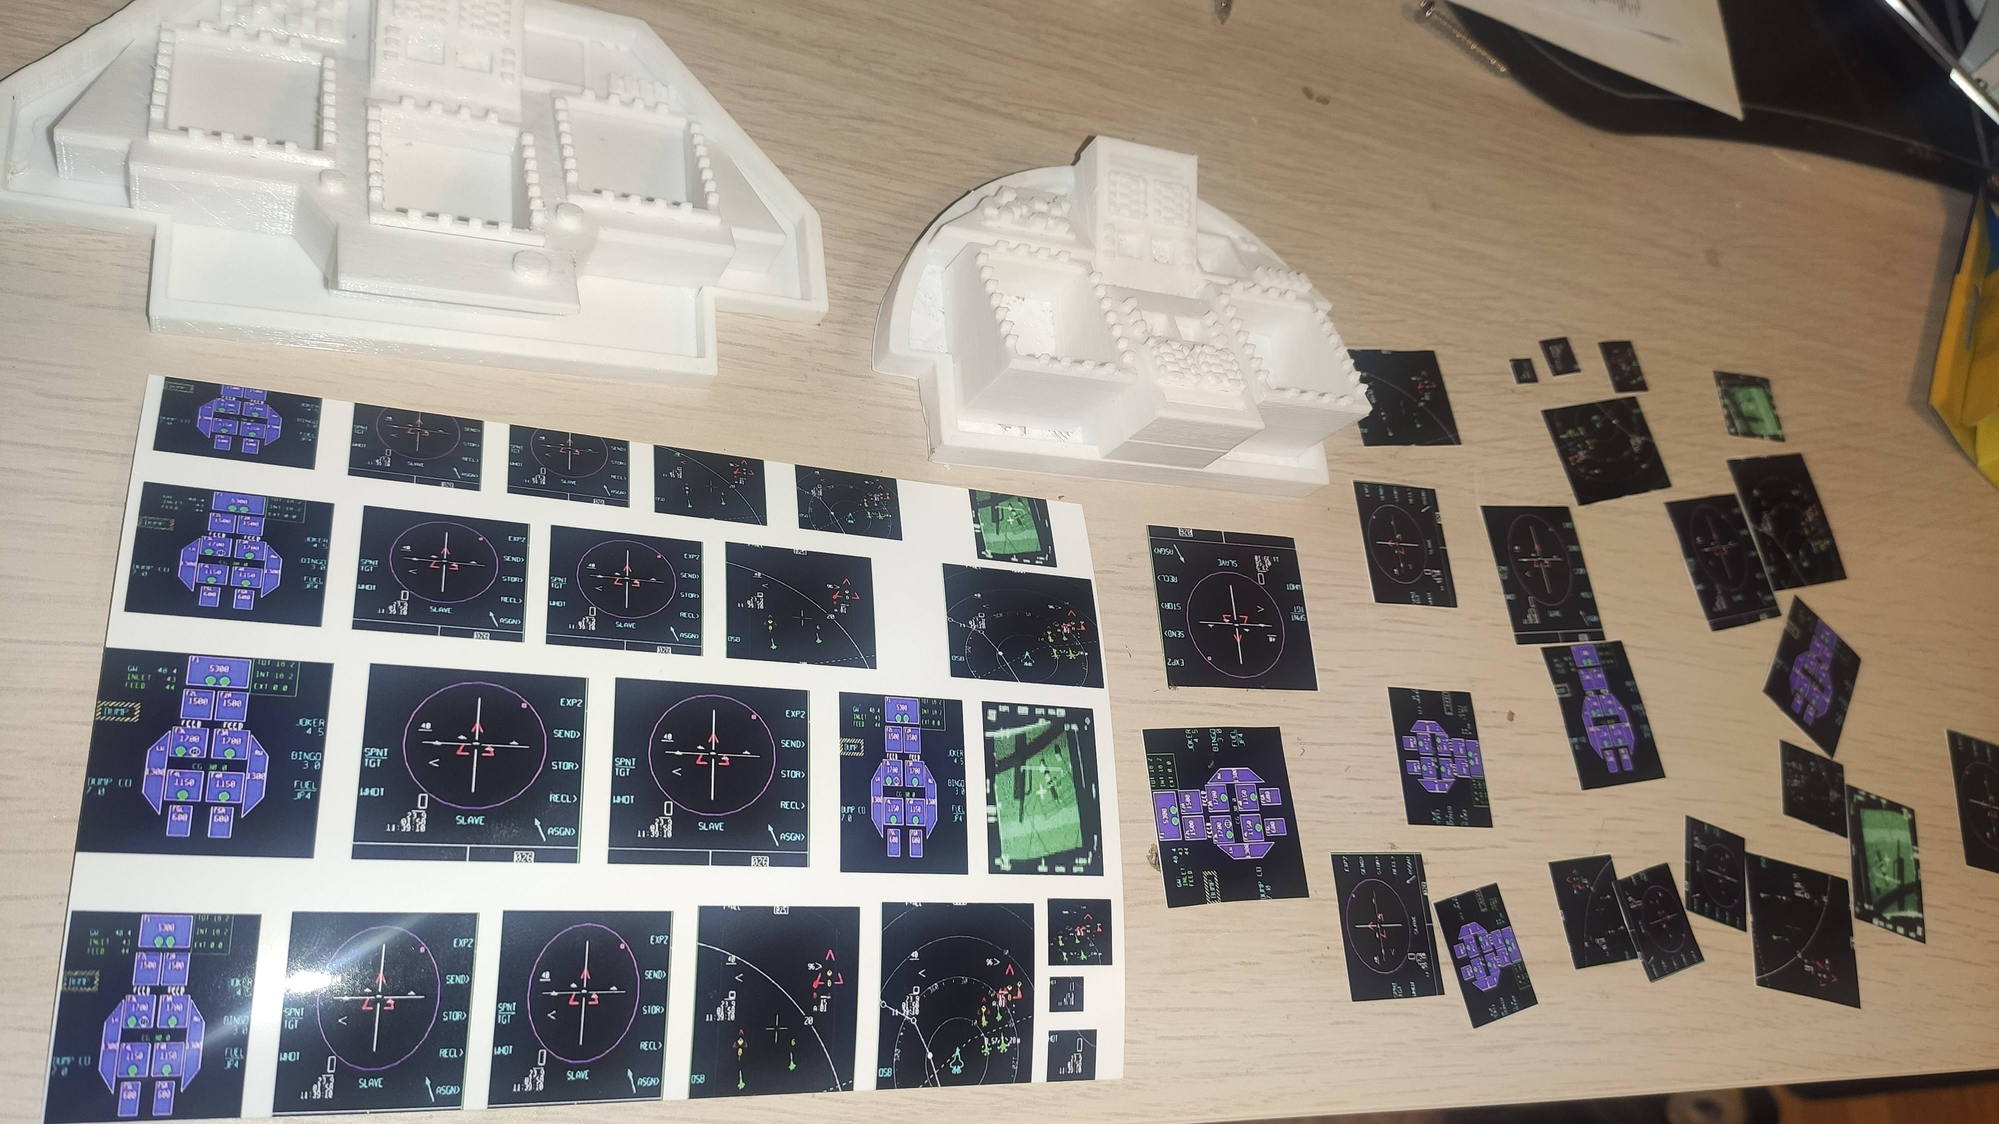
Those screen images are not stickers but cutouts from a 50cent photo made at grocery store(machine that prints photos via bluetooth from phones)
so will try to find that file on my PC, that I've compiled from few googled HUDs and scaled at different sizes
so I coild test fit which one os ok when cutted. Nothing too scientific or mega scale, just a fun effect for me. since everythig you do is better than those pink stock sticker HUD
Last edited by dr.tom; 11-18-2022 at 07:33 AM.
11-18-2022, 10:16 AM
#19
The cockpits dr.tom designed are perfect fit. I printed them in gray. I have not put any sticker on them yet.
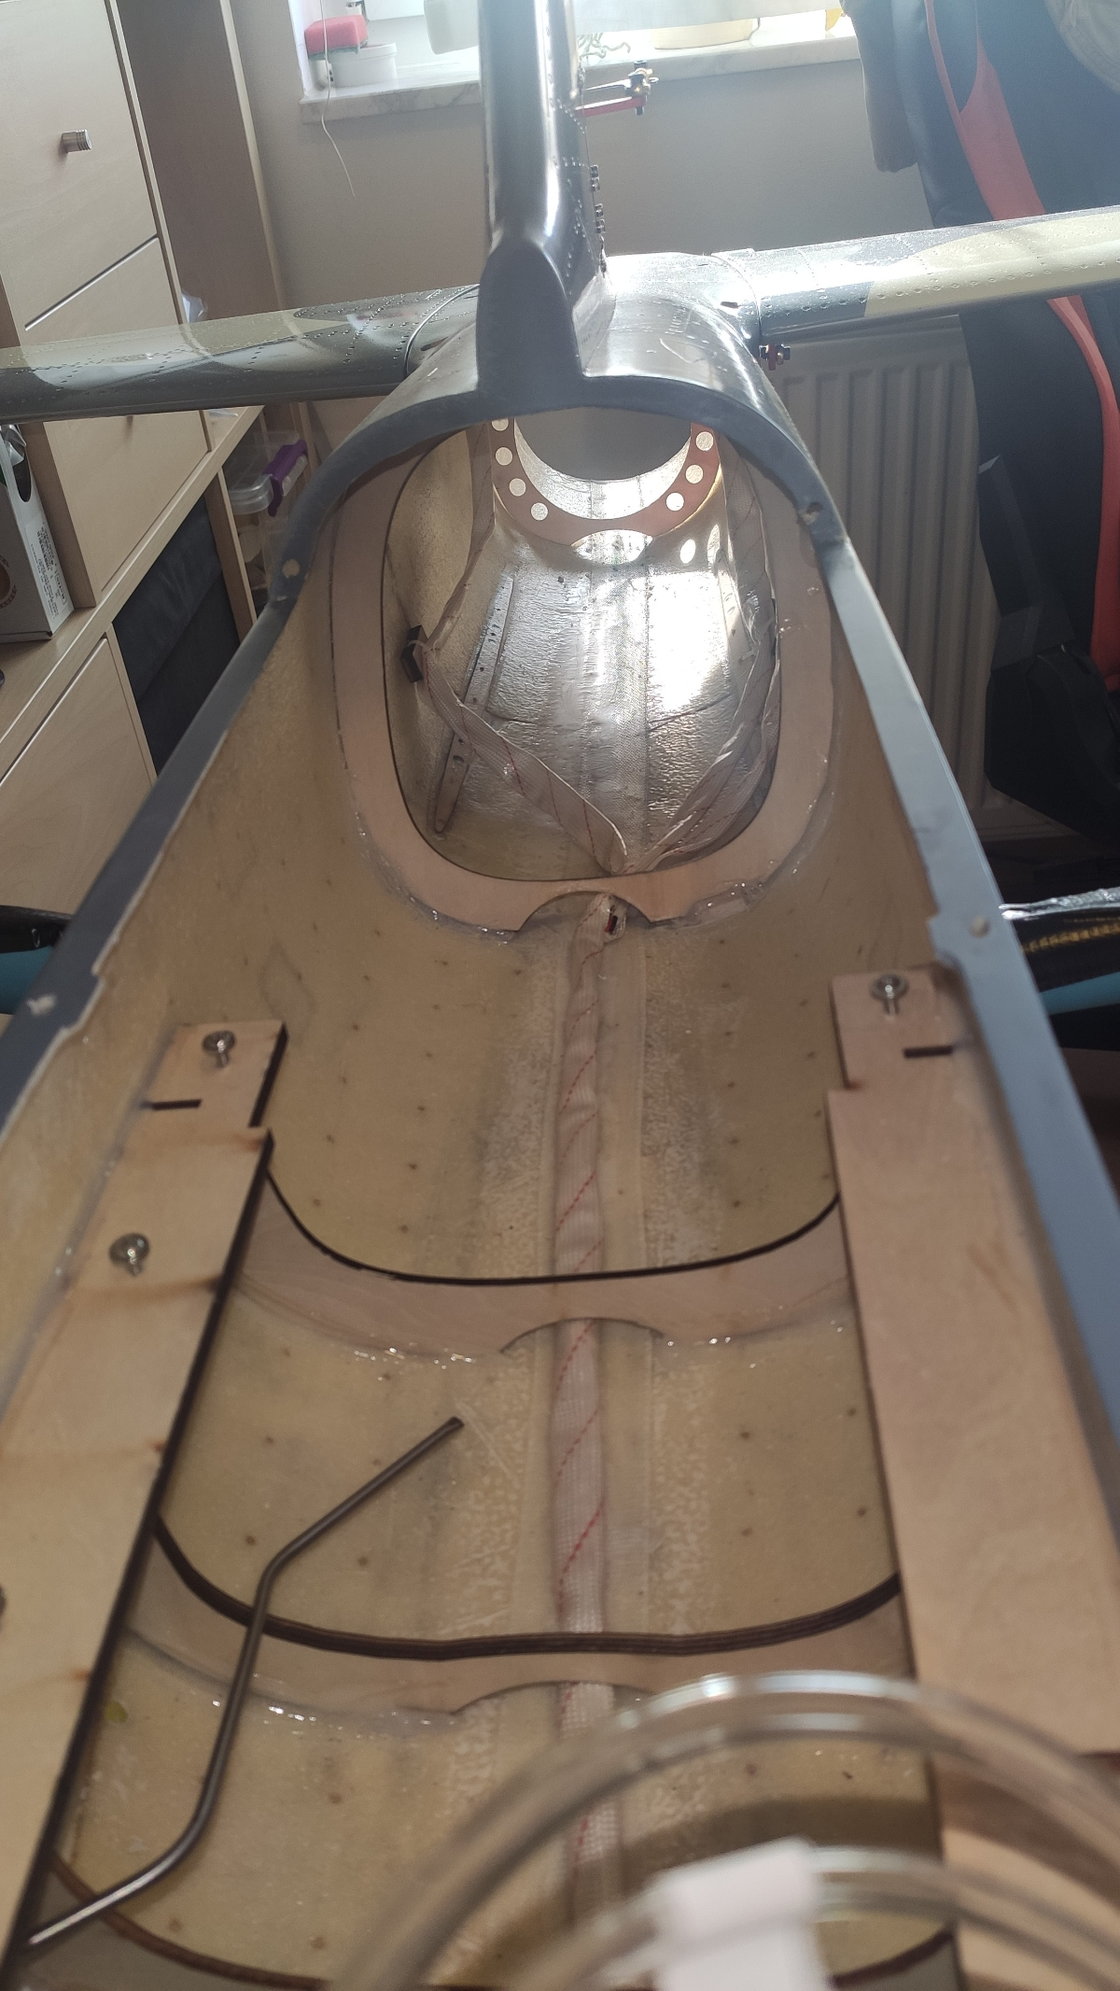
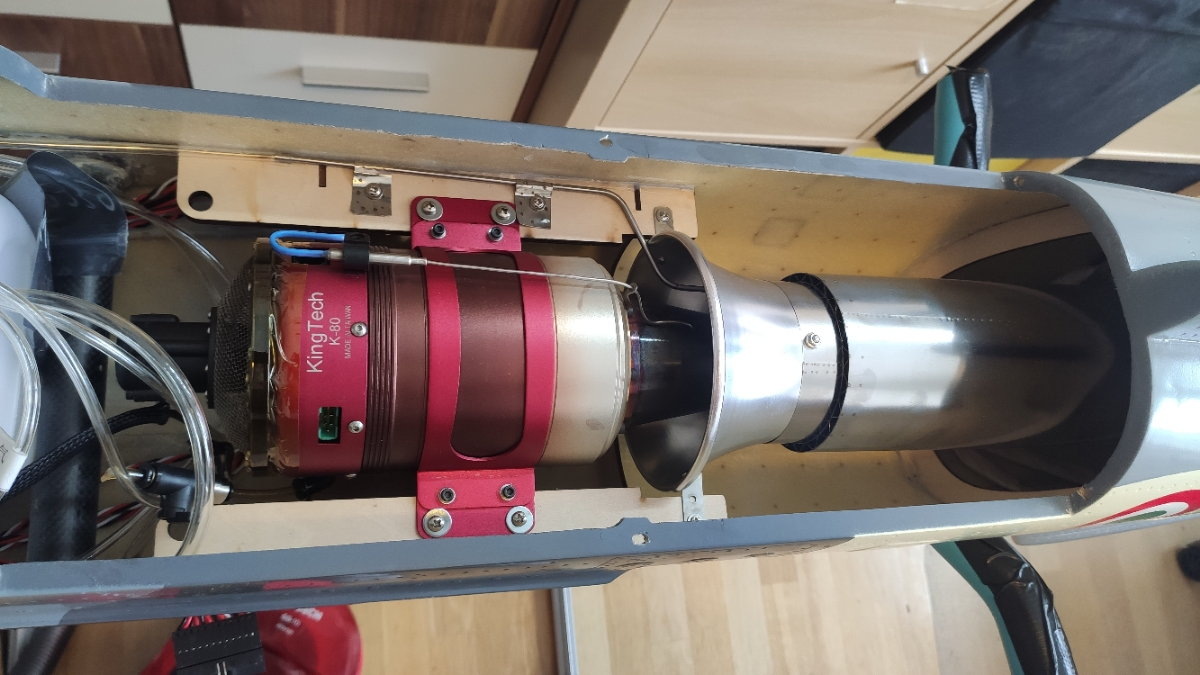
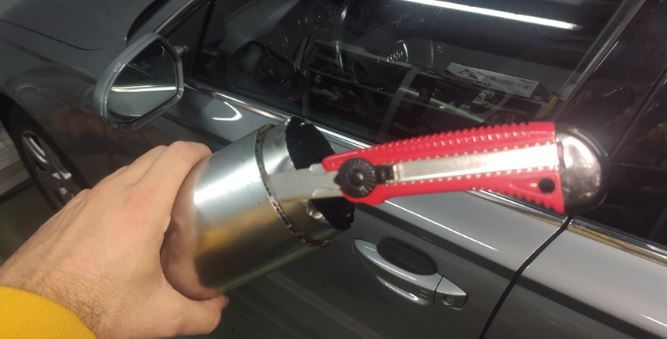
Here are few photos of mine. Even at 155mm CG, it is still tail heavy, planning to add some lead to the nose. The outer wall of the thrust tube bent in several places after the first engine run but the inner wall s fine. On the positive note, the jet is very light and assembly was quick.

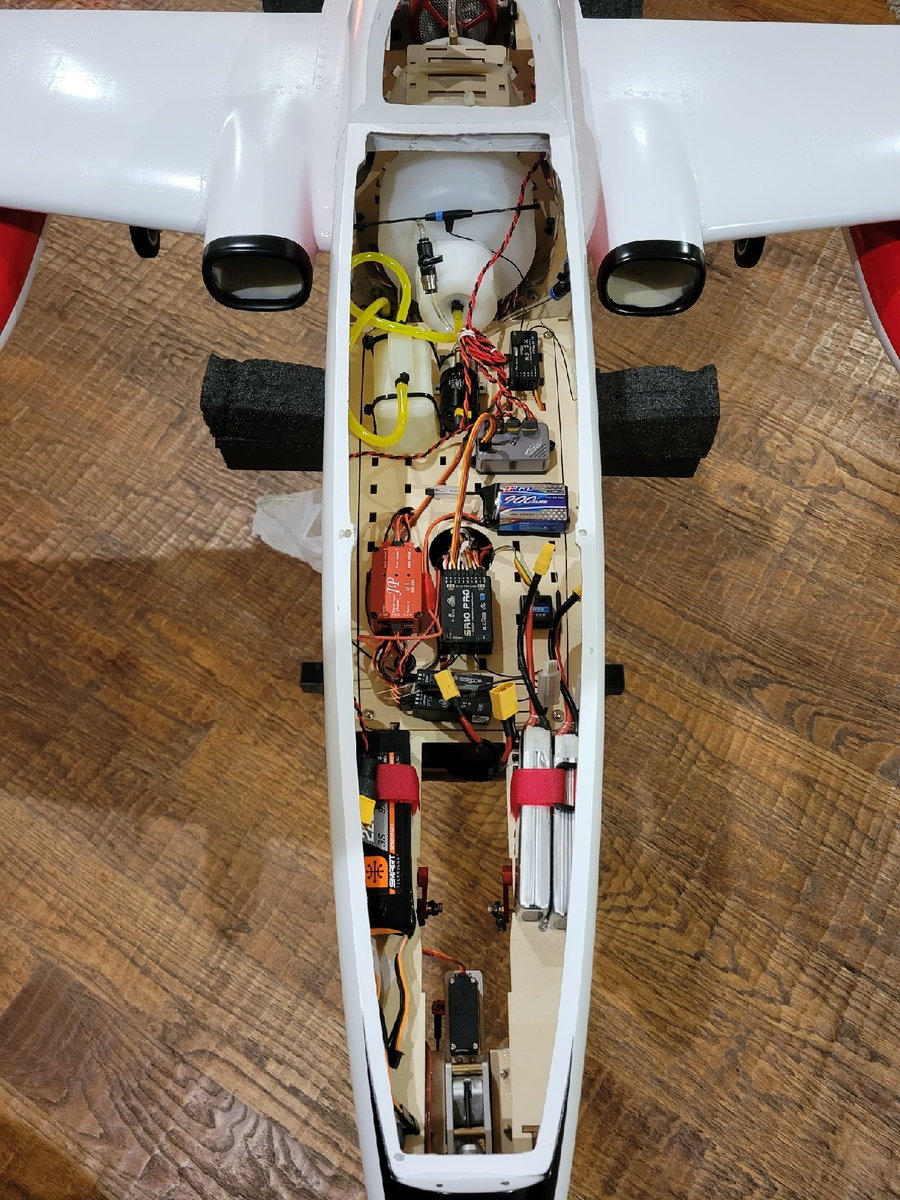
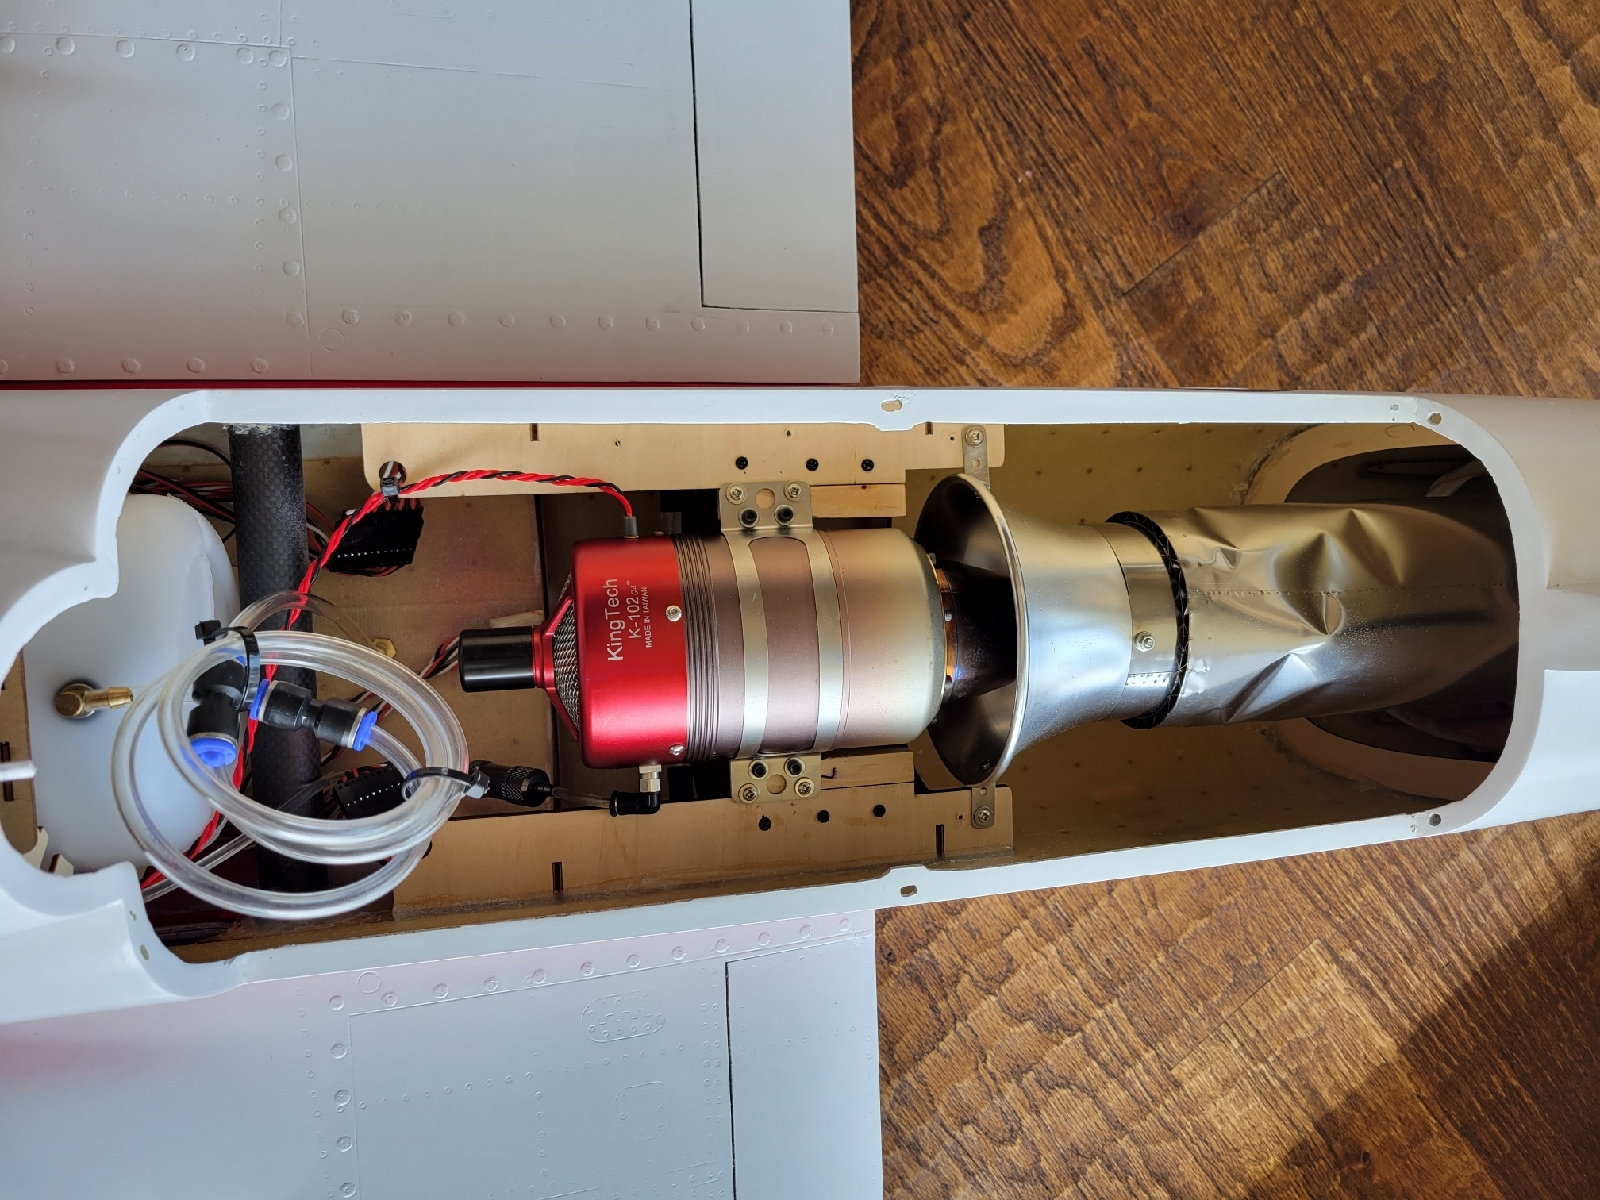
Here are few photos of mine. Even at 155mm CG, it is still tail heavy, planning to add some lead to the nose. The outer wall of the thrust tube bent in several places after the first engine run but the inner wall s fine. On the positive note, the jet is very light and assembly was quick.
11-18-2022, 11:02 AM
#20
Thread Starter
Nice to see others setups and experience, yes 155 can be tail heavy, try 135-140 at first.
your turbine is a lot lighter than mine(900 vs 1300g) so its weight is not what is making you tail heavy,
you have set it all way back there,
if you move it closer to wing spar, you can have right CG without need for lead in nose i believe
(p.s. I am looking ito going k102 way next spring too)
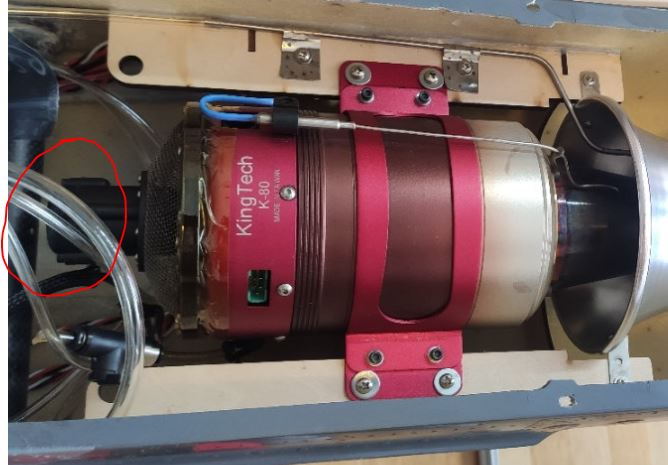
about tube... it is all described on german forum, the thrust tube is welded on both ends, you need to set one edge loose, I opted for front one to keep end part working (inner shorter than outer, for cooling)
but If I had to do it again, I would just cut it at rear, since I measured minimal expansion which would not disturb its function at the rear side...
google translate with right click whole page in Chrome.... a lot of info there
https://www.rc-network.de/threads/jm...#post-12116179
your turbine is a lot lighter than mine(900 vs 1300g) so its weight is not what is making you tail heavy,
you have set it all way back there,
if you move it closer to wing spar, you can have right CG without need for lead in nose i believe
(p.s. I am looking ito going k102 way next spring too)
about tube... it is all described on german forum, the thrust tube is welded on both ends, you need to set one edge loose, I opted for front one to keep end part working (inner shorter than outer, for cooling)
but If I had to do it again, I would just cut it at rear, since I measured minimal expansion which would not disturb its function at the rear side...
google translate with right click whole page in Chrome.... a lot of info there
https://www.rc-network.de/threads/jm...#post-12116179
Last edited by dr.tom; 11-18-2022 at 11:05 AM.
11-18-2022, 11:55 AM
#21
Thank you for your tip on the thrust tube dents! I will look into it.
As for moving the engine forward, the position of thrust tube is the constraint. If I move it forward, it will not be in the specified range of turbine nozzle to straight pipe. The one I got is supposedly a newer version. It came with light kit, unfortunately, they went up in the smoke as soon as I connected them to the light controller, so I removed them and covered the holes. I am not sure what else has changed in this version, I know the wing connectors are different than my friends MB339, he has the previous version without the light kit.
As for moving the engine forward, the position of thrust tube is the constraint. If I move it forward, it will not be in the specified range of turbine nozzle to straight pipe. The one I got is supposedly a newer version. It came with light kit, unfortunately, they went up in the smoke as soon as I connected them to the light controller, so I removed them and covered the holes. I am not sure what else has changed in this version, I know the wing connectors are different than my friends MB339, he has the previous version without the light kit.
11-18-2022, 12:05 PM
#22
Thread Starter
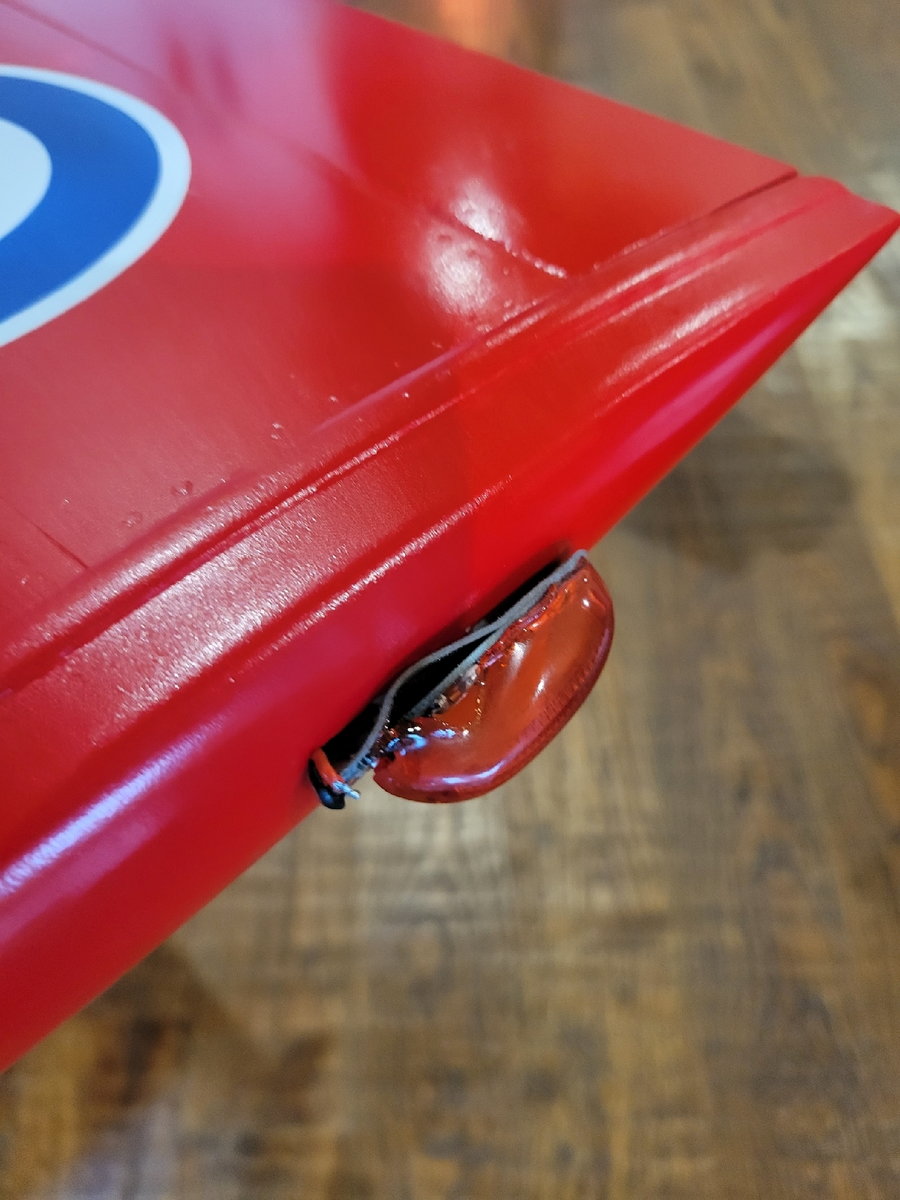
Mine from 9.2021. came with lights, smoke pump and smoke tank, round clear UAT, and single black wing connector (like for PC ATX power supply)
Before there were 2 connectors per wing, molex style (white) and lead in the nose.
I believe you can move tube a bit forward too to keep right distance from end of turbine nozzle of course. Rear part is not that critical, venturi helps with cooling, center blast is hot, the air that comes between two layers of tube creates a circular shield even after tube ends in the rear to some extent....
Last edited by dr.tom; 11-18-2022 at 12:08 PM.
11-18-2022, 12:22 PM
#23
The cockpits dr.tom designed are perfect fit. I printed them in gray. I have not put any sticker on them yet.
Here are few photos of mine. Even at 155mm CG, it is still tail heavy, planning to add some lead to the nose. The outer wall of the thrust tube bent in several places after the first engine run but the inner wall s fine. On the positive note, the jet is very light and assembly was quick.
Here are few photos of mine. Even at 155mm CG, it is still tail heavy, planning to add some lead to the nose. The outer wall of the thrust tube bent in several places after the first engine run but the inner wall s fine. On the positive note, the jet is very light and assembly was quick.
Thanks,
Tone
11-18-2022, 12:53 PM
#24
11-18-2022, 12:56 PM
#25
Mine from 9.2021. came with lights, smoke pump and smoke tank, round clear UAT, and single black wing connector (like for PC ATX power supply)
Before there were 2 connectors per wing, molex style (white) and lead in the nose.
I believe you can move tube a bit forward too to keep right distance from end of turbine nozzle of course. Rear part is not that critical, venturi helps with cooling, center blast is hot, the air that comes between two layers of tube creates a circular shield even after tube ends in the rear to some extent....
Before there were 2 connectors per wing, molex style (white) and lead in the nose.
I believe you can move tube a bit forward too to keep right distance from end of turbine nozzle of course. Rear part is not that critical, venturi helps with cooling, center blast is hot, the air that comes between two layers of tube creates a circular shield even after tube ends in the rear to some extent....